Configuring User, User Group, Roles, Reset Password
Adding a User
To add users,
- Go to Identities > Users.
- Click the + icon.
-
Enter the following information.
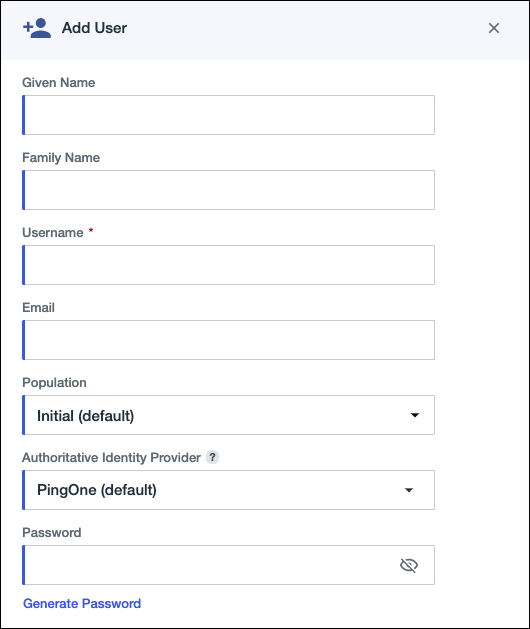
Field Description Given name The user's first name. Family name The user's last name. Username A unique identifier for the user. Note: In a workforce environment, usernames cannot be changed after they have been set.Email A valid email address for the user. Population The population to which the user should belong. If you don't specify a population, the user will be added to the default population. For more information, see Populations. Authoritative identity provider If you have configured an external identity provider, select it from the list. An authoritative identity provider has authority over user records and credentials. For more information, see Authoritative identity providers. Password An initial password for the user. Click Generate password to have PingOne create a strong password for you.
Click the eye icon to show the password in clear text.
-
Click Save.
The user is created in the PingOne directory. You can edit a user profile after it has been created.
Assigning a User Role
- Go to Identities > Users.
- Locate the user you want to edit. You can browse or search for users.
- Click the user entry to open the user details panel
- Click the Roles tab to see the currently assigned roles.
-
Do one or more of the following:
Choose from:
- Add a role. To add roles to the user, click
Grant roles. Select or clear the appropriate
responsibilities. To see all responsibilities, click Available
responsibilities. To see only the currently assigned
responsibilities, click Granted responsibilities.Tip: Click Select all or Remove all to select or clear all available responsibilities.
-
Reduce access for a responsibility. You can choose to grant fewer responsibilities than the admin account that created the user. Use this feature to limit the user’s access to a particular environment or population. Click the funnel icon, and then select or clear the appropriate environments or populations.
-
Remove a role. Locate the role you want to remove, and then clear the check box for that role.
- Add a role. To add roles to the user, click
Grant roles. Select or clear the appropriate
responsibilities. To see all responsibilities, click Available
responsibilities. To see only the currently assigned
responsibilities, click Granted responsibilities.
- Click Save.
Creating a Group
- Go to Identities > Groups.
- Click the + icon.
-
Enter the following information.
Field Description Group name A name for the group. The name must be unique within the environment for environment groups, and unique within a population for population groups. Description (optional) A brief characterization of the group. Population (optional) The population in which the group will be created. Users with the Environment Admin role can create groups at the environment level, but users with the Identity Admin role must assign a group to a population for which they are an Identity Admin. If you select a population, the group can contain users from that population only. - Click Save.
Adding Users to a Group
- Go to Identities > Users.
- Locate the user you want to view. You can browse or search for users. The results list is updated as you enter the search query.
- Click the user entry to open the user details panel.
-
Click the Groups tab.
The list shows current group membership.
- Click the Pencil icon.
-
Do one or more of the following:
- To add the user to a group, select the check box next to the group name. A check mark appears.
- To remove a user from a group, clear the check box next to the group name. The check mark disappears.
Note: If a user is in a group due to matching a filter, you can't directly remove a user that was added to a dynamic group. To remove a user from a dynamic group, change the filter criteria or modify user attributes to no longer match the filter criteria. - Click Save.
Providing Access to a Group
- Go to Identities > Users.
-
Click the Access tab.
The list shows current group membership.
- Click the Pencil icon.
-
Do one or more of the following:
- To add the user to a group, select the check box next to the group name. A check mark appears.
- To remove a user from a group, clear the check box next to the group name. The check mark disappears.
- Any user having access to this group will have access to AppViewX.
- Click Save.
Resetting a User Password
- Go to Identities > Users.
- Locate the user whose password you want to reset. You can browse or search for users.
- On the right side of the user entry, click the three dots options menu and then click Reset Password.
-
In the Reset Password window, select one of the following:
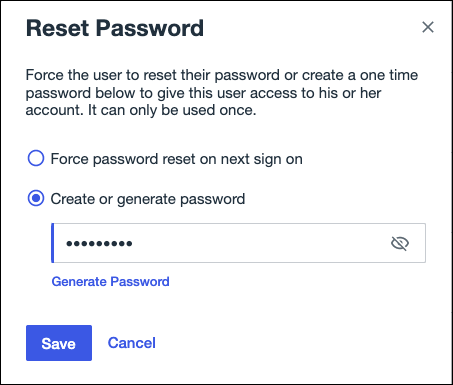
- Force password reset on next sign on. The user will be prompted to change their password the next time they sign on.
- Create or generate a password. Enter a temporary password or click Generate Password to have PingOne create a secure password. Copy the password if needed.
- Click Save.