RADIUS Configuration
Accessing the RADIUS Configuration Settings
| New Menu | Old Menu |
|---|---|
| In the Platform module, from the navigation pane on
the left, under ACCESS MANAGEMENT, select
RADIUS. The Settings :: Authentication page is displayed with the RADIUS tab open by default. |
|
| For more information on how to switch between menus, click here. | |
Configuring the RADIUS Configuration
AppViewX integrates with RADIUS for authentication of external users.
To configure the RADIUS authentication:
-
On the Settings :: Authentication page, under the RADIUS tab,
enter the following details (sample values are shown in the image):
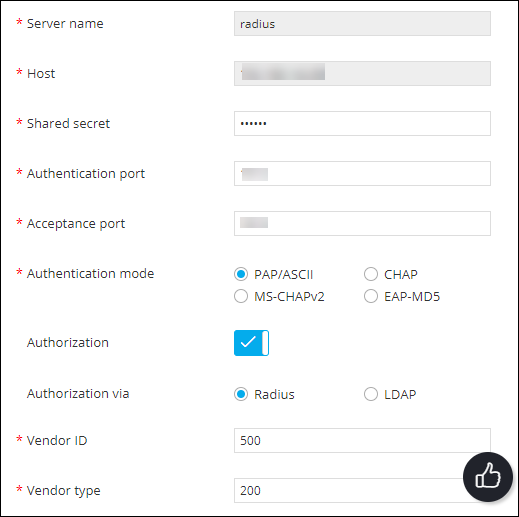
Table 1. Field descriptions for RADIUS Field Description *Server name Name of the RADIUS server. *Host The IP address of the RADIUS server. *Shared secret A unique key for authentication between the AppViewX server and the RADIUS server. *Authentication port Port number that AppViewX will use for authentication. The default authentication port number is 1812. Please check with your sysadmin if your organization uses a different port number.
*Acceptance port Port number that AppViewX will use to accept a response from the RADIUS server. The default acceptance port number is 1813. Please check with your sysadmin if your organization uses a different port number.
*Authentication mode Select one of the following authentication modes: - PAP/ASCII
- CHAP
- MS-CHAPv2
- EAP-MD5
Note: Ensure that the selected authentication mode is also confirmed in the RADIUS server settings.*Authorization In addition to authentication, AppViewX also lets you perform user authorization against the RADIUS server. To enable authorization along with authentication, turn on the toggle.
Note: If Authorization is not enabled, AppViewX will only carry out RADIUS authentication for the given user.*Authorization via Select from one of the following authorization modes: - RADIUS: To perform both, authentication and authorization, via the RADIUS server
- LDAP: To perform authentication via the RADIUS server and authorization via the LDAP server
This field is enabled only when the Authentication toggle is turned on.
*Vendor ID Enter the vendor ID. Note: AppViewX does not have a unique vendor ID. We use a free vendor ID: 500. Ensure that this is configured as part of the RADIUS server settings.This field is enabled only when the Authentication toggle is turned on and authorization is done via the RADIUS server.
*Vendor type Enter the vendor type. Note: AppViewX does not have a unique vendor type. We use a free vendor ID: 200. Ensure that this is configured as part of the RADIUS server settings.This field is enabled only when the Authentication toggle is turned on and authorization is done via the RADIUS server.
*LDAP From the drop-down menu, select the LDAP server to be used for the authorization. This field is enabled only when the Authentication toggle is turned on and authorization is done via the LDAP server.
* : Mandatory fields -
To save the RADIUS authentication settings entered above, click
Add.
The RADIUS authentication settings thus configured are saved and displayed in the table shown in the left half of the screen:
 Note: In the case of multiple RADIUS servers, to define/update the order in which the servers will be authenticated, drag and drop the entries in this table.
 - To reconfigure the settings, click Reset.
Enabling a RADIUS Server for Authentication
- On the Settings :: Authentication page, under the RADIUS tab, from the table displayed in the left half of the page, for the server you want to enable, select the check box corresponding to the server name.
-
From the top-right corner of the page, click
 (Enable) icon.
- In the Confirmation message dialog box, click Proceed.
Disabling a RADIUS Server for Authentication
- On the Settings :: Authentication page, under the RADIUS tab, from the table displayed in the left half of the page, for the server you want to disable, select the check box corresponding to the server name.
-
From the top-right corner of the page, click
 (Disable) icon.
- In the Confirmation message dialog box, click Proceed.
Deleting a RADIUS Server
- On the Settings :: Authentication page, under the RADIUS tab, from the table displayed in the left half of the page, for the server you want to delete, select the check box corresponding to the server name.
-
From the top-right corner of the page, click
 (Delete) icon.
- In the Confirmation message dialog box, click Proceed.