Configuring Policies (Notifications)

Configuring Policies for Notifications refers to setting up rules and triggers that determine when, how, and to whom notifications are sent based on specific events or system activities. It is mainly used to:
  • Alert users/admins about important system activities, such as workflow completions, errors, certificate expirations, license issues, or secret rotations.
  • Ensure timely responses to critical events in both operational and security contexts.
  1. Login to AppViewX with valid credentials.
  2. From the top right corner of your screen, click Notification Center (Bell) icon.
    The Notifications window is displayed.
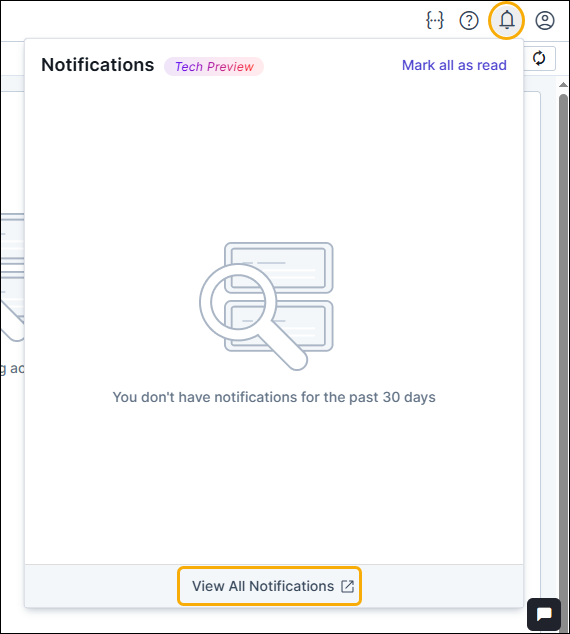
  3. At the bottom of the Notifications window, click View All Notifications.
    The notification details screen is displayed.
  4. Click the (Configure Policies) button on the top right, below the bell icon.
    The Notification Policies screen is displayed.
  5. Click the Configure Notifications button on the top right, below the bell icon.
    The Action Center > Configure Notifications page is displayed with the different notification categories and events in a tabular grid.
    Column Description
    Category Displays the notification category.
    Event Displays the event belonging to the category that will generate notification alerts.
    Status Displays whether the event is enabled or disabled.
    Notification Channels Displays the selected channels — Emails, In-App Notifications or both.
    Subscriber Category Displays the category opted — User, User Groups, or Email / Distro)
    Subscriber Displays the name of the user(s)/user groups(s)/email/distro that will receive the notifications.
    Action Displays the edit icon to modify the desired event.
  6. To edit any Category/Event
    1. On the Configure Notifications page, choose a category from the Select Category dropdown or use the searh field to Search for a category or an event.
    2. For the desired event, click the edit () icon in the Action column.
      The Edit Event window is displayed on the right.
    3. Enter/Select the field values in the Notification Policies screen as described in the table below.
      Table 1. Field Descriptions for Edit Event window
      Fields Description
      *Category Displays the notification category. This field is non-editable. The following categories can be configured.
      • Certificate & PKI Operations
      • Infrastructure Certificate
      • Infrastructure Health
      • Platform Operations
      • Security & Access Control
      *Event Type Displays the event belonging to the category that will generate notification alerts. This field is non-editable. For the category and its related events refer to the category-event mapping table below.
      *Notification Channels Select the channels to receive the notifications:
      • In-App Notifications - These are in-product notifications, displayed on the notifications window upon clicking the bell icon.
      • Emails - Notifications will be received by email in the designated user(s) inbox.
      Subscriber Category Select who should receive the notifications:
      • User
      • User Group
      • Email / Distro
      *User Select one or more user(s) from the dropdown if the Subscriber Category is User.
      *User group Select one or more user group from the dropdown if the Subscriber Category is User Group.
      *Email / Distro Enter one or more email ids in the field provided if the Subscriber category is Email. (Input multiple email ids separated by comma).
      Table 2. Category - Event mapping table
      Category Events
      Certificate & PKI Operations Certificate Auto Enrollment Protocol Requests

      PKI Custodian Approval

      DCV Action

      Certificate Issuance Notification

      Certificate Renewal Notification

      Certificate Re-enrollment Notification

      Certificate Regenerate Notification

      AppViewX Native CA Certificate Expiry

      AppViewX Native OCSP Responder Unavailable

      AppViewX Native OCSP Signing Certificate Expiry

      AppViewX Native OCSP Signing Certificate Missing / Not Configured

      AppViewX Native OCSP Responder Using Expired Signing Certificate

      AppViewX Native CRL Publication Failure

      AppViewX Native CRL Not Generated on Schedule

      AppViewX Native CRL Expiry Notification

      Infrastructure Certificate Kube Certificate Expiry
      Infrastructure Health Kube Service Account Expiry

      Kube Cluster Status

      LDAP Health

      LDAP Health

      SMTP Health

      PAM Health

      TACACS Health

      Radius Health

      Proxy Health

      Log forwarding Health

      Platform Operations License Management

      Missed Cron Jobs Execution

      Workflow request failure

      Policy Engine Notifications

      Security & Access Control Password Policy Updates

      Super Admin Login

      User Profile Update

    4. Click Update.
      The configuration is saved.
  7. To enable or disable an event, and
    1. Select the checkbox(s) for the desired Category/Event.
    2. From the Actions dropdown (above the grid) select Enable or Disable.
      A pop-up message is displayed confirming the enable or disable action.
    3. Select the Enable event(s) or Disable event(s) button accordingly in the pop-up.
      The selected category(ies) are enabled or disabled.

Viewing Notifications

To view the push (in-product) notifications:
  1. Login to AppViewX with valid credentials.
  2. From the top right corner of your screen, click Notification Center (Bell) icon. (The Notifications window is displayed with the notifications.)
  3. To expand or view product based notifications, from the bottom of the Notifications window, click View All Notifications. (All product notifications are displayed.)
    • To view product specific notifications, click the specific product on the left.
To view the email notifications:
  • As soon as the event is triggered, check the inbox. (if your email was assigned or you belong to the specific user group or email distro.)