IP Restriction Configuration
IP Restriction Configuration involves setting up limitations on network access based on specific IP addresses or ranges, controlling the ability to access a system, network, or application based on predefined rules or allowed IP ranges.
Accessing the IP Restriction Configuration Settings
| New Menu | Old Menu |
|---|---|
| In the Platform module, from the navigation pane on
the left, under ACCESS MANAGEMENT, select IP
Restriction. The Settings :: Authentication page is displayed with the IP Restriction tab open by default. |
|
| For more information on how to switch between menus, click here. | |
Configuring the IP Restrictions
To configure IP restrictions:
- On the Settings :: Authentication page, under the IP Restriction tab, and General Information section, turn on the Enable IP Restriction toggle.
-
In the IP/Subnet Configuration section, enter the
required field information.
Table 1. Field descriptions for IP/Subnet Configuration Field Description *Rule Name Rule name for a whitelisting condition. *User group Select the user group to which this rule will apply, from the dropdown menu, . Only the users from the selected user group will be allowed to login to AppViewX from the whitelisted IP address/subnet range.
Mapping Type Select one of the two mapping types: - IP Range
- Subnet.
*Start IP Enter the starting IP address for the whitelisted IP/subnet range. Note: The IP/subnet range should be specified in the ascending order.This field is displayed only when Mapping Type is selected as IP Range.
End IP Enter the ending IP address for the whitelisted IP/subnet range. Note: The IP/subnet range should be specified in the ascending order.This field is displayed only when Mapping Type is selected as IP Range.
*Subnet Enter the Subnet network range to whitelist. This field is displayed only when Mapping Type is selected as Subnet.
* : Mandatory fields -
To save the IP restriction settings, click Add or to reconfigure the
settings, click Reset.
The IP restriction settings thus configured are saved and displayed in the table shown at the end of the screen.

Enabling a IP Restriction Rule
- On the Settings :: Authentication page, under the IP Restriction tab, from the table at the end of the page, for the IP restrictions rule you want to enable, select the check box corresponding to that rule.
-
From the More actions dropdown menu, click
Enable.
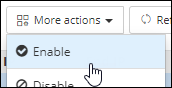
- In the Enable dialog box, click Yes.
Disabling an IP Restriction Rule
- On the Settings :: Authentication page, under the IP Restriction tab, from the table at the end of the page, for the IP restrictions rule you want to disable, select the check box corresponding to that rule.
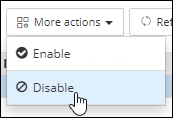
-
From the More actions dropdown menu, click
Disable.
-
In the Disable dialog box, click Yes.
The selected rule is disabled.
Deleting an IP Restriction Rule
- On the Settings :: Authentication page, under the IP Restriction tab, from the table at the end of the page, for the IP restrictions rule you want to delete, select the check box corresponding to that rule.
-
Click
 (Delete).
-
In the Confirmation dialog box, click Yes.
The selected rule is deleted.