OAuth Settings
OAuth Settings typically refer to the configuration and management of OAuth (Open Authorization) protocols within an application or system. These settings encompass various parameters and configurations that govern OAuth-based authentication and authorization processes, including client IDs, client secrets, token lifetimes, scopes, and callback URLs, among others. Managing OAuth settings allows defining secure and authorized access for users or applications to protected resources.
Accessing OAuth Settings Configuration
| New Menu | Old Menu |
|---|---|
| In the Platform module, from the navigation pane on
the left, under ACCESS MANAGEMENT, select OAuth
Settings. The Settings :: Service Account Settings page is displayed with the External tab open by default. |
|
| For more information on how to switch between menus, click here. | |
Configuring External OAuth Settings
-
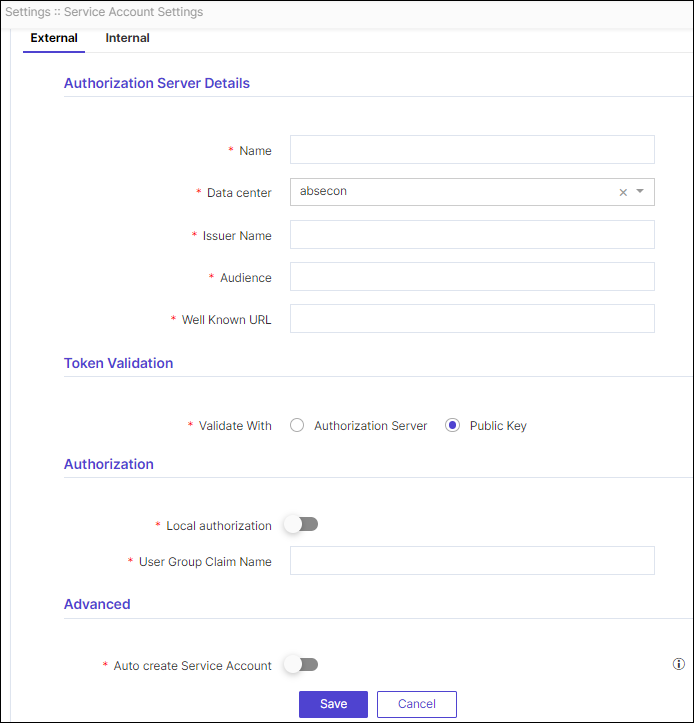
On the Settings :: Service Account Settings page, under the
External OAuth Settings tab, enter the required field
information.
-
In the Authorization Server Details section, enter the following
details.
Table 1. Field descriptions for Authorization Server Details Field Description *Name Enter the unique name for the Authorization server. *Data center From the options available in the dropdown, select the data center. *Issuer Name Enter the issuer name of the token, ensuring it matches the value in the issuer token claim. *Audience Enter the audience claim value. *Well Known URL Enter the well known URL of the Authorization server. *: Mandatory fields -
In the Token Validation section, enter the following details.
Table 2. Field descriptions for Token Validation Field Description *Validate With Select the Validation type: - Authorization Server: To validate with Client ID and Client Secret, Select Authorization Server option.
- Public Key: To validate using a Public Key, Select Public Key option.
*Client ID This field is displayed when Validate With is selected as Authorization Server. Enter the Client ID that is generated in the OAuth server when the OAuth client is created.Note: This client ID is generated in the OAuth server for AppViewX.*Client Secret This field is displayed when Validate With is selected as Authorization Server. Enter the Client Secret that is generated in the OAuth server when the OAuth client is created.Note: This client secret is generated in the OAuth server for AppViewX.*: Mandatory fields Note:- If the token is valid and a service account has not been created, an automatic process will generate the service account, using the client ID as the login name.
- When the service account is automatically created, there is a chance of authorization failure resulting from unassigned user groups. To resolve this, manually assign the required user group to the service account.
-
In the Authorization section, enter the following details.
Table 3. Field descriptions for Authorization Field Description *Local authorization To enable or disable local authorization for authentication with the OAuth server and authorization within AppViewX, if the OAuth server is unable to pass the roles or user groups as part of the token and requires AppViewX to perform the authorization, then the above feature can be used. *User Group Claim Name This field is displayed when the Local authorization is disabled. Enter the user group's claim name from the token.
Note: Ensure that the user group already exists in AppViewX; if it doesn't, create a new user group with the same name.*: Mandatory fields -
In the Advanced section, enter the following details.
Table 4. Field descriptions for Advanced Field Description *Auto create Service Account If enabled, AppViewX will automatically create a Service Account upon the first login attempt; otherwise, manual creation in AppViewX is necessary for it to function. *: Mandatory fields - Click Save.
Configuring Internal OAuth Settings
-
On the Settings :: Service Account Settings page, under the
Internal OAuth Settings tab, enter the required field
information.
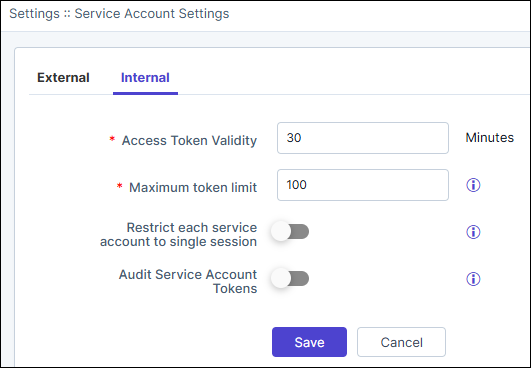
Table 5. Field descriptions for Internal OAuth Settings Field Description *Access Token Validity Enter the access token's validity in the number of minutes. *Maximum token limit The maximum number of live tokens permitted from service accounts. Enter a value between 1 to 200. Restrict each service account to single session Enable the toggle to limit each service account to have only one valid Access token at a time, thereby restricting them to use only one session at a time. Note: If the toggle is disabled, then a maximum of 100 Access tokens can be created in parallel for a single service account which allows using multiple sessions in parallel with the same service account.Audit Service Account Tokens Based on resource considerations, admins can enable or disable the toggle button to control token-related audit logging. Source details (IP, user agent, etc.) are included in the logs. - Captures and displays token generation events when a service account invokes an API.
- Logs failed attempts when an expired token is used.
*: Mandatory fields Note: Whenever an Access Token expires, an HTTP Error Code 401 is displayed in the API response. The client application can generate a new Access Token using the Client ID and Client Secret. - Click Save.