MFA Settings Configuration
MFA Settings Configurations refers to the process of configuring Multi-Factor Authentication (MFA) settings within a system or application. This involves setting up additional security measures beyond passwords, such as OTP (One-Time Password), biometric verification, or other methods, to enhance the authentication process and bolster security.
Accessing MFA Settings Configuration
| New Menu | Old Menu |
|---|---|
| In the Platform module, from the navigation pane on
the left, under ACCESS MANAGEMENT, select
MFA. The Settings :: Authentication page is displayed with the MFA tab open by default. |
|
| For more information on how to switch between menus, click here. | |
Configuring the MFA Settings
- SMTP configuration should be done before enabling MFA.
- Email should be configured for "Admin user" before enabling MFA.
- If there is communication or any other issue with SMTP, then local users cannot login to AppViewX if MFA is enabled. So, our recommendation is to maintain high availability for SMTP.
- In On-Prem, only the "Admin user" can configure MFA settings, and in SaaS, only the "Account owner" can configure MFA settings.
- For SaaS deployment, MFA is enabled by default for the Account Owner. You cannot disable MFA for the account owner.
To configure the MFA settings:
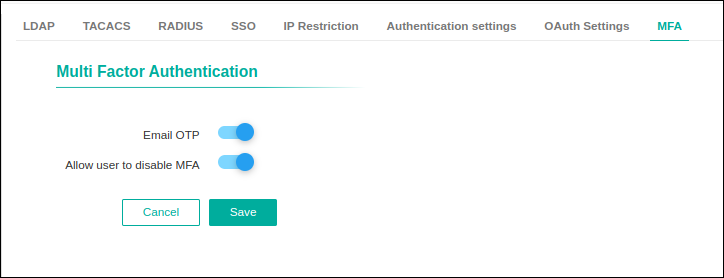
- On the Settings :: Authentication page, under the MFA tab, select Email OTP to enable multi factor authentication.
-
The Audit logs for enable/disable MFA are
User:
                            <Username> update MFA settings and enabled/disabled
                        MFA
. - On selecting Email OTP, the Allow user to disable MFA option appears, which can be enabled or disabled based on the user's requirement.
-
If the admin disables the Allow user to disable MFA
option, it will enforce MFA usage for all the users. If enabled by the
admin, users can enable/disable MFA usage from their user profile settings.
-
The Audit logs for enable/disable Allow user to disable MFA are
User: <Username> updated MFA settings and enabled/disabled
                            Allow user to disable MFA
. - Click Save.
MFA Settings for User Profile
The following steps explains access to enable/disable MFA from user profile:
-
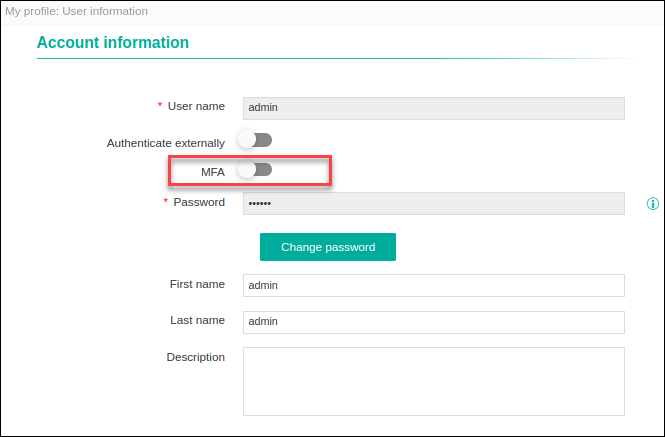
On selecting email OTP, the Allow user to disable
MFA option appears. This can be enabled or disabled
based on the user's requirement.
-
If the admin enables Allow user to disable MFA,
then users have provision to enable/disable MFA and
MFA option appears in user profile.
-
If the admin disables Allow user to disable MFA,
then users can not see MFA option in the user
profile.
Logging in using MFA
-
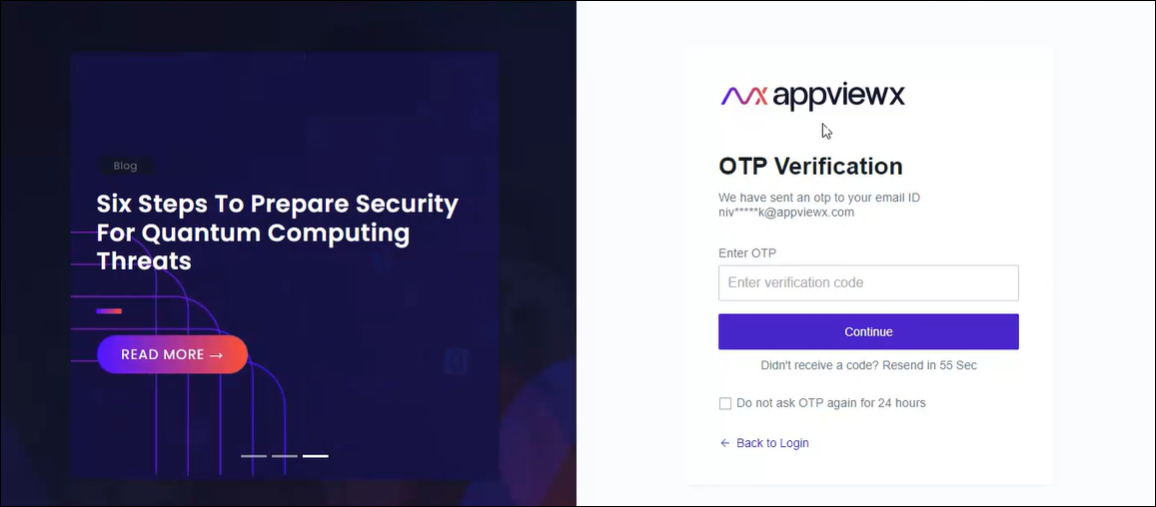
Log in using your user credentials.
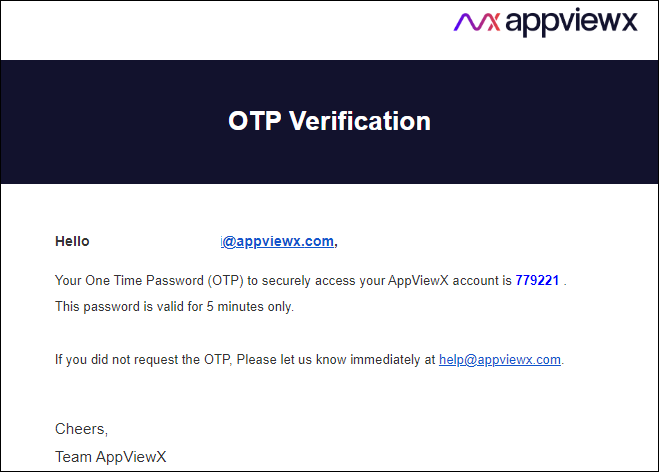
The MFA system generates a random six digit numeric value and sends OTP to the registered user's email ID.
-
User authentication (OTP Verification) screen is
displayed.
-
Enter OTP which is sent to your registered email ID.
-
OTP Validation.
- OTP sent to Email will be valid only for next five minutes.
- Users will be locked if wrong OTP is entered more than five times.
- Once the user is locked for 15 minutes, an auto-generated Email is received asking to contact the administrator to unlock.
-
Resend OTP - MFA.
- Resend option will be enabled after 60 seconds.
- Resend option will be available only five times for wrong attempt.
- Users will be locked if resend OTP is attempt for more than five times.
- Once the user is locked for 15 min, an auto-generated Email is received asking to contact the administrator to unlock.
Note: Users can select Do not ask OTP again for 24 hours during login and disable OTP Verification for next consecutive logins for 24 hours. - Click Continue.
-
The Audit log for invalid OTP is
Login failed for user:
                                <Username> due to Invalid OTP
. -
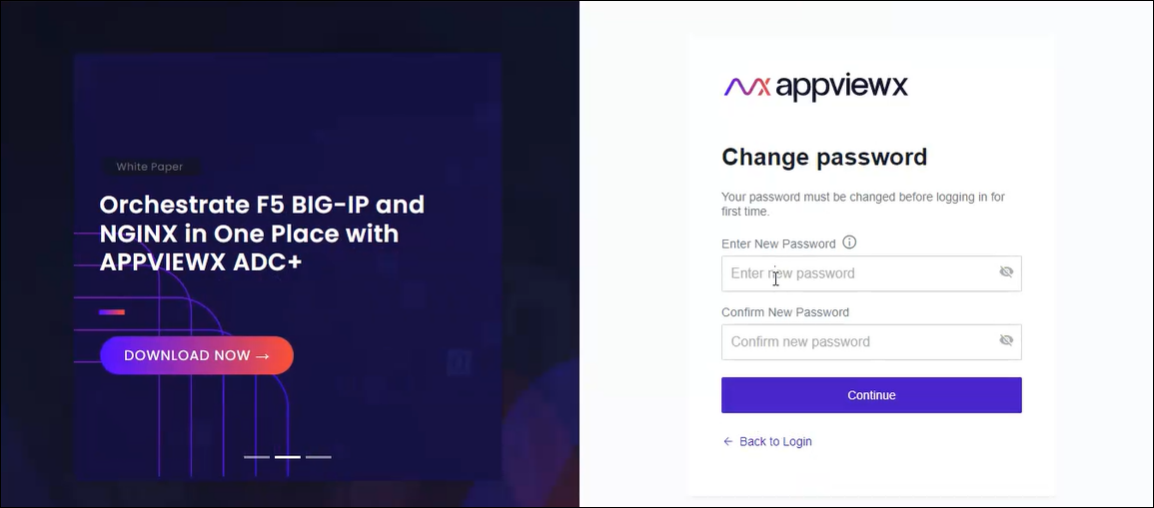
Change Password page is displayed for the users
logging in for the first time.
-
Enter the New password in the required fields.
Note: The new password should have:
- At least one uppercase, lowercase, and numeric character
- At least one special character (~!@#$^&*_-+=|())
- 8 to 128 characters.
Note: The new password should not contain:- The user name
- The same character more than three times consecutively
- Blank space and special characters other than (~!@#$^&*_-+=|()).
- Click Continue.