Generic Linux
Prerequisites
-
Ensure that SSH users have the required read and write permissions to
perform CLM actions on the server device when access elevation is set to
None.
If access elevation is configured as sudo or dzdo, all commands for CLM operations will be executed using sudo or dzdo.
- If sudo/dzdo access elevation is enabled on the device onboarding page, ensure that the user has the necessary permissions to execute the sudo command provided below.
-
Ensure that the following packages are installed to facilitate device
addition:
- sudo/dzdo (Only applicable if access elevation is selected as sudo/dzdo in the device onboarding page)
- timeout
- base64
-
Ensure that the OpenSSL toolkit on the Linux machine is installed.
Note: This package is essential for supporting endpoint enrollment. However, if endpoint enrollment is not required, the package is optional.
- Ensure the server's resource health remains above the 50% threshold.
-
Ensure that the target IP address is accessible from the cloud connector
and the port is open.
Note: To SSH into a machine using a specific port, you can use the following command:
ssh -p <port_number> <username>@<hostname_or_ip_address> -
Ensure that the SFTP is configured.
Note:
Avoid restricting SFTP sessions to a single connection, as this may cause failures in push use cases. To prevent such issues, adjust the settings in
/etc/security/limits.confto allow up to 5 connections.
-
Ensure that GSKit is installed on the server to work with the KDB
certificate.
For the KDB use case, one of the available packages is utilized.
To verify if the package is installed on the machine, use the following commands:
dspmqver -p 64gsk8capicmd -version | grep FileVersiongsk8cmd -version | grep FileVersiongsk7capicmd -version | grep FileVersiongsk7cmd -version | grep FileVersiongskcmd -version | sed 's/version/Version/'gsk8capicmd_64 -version | grep FileVersionNote:- The first successfully executed command determines the package to be used.
-
To discover a password-protected certificate, ensure the password is added
to the password vault at
 (Menu) >
CERT+ > ADMINISTRATION >
Password Vault.
(Menu) >
CERT+ > ADMINISTRATION >
Password Vault.
- SSH private keys are incompatible with password-enabled sudo/dzdo settings. Therefore, when using an SSH key for authentication, ensure that sudo/dzdo is configured for passwordless access.
- Certificates cannot be identified from the mounted paths /boot, /bin, /dev, /lib, and /sbin. It is recommended to move the certificate to an alternative location.
-
Host-level configurations take precedence over global settings, allowing
you to override global settings at the host level.
Note: The global setting can be configured in the
(Menu) > CERT+ >
ADMINISTRATION > Device
Management > Server >
 (Device Settings).
 - Port scanning is disabled by default during Linux discovery. However, configurations are enabled at both the host level and global level to control this feature.
- If device onboarding fails due to host key algorithm mismatches, activate the required algorithms on the client or server. Add deprecated algorithms only if necessary.
- It is recommended to exclude the NAS mount paths from certificate scanning which might consume additional resources during scanning and might affect the server performance.
Supported Linux Feature
- On-demand or scheduled certificate discovery.
- CSR generation on the end device.
- Certificate deployment to Linux servers, supporting various certificate types.
- Delta discovery to identify new or modified certificates.
- Nightly configuration synchronization job.
- Authentication via manual entry, SSH, SSM, or external vaults.
- Service account usage for CLM operations.
- Global settings for including/excluding file paths in certificate discovery.
- Configurable port scanning for Linux discovery (disabled by default).
- Discovery of certificates with case-insensitive file extensions (for example, fileName.kdb or fileName.KDB).
- Mapping certificates to specific certificate groups and applying discovery filters.
- Bulk push support for root and intermediate certificates to one or more devices is now enabled for the Generic Linux vendor.
- The capability to modify permissions, ownership, group ownership, and other user permissions for pushed certificates is now enabled for Generic Linux in JKS, Keystore, PFX, PEM, and P12 formats.
- The discovery of extension less trust certificates will be performed if the path is configured with the aggressive scan type during device onboarding. Additionally, the scan will be limited to a maximum depth of 1, and no nested directory scanning will be performed.
Limitations
- When the same issuer certificate exists in multiple locations, the first one found is prioritized. As a result, even if a renewed certificate is available in another location, only the initial match is considered.
- In the AIX operating system, identifying certificates located in folders or files with spaces in their names is not supported. However, this functionality is available on non-AIX platforms.
- The exclusion or inclusion of files using wildcard paths at the global or host level is not supported.
- Support for elliptic curve (EC) certificates, used in elliptic curve cryptography (ECC), is unavailable in IBM MQ versions prior to version 9.0. This feature is introduced in IBM MQ version 9.0 and later.
- The push of auto-renewed, regenerated, or discovered password-protected certificates is not supported.
- App connector cert details cannot be updated when the discovered certificate has a file extension in uppercase.
Onboarding Linux
-
Go to
(Menu) > CERT+ >
ADMINISTRATION > Device
Management.
By default, the ADC tab opens.
- Click the Server tab.
-
Click the
 (Add) icon.
- Select the Linux logo from the Vendors list.
-
In the Server Details section, enter details as
mentioned below.
Table 1. Server Details - Field Description Table Field Description *Server name Enter a unique name for the designated Linux server that is to be onboarded *IP address/ FQDN Enter the valid IP address or fully qualified domain name (FQDN) for device communication and integration with the Linux server. Data center Choose the desired data center. Onboarding Group Select the onboarding group to assign the device. Note: Devices without an assigned group are automatically mapped to the Default group during migration, onboarding, and when edited without existing group mappings.Communication mode Select the SSH or SSM protocol to be used for communication between the AppViewX node and the Linux server. SSH is the preferred communication mode. *SSH Port Retain the value 22; it is the default port used for the SSH communication mode. (The field is not displayed for SSM communication mode.) Cert sync Choose from any of the following: - Managed - AppViewX performs the config fetch operations and the certificates are discovered and managed in the inventory. CLM actions (push) can be performed on them.
- Monitored - AppViewX performs the config fetch operations and the certificates are downloaded in the inventory in the read-only state. CLM actions cannot be performed on them.
- Ignored - AppViewX only performs the config fetch operations for the devices. There is no certificate discovery performed.
*: Mandatory fields -
In the Credentials section, select/enter the details
as follows.
Table 2. Credentials - Field Description Table Field Description *Credential Type Select the credential type from the dropdown. - Manual entry (default)
- Credential List - Appviewx
- Credential List - Thycotic
- Credential List - HashiCorp
- Credential List - BeyondTrust
- Credential List - CyberArk
- SSH
- IAM ROLE ACCESS
 : An IAM role-based
approach is used for authentication instead of
direct access keys.
: An IAM role-based
approach is used for authentication instead of
direct access keys.This field is displayed only when Communication mode = SSM.
Access is provided based on IAM roles. To enable this feature in your SaaS environment:- Create a role in one of your AWS accounts that trusts the AppViewX AWS account.
- From AppViewX, assume the role created in your account.
- Using the assumed role from the above step, assume the roles created in the respective child accounts to perform the required CLM actions.
Note:- All other vault settings (BeyondTrust, Cyberark, Hashicorp Vault, Thycotic, and so on.) configured in the Credentials will be displayed in the dropdown.
- If Credential list - Appviewx is selected, the *Credentials list dropdown field is displayed. Select any of the preconfigured credential values.
- If Credential list - HashiCorp is selected, the *Credentials list dropdown field is displayed with credential type by default.
- If SSH is selected, enter the *Username, *Upload key file, and optionally enter the Passphrase for authentication.
*Username Enter the designated username for authentication. Note: This field appears when the credential type is selected as Manual entry or SSH.*Password Enter the secure password. Note: This field appears when the credential type is selected as Manual entry.Download Cloud Formation Template (CFT) For Credential type = IAM ROLE ACCESS, to download the CloudFormation template, click the Download Cloud Formation Template link that is displayed below the Credential Type dropdown list. 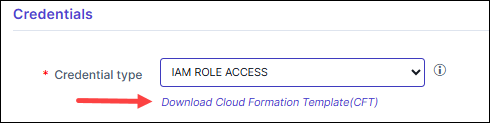 The downloaded CloudFormation template is pre-configured with the AppViewX AWS account details that need to be trusted. Ensure that you:
- Use the downloaded template to create a role in any of your AWS accounts.
- Provide a unique string as the External ID for the role you are creating.
*Master Account Role This field is displayed when Credential type = IAM ROLE ACCESS. Enter the Amazon Resource Name (ARN) of the AWS IAM role.
The IAM role input for this field can be:- a simple name (as a alpha-numeric string)
- an identifier in a full path format (e.g.,
/service-prefix/role-name)
AWS allows roles to be created within paths to help manage large numbers of roles and delegate permissions. With path support, users can onboard resources where the IAM Role is nested.
*External Id This field is displayed when Credential type = IAM ROLE ACCESS. Enter the unique identifier generated to establish a secure trust relationship between AWS and AppViewX.
*: Mandatory fields -
In the Service account credentials section,
select/enter the details as indicated below. If interactive mode is not
enabled for the service account on the Linux machine, the configured service
account will switch the session from the logged-in SSH account to the
service account using the command:
su - {serviceUserName}. Once the session is switched, all subsequent commands will execute within the context of the service account session.Table 3. Service account credentials - Field description table Field Description Username Enter the designated username for authentication. Note: The service account is not used for authentication; instead, it is used to switch the session from the logged-in SSH user account to the service account.Password Enter the secure password. *: Mandatory fields -
In the Vendor Specific Details section, enter
details as mentioned below.
Table 4. Vendor Specific Details - Field Description Table Field Description Access Elevation Select from the following:. - None (default)
- sudo- to execute with root privileges using sudo access
- dzdo- to execute with root privileges using dzdo access.
Note: SSH key-based authentication does not support password-enabled sudo/dzdo.Discover Formats The Discover Formats fields contain all the possible certificate formats that are applicable to the 'Default' scan type. The formats include KBD(*.kbd), PEM(*.crt), PEM(*.cer), PEM(*.pem), DER(*.der) DER(*.cer), PKCS#7(*.p7b), PKCS#7(*.p7c), PKCS#12(*.p12), PKCS#12(*.pfx), JKS(*.JKS), JKS(*.keystore). To delete the certificate format from the scan, click the 'x' icon in the respective cert type.
To delete all the certificate formats from the scan, click 'Clear' on the top-right of the field.
File Upload Temp Path This field is displayed if the Access elevation value is selected as sudo or dzdo. Enter the path of the temp folder Example: /cert/temp
This field is applicable for Push and CSR generation operations. This directory must have common access (RW) for the logged-in user and the service admin user if Service Account credentials are entered.
Enable access elevation for the service account? When enabled, the commands are executed with selected access elevation. Note:- By default, this field is disabled.
- This field is enabled only for a service account user when an Access Elevation type, such as sudo or dzdo, is selected.
Enable Network Scan Select the checkbox to perform a network scan in addition to the managed device discovery scan for these devices. Note:- By default, this field is disabled and can be
enabled through a global device setting.
[CERT+ >
ADMINISTRATION >
Device Management >
Server > (Device
Settings)]
*: Mandatory fields -
In the Certificate details section, enter the
details as indicated below.
Table 5. Certificate Details - Field Description Table Field Description Certificate Directory Enter the actual directory/path where certificates are stored in the Linux server. Example: /cert/files
Scan Type Select any of the following: - Default - System scans for all
certificate formats and adds them in the
certificate inventory.Note: It scans the provided directory and subdirectory as well.
- Aggressive - System scans for all
keystore files with non-standard SSL extensions
and also scans for trust certificates from
extension less files.Note: It scans only the given directory.
*Operation Select the value include or exclude from the dropdown field. It indicates that the specified certificate directory will be included/excluded from the certificate scan process. *: Mandatory fields - Default - System scans for all
certificate formats and adds them in the
certificate inventory.
-
Click Add.
The certificate location will be listed in the table.
- [Optional step] Click the (Delete) icon if you want to delete the certificate details from the list.
-
Click Save.
The Linux device is added successfully.
Device Settings
-
Go to
(Menu) > CERT+ >
ADMINISTRATION > Device
Management.
By default, the ADC tab opens.
- Click the Server tab.
-
Click the () device settings icon.
The Device Settings page opens.
-
In the Vendor Specific details section, enter the details as
indicated below.
Table 6. Certificate Details - Field Description Table Field Description Enable Network Scan Enable this checkbox to perform Network Scan along with Managed Device Discovery Scan for these devices. Certificate Ownership & Permission Enable the toggle button to customize certificate ownership and file permissions at the App Connector level. Update System TrustStore Enable this to update system trust store for root and intermediate certificates. Once enabled, this setting will be turned on at the device connector to update the trust store during certificate push. This can be disabled at individual level at the connector level, if required. *Health Value (%) Acceptable values range is 0-99. This threshold defines the minimum server resource health required. If the SAR-derived health value drops below this limit, the device will remain unresolved to prevent further processing. Only numeric values between 0 and 99 are allowed, with a default value of 50%. If the SAR package is unavailable, this health check will be skipped.
*: Mandatory fields -
In the Certificate details section, enter the
details as indicated below.
Table 7. Certificate Details - Field Description Table Field Description Certificate Directory Enter the actual directory/path where certificates are stored in the Linux server. Example: /cert/files
Scan Type Select any of the following: - Default - System scans for all certificate formats and adds them in the certificate inventory.
- Aggressive - System scans for all keystore files with non-standard SSL extensions.
*Operation Select the value include or exclude from the dropdown field. It indicates that the specified certificate directory will be included/excluded from the certificate scan process. *: Mandatory fields -
Click Add.
The certificate location will be listed in the table.
- [Optional step] Click the (Delete) icon, if you want to delete the certificate details from the list.
-
Click Save.
The Linux device setting is configured successfully.
Fetch Config
-
Go to ADMINISTRATION > Device
Management.
By default, the ADC tab opens.
- Select the device from the list to trigger fetch config.
-
Click the (
 ) Fetch Config
icon.
The pop-up message is displayed as Fetch config has been triggered for the device (s).
) Fetch Config
icon.
The pop-up message is displayed as Fetch config has been triggered for the device (s). - To override the default threshold value, in the Device Settings page, enter the appropriate value in the *Health Value (%) field.
CSR Generation at the End Device
In the CSR generation use case at the end device, the private key will be generated directly on the device. When the private key is generated on the device, the Private Key at End Device checkbox will be automatically set to true, and the Private Key Location field will be pre-filled in the push app connector.
Certificate Push
-
The Linux push operation allows certificates to be pushed to the Linux
server.
- KDB
- CRT
- CER
- PEM
- DER
- P7B
- P7C
- P12
- PFX
- JKS
- Keystore
-
For JKS, PEM, and PKCS12 certificates, the capability to modify Certificate
Ownership and Permissions after the certificate is pushed has been
introduced. This feature is disabled by default and can be enabled by
navigating to: (Menu) > CERT+ >
Device Management > Server
> Device Settings.
- If no specific permissions are configured, the pushed certificate will default to 640 permissions. If the file already exists, its existing permissions will be retained.
Possible Error Messages with Linux CLM Use-case
| Error Message | Remediation |
|---|---|
| Communication to 192.168.143.30 has failed. Caused by: net.schmizz.sshj.userauth.UserAuthException: Exhausted available authentication methods. | Authentication failure. Check the credentials used for the authentication. |
| java.lang.Exception: No agent is available as all registered agents are either paused, rejected or deleted or agent resource limit exceeded. | The possible reason(s) could be CC is down or busy processing the other request. |
| Communication to <ip/fqdn> has failed. Caused by: java.net.SocketException: Network is unreachable (connect failed) | IP/FQDN provided is not reachable. Check manually by establishing an SSH session to the target device with the provided IP/FQDN. |
| Device prerequisite check failed: -bash: sudo: command not found. Install the necessary packages (base64, timeout, sudo) to on-board the Server. | The base64, timeout, and sudo packages are required to proceed to onboard the Linux server into AppViewX. |
| Beyond trust vault response parsing failed::["Managed Account not found" ]. | Verify that the Linux device hostname or IP address is configured for the user in BeyondTrust. |
| Thycotic vault access token denied / not generated. | Verify the Thycotic vault integration with AppViewX. |
| No matching password object was found for the query. Ensure a password object exists in the Vault that meets the query criteria and verify that both the Provider and the application user have the necessary permissions to access and use the password. | Verify the Thycotic vault integration with AppViewX. |
| CredentialStore(s) does not exist. | Verify that the Linux device hostname or IP address is configured for the user on the Thycotic server. |
Linux Commands
| Operation | Command | Description | Sudo/Dzdo Configuration Required |
|---|---|---|---|
| Session configuration commands (Executed post-creation of ssh session for all use cases) | bind 'set enable-bracketed-paste off' | Disable the bracketed-paste configuration for the current session. | No |
| ulimit -s unlimited | This would set the stack size limit to unlimited for the current shell session or user. | No | |
| export SUDO_PROMPT='[sudo] password for %p: ' | Set the sudo password prompt to the standard value for the
current session. Note: This will be
executed only when the access elevation is set as sudo or
dzdo. |
Yes | |
| export LANG=en_US.UTF-8 | Defaulting the session language to English | ||
| Config fetch | su - {serviceAccountUserName} | Switch to the service account | Yes |
|
Mandatory package availability prerequisite verification. | No | |
| uname | To fetch the OS Name | No | |
| sudo sar 2 5 | tail -1 | awk {'print $NF'} | Server health check for Linux | Yes | |
| sudo sar 2 5 | tail -1 | awk {'print $5'} | Server health check for AIX OS | Yes | |
| Discovery | Timeout 120 sudo find <discovery_path> ( -path /AvxTempCertDiscovery -prune ) -o -type f -iname '.kdb' 2> /dev/null | xargs timeout 120 sudo cksum 2> /dev/null | Find command to identify the KDB Certificates with its
checksum. Note: This will be executed
only when the KDB cert type is selected |
Yes |
|
The toolkit version is retrieved based on a specified order of preference. Once a version is identified from one of the toolkits, subsequent commands in the sequence are not executed. | Yes | |
| sudo <toolkit> -cert -list -db <key_database_path> -stashed | List certificates in a specified Key Database (KDB). | Yes | |
| sudo <kdbtoolkit> -cert -export -db <key_database_path> -stashed -type cms -target_type pkcs12 -target /root/LinuxServerAvxTempCertDiscovery_1693815850667/click1602636522.p12 -target_pw ##### | Convert KDB certs into p12 | Yes | |
| sudo find '<scan_directory>' -type d 2 > /dev/null -printf "%d\n" | sort -nr | head -n 1 | To identify the depth of the directory. Depth search is not available in AIX. | Yes | |
| Timeout 120 sudo find /<directory> -mindepth 5 -maxdepth 8 \( -path */*AvxTempCertDiscovery* -prune \) -o -type f -iname '*.crt' -o -iname '*.cer' -o -iname '*.p7c' -o -iname '*.p7b' -o -iname '*.key' -o -iname '*.jks' -o -iname '*.pem' -o -iname '*.pfx' -o -iname '*.der' -o -iname '*.p12' -o -iname '.keystore' -o -iname '*.keystore' 2> /dev/null | xargs timeout 120 sudo cksum 2> /dev/null | Use the command to identify a file's path along with its checksum. | Yes | |
| output="[ "; for a in '/opt/enrollrabitmq.key' ; do value=$(sudo base64 "$a" 2>/dev/null | tr -d '\n\r'); if [ -z "$value" ]; then error=$(sudo base64 "$a" 2>&1 >/dev/null); output="${output} {\"file\":\"$a\", \"error\": \"$error\" },"; else output="${output} {\"file\":\"$a\", \"value\": \"$value\" },"; fi done; output=${output%,}; output="${output} ]"; echo "$output" | Download cert content from the Linux server in base64 format. | Yes | |
for p in |
Network scan | Yes | |
| Temp directory when sudo or service account is
used. Note: This is used during the CSR
generation at endpoint and push operation. |
sudo mkdir -p {temp_directory} | Create temp directory | Yes |
| chmod 700 {temp_directory} && setfacl -m
u:appviewx:rwx -m u:serviceUserName:rwx
{temp_directory} AIX OS Specific Command: chmod 700 {temp_directory} && ( aclget {temp_directory}; echo -e "extended permissions:\nenabled\npermit rwx u:sshUserName\npermit rwx u:serviceUserName") | aclput {temp_directory} |
To address security concerns raised by AppViewX EIS regarding
777 permissions, we are leveraging ACL commands to grant access
to both the SSH/SFTP user and the service account user for the
temp directory. This ensures secure access while allowing
uploaded files in the temp directory to be copied to the
configured target location. Note: The
service account username will only be used when the service
account is enabled for device onboarding. As a fallback for any failure in executing this command, chmod 777 is applied to the temporary directory created by AppViewX. Once the transaction is complete, the temporary folder is deleted. |
Yes | |
| sudo cp /{temp_directory}/csr_1700139913719.cnf /home/appviewx/ | From the temp directory, the uploaded files will be copied to the configured target location. | Yes | |
| sudo rm -rf /{temp_directory} | Remove the temp directory which is created by AppViewX. | Yes | |
| CSR Generation at endpoint | sudo openssl req -nodes -newkey rsa:2048 -sha256 -days 366 -keyout /home/appviewx/report.key -out /home/appviewx/report.csr -subj '/C=/ST=/L=/O=/OU=/CN=report.appviewx.com/emailAddress=/' -config /home/appviewx//csr_1700139913719.cnf | Generating a Certificate Signing Request (CSR) | Yes |
| Push Cert | sudo find /home/appviewx/devtestcsrgen.keysudo find /home/appviewx -type f -name 'devtestcsrgenkeystore.jks' sudo find /home/appviewx -type f -name 'devtestcsrgentruststore.jks' | Verify that the certificate is already present in the target location. If the "Private Key at Endpoint" option is selected and the key does not exist at the specified location, the push operation will fail. | Yes |
|
sudo stat -c \"%a\" /home/appviewx/existingkeystore.jks sudo stat -c \"%U:%G\" /home/appviewx/existingkeystore.jks |
Commands to retrieve the permission and user and user group of the existing Keystore. | Yes | |
| sudo mkdir -p {push_path} ; sudo touch {push_path} | Verify if the target directory is editable. | Yes | |
| sudo echo $HOME | Identify the Home directory | Yes | |
| sudo openssl pkey -pubout -in /home/appviewx/devtestcsrgen.key | openssl md5 | Cert And Key Compatibility Check | Yes | |
| sudo test -e /home/appviewx/report.pem && echo file exist || echo file not exist | Verify that the certificates already exist in the target location. | Yes | |
| sudo cp -f '/home/appviewx/devtestcsrgen.key' '/home/appviewx/avx_cert_backup//devtestcsrgen_20230908132855.key' | Take backup if the cert already exists with the same name. | Yes | |
| sudo openssl pkcs12 -export -in '/home/appviewx/avx.pem' -inkey '/home/appviewx/devtestcsrgen.key' -out '/home/appviewx/p12pushtolinux.p12' -passout ##### -name 'p12pushtolinux' | Export command in case of p12 push. | Yes |
Sudo-enabled Commands
- su
- sar
- find
- mkdir
- netstat (only if port Scan is enabled)
- chmod
- chgrp
- chown
- openssl
- base64
- rm
- mv
- touch
- echo
- test
- cp
- cksum
- stat
- setfacl
- runmqakm
- gsk8capicmd
- gsk8cmd
- gsk7capicmd
- gsk7cmd
- dspmqver
- gskcmd
- gsk8capicmd_64(only if .kdb certs are required, depending on the tool kit currently installed).
Validating the Device
-
Go to
(Menu) > ADMINISTRATION >
Device Management.
By default, the ADC tab opens.
-
Click the Server tab.
The Server Inventory page is displayed.
-
Check that the device name appears in the inventory (name column) with the
specified Status column.
The status column will have the value Managed/Monitored/Ignored if the connection is successful or displays Failed/Unresolved in case of failure.
-
From the Status column, click the
Managed/Monitored/Ignored/Failed/Unresolved.
Device Status Log pop-up is displayed.
- Expand each value in the pop-up to know the Device communication, Device Version, Instance Information, and Certificate Discovery From Device.
What's Next
- If you want to discover certificates from the onboarded device, see Managed Devices Scan.
- If you want to enroll a new server certificate, see Enrolling a Server Certificate.