CISCO
Prerequisites
CISCO CUCM
For executing these commands, ensure that the admin user has an access privilege of level 1 (read and write access)
For links to detailed documentation on the commands and access privileges, see the References section.
CISCO ISE
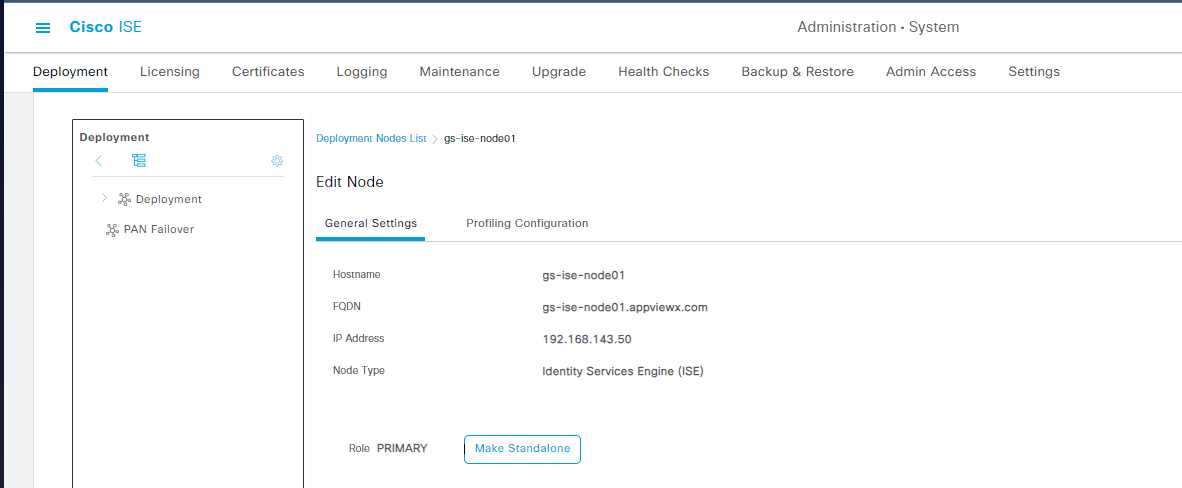
- Ensure that at least one node is designated as the primary node.
Cisco ISE can have one primary PAP node and multiple secondary nodes. AppViewX will always discover certificates from the primary node.
In the absence of a designated primary node, certificates will not be discovered from Cisco ISE.
If a primary node is designated but is disabled, only trust certificates will be discovered.
- Ensure that the API setting is enabled for both ERS and OpenAPI.
Cisco ISE recommends to use port 443 for both ERS and OpenAPI.
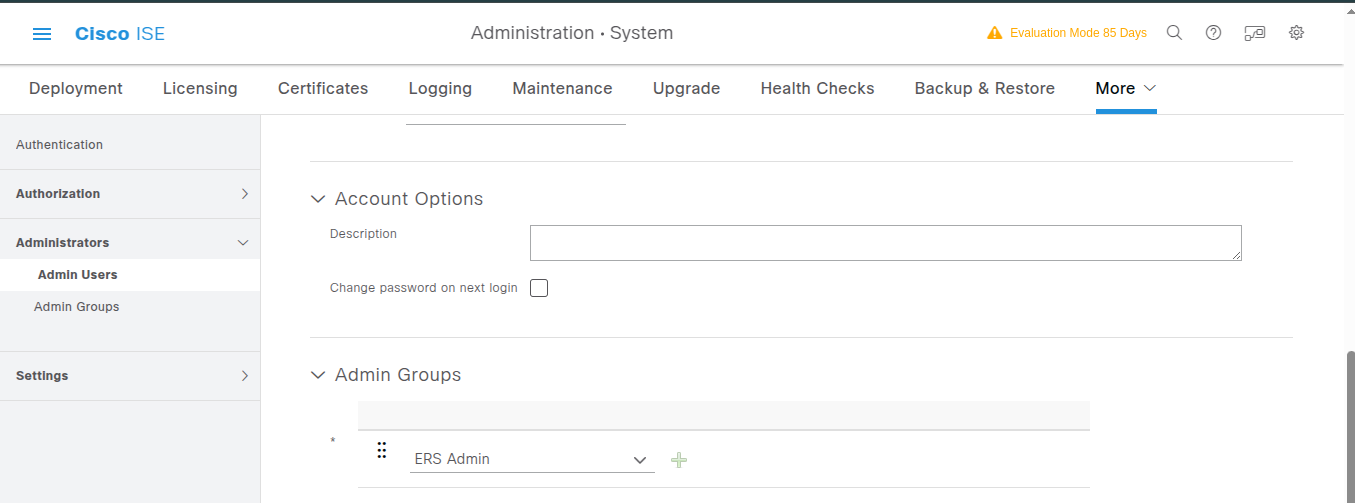
- Ensure that the onboarding user has been mapped to the ERS Admin group
CISCO IOS
For links to detailed documentation on the commands and access privileges, see the References section.
Onboarding CISCO
- UCS
- CUCM
- ISE
- IOS.
-
Go to
 (Menu) > CERT+ >
ADMINISTRATION > Device
Management.
By default, the ADC tab opens.
(Menu) > CERT+ >
ADMINISTRATION > Device
Management.
By default, the ADC tab opens. - Click the Server tab.
-
Click the
 (Add) icon.
-
Select CISCO logo from the Vendors list.
The CISCO server configuration screen is displayed.
-
In the Server Details section, enter details as
mentioned below.
-
Select the Server Type = ISE. All the fields
mentioned above (in step a) will be displayed along with the
additional fields as below:
Table 3. Server Details - Field Description Table Fields Description ERS API Port The Cisco Identity Services Engine (ISE) API uses ERS and OpenAPI port for communication. These port requirements can be modified during the installation or configuration of the ISE, depending on the network and security requirements. The default value for ERS API Port is 9060.
The default value for Open API Port is 443.
Open API Port Proxy Required The checkbox is not selected (false) by default. To enable communication through proxy servers select the checkbox (true). Cert sync Select the required cert sync. The possible options are
- Managed (default selection)
- Monitored
- Ignored
Cisco ISE Device Onbording - Prerequisite- Make sure that one of the nodes is designated as the Primary
node. If no Primary node is set, server certificates will
not be discovered from Cisco ISE. When disabled, only trust
certificates will be discovered.
- Make sure the API setting is enabled for both ERS and
OpenAPI. API services are disabled by default. To enable it,
navigate to Administration > System >
Settings > API Settings > API Service
Settings.
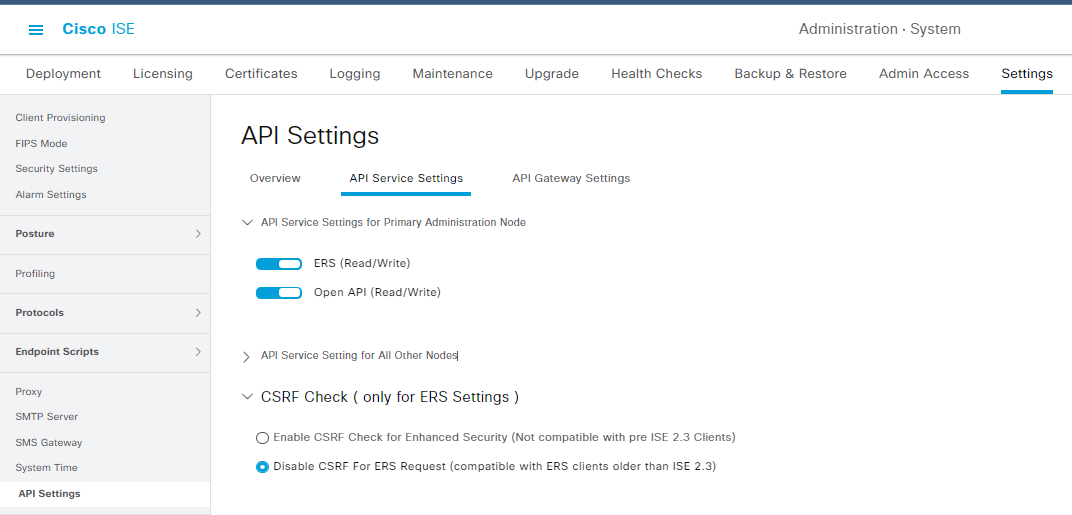
- Cisco ISE recommends to use port 443 for both ERS and OpenAPI.
- Make sure the onboarding user has been mapped to the ERS
Admin group.
- Cisco ISE can have one primary PAP node and multiple secondary nodes. AppViewX will always discover certificates from the primary node.
Additional Fields Support for Rest API based vendors
Additional Fields Supported in AppViewX Proxy Required Yes The Cisco Identity Services Engine (ISE) API uses ERS and OpenAPI port for communication ERS Port 443 or 9060 (External Restful Services) Open API Port 443 Discovery
- AppViewX discovers all trust certificates and system certificates from the primary node.
- AppViewX would also show the certificate associatation to the role details in the discovery response and also in the app connector.
- A profile will be created for the primary node, along with
dedicated profiles for each existing certificate.
-
- If the profile name follows the format
{deviceName}:{primary_node_name}, it is used for pushing certificates to Cisco ISE but cannot be used to map certificates to any role. - If the profile name follows the format
{deviceName}:{primary_node_name}:{commaSeparatedRoleName}:{friendlyName}, the profile can be used to renew, push, and bind the certificate to the specified roles.
- If the profile name follows the format
-
Push Format Support
Push Format Supported in AppViewX PEM Privacy Enhanced Mail (PEM) AppConnectorField Name Details Friendly Name Enter a friendly name for the certificate. If no name is specified, Cisco ISE automatically creates a name in the format common-name, Subject-Alternative-Name#issuer#nnnnn where <nnnnn> is a unique five-digit number. - If the trust certificate already exists in Cisco ISE, pushing it again is not required.
- If the admin profile is selected, the application server
will restart automatically.Note: It is recommended to include both the FQDN and IP address of the ISE server in the SAN field of the ISE system certificate.
- The private key is required to push the certificate to Cisco ISE.
- If no role or 'Used By' value is defined, the certificate will be pushed to the Cisco ISE system certificate but will remain in a Not In Use state.
- Users cannot uncheck the pre-selected role from the discovered certificate. However, additional roles can be added based on the role selection rules.
- During the push process, users can select multiple roles for the certificate, in accordance with the rules defined in Cisco ISE.
- The SAML role cannot be combined with any other role.
- If the ISE Messaging service role is selected, users should not be allowed to select any other roles from the dropdown.
- If the portal role is selected, the Default Portal
Certificate Group is used as the
portalGroupTag; custom groups cannot be selected from the AppViewX application. - Each role can be associated with only one system certificate. Assigning a new certificate will remove the role from the existing certificate.
- Users can utilize the existing configuration to push and bind the certificate.
- By default, the use of existing configuration is enabled on the Add/Edit App Connector screen.
- Users can disable the 'Use Existing Configuration' option and provide a new Friendly Name and Roles for the certificate.
- Certificate push operations always upload the certificate to the primary node. Customers must manually transfer the certificate from the primary node to the respective target node.
- If the user selects the Node profile to push a new certificate to a role, the existing certificate bound to that role cannot be identified, so a backup cannot be taken. As a result, the backup step will be skipped with the comment: 'No data available,' and rollback will not be possible.
- Cisco ISE does not allow pushing a new certificate with the same public key and will throw the following exception. Therefore, the user must regenerate the certificate before proceeding with the push. Found a certificate with matching public key.
Limitation
- CSR generation at the Cisco ISE endpoint is not supported.
-
Select the Server Type = ISE. All the fields
mentioned above (in step a) will be displayed along with the
additional fields as below:
-
In the Credentials section, select/enter the details
as follows.
Table 4. Credentials - Field Description Table Fields Description *Credential Type Select the credential type from the dropdown. - Manual entry
- Credential List - AppViewX
- Credential List - BeyondTrust
- Credential List - Thycotic
Note:- If Credential list - Appviewx is selected, the *Credentials list dropdown field is displayed. Select any of the preconfigured credential values.
*Username Enter the assigned username. (This field is displayed for Manual entry only) *Password Enter the secure password. (This field is displayed for Manual entry only) *Privilege Password Enter the privilege password for using the privilege mode. *: Mandatory fields -
Click Save.
Note: The Cisco device can be configured through the Import option, by downloading the .csv or .xlxs templates, Additional columns (ERS API Port and Open API Port) have been added for Cisco ISE. These can be left blank; the default values, 9060 and 443 respectively will be considered.
Validating the Device
-
Go to ADMINISTRATION > Device
Management.
By default, the ADC tab opens.
-
Click the Server tab.
The Server Inventory page is displayed.
-
Check that the device name appears in the inventory (Name column) with the
specified CertSync status (Status Column).
The status column will have the value Managed/Monitored/Ignored based on the CertSync status if the connection is successful or displays Failed/Unresolved in case of failure.
-
From the Status column, click the Managed/Monitored.
Device Status Log pop-up is displayed.
- Expand each value in the pop-up to know the Device communication, Device Version, Instance Information, and Certificate Discovery From Device.
References
What's Next
- If you want to discover certificates from the onboarded device, see Managed Devices Scan.
- If you want to enroll a new server certificate, see Enrolling a Server Certificate.