AppViewX Integration with OIDC Provider
-
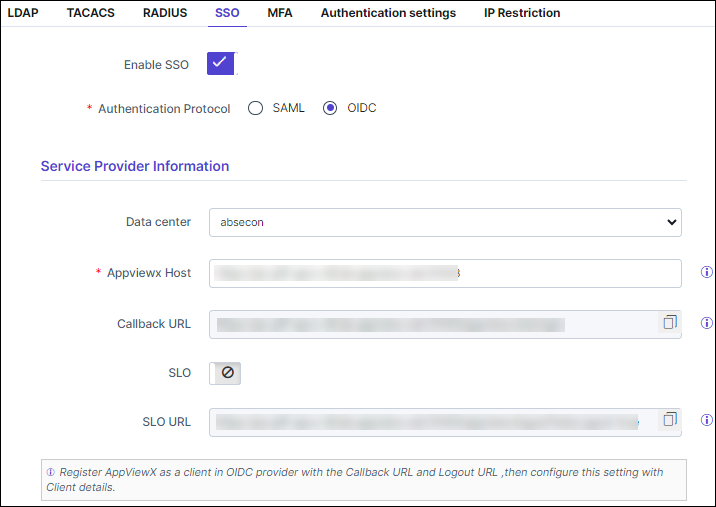
On the Settings :: Authentication page, under the SSO tab, turn
on the Enable SSO toggle.
The Authentication Protocol options are displayed.
-
Select OIDC as the Authentication Protocol.
The Service Provider Information section will automatically populate based on the OIDC selection.
-
Copy the Callback URL and SLO URL, which has to be configured at
the OIDC identity provider settings for AppViewX, from the Service Provider
Information section.
-
Under the IDP Configuration section, enter the required field information.
Table 1. Field descriptions for IDP Configuration Field Description *Client Name Unique name for the OIDC identity provider configuration. *Client ID The client ID of the application that is registered in the third-party OIDC identity provider. *Client Secret The client secret of the application that is registered in the third-party OIDC identity provider. Note: While configuring or editing, a view icon will appear, enabling the user to see the client secret. After saving, the client secret is encrypted and the UI will show a masked value.*Discovery Endpoint (Well known) URL The URL contains metadata about the third-party OIDC identity provider. * : Mandatory fields -
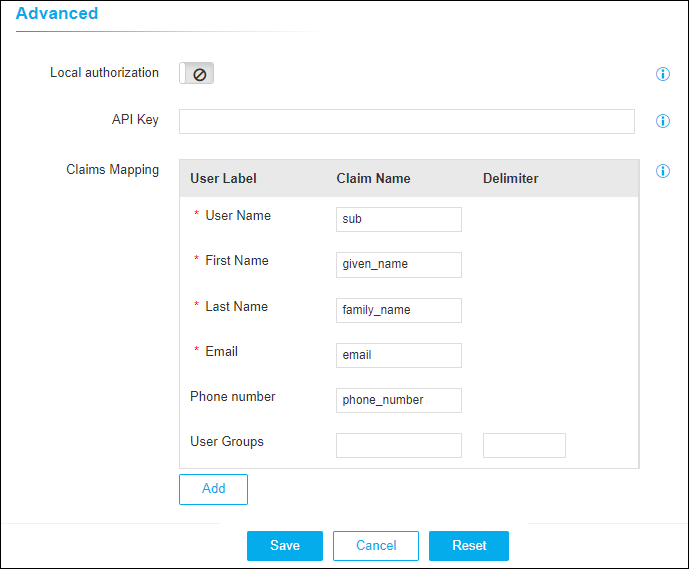
Under the Advanced section, turn the Local Authorization toggle
on/off to define custom claim mapping based on the ID claims which are sent from
the OIDC Identity provider.
Turn the Local Authorization toggle on to define the following privileges:
- When a user from an OIDC provider tries to log in to AppViewX for the first time, the user account will be created under Account > User within AppViewX. But users will not be allowed to perform any operations until Admin assigns the user to the respective User Group.
- To enable the user with a successful login, an User Group must be created as a prerequisite, and the User Group must be assigned with Roles and Resources permissions for the SSO users and has to be assigned within AppViewX by mapping the users to the User Group.
Turn the Local Authorization toggle off to define the following privileges:- When a user from an OIDC provider tries to log in to AppViewX, with Local Authorization disabled it is assumed that the Security Groups are passed as a part of the ID token.
- Create the required Security Group under the Menu > Account > User Groups within AppViewX by assigning respective Roles and Resources.
- Under the Advanced section, enter the API Key if provided by the OIDC provider.
-
Navigate to Advanced > Claims Mapping, enter the
required field information to map the claim keys against the AppViewX User Label
for the user profile information to be stored in the AppViewX expected format.
 For example:
- An identity provider can send the user login name with the key called sub in the ID token and another identity provider can send the user login name with the key called upn.
- The administrator can configure/modify the claim setting against the User Name either as sub or upn based on the ID claim response sent by the OIDC vendor.
- Similarly, custom claims can be configured and additional claims for the user profile if required. Currently, these custom claims stored in the user profile will not be shown along with the user profile on the AppViewX web application.