Adding a Node to the Cluster
This section explains the steps to be followed to add a new node to an existing cluster.
- Login to the node from where the AppViewX deployment was triggered (installer node).
-
(Optional) Execute this step ONLY when the new node is cloned from an existing
node. In this case, you will have to remove the existing Kubernetes
configuration files. To delete the existing kubelet config files:
-
Before adding nodes using the node addition script, ensure that the following
prerequisites are met:
Adding a Master Node
-
To add the master node, execute the following command:
- Run the
command:
cd <Installer_Location/appviewx_kubernetes/scripts>
- Run the
command:
-
Ensure that the current Kubernetes context is set to the admin user. If it
is not, switch to the admin configuration instead of the read-only user
configuration.

-
Execute the node addition script using the sudo command.
sudo ./appviewx_add_node.shNote: The total of master nodes must be an odd number (for example, 3, 5, and so on.). Add the master nodes accordingly. To enter multiple IP addresses, separate them with commas (for example, IP1, IP2). -
The command will be prompted to enter the following details:
- Confirmation of the current Installer directory.
- IP addresses of new master nodes.
- datacentername:hostname of the new master nodes.
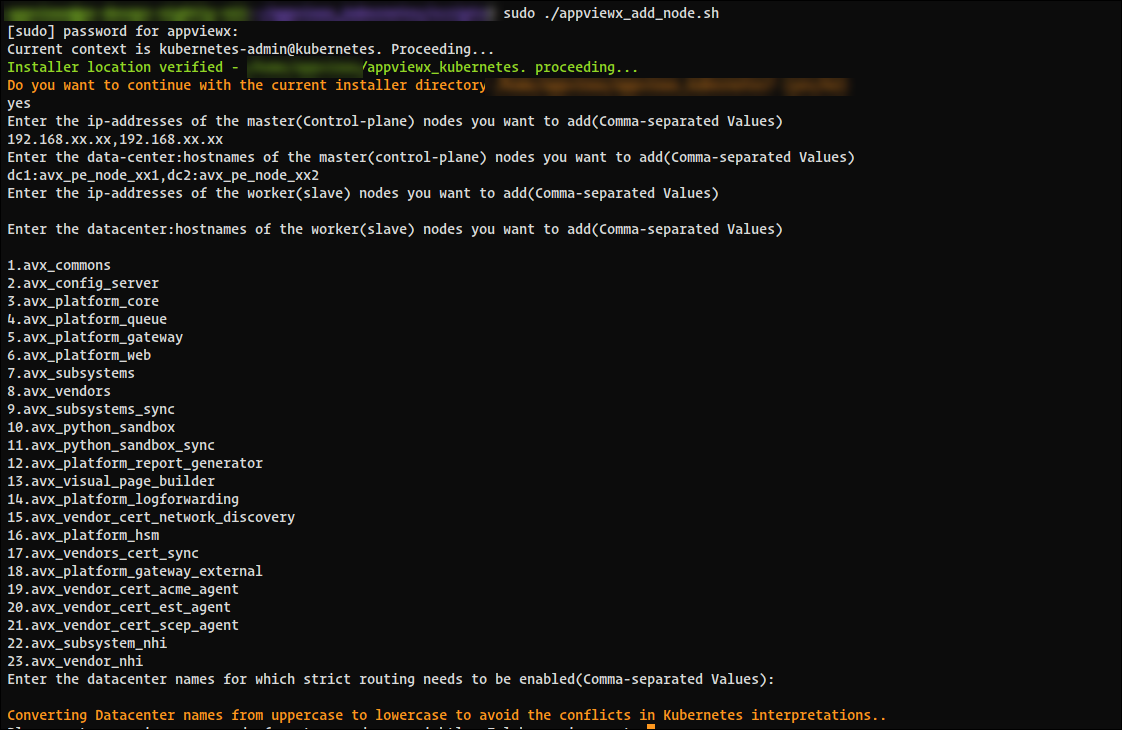 Note: If you are prompted to enter the worker node details, hit the enter key and proceed.
 - After execution, the new master nodes join the cluster, and all pods and daemonsets deploy on them.
-
To verify whether the pods are up and running in the new node, execute the
following command:
kubectl get pods -n <dcname> -o wide
Adding a Worker Node
-
To add the worker node, execute the following command:
- Run the
command:
cd <Installer_Location/appviewx_kubernetes/scripts>
- Run the
command:
-
Ensure that the current Kubernetes context is set to the admin user. If it
is not, switch to the admin configuration instead of the read-only user
configuration.
-
Execute the node addition script using the sudo command.
sudo ./appviewx_add_node.sh -
The command will be prompted to enter the following details:
- Confirmation of the current Installer directory.
- IP addresses of new master nodes.
- datacentername:hostname of the new master nodes.
- (optional - leave blank) datacenter names for strict host routing if required.
Note: If you are prompted to enter the worker node details, hit the enter key and proceed. - After execution, the new master nodes join the cluster, and all pods and daemonsets deploy on them.
-
To verify whether the pods are up and running in the new node, execute the
following command:
kubectl get pods -n <dcname> -o wideNote: The script adds both master and worker nodes together. Provide the Node IP and hostname clearly when prompted. It performs all necessary validations, including checking that the IP and hostname resolve correctly, verifying that new nodes have the same OS version as existing nodes, and ensuring worker node IPs do not conflict with master node IPs.