Running the Prerequisite Tool
- validates for environment readiness and also configures some of the system configurations to ensure a smooth and successful AppViewX deployment.
- is a secure and reliable way to avoid any adverse effects on the environment.
- logs all changes made to the environment configuration for auditing and troubleshooting purposes.
The table below lists all the validations and the possible configurations performed by the prerequisite tool.
| System Configuration | Validation | Configuration | Reason |
|---|---|---|---|
| Validating the system architecture - x86_64 | Yes | No | System level configuration |
| Validating RAM in worker nodes and master nodes | Yes | No | System level configuration |
| Validating CPU cores in worker nodes and master nodes | Yes | No | System level configuration |
| Validating disk space | Yes | No | System level configuration |
| Verifying ports communication | Yes | No | System level configuration |
| Cleaning up the process running on ports | Yes | Yes | NA |
| Validating OS | Yes | No | OS - RHEL/ CentOS/ Ubuntu |
| Validating OS version | Yes | No | Validating version of OS |
| Installing rpm/ deb dependency packages | Yes | Yes | NA |
| Validation for chrony and chrony sync status | Yes | Yes | NA |
| Validating NTP and NTP sync status | Yes | Yes | NA |
| Validate Runc version | Yes | Yes | NA |
| Validating Selinux status | Yes | Yes | NA |
| Validating IP of node | Yes | No | Validating the provided Ip of the nodes |
| Validating user id value | Yes | No | User id check |
| Validating umask value | Yes | Yes | NA |
| Validating ulimit value | Yes | Yes | NA |
| Validating Openssl version | Yes | No | Openssl version validation |
| Validating time difference between the servers | Yes | Yes | NA |
| Validating ftype in xfs_info | Yes | No | Checking supported file system |
| noexec for /tmp | Yes | No | Checking permission for the /tmp directory |
| Validate IPV6 service | Yes | Yes | NA |
| Check vm.max_map_count value | Yes | Yes | NA |
| Server latency check | Yes | No | Latency check in and between the servers |
| Validate loopback IP - 127.0.0.1 | Yes | Yes | NA |
| Validate Firewalld service | Yes | Yes | NA |
| Network interface lookup | Yes | No | Validating the network interface |
| Packet analyser | Yes | No | capture, inspect, and analyze network traffic |
| Analysing received packets | Yes | No | capture, inspect, and analyze network traffic |
| Validation of Crontab of user | Yes | Yes | NA |
| Validate puppet status | Yes | Yes | NA |
| Validate IP Tables | Yes | Yes | NA |
| Validate ip_forwarding | Yes | Yes | NA |
| Validate bridging | Yes | Yes | NA |
| Validating proxy variable values | Yes | Yes | NA |
| Cross validating SSH communication | Yes | No | Validation of ssh to nodes |
| Validating the GID | Yes | No | Verify that the GID we're validating corresponds to an existing group on the system |
| Validating User Id between the user of all servers | Yes | No | Ensuring user id assignment across servers is same |
| Validating group Id between the user of all servers | Yes | No | Ensuring GID assignment across servers is same |
To run the prerequisite tool:
-
Create a folder to download the prerequisite.tar.gz Eg:
mkdir -p <folder_name> -
Download and extract the prerequisite.tar.gz file to the created
folder. To extract the file use the command below.
tar -xvf prerequisite.tar.gz -
To update the hosts_template execute the command below. Specify the
AppViewX IP address of the VMs (master and worker nodes), DNS servers and gateway address,
and users in the file.
Add the following values in the host_template parameters below.vi hosts_templateParameters Description NODES It is the IP addresses of all the nodes. You can enter multiple comma separated values. Example:
NODE = 192.111.222.333USERS The username for the nodes and must have sudo privileges. Example:
USERS = appviewxIn case of multi-node setup, enter the sudo username with comma separated value the number of times equivalent to number of AppViewX nodes (including masters & workers). for example, for a 2 DC 7 node setup, we need to enter the username 7 times - appviewx,appviewx,appviewx,appviewx,appviewx,appviewx,appviewx.
Note: Usually for a multi-node setup the username for all nodes (master and slave) must be the same.MASTER_NODES IP address of the master node Example:
MASTER_NODES =
                        192.111.222.444
WORKER_NODES IP address of the master node Example:
WORKER_NODES =
                        192.111.222.555
NEW_INSTALLATION_PATH Example: NEW_INSTALLATION_PATH = /home/appviewx/appviewx_clusterUSER_GENERATED_PEM If you require to do a password-less installation of AppViewX, enter the value as True. If set to False, then you will be prompted to enter the password after you execute the ./prerequisitecommandExample:
USER_GENERATED_PEM = TRUEPRIVATE_KEY_FILE_PATH Specify the path where the pem file is saved. Example:
PRIVATE_KEY_FILE_PATH =
                        /tmp/user_generated_private.pem
CHRONY_SYNC If you require the time sync in the nodes enter the value as true. Example:
CHRONY_SYNC = TRUECHRONY_SERVER Specify the chrony server to be used for time sync. Example:
CHRONY_SERVER =
                    abcs.appviewx.net
HTTP_PROXY If internet is not present in the nodes then use the http proxy to install the rpm/deb packages in the nodes. Example:
HTTP_PROXY =
                        https://192.999.888.777:1234
HTTPS_PROXY If internet is not present in the nodes then use the http proxy to install the rpm/deb packages in the nodes. Example:
HTTPS_PROXY = https://192.999.888.777:1234 -
Execute the following command:
The following options are displayed../prerequisite
-
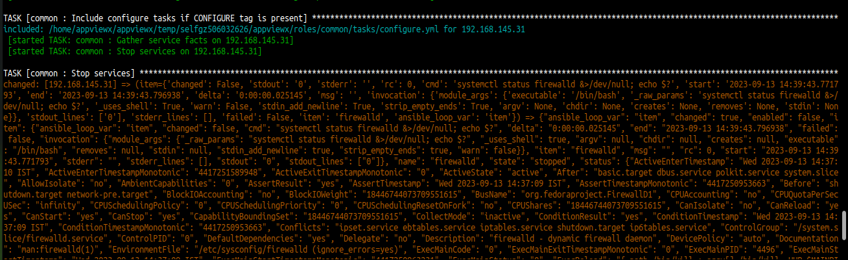
If you enter 1, then the tool validates all the system configurations specified in
the table. If the configurations are not as per expectations the errors/failures will
be displayed as shown below.
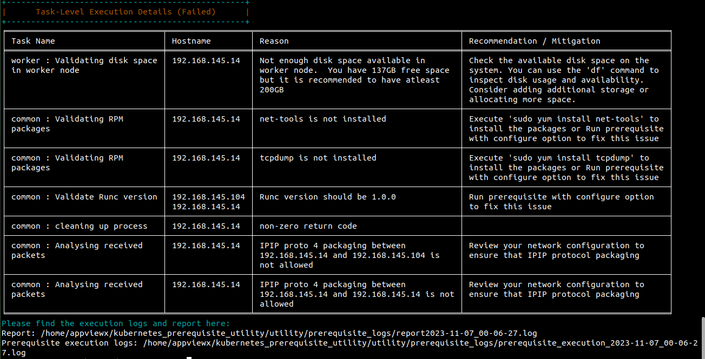
 Post the validation the results are displayed as report in the format below. It shows the Summary, Host-Level Execution Status, and the Task-Level Execution Status (Failed). (The screenshots shown are for a multi-node setup.)
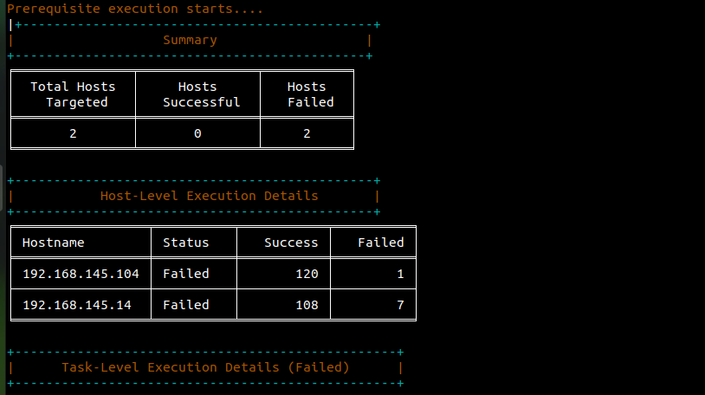
-
If you enter 2, then the tool will install the configurations as specified in the
table and also validates all the system configurations.
- It stops the firewall service.
- It installs the rpm/deb package if not already installed.

- It stops the firewall service.
-
If you enter 1, then the tool validates all the system configurations specified in
the table. If the configurations are not as per expectations the errors/failures will
be displayed as shown below.