Configuring AppViewX win-acme Client
Getting Started
Prerequisites
- The AppViewX server/cloud connector (CC) must be bound with a valid certificate. See Section, Binding Custom Certificate to Gateway in Cloud Connector.
- The certificate bound to the AppViewX or CC gateway must be trusted by the Windows client machine.
- To trust the certificate, import the root and the issuer certificates to the Windows root and intermediate trust stores.
- A proper DNS entry for the Windows server where winacme is being installed.
- A valid ACME endpoint must be configured on the AppViewX GUI.
- To
enable client connections, ensure the following ports are open for
inbound communication in AppViewX:
- 31443 is open for on-premises deployment and port.
- 30020 in cloud connectors is open for SaaS deployment in AppViewX.
- If the domain validation is set as HTTP, ensure port 80 is accessible on your Windows machine to allow AppViewX to establish a connection.
- If the DNS validation is for DNS challenge, then the DNS server must be up and running and the DNS credentials file should be correctly configured.
- Certificate attributes and custom attributes must be configured to capture the attributes in the AppViewX GUI (if required).
System Requirements
- Operating System: Windows Server 2012 R2 SP1 or higher
- Framework: .NET Core 5 or higher
- RAM: 4GB or higher
Installing win-acme Client
- Download the latest version from the AppViewX release portal.
-
Unzip files to a non-temporary folder so that the scheduled task can be
run.
We recommend using
%program files%\win-acme.The settings.json file inside the win-acme folder is used for further configurations.
Configuring win-acme
Configuring URL
- Go to Cert+ > Administration > Auto Enrollment > ACME.
- Copy the URL from the Directory URL field.
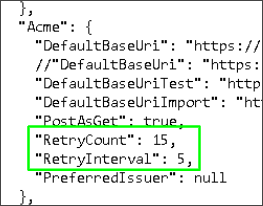
- Update the DefaultBaseUri field in the settings.json file.
Enabling Polling
- Configure the RetryCount parameter to determine the maximum number of times to refresh validation and order status, while waiting for the ACME server to complete its tasks. By default, this value is set to 15.
- Configure the RetryInterval parameter to the amount of time in
seconds to wait for each retry. By default, this value is set to 5
seconds.Example: Let us consider a scenario where the RetryCount is set as 15, and the RetryInterval is configured as 5 seconds. In this case, the total timeout duration (polling time) is calculated as 15 multiplied by 5 seconds totaling 75 seconds.
Setting Custom and Certificate Attributes
Certificate attributes are included in the payload sent to AppViewX. They are primarily used internally for categorization and management purposes. These values must be added in the settings.json file.
Both these attributes are optional fields, so they can be left blank.
Example of cert and custom attributes in settings.json file:
"certAttributes" : {"id":"12345678", "manager":"managerName2"},
"customAttributes" : {"email_address":"[email protected]","Director":"Name"}

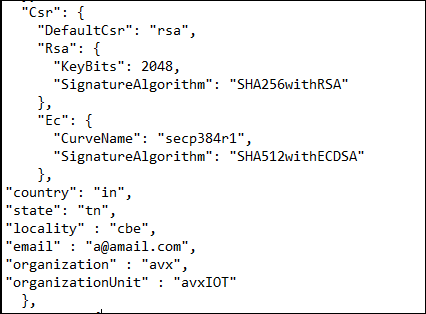
Providing additional CSR Parameters
- Organization
- Organization unit
- Country
- State
- Locality
- Email-ID
Actions using win-acme
Enrolling Certificates
- Interactive terminal -OR-
- PowerShell script
Enrolling Certificates using Interactive Terminal
wacs.exe
-
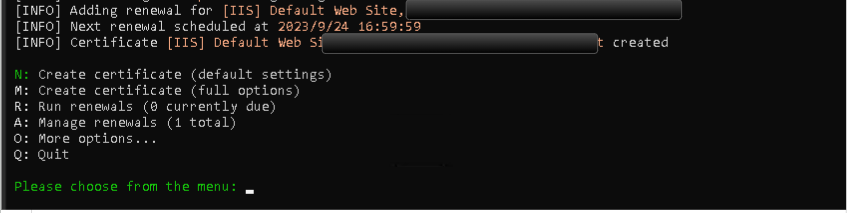
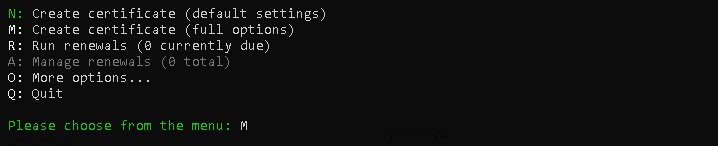
To create a new certificate with default settings, choose N from
the main menu.

-
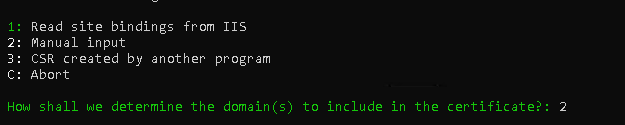
Choose how you want to determine the domain name(s) that are to be
included in the certificate. This can be derived from the bindings
of an IIS site or can be entered manually.


 Note: If EAB is enabled in the AppViewX ACME configuration settings, win-acme will prompt to enter the key identifier and key (base64 url encoded) [enter the value from MAC value in the place of key (base64 url encoded)]
 AppViewX ACME
configuration:
AppViewX ACME
configuration: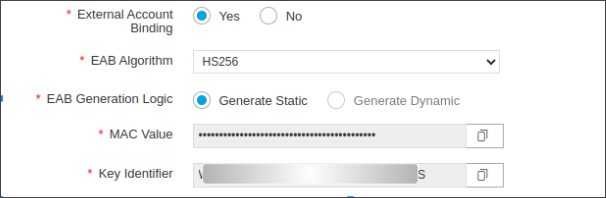
-
A registration is created with the ACME server, if no existing one
is found. You will be prompted to agree to its terms of service and
to provide an email address that the administrators can use as
contact information.

- The program communicates with the ACME server to confirm ownership for the certificate you want to create. By default, the http validation mode is used and handled by AppViewX’s self-hosting plugin. Getting the validation correct can be the most challenging aspect of obtaining an ACME certificate. If problems persist, refer to the common issues.
-
After the proof has been provided, the program gets a new
certificate from the ACME server and creates/updates the IIS
bindings as required according to the logic documented here.
 The program stores all choices made while creating the certificate and applies them for each subsequent renewal.
Steps for using M: create certificates with full option
-
Choose M to create certificates using full options.
-
Choose 1 to read site bindings from IIS server; else, choose 2 to
provide the domain name manually.
-
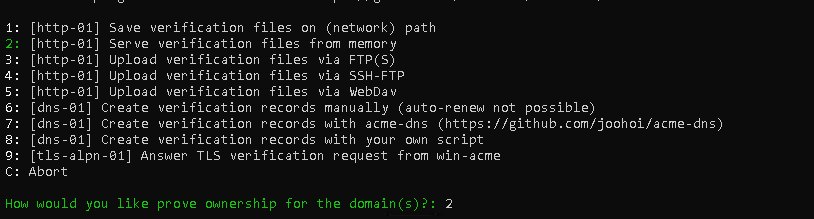
Continue with the default options for HTTP Challenge validations
(The number highlighted in green).
HTTP challenge validation is the most common challenge type. ACME server will give a token to the ACME client, and the ACME client puts a file on the web server at http://<YOUR_DOMAIN>/.well-known/acme-challenge/<TOKEN>. Once the token is published in the webserver, AppViewX will send an HTTP request to fetch the token from the client machine.Note: The common name must be resolving to the client machine IP address and port 80 of the client machine must be accessible by AppViewX.
-
Provide the default option 2 to create the private key for the
certificate.

-
To store the certificate in the Windows certificate store, enter
4.

-
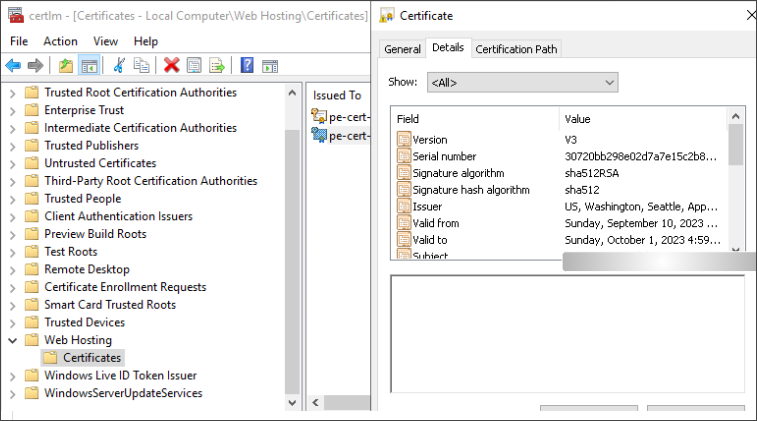
Choose the WebHosting option/ default option to store the
certificates in that particular store. (The certificates can be
found in the Windows machine certificate store > Web Hosting >
Certificates.)
 Note: To store the certificate in the personal store use the option 2 instead of 3.
 -
Enter the default option 5 and continue.

-
To create and update the https bindings in IIS server, choose
1.

-
Enter 4 to add no other installation steps and continue.

-
Provide an email address or press enter to skip.

-
The certificate will be bound to the chosen IIS server and the
certificate will be stored in the Windows certificate store.
Using PowerShell Script
Steps to run the win-acme enrollment process in background:
-
Choose the script as per the requirement and follow these
steps:
- Run win-acme using manual hostname as input: The
following PowerShell script fetches the certificate for the
hostname specified and binds it with the IIS server for the
site ID
specified.
$wacsPath = "<path to the wacs.exe file>"
$arguments = "--validationmode HTTP-01 --source manual --host <host-name> --emailaddress <email id (or) NA> --installation iis --installationsiteid <site id> --verbose --eab-key-identifier <eab-key-identifier> --eab-key <eab-key> --eab-algorithm <eab-algorithm>"
Start-Process -FilePath $wacsPath -ArgumentList $arguments -WindowStyle Hidden
Note: The command--eab-key-identifier -O7R97x8T52ASpwAYZJzJ --eab-key _Pqh5h6yJKThrXiqy6GGsfVIZdgNNw --eab-algorithm HS256is only applicable when EAB is enabled in the server side. - Run using CSR as input for certificate generation:
The following PowerShell script fetches the certificate
using the given CSR file and binds the certificate to the
specified site
ID.
$wacsPath = "<path to the wacs.exe file>" $arguments = "--validationmode HTTP-01 --source csr --csrfile <Path to the csr file> --pkfile <Path to the key file> --emailaddress <email id (or) NA> --installation iis --installationsiteid <site id> --verbose" Start-Process -FilePath $wacsPath -ArgumentList $arguments -WindowStyle Hidden - Run using site ID as input for certificate
generation
- Multiple site IDs can be given in comma separated format in this script (for example, 1,2,3).
- This PowerShell script fetches the hostnames of the servers mentioned in the <site ID> and creates a single certificate.
- The hostnames of all the specified IIS servers are present in the SAN DNS of that certificate.
- All the servers mentioned in the <site ID> are bound with the same certificate.
- This is not applicable for IP based binding and only works for hostname based bindings.
$wacsPath = "<path to the wacs.exe file>"
$arguments = "--validationmode HTTP-01 --source iis --siteid <site id>  --emailaddress <email id (or) NA> --installation iis --verbose"
Start-Process -FilePath $wacsPath -ArgumentList $arguments -WindowStyle Hidden
Note: The command--eab-key-identifier -O7zaR976x8T52AGASpwAAAYZJzJ --eab-key _PqhM5h6yJnXKThr7Xiq4y6GGlFsfGVICZdgNNw --eab-algorithm HS256is only applicable when EAB is enabled in the server side.Refer to these points to replace placeholder values in the commands:<path to the wacs.exe file>: The wacs.exe file path (present inside the win-acme installation folder).<host-name>: The hostname for which the certificate needs to be acquired.<site id>: This ID can be found in the IIS server manager.<email id (or) NA>: An email address or NA (should not be empty). This is bound to the win-acme account.<Path to the csr file>: Path of the CSR file.<Path to the key file>: Path of the key file associated with the given CSR.
- Run win-acme using manual hostname as input: The
following PowerShell script fetches the certificate for the
hostname specified and binds it with the IIS server for the
site ID
specified.
- Save the required script in .ps1 format (the new ps1 file can be created using Windows PowerShell ISE > File > New ).
- Open PowerShell with admin privileges.
-
Run
.\<shell script file name> - To ensure that the task is being run in the background, open the Windows Task Manager and look for the wacs process (This may be found as separate process or under Windows PowerShell process).
-
If the manual approval is enabled in the CA policy settings, this
process waits for the certificate to be approved. (The client polls
the ACME server for the certificate according to the RetryCount
and RetryInterval values provided in the
settings.json file. [Path -
C:\AppViewX_ACME_Winacme_Client\winacme\settings.json].
After receiving the certificate, this process is terminated. The certificate is found in the Windows certificate store (under the Web Hosting/certificates tab).
DNS-based Challenge Validation
DNS-based challenge validation in the ACME protocol involves proving the domain ownership by adding a specific TXT record to the domain's DNS records. When the ACME server issues a certificate for a domain, it provides the ACME client with a unique challenge token. The ACME client then adds this token as a TXT record in the domain's DNS configuration. AppViewX verifies the domain ownership by querying the DNS records for the challenge token. Once the token is found, the validation is considered successful and the certificate is issued.
This method of validation requires access to modify DNS records for the domain typically through the domain registrar or DNS-hosting provider.
- Extract the route53 plugin zip file in the win-acme folder.
-
Open a command prompt terminal in the win-acme folder and run the
following command:

- Continue with the enrollment process as mentioned in the Section, Steps for using M: Create Certificates with Full Option until you reach the step where the challenge method is chosen.
-
Select Create verification records in AWS route 53
option.
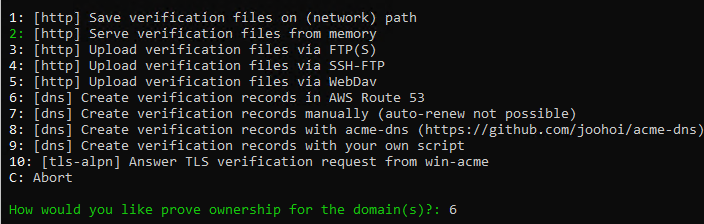
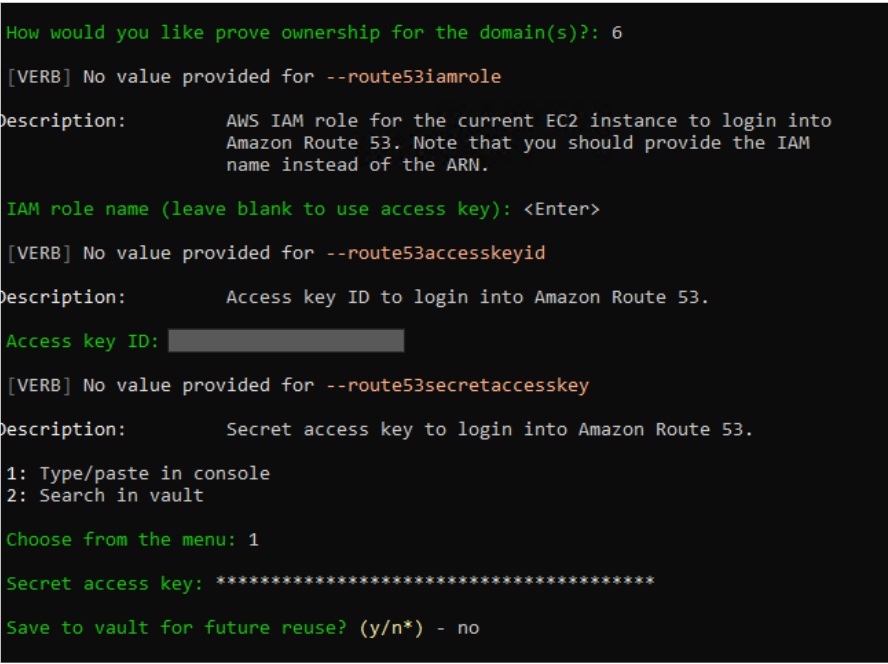
- Enter the Route53 credentials when prompted.
-
Follow the steps as shown:
 On completion, the enrollment process begins and the certificate is issued upon successful validation of the DNS challenge.Note: This is a sample to use the DNS route 53 plugin for challenge validation. Users can use the other DNS plugins also for validation. Refer to the following link to use the other DNS plugins: https://www.win-acme.com/reference/plugins/validation/dns/
Default Challenge Validation
This challenge requires you to prove control over the DNS for a domain by adding a specific value to a TXT record within that domain. AppViewX then performs a DNS query to verify the presence of the token in the domain's DNS records.
wacs.exe --target manual --host <domain name> --validation route53 --validationmode dns-01 --route53accesskeyid <route53 key id> --route53secretaccesskey <route53 key> --eab-key-identifier <EAB key identifier> --eab-key <EAB HMAC key> --eab-algorithm <EAB alogrithm> --verbose --emailaddress <mail address>DNS Challenge Validation (using AppViewX DNS plugin with Infoblox DNS Server)
This challenge requires you to show how AppViewX manages DNS for the domain by adding a specific value to a TXT record within that domain. AppViewX then performs a DNS query to verify the token's presence in the domain's DNS records. AppViewX, with the support of Platform Integration Hub, will handles all aspects of creating, searching, and deleting TXT records in the DNS server.
wacs.exe --target manual --validation appviewx --host <domain name> --vendor infoblox --vendoraccountname <Infoblox server name configured in appviewx> --validationmode dns-01 --eab-key-identifier <Key identifier> --eab-key <HMAC key> --eab-algorithm <EAB Algorithm> --verbose --emailaddress <email address>Enterprise Secure Challenge Validation
wacs.exe --target manual --validation appviewx --host <domain name> --validationmode dns-01 --eab-key-identifier <key identifier> --eab-key <HMAC key> --eab-algorithm <EAB Algorithm> --verbose --emailaddress <email address>DNS Challenge Validation using Bluecat Micetro Plug-In
- Create a Bluecat credential file with the following values, in the
format below (example: bluecat_creds.txt):
- hostname=<bluecat_hostname>
- username= <username>
- password=<password>
- To issue certificate, run the following command: (sample command
below)
./wacs.exe --target manual --validation bluecatmicetro --host <FQDN> --credentialfilepath <bluecat_credentials_file_path> --validationmode dns-01 --verbose
DNS Challenge Validation using Azure Plugin
Enrolling Certificates for Public DNS
wacs.exe --target manual \
--host <FQDN_NAME_FOR_CERTIFICATE>\
--validation azure \
--azuretenantid xxx-xxx-xxx \
--azureclientid xxxxxxxxx \
--azuresecret xxxxxxxxx \
--azuresubscriptionid xxx-xxx-xxx \
--azureresourcegroupname xxx \
--eab-key-identifier <key_identifier> \
--eab-key <hmac_value> \
--eab-algorithm <eab_algorithm>
--emailaddress <eab_email_address>
Enrolling Certificates for Private DNS
wacs.exe --target manual \
--host <FQDN_NAME_FOR_CERTIFICATE>\
--validation azure \
--azuretenantid xxx-xxx-xxx \
--azureclientid xxxxxxxxx \
--azuresecret xxxxxxxxx \
--azuresubscriptionid xxx-xxx-xxx \
--azureresourcegroupname xxx \
--eab-key-identifier <key_identifier> \
--eab-key <hmac_value> \
--eab-algorithm <eab_algorithm>
--emailaddress <eab_email_address>
--azurezonetype private
Renewing Certificates
Scheduling Tasks
The following are configuration settings in the settings.json file located within the win-acme directory:
- Adjust the value of ReuseDays to 0:
When renewing or creating a certificate with the same domain names as before, ReuseDays decides how long the program will use a cached version. Setting ReuseDays to 0 stops using cached files for renewals.
The default value for ReuseDays is set to 1.
- Set RenewalMinimumValidDays to determine the minimum
number of days a certificate should remain valid. If a
certificate has fewer days left than this threshold, automatic
renewal will be triggered.
The default value for RenewalMinimumValidDays is set to null, which is interpreted as 7 days.
For example: If you set the parameter to 10, certificates with less than 10 days validity will be renewed automatically using the task scheduler. Certificates with 10 days or more remaining will not be renewed.
- Adjust the StartBoundary to specify the start time for
the scheduled task.
The default value for StartBoundary is set to 09:00:00, which is interpreted as 9:00 am (local time).
- [Optional]: Set RandomDelay to 00:00:00 (0 hour),
which is the time to wait before starting the scheduled task to
spread the load on the servers and thus prevent users from
getting TooManyRequests errors.
The default value for RandomDelay is set to 04:00:00, which is interpreted as 4 hours.
Health Checks
Monitoring
%programdata%\win-acme\$baseuri$\Log. Scheduling Tasks for Auto-Renewal
It is possible to create a renewal task for win-acme in Windows using either a command or an interactive terminal session.
Using Command
-
Open command prompt with admin privilege and run:
wacs.exe --verbose --setuptaskscheduler
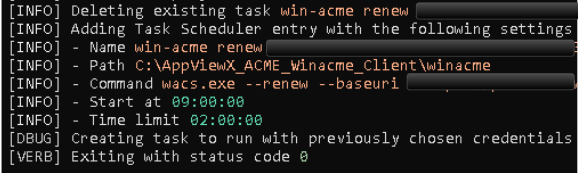
- Ensure that the Start at time in the end of the log matches with the StartBoundary time specified in the settings.json file.
Using Interactive Terminal
-
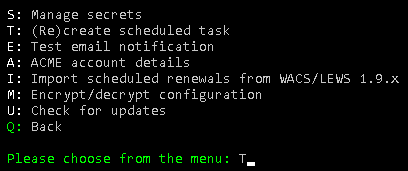
Run the following command and choose option O to go into More
Options:
wacs.exe --verbose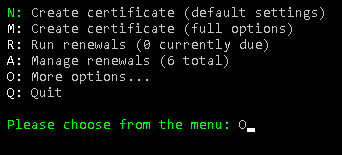
-
Choose option T.
 Ensure that the Start
at time aligns with the StartBoundary time
specified in the settings.json file.
Ensure that the Start
at time aligns with the StartBoundary time
specified in the settings.json file. -
Type n.
 This sets up a scheduled task in the Windows Task Scheduler for the renewal of win-acme using the parameters specified in the settings.json file.Note: You can cross verify by refreshing the Task Scheduler Library to find the win-acme renew task. Check if the Next Run Time of this task matches the defined StartBoundary time.Points to be noted:
- Whenever the scheduled win-acme renew task is triggered, the newly generated certificates from the renewal process will take the place of the older certificates in the Certificates - LocalComputer\Web Hosting\Certificates section present within the Manage computer certificates console.
- Certificates that have a remaining validity period that is equal to or greater than the specified RenewalMinimumValidDays will not be subjected to renewal and will remain unaltered in the certificates console.
- After scheduling a win-acme renewal task using the specified settings.json, the task will continue to operate with those configurations until a new win-acme renewal task is generated with altered settings.
- Later on, if you want to (re)create a scheduled task for winacme renewal, simply go through the steps a and b as described earlier. This will overwrite any existing winacme renewal task in the task scheduler, if there is one.
- Other properties of the scheduled task like RenewalDays, ExecutionTimeLimit can also be changed in a similar manner. Some of these parameters can be changed from the Task Scheduler itself, as long as the name is not modified.
Revoking Certificates
To revoke a certificate in win-acme:
-
Run
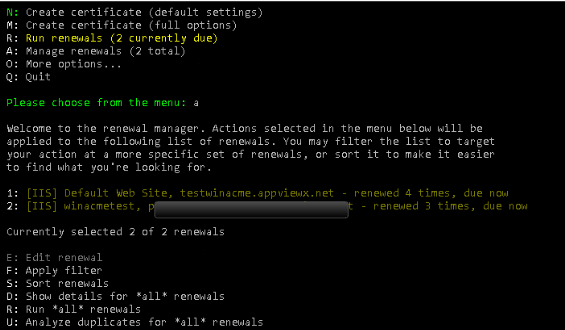
wacs.exe. -
Enter A to list the certificates. These names can be used to revoke a
particular certificate.
-
Enter V to revoke all certificates. If one particular certificate is
to be revoked, then use F option to apply filter.

-
If F is chosen, this menu will be prompted. Enter 1 to filter by
friendly name.

-
Enter the friendly name as shown (Friendly names are displayed in Step
1):
Example 1 If the name displayed in the menu is [
IIS] winacmetest,
                                                pe-cert-swat-142107.appviewx.net
, then enter the following in the friendly name filter →[IIS] winacmetest*Example 2 If the name displayed in the menu is
[IIS]
                                                Default Web Site, testwinacme.appviewx.net
, then enter the following in the friendly name filter -[IIS] Default Web Site* - Verify if the intended certificate is filtered.
-
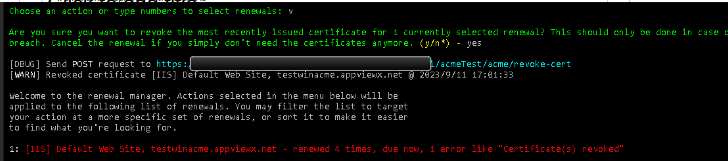
Enter V to revoke the selected certificate and type
yes for the revoke prompt as shown:
Issuing Certificates using Tomcat Server
wacs.exe --verbose --target manual --validation filesystem --host <server-domain-name> --webroot "<complete-path-of-tomcat-webapps-folder>" wacs.exe --verbose --target manual --validation filesystem --host test.appviewx.net --webroot "C:\Program Files\Apache Software Foundation\Tomcat 9.0\webapps"- While win-acme does not include a native plugin for binding
certificates to the Tomcat server, the following command can be used
to leverage the installation script option in
win-acme:
where:.\wacs.exe --verbose --target manual --validation filesystem --host <server-domain-name> --webroot "<complete-path-of-webapps-folder>" --store pfxfile --pfxfilepath "<pfx-file-folder>" --pfxpassword <pfx-password> --accepttos --pfxfilename <pfx-file-name> --installation script --script "<script.ps1 file>"- <server-domain-name>: The actual domain name for which the certificate is requested (e.g., example.com).
- <complete-path-of-webapps-folder>: This should point to the location where Tomcat serves its web applications.
- <pfx-file-folder>: The directory where the PFX file will be saved (e.g., C:\path\to\output\folder).
- <pfx-password>: The password used to encrypt the PFX file, securing the private key.
- <pfx-file-name>: The desired name for the PFX file to be created (e.g., mycert).
- <script.ps1 file>: The full path to the PowerShell script that will run after certificate issuance (e.g., C:\path\to\your\script.ps1).
Sample command:.\wacs.exe --verbose --target manual --validation filesystem --host test.appviewx.net --webroot "C:\Program Files\Apache Software Foundation\Tomcat 9.0\webapps" --store pfxfile --pfxfilepath "C:\Program Files\Apache Software Foundation\Tomcat 9.0\conf" --pfxpassword Test@1234 --accepttos --pfxfilename cert2024.appviewx.com --installation script --script "C:\Users\admin\Desktop\restart_tomcat_9.ps1" - Sample PowerShell Script to restart the Tomcat
service:
Restart-Service -Name 'Tomcat9'
- Perform challenge validation using Tomcat on port 80 to obtain the certificate.
- Export the PFX file with the required password and file path.Note: This file is referenced in Tomcat’s server.xml. This allows win-acme to automatically replace the certificate as needed.
- PowerShell (.ps1) script that restarts the Tomcat server is run after the certificate is issued, ensuring the new certificate is bound to the Tomcat instance.
Support for other .NET Versions
wacs.dep and
wacs.runtimeconfig need to be changed. These files are found in
the win-acme folder.Changes in the wacs.dep file
- Use CTRL+H to open the find and replace menu to replace
.NETCoreApp,Version=v5.0with".NETCoreApp,Version=v<version of .NET in the pc>" - Use the complete version number when replacing, such as 7.0.10For example:
".NETCoreApp,Version=v5.0"is replaced with".NETCoreApp,Version=v7.0.10"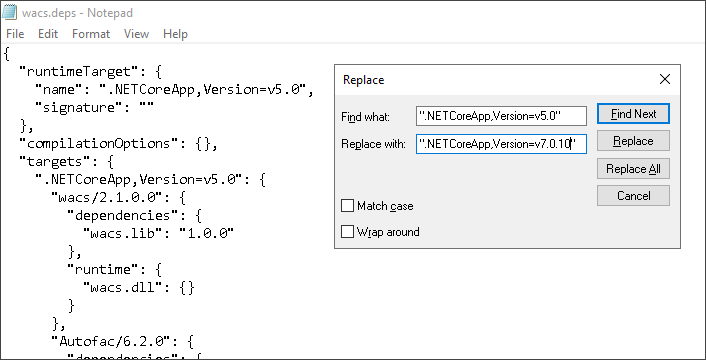
- Similarly replace (replace all)
"Microsoft.NETCore.Platforms": "5.0.0"with"Microsoft.NETCore.Platforms": "<version of .NET in the pc>".
Changes in the wacs.runtimeconfig file
- Replace (use replace all)
"tfm": "net5.0"with"tfm": "net<version of .NET in the pc>" - Replace
"version": "5.0.0"with"version": "<version of .NET in the pc>".
Best Practices
- Prefer Stronger Key Sizes: Use higher key sizes where applicable—consider using RSA 2048 or above for increased cryptographic strength.
- Distribute Renewal Schedules: Ensure that certificate renewal cron jobs or schedulers are spread out in time to avoid concentrated load on the ACME server and ensure smooth, uninterrupted renewals.
- Use External Account Binding (EAB): Use EAB as an added layer of authentication for enhanced security.
- Secure your API credentials: Store DNS provider API keys securely (e.g., environment variables, encrypted files).
- Challenge Methods: Prefer DNS-01 challenge when possible using supported DNS APIs. For HTTP-01, ensure port 80 is reachable and forwarded correctly if behind a NAT or firewall.
- Scripting & Hooks: Use pre- and post-renewal scripts to restart IIS or services and to copy certificates to remote locations or appliances.
- Storage: Use --store and --installation parameters wisely to define multiple cert storage and bindings (IIS, file, registry, etc.).
- Logging: Enable verbose logging and monitor the renewal logs at C:\ProgramData\win-acme\logs.
- Custom Package Verification: Make sure the AppViewX DNS plugin is available in Winacme package if the user is using the AppViewX DNS Challenge or the Enterprise Secure DNS Challenge option.
Troubleshooting
Accessing ACME Logs
- Access the terminal window.
-
Go to <Installed_Path>/logs directory and find
the name format with <avxgw-HTTPS-<yyyy-mm-
dd>.log>. For example,
<avxgw-HTTPS-2021-03-17.log>
- If the file size exceeds 100MB, it will be rolled over and the latest logs will be available in the latest file named with an incrementing counter starting from 1 such as avxgw-HTTPS-<yyyy-mm- dd>.<incrementing_counter>.log, for example, <avxgw-HTTPS- 2021-03-17.1.log>.
- ACME plugin logs:
</home/appviewx/appviewx/logs/avx-vendor-cert-acme-agent-<pod_name>.log>
Common Issues
- You may need to install Microsoft Visual C++ 2015 Redistributable Update 3
- If you run into an error about api-ms-win-crt-runtime-l1-1-0.dll, refer to KB2999226.
- If you run into an error about hostfxr.dll, refer to KB2533623.
- If you run into an error such as Failure processing application bundle, perhaps this thread might provide a solution.
- If the program does not seem to start but you see an error such as Microsoft.Windows.Apprep.ChxApp_cw5n1h2txyewy:App.AppXc99k5qnnsvxj5szemm7fp3g7y08we5vm.mca in the Event Viewer, this thread might provide a solution.
Troubleshooting Scenarios
| # | Error Message | Description | Troubleshooting |
|---|---|---|---|
| 1 | Unable to connect to ACME server System.Net.Http.HttpRequestException: An error occurred while sending the request. ---> System.Net.Http.WinHttpException (80072EE7, 12007): Error 12007 calling WINHTTP_CALLBACK_STATUS_REQUEST_ERROR, 'The server name or address could not be resolved'. | The default base uri name is not configured in the settings.json /the configured URL or the port is wrong. | Configure the correct URL in the default base uri section in settings.json file. |
| 2 | Initial connection failed |
|
|
| 3 | Failed to create order: Unable to fetch acme server url. - Agent Settings name given is invalid | The Agent name provided in the URL is incorrect / Agent setting is not configured in the ACME server side configuration. | Check the status of the ACME end point in
AppViewX GUI. It should be in Valid status. If it is in
failed status, check the reason for the same and fix it.
|
| 4 | Authorization Invalid (Challenge validation failed) | HTTP
DNS win-acme might not be able to access the DNS server to add the txt record. HTTP |
HTTP
DNS Check if the DNS server credentials provided in win-acme is a valid one. Check if the Windows machine has internet access to access the DNS server to add the TXT records. Check if AppViewX or CC has internet access to read the TXT records. |
| 5 | No sites with host bindings have been configured in IIS | IIS server in windows client is:
|
Check the following in the IIS server configuration:
|
| 6 | Requested account not available. | Account that client is trying to use for enrollment is not available on the server. | Go to C:\ProgramData\win-acme\ folder and then go inside the agent folder and delete the Registration_v2 file |
| 7 | Unable to perform ACME order finalize operation - Either CSR Parameters,CA details or certificate algorithm values are not compliant with the policy name - <Policy Name> | CSR parameters from the client are not matching with parameters configured in AppViewX policy. | Check if the policy is set as strict.
OR
|
| 8 | Unexpected order status processing (Exception): Unable to complete order |
Certificate issuance is still in progress or failed. |
Navigate to the holistic view of the certificate in AppViewX and check for the work order status:
|
| 9 | Self DNS Challenge token validation/IP Validation option is selected but EAB details/Allowed domains are not configured for the agent settings. | When AppViewX DNS Challenge or Enterprise Secure Challenge Validations is selected but Allowed Domains or EAB details are not provided from the ACME client, you get this error. |
|
| 10 | DNS Challenge validation failed. IP Options are not selected for agent settings. Allowed options are STRICT, ANY, NONE. | If Enterprise Secure Challenge type other than Secure, Any, Ignore is selected in the ACME Settings. | Select any one of the following under Enterprise Secure Challenge options: Secure, Any, Ignore. |
| 11 | DNS Challenge validation failed. ACME DNS challenge verification via DNS A record failed. For STRICT Option IP didn't Match. | If the Secure option is selected under Enterprise Secure Challenge type and the ACME client’s IP address does not match with the available DNS A record for the particular domain. | Make sure that the DNS A record of the requesting domain contains the same IP address as the ACME client's IP address. |
| 12 | DNS Challenge validation failed. ACME DNS challenge verification via DNS A record failed. For STRICT Option there are more IP address entries in DNS A Record. | If the Secure option is selected under Enterprise Secure Challenge type and the DNS A record for the requesting domain is fetched with more than one IP address. | Make sure that the DNS A record of the requesting domain contains only one IP address, which is the same as the ACME client's IP address. |
| 13 | DNS Challenge validation failed. No DNS A records are found to validate ANY type. | If the ANY option is selected under Enterprise Secure Challenge type and the DNS A records for the requesting domain are fetched in which none of the IP address matches with the ACME client’s IP address. | Make sure that the DNSA records of the requesting domain contains any one IP address, which is the same as the ACME client’s IP address. |
| 14 | DNS Challenge validation failed. DNS A record for the domain <domain name> is not available. | When AppViewX is not able to obtain the DNS A records for the requesting domain. |
|
| 15 | DNS Challenge validation failed. Error while executing Create/Delete record operation. |
|
|
| 16 | [ERR] (WinHttpException): Error 12002 calling WINHTTP_CALLBACK_STATUS_REQUEST_ERROR, 'The operation timed out'. | This issue occurs during the challenge validation process. When validation fails, it is often due to the firewall or Microsoft Defender blocking the AppViewX server or CC from accessing port 80 on the Windows machine. | Configure the firewall to allow AppViewX server/CC to access port 80 of the win-acme machine. |
Keywords Used in win-acme Commands
| Keyword | Expected Input | Comments |
|---|---|---|
| -host | <Domain_Name> (Type: String) domain1.com (or) domain1.com, domain2.com, domain3.com |
Comma-separated list of domains to obtain a certificate for. |
| -baseuri | <Acme Server Endpoint URL fetched from
AppViewX GUI> (Type: String) |
ACME Directory Resource URI. |
| -source | csr/iis/manual | Source using which the CSR is generated |