Configuring AppViewX Posh-ACME Client
Getting Started
Prerequisites
- The AppViewX server/cloud connector must be bound with a valid certificate. See Section, Binding Custom Certificate to Gateway in Cloud Connector.
- Root user permissions for setup process in Linux.
- Admin privileges are required during setup and runtime in Windows.
- A proper DNS entry for the services in the DNS server.
- A valid ACME endpoint must be configured on the AppViewX GUI.
- To enable client connections, it is essential to have port 31443 open for on-premise deployment and port 30020 (in cloud connector) open for SaaS deployment in AppViewX.
- If the DNS validation is for HTTP challenge, it is essential to have port 80 accessible on the client machine to allow AppViewX to establish a connection.
- If the DNS validation is for DNS challenge, then the DNS server must be up and running and the DNS credentials file should be correctly configured.
- Certificate attributes and custom attributes must be configured to capture the attributes in the AppViewX GUI (if required).
System Requirements
- Operating System: Windows Server 2019, Linux (Ubuntu 20, RHEL 8)
- For IIS Server Binding: Windows PowerShell 5.1 or later (Desktop edition) with .NET Framework 4.7.1 or later
Providing Sudo Permissions in Linux
- To provide access to port 80 for a non-root user:
- Ensure that you are currently located within the POSHACME_AVX directory.
- Run the following command to grant the
pwsh executable the capability to bind
to port 80 without requiring root privileges:
sudo setcap 'cap_net_bind_service=+ep' pwshThis step is essential to facilitate the http-01 challenge.
- To add custom CA certificates to TrustStore:
- Determine the appropriate trust store on your Linux system. Common locations for trust stores are /etc/ssl/certs/ca-certificates.crt and /etc/ssl/certs/ca-bundle.crt.
- Obtain the acmetrustchain.crt file provided by the administrator from the POSHACME_AVX directory and place it in the trust-store of the machine.
- Log in as the root user. Run:
sudo -i - Copy the entire contents of the acmetrustchain.crt
certificate chain file and append them to the end of
the trust store file using the
catcommand:cat acmetrustchain.crt >> /etc/ssl/certs/ca-bundle.crt - After execution, exit from the sudo user session.
Installing Posh-ACME
For Administrators
- Download the latest version of Posh-ACME client from the AppViewX release portal.
- Open your terminal/command prompt and navigate to the directory where the downloaded Posh-ACME ZIP file is present.
-
Unzip AppViewX_ACME_PoshACME_Client.zip to the
current directory using the command:
Linux
Windowsunzip AppViewX_ACME_PoshACME_Client.ziptar -xf AppViewX_ACME_PoshACME_Client.zip -
Go to the extracted folder named POSHACME_AVX
using the command:
cd POSHACME_AVX -
Obtain server trust chain certificates. If the server certificate is
created in AppViewX, download it from the AppViewX inventory, else
download the certificate chain files (.pem or .crt) for the Certificate
Authority (CA). This chain of files must include the root certificate as
well as any intermediate certificates of the server.
LinuxIf there are individual certificates for root CA and intermediate CAs, combine these certificate files into a single file. This can be done either through a text editor or by using the cat command:
cat intermediateca.crt rootca.crt > acmetrustchain.crtIn this case, acmetrustchain.crt represents the name of the server trust chain certificate file. Now place this server trust chain certificate within the POSHACME_AVX directory.
Windows
If there are individual certificates for root CA and intermediate CA, then place the root CA certificates and intermediate CA certificates in the POSHACME_AVX directory under the RootCA and IntermediateCA folders, respectively.
-
Navigate from POSHACME_AVX to its parent directory
using the command:
cd .. -
Create a new zip archive named
AppViewX_ACME_PoshACME_Client.zip for the
POSHACME_AVX directory with the command:
Linux
Windowszip -r AppViewX_ACME_PoshACME_Client.zip POSHACME_AVXtar -a -c -f AppViewX_ACME_PoshACME_Client.zip POSHACME_AVXThe resulting zipped folder can be shared among the users.
For Linux Users
- Download the latest version of Posh-ACME client received from the administrator.
- Open your terminal/command prompt and navigate into the directory where you downloaded the Posh-ACME ZIP file.
-
Unzip AppViewX_ACME_PoshACME_Client.zip using the
command:
unzip AppViewX_ACME_PoshACME_Client.zip -
Go to the extracted folder named POSHACME_AVX
using the command:
cd POSHACME_AVX -
Ensure the following permissions have been granted:
- Port 80 access to a non-root user for HTTP challenge.
- Presence of server trust chain certificates in the system truststore for SSL verification.
Note: For more details, see Section, Providing Sudo Permissions in Linux. -
Run:
./install.shRunning this command relocates the Powershell folder from the current directory to the current user’s local/share/ directory.
-
Before performing CLM Actions, run:
./pwshThis command initiates the PowerShell environment. Ensure that you are in the POSHACME_AVX directory.
For Windows Users
- Download the latest version of Posh-ACME client received from the administrator.
- Open your command prompt as an administrator and navigate to the directory where you downloaded the Posh-ACME ZIP file.
-
Unzip AppViewX_ACME_PoshACME_Client.zip using the
command:
tar -xf AppViewX_ACME_PoshACME_Client.zip -
Go to the extracted folder named POSHACME_AVX
using the command:
cd POSHACME_AVX -
Ensure to add custom CA certificates to the TrustStore.
In Windows, you can add the root CA and intermediate CA certificates located within the RootCA and Intermediate CA directories found in the POSHACME_AVX directory provided by the administrator to the Trusted Root Certification Authorities and Intermediate Certification Authorities stores, respectively.
Access to these stores can be achieved through the Manage Computer Certificates control panel.
-
Run:
install.batRunning this command relocates the Posh-ACME folder and Posh-ACME.Deploy folder from the current directory to the C:\Program Files\WindowsPowerShell\Modules\ directory.
- Before performing CLM Actions, initiate Windows PowerShell environment as an administrator. Ensure you are in the POSHACME_AVX directory.
Actions using Posh-ACME
Enrolling Certificates
Prerequisites
- Run the following command to import Posh-ACME:
Import-Module Posh-ACME -Force - Open PowerShell with admin privileges.
- Ensure that you are in the POSHACME_AVX directory before you run the http-01 and dns-01 based challenge validation commands (described below) to enroll a certificate.
http-01 Based Challenge Validation
New-PACertificate <Domain_Name> -AcceptTOS -Plugin WebSelfHost -Verbose -Force -retryCount <retryCount> -retryInterval <retryInterval> -location <ACME server endpoint URL> -attributes <Attributes> -attributesType <AttributesType> -AlwaysNewKeydns-01 Based Challenge Validation
Default DNS Challenge
The command for an dns-01 based challenge validation is:New-PACertificate <Domain_Name> -AcceptTOS -Contact <mail.id> -Plugin <Plugin_Name> -PluginArgs $pArgs -verbose -retryCount <retryCount> -retryInterval <retryInterval> -location <ACME server endpoint URL> -attributes <Attributes> -attributesType <AttributesType> -AlwaysNewKey -ForceA sample certificate enrollment for DNS validation using route53 is as shown. Similarly other DNS plugins can be used.

Purpose: This command stores AWS credentials under a named profile poshacme.
Parameters:
- -StoreAs 'poshacme': The name under which the AWS credentials are stored. This profile name is referenced later when configuring the Route 53 plugin.
- -AccessKey '***********': The AWS Access Key ID.
- -SecretKey '***********': The AWS Secret Access Key.

Purpose: This command sets up a hashtable $pArgs to store the Route 53 plugin arguments.
Key:
- R53ProfileName='poshacme': Specifies the AWS profile name (poshacme) to be used by the Route 53 plugin for authentication.

DNS Challenge
$pArgs==@{vendor='infoblox';vendorAccountName='infoblox'}
New-PACertificate <FQDN> -AcceptTOS -Contact <EMAIL> -Plugin Appviewx -PluginArgs $pArgs -retryInterval 30 -location <ACME_URL> -AlwaysNewKey -Force -verbose
where the vendor value must be the DNS vendor name such as infoblox, vendorAccountName value must be the same as that configured in the AppViewX Integration Hub DNS Vendor settings, the -Plugin value must always be Appviewx.
$pArgs=@{}
New-PACertificate <FQDN> -AcceptTOS -Contact <EMAIL> -Plugin Appviewx -PluginArgs $pArgs -retryInterval 30 -location <ACME_URL> -AlwaysNewKey -Force -verbose
where the pArgs will be empty as there is no DNS vendor involved, the Plugin value must always be Appviewx.
Parameter Description
| Parameter | Mandatory | Description |
|---|---|---|
| <ACME server endpoint URL> | Yes | Enter the appropriate ACME endpoint as configured in the AppViewX GUI. |
| <Domain_Name> | Yes | Enter a valid domain name for which the certificate
needs to be enrolled.
|
| -attributes <Attributes> and -attributesType <AttributesType> | No | Posh-ACME can be run with attributes. These
parameters allow you to provide multiple attributes.
These attributes can include multiple name-value pairs,
which are then included in the Finalize Order
call along with the CSR. The values for these fields are
provided as a JSON name/value pair, which can then be
retrieved and mapped to the attributes in the
application. This mapping enables you to include the
attribute information in the certificate request for
reporting purposes. For more information on the usage of attributes in Posh-ACME, see Defining Custom and Certificate Attributes. |
| -retryCount <retryCount> and -retryInterval <retryInterval> | No | These parameters allow you to customize polling
behavior by defining the number of retry attempts and
the wait time between each attempt respectively. For more information on polling in Posh-ACME, see Polling during Enrollment/Renewal. |
| -Plugin <Plugin_Name> | Yes (only for dns-01 Based Challenge Validation) | Replace <Plugin_Name> with the appropriate powershell compatible DNS Plugin Name to perform DNS Validation. For more information on DNS plugins, see PoshACME DNS Plugins. |
| -PluginArgs $pArgs | Yes (only for dns-01 Based Challenge Validation) | Enter the appropriate plugin arguments for the chosen DNS plugin. For more information on the usage of DNS plugin arguments, see PoshACME DNS Plugins. |
For more information on the keywords used in the Posh-ACME commands, see Keywords in Posh-ACME commands.
Binding Certificate to IIS Server in Windows
Get-PACertificate <Main_Domain_Name> | Set-IISCertificate -SiteName '<Site_Name>' -Verbose| Parameter | Mandatory | Description |
|---|---|---|
| <Main_Domain_Name> | Yes | Enter a valid main domain name of the certificate to be bound. |
| <Site_Name> | Yes | Enter a valid IIS site name as shown: 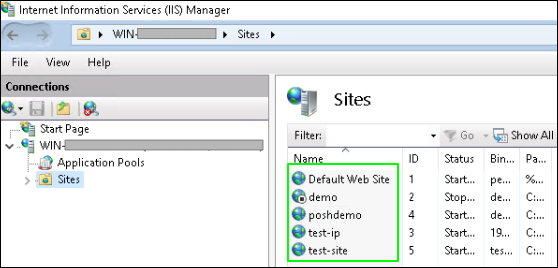 |

- If a binding with the same domain name already exists, it will
skip the binding process.

- If no such binding is found, it will proceed to bind the new
certificate.

For more information on the keywords used in the Posh-ACME commands, see Keywords in Posh-ACME commands.
Working Behavior of Enrollment
https://<server_hostname>:31443/avxapi/<acme_agent_x>/acme/directory.
Several scenarios can occur when enrolling a certificate for a domain name
using ACME Agent X's Endpoint URL as described:Scenario 1: No Previous Order Exists
- Successful enrollment: In the case of a successful enrollment, an order is created for that domain using Agent X's Endpoint URL and the certificate is successfully generated.
- Interrupted/Failed enrollment: If the enrollment process was interrupted or failed, an order may or may not be created for that domain using Agent X's Endpoint URL and the certificate is not generated.
Scenario 2: Previous Order Exists
- Successful enrollment: If enrollment is successful, the previous domain-associated order linked to the domain is used, even if it was set up with a different Agent’s Endpoint URL. Attempting to use Agent X’s Endpoint URL will not work. The older certificate cannot be used and is backed up as a .bak file, while a new certificate is generated.
- Interrupted/Failed enrollment: If the enrollment process was interrupted or was unsuccessful, the domain-associated older order persists. The older certificate cannot be used and is backed up as a .bak file, and no new certificate is generated.
- Delete the domain-associated older order and associated certificate-related files. This allows for a new certificate issuance process using ACME Agent X’s Endpoint URL.
- To delete the domain-associated older order, use the
following command in the PowerShell
environment:
Remove PA-Order -Name <Domain_Name>
Renewing Certificates
Renewing Certificates
- Open PowerShell with admin privilege.
- Ensure that you are in the POSHACME_AVX directory before you run any commands to renew certificates.
-
Run:
./renewal.ps1 -retryCount <retryCount> -retryInterval <retryInterval> -renewalDaysThreshold <renewalDaysThreshold> The above command implies that
certificates with a validity of less than 20 days are considered for
renewal.
The above command implies that
certificates with a validity of less than 20 days are considered for
renewal.Table 3. Parameters used in the renew command Parameter Mandatory Description -retryCount <retryCount> and -retryInterval <retryInterval> No These parameters enable users to customize polling behavior by defining the number of retry attempts and the wait time between each attempt respectively. For more information on polling in Posh-ACME, see Polling during Enrollment/Renewal.
<renewalDaysThreshold> No Specify the threshold number of days. The default value is set to 30. Note: When there is an incomplete renewal, the old certificate that is being renewed is deleted from the client’s machine.For more information on the keywords used in the Posh-ACME commands, see Keywords in Posh-ACME commands.
Scheduling Tasks for Automated Certificate Renewal
A single scheduled task runs every day at a specified time and checks the validity of all the certificates to determine if any of them should be renewed based on the threshold renewalDaysThreshold specified.
(crontab -l ; echo "MM HH * * * <path to renewal.sh file> -retryCount <retryCount> -retryInterval <retryInterval> -renewalDaysThreshold <renewalDaysThreshold> -poshACMEDirectoryPath <poshACMEDirectoryPath> >> <path_to_renewal_log_file> 2>&1") | crontab -| Commands | Description |
|---|---|
| MM HH | Specify time for renewal in HH (hours), MM (minutes). |
| <path to renewal.sh file> | Specify the path to the renewal.sh file which is present in the POSHACME_AVX directory. |
| <poshACMEDirectoryPath> | Specify the path to the POSHACME_AVX folder. |
| <path_to_renewal_log_file> | Specify the path to a text file where automated renewal activities are logged. This file can be used to track renewal processes. |
| <renewalDaysThreshold> | Specify the threshold days renewal. The default value is set to 30. |
| -retryCount <retryCount> and -retryInterval <retryInterval> | These parameters enable users to customize polling
behavior by defining the number of retry attempts and
the wait time between each attempt respectively. For more information on polling in Posh-ACME, see Polling during Enrollment/Renewal. |
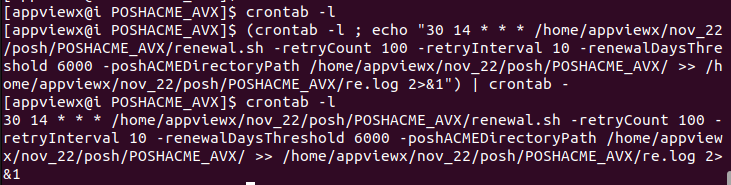 In the above example, the scheduled renewal
task is triggered at 02:30 pm daily. Certificates that have less than 6000
days of remaining validity will qualify for renewal.
In the above example, the scheduled renewal
task is triggered at 02:30 pm daily. Certificates that have less than 6000
days of remaining validity will qualify for renewal. | Command | Description |
|---|---|
| date | Cron jobs operate according to the server's predefined timezone, typically set to UTC by default. You can verify this timezone by running the date command in the terminal. Scheduled tasks will commence in accordance with the cron system's understanding of time and time zones. |
| crontab -e | If you need to modify the time for a cron job that you have previously set up, you can adjust it by editing the time in the crontab file. |
| crontab -l | Used to check the scheduled cron jobs. |
For more information on the keywords used in the Posh-ACME commands, see Keywords in Posh-ACME commands.
A single scheduled task runs every day at a specified time and checks the validity of all the certificates to determine if any of them should be renewed based on the threshold renewalDaysThreshold specified.
.\renewal_schedule_windows.ps1 -retryCount <retryCount> -retryInterval <retryInterval> -renewalDaysThreshold <renewalDaysThreshold> -time HH:MM| Commands | Description |
|---|---|
| HH:MM | Specify time for renewal in HH (hours), MM (minutes). |
| <renewalDaysThreshold> | Specify the threshold days renewal. The default value is set to 30. |
| -retryCount <retryCount> and -retryInterval <retryInterval> | These parameters enable users to customize polling
behavior by defining the number of retry attempts and
the wait time between each attempt respectively. For more information on polling in Posh-ACME, see Polling during Enrollment/Renewal. |
 As per the above command, the scheduled renewal
task is triggered at 02:30 pm on a daily basis. Certificates that have less
than 40 days of remaining validity are subject to renewal.
As per the above command, the scheduled renewal
task is triggered at 02:30 pm on a daily basis. Certificates that have less
than 40 days of remaining validity are subject to renewal.For more information on the keywords used in the Posh-ACME commands, see Keywords in Posh-ACME commands.
Working Behavior of Renewal
- Successful Renewal: When the renewal of a domain certificate is successfully completed, the older certificate cannot be used and is backed up as a .bak file and is then replaced with the newly generated certificate. This ensures that a copy of the older certificate is preserved while the updated certificate takes its place.
- Interrupted Renewal: If the renewal process is prematurely interrupted, the older certificates may not be successfully renewed. In such cases, the older certificates become unusable and they are deleted and backed up as a result of the interrupted renewal process.
Revoking Certificates
- Open PowerShell with admin privileges.
- Ensure that you are in the POSHACME_AVX directory before you run any commands to revoke certificates.
-
To revoke certificates:
- By specifying the main domain name of the certificate.
Revoke-PACertificate -Name <Main_Domain_Name>
- By specifying the certificate file path.
Revoke-PACertificate -certFile <certFilePath>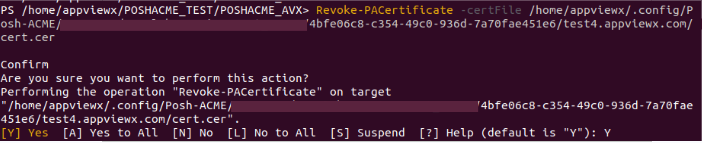
Tip: To skip the revocation confirmation prompt, use the flag -Force along with the command.Using the Revoke-PACertificate command does not automatically delete the order associated with the revoked certificate. Consequently, Posh-ACME makes renewal attempts for revoked certificates during the next scheduled renewal process. To avoid this, delete that specific domain-associated order manually.For more information on the keywords used in the Posh-ACME commands, see Keywords in Posh-ACME commands.
- By specifying the main domain name of the certificate.
Executing Certbot with Enhanced Data
Accessing Orders and Certificates
- To return details such as domains, key length, expiration, and status
for one or more ACME orders previously created, run:
Get-PAOrder -List
- To return details such as thumbprint, subject, validity, SANs, and file
locations for one or more ACME certificates previously created, run:
Get-PACertificate -List | Format-List - To return details such as Thumbprint, Subject, Validity, SANs, and file
locations for a specific certificate,
run:
Get-PACertificate <Main_Domain_Name> | Format-List - The common OS specific certificate directory paths are as follows:
- Linux: /home/<user>/.config/Posh-ACME/<server-name>/<account-id>/<order(Main_Domain_Name)>/
- Windows: C:\Users\<user>\AppData\Local\Posh-ACME\<server-name>\<account-id>\<order(Main_Domain_Name)>\
The files within this certificate directory must have the following contents:- cert.cer (Base64 encoded PEM certificate)
- cert.key (Base64 encoded PEM private key)
- cert.pfx (PKCS12 container with cert+key)
- chain.cer (Base64 encoded PEM with the issuing CA chain)
- chainX.cer (Base64 encoded PEM with alternate issuing CA chains)
- fullchain.cer (Base64 encoded PEM with cert+chain)
- fullchain.pfx (PKCS12 container with cert+key+chain)
Note: The password protecting the PFX files is poshacme.
Defining Custom and Certificate Attributes
attributes and attribute-type
-attributes @{'id'='1098';'environment'='development';'Director'='director_id'}The -attributesType <AttributesType> parameter must be accompanied with the -attributes <Attributes> parameter which takes in one of the following inputs cert/custom/both.
-attributesType customUsage of attributes with attributesType
- When attributesType is passed as cert, the attributes
from the attributes field are taken as certificate
attributes.
Sample certificate attributes input:
-attributes
                                        @{'Id'='1';'eai'='test';'inScope'='yes';'environment'='envi1'}
                                        -attributesType cert
The image shows the certificate attributes defined in the Posh-ACME command: The following image shows the certificate attributes and custom attributes sent as part of the request:
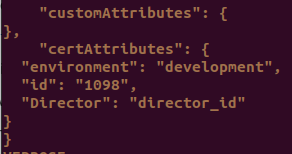
- When attributesType is passed as custom, the
attributes from the attributes field are taken as custom
attributes.
Sample custom attributes input:
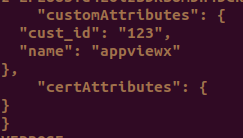
-attributes
                                        @{'cust_id'='123';'name'='appviewx'} -attributesType
                                        custom
The image shows the certificate attributes defined in the Posh-ACME command:
The following image shows the certificate attributes and custom attributes sent as part of the request:
- When attributesType is passed as both, a JSON mapping
is expected by the AppViewX Posh-ACME. A json file in the name
attributesMapping.json needs to be created
inside the POSHACME_AVX directory. There is a
template file named
attributesMappingTemplate.json present
within the POSHACME_AVX directory, which can
also be renamed to attributesMapping.json.A sample attributesMapping.json is as shown:
{ "senior_director" : "Sr Director", "intermediate_director" : "Intermediate Director" }- The key [in the key:value pair from attributesMapping.json] refers to the certificate attribute key provided in the command, while the value corresponds to the custom attribute key where the value of the certificate attribute must be passed.
- The attributes passed as input are sent as certificate attributes and for the attributes present in the attributesMapping.json, the mapped value is being used as attribute name and sent as custom attribute.
Sample certificate attributes input:
-attributes
                                        @{'cust_id'='123';'name'='appviewx';'senior_director':'srDirector_id_1','intermediate_director':'IntDirector_2'}
                                        -attributesType both
The image shows the attributes defined in the Posh-ACME command: The following image shows the certificate attributes and custom attributes sent as part of the request:
- The use of -attributes <Attributes> -attributesType <AttributesType> is optional.
- Omitting this parameter will not disrupt the current flow of certificate creation. You may proceed with the certificate generation process without any issues.
- The values provided in the attributes field and attributesType field while enrolling are stored in a folder named attributes inside the POSHACME_AVX directory under the name of the certificate’s domain.
- These values are fetched and used when the certificate of that domain name is being renewed.
Polling during Enrollment/Renewal
| Parameters | Type | Mandatory | Description |
|---|---|---|---|
| -retryInterval | Integer | No | The waiting period (in seconds) after which the next call
in the polling is triggered. [Default value : 2] |
| -retryCount | Integer | No | The number of times the certificate is polled from the
client side. [Default value : 30] |
A sample usage of the above parameters: -retryCount 8
-retryInterval 5
In this example, the -retryInterval is set to 5 seconds, and the -retryCount is set to 8. Hence, the certificate will be polled 8 times (retryCount) with a 5 second interval (retryInterval) for each polling attempt. The polling process will take a total of 8 * 5 = 40 seconds to complete.
- The use of -retryCount <retryCount> and -retryInterval <retryInterval> is optional and is required only when the Certificate Requests Need Approval attribute is enabled in the CA policy settings of the ACME Server.
- Omitting these parameters will not disrupt the current flow of certificate creation.
- If necessary, the default values for polling are used. You may proceed with the certificate generation process without any issues.
Providing CSR and EAB Fields
- Subject fields:
- Organization
- Organization unit
- Country
- State
- Locality
- Hashing algorithm (when using RSA)
- Key-Size
- EAB hmac
- EAB kid
- EAB Algorithm
{
"csr_params": {
        "organization" : "cert_appviewx",
        "organization_unit" : "crypto_avx",
        "country" : "IN",
        "state" : "Andhra Pradesh",
        "locality" : "Rajahmundry",
        "hashing_algorithm":"SHA384",
        "key_size":"2048"
        },
"eab": {
        "kid":"",
        "mac":"",
        "alg":"hs256"
}
}- When EAB is not configured on the server side, the fields for kid, mac, and alg can be configured to empty strings ("").
- If you intend using the default configuration of Posh-ACME, you may set the fields in the certConfig.json file to empty strings ("").
For more information on the keywords used in the Posh-ACME commands, see Keywords in Posh-ACME commands.
Best Practices
- Prefer Stronger Key Sizes: Use higher key sizes where applicable—consider using RSA 2048 or above for increased cryptographic strength.
- Distribute Renewal Schedules: Ensure that certificate renewal cron jobs or schedulers are spread out in time to avoid concentrated load on the ACME server and ensure smooth, uninterrupted renewals.
- Use External Account Binding (EAB): Use EAB as an added layer of authentication for enhanced security.
- Secure your API credentials: Store DNS provider API keys securely (e.g., environment variables, encrypted files).
- Challenge methods: Customize plugins with fallback and retries if DNS propagation is slow.
- Automation: Use scheduled tasks or pipelines (like Jenkins/GitHub Actions) to automate renewals. Use Renew-PAOrder in a loop or job script.
- Deployment: Use Export-PACertificate with -OutPath or -PfxPass for downstream systems.
- Automate deployment to:
- IIS: Import-PfxCertificate, New-WebBinding
- Remote systems: use PowerShell Remoting, WinRM, or secure file copy.
- Secure Storage: Avoid storing API keys in plain text. Use PowerShell's ConvertTo-SecureString and Export-Clixml.
- Custom Package Verification: Make sure the AppViewX DNS plugin is available in Posh-ACME package if the user is using the AppViewX DNS Challenge or the Enterprise Secure DNS Challenge option.
Troubleshooting
Accessing ACME Logs
- Access the terminal window.
-
Go to <Installed_Path>/logs directory and find
the name format with <avxgw-HTTPS-<yyyy-mm-
dd>.log>, for example,
<avxgw-HTTPS-2021-03-17.log>
- If the file size exceeds 100MB, it will be rolled over and the latest logs will be available in the latest file named with an incrementing counter starting from 1 such as avxgw-HTTPS-<yyyy-mm- dd>.<incrementing_counter>.log, for example, <avxgw-HTTPS- 2021-03-17.1.log>.
- ACME plugin logs:
</home/appviewx/appviewx/logs/avx-vendor-cert-acme-agent-<pod_name>.log>
General Errors
| 1. Invalid End-point URL | |
| Description | When an invalid ACME endpoint URL is provided in Posh-ACME, it will result in the following error. |
| Error | Set-PAServer: Name or service not
known |
| Troubleshooting | Ensure that the provided URL is valid and set up through the AppViewX GUI. |
| 2. CA Certificate not configured in the client’s trust store | |
| Description | When the CA certificate of the ACME server is not configured in the client’s trust store, the following error is expected. |
| Error | Set-PAServer: The remote certificate is invalid
because of errors in the certificate chain:
PartialChainor
|
| Troubleshooting | See Point 2 (To add custom CA certificates to TrustStore) in the Section, Providing Sudo Permissions in Linux. |
| 3. Invalid Acme Agent | |
| Description | When the specified ACME agent name in the endpoint URL does not match any configured agent in the AppViewX GUI, it will trigger the following error. |
| Error | Set-PAServer: {"detail":"Unable to fetch acme
server url. - Agent Settings name given is
invalid","type":"urn:ietf:params:acme:error:serverInternal"} |
| Troubleshooting | Ensure that the provided URL is valid and set up through the AppViewX GUI. |
| 4. Invalid Port in the End-point URL | |
| Description | This error is expected when invalid port details are provided in the acme end-point URL. |
| Error |
|
| Troubleshooting | Ensure that the port specified in the URL is valid. |
| 5. Port 80 permission is missing for PowerShell | |
| Description | When PowerShell pwsh executable lacks the capability to bind to port 80 without requiring root privileges, it will result in the following error. |
| Error | MethodInvocationException: Exception calling
"Start" with "0" argument(s): "Permission
denied"or
|
| Troubleshooting | See Point 1 (To provide access to port 80 for a non-root user) in the Section, Providing Sudo Permissions in Linux. |
| 6. Invalid Domain Name | |
| Description | When an enrollment call is made for an invalid domain name, the certificate issuance process will not proceed. |
| Error |
|
| Troubleshooting | In order for the domain to be considered valid and for the certificate issuance to succeed, a proper DNS entry must be made for the server corresponding to the domain before attempting to enroll a certificate for it. |
| 7. Incorrect usage of attributes and attributesType fields | |
| Description | When only one field - either the ‘attributes’ or ‘attributesType’ is provided in the arguments of the enrollment command, it results in the following error. |
| Error |
|
| Troubleshooting | The attributesType field must be accompanied with the attributes field. See Accessing Orders and Certificates section for more information. |
| 8. Incorrect attributeType | |
| Description | An incorrect value is provided for the -attributesType field. |
| Error | Submit-OrderFinalize: Attribute type must be one
of the following values :
cert/custom/both) |
| Troubleshooting | The attributesType field must be one of the following values : cert/custom/both). See the Accessing Orders and Certificates section for more information. |
| 9. Incorrect IIS Site Name | |
| Description | An incorrect IIS site name is used for the field -SiteName. |
| Error | Set-IISCertificate : Site <Site_Name> not
found. |
| Troubleshooting | The ‘SiteName’ field must be valid (present in the Sites of IIS Manager of the machine). |
| 10. Missing EAB Credentials | |
| Description | EAB Credentials (‘eab:hmac’ and ‘eab:key’ fields) are set to empty string (“”) in the ‘certConfig.json’ file, while the end-point server requires external account credentials. |
| Error | New-PACertificate : The current ACME server
requires external account credentials to create a new
ACME account. Please run New-PAAccount with the
ExtAcctKID and ExtAcctHMACKey |
| Troubleshooting | Provide valid EAB credentials for the ‘eab:hmac’ and ‘eab:key’ fields in the ‘certConfig.json’ file. |
| 11. Invalid EAB Kid | |
| Description | Incorrect EAB kid is provided in the ‘certConfig.json’ file. |
| Error | New-PACertificate: The
"externalAccountBinding.protected" field is invalid.::
kid is invalid |
| Troubleshooting | Provide a valid EAB kid which is configured in AppViewX ACME configuration settings. |
| 12. Invalid EAB Algorithm | |
| Description | Incorrect EAB Algorithm is provided in the ‘certConfig.json’ file. |
| Error | New-PACertificate : Some of the errors was found
in request. |
| Troubleshooting | Provide a valid EAB Algorithm which is configured in AppViewX ACME configuration settings. |
| 13. Invalid Key Length | |
| Description | Incorrect key length is provided in the ‘certConfig.json’ file. |
| Error | New-PACertificate : Cannot validate argument on
parameter 'CertKeyLength'. Must be
'ec-256','ec-384','ec-521' for EC keys or between
2048-4096 (divisible by 128) for RSA
keys |
| Troubleshooting | Provide valid key length value. Must be 'ec-256','ec-384','ec-521' for EC keys or between 2048-4096 (divisible by 128) for RSA keys. |
| # | Error Message | Description | Troubleshooting |
|---|---|---|---|
| 1 | Self DNS Challenge token validation/IP Validation option is selected but EAB details/Allowed domains are not configured for the agent settings. | When AppViewX DNS Challenge or Enterprise Secure Challenge Validations is selected but Allowed Domains or EAB details are not provided from the ACME client, you get this error. |
|
| 2 | DNS Challenge validation failed. IP Options are not selected for agent settings. Allowed options are STRICT, ANY, NONE. | If Enterprise Secure Challenge type other than Secure, Any, Ignore is selected in the ACME Settings. | Select any one of the following under Enterprise Secure Challenge options: Secure, Any, Ignore. |
| 3 | DNS Challenge validation failed. ACME DNS challenge verification via DNS A record failed. For STRICT Option IP didn't Match. | If the Secure option is selected under Enterprise Secure Challenge type and the ACME client’s IP address does not match with the available DNS A record for the particular domain. | Make sure that the DNS A record of the requesting domain contains the same IP address as the ACME client's IP address. |
| 4 | DNS Challenge validation failed. ACME DNS challenge verification via DNS A record failed. For STRICT Option there are more IP address entries in DNS A Record. | If the Secure option is selected under Enterprise Secure Challenge type and the DNS A record for the requesting domain is fetched with more than one IP address. | Make sure that the DNS A record of the requesting domain contains only one IP address, which is the same as the ACME client's IP address. |
| 5 | DNS Challenge validation failed. No DNS A records are found to validate ANY type. | If the ANYoption is selected under Enterprise Secure Challenge type and the DNS A records for the requesting domain are fetched in which none of the IP address matches with the ACME client’s IP address. | Make sure that the DNSA records of the requesting domain contains any one IP address, which is the same as the ACME client’s IP address. |
| 6 | DNS Challenge validation failed. DNS A record for the domain <domain name> is not available. | When AppViewX is not able to obtain the DNS A records for the requesting domain. |
|
| 7 | DNS Challenge validation failed. Error while executing Create/Delete record operation. |
|
|
Keywords in Posh-ACME commands
| Keyword | Expected Input | Comments |
|---|---|---|
| -domain | <Domain_Name> (Type: String) domain1.com (or) domain1.com, domain2.com, domain3.com |
Comma-separated list of domains to obtain a certificate for. |
| -server | <Acme Server Endpoint URL fetched from
AppViewX GUI> (Type: String) |
ACME Directory Resource URI. |
| -attributes | [format: @{'id'='1098';'environment'=
'development';'Director'=' director_id'}] |
The -attributes field allows users to provide
multiple attributes in the format of
'attribute_name'='attribute_value' and separate each
attribute with a semicolon in the Posh-ACME command. [optional, but -attributes field must be accompanied with the -attributesType field] |
| -attributesType | Any one of the following : cert/custom/both
(Type: String) |
Takes in one of the following inputs
cert/custom/both. [optional, but must be included when -attributes is passed] |
| -retryInterval | <retryInterval> (Type: Integer) |
The waiting period in seconds, after which the
next call in the polling is triggered. [Default value : 2] (Optional) |
| -retryCount | <retryCount> (Type: Integer) |
The number of times for which the certificate is
polled from the client side. [Default value : 30] (Optional) |
| -renewalDaysThreshold | <renewalDaysThreshold> (Integer) | Threshold value for renewal. Certificates with a
remaining validity period (measured in days) less than the
specified threshold will only be considered for renewal. [Default value: 30] (Optional) |
| -poshACMEDirectoryPath | <poshACMEDirectoryPath> | Path to the POSHACME_AVX folder. |
| -Name | <Main_Domain_Name> (Type: String) |
The main domain name of the certificate. It is the same as the order name. |
| -SiteName | <Site_Name> (Type: String) |
Name of the site in IIS. |
| -certFile | <certFile> (Type: String) |
Path to the certificate to be revoked. |
Keywords in Posh-ACME certConfig.json
| Json keys | Type | Comments |
|---|---|---|
| csr_params:organization csr_params:organization_unit csr_params:country csr_params:state csr_params:Locality |
String | Choose the appropriate subject fields for the
CSR. (Optional) |
| csr_params:hashing_algorithm | String | Hashing algorithm for signing (RSA). Specify any one algorithm from {SHA256, SHA384, SHA512}. [Default value: SHA384] (Optional) |
| csr_params:key_size | String | The type and size of private key to use for the
certificate. For RSA keys, specify a number between 2048-4096
(divisible by 128). For ECC keys, specify either
'ec-256'\'ec-384'\'ec-521'. [Default value: 2048] (Optional) Whenever ECC keys are used, the hashing algorithm is set internally and cannot be changed from configuration file. |
| eab:kid | String | The value of Key Identifier for External Account
Binding. (Optional) |
| eab:hmac | String | The value of HMAC key for External Account
Binding. (Optional) |
| eab:alg | String | Signature Algorithm for External Account
Binding. Specify any one algorithm from {HS256, HS384, HS521}. [Default value: HS256] (Optional) |