CSC Global CA
Prerequisites
- CA Base URL (the value is available in the UI field of the CA setting page)
- API Key
- Token
Please contact the CSC Global team for retrieving the above listed prerequisite values.
- Internet access or a proxy configuration for the AppViewX server. Refer to the Managing Proxy Settings documentation in the Platform guides.
Configuring CSC Global CA
-
Go to
 (Menu) > CERT+ >
ADMINISTRATION > Certificate
Authority.
(Menu) > CERT+ >
ADMINISTRATION > Certificate
Authority.
-
From the displayed CA, Select CSC.
The CSC home page is displayed.
-
Click the Configure Now button or
+Add icon from the middle or top-right of the
page respectively.
The CSC Global CA configuration page is displayed.
-
Update the following details in the General
Information section as described in the table:
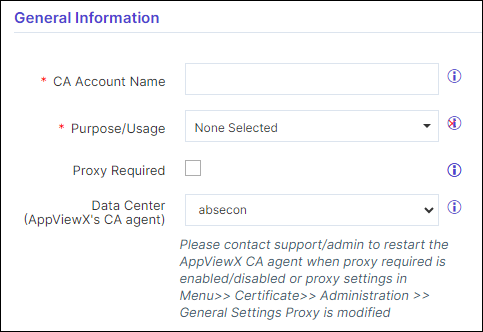
Table 1. General Information - Field Description Table Fields Description *CA Account name Enter a unique name in the text field to identify the CA account and be represented during certificate enrollment and policy creation. No special characters other than ‘.’, ‘-’,’_’ are allowed. Names should not start with special characters. *Purpose/Usage Select the purpose of the certificate from the dropdown list for which CLM actions will be enabled. Example: Server, Client
Proxy Required Enable this field if the CA communication needs to happen via Proxy. The proxy details configured in general settings will be used for communication. Data Center (AppViewX's CA agent) Select the data center through which the CA communication needs to happen. *: Mandatory fields -
Update the following details in the CA Configuration
section as described in the table. These fields are necessary for invoking
the CSC Global CA APIs for Certificate Management:
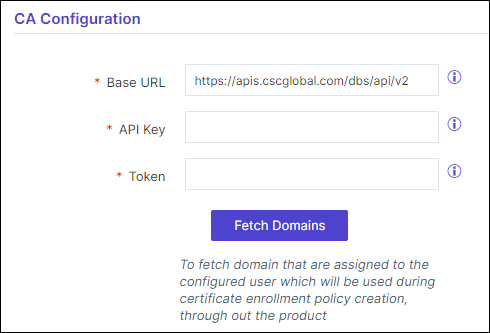
Table 2. CA Configuration - Field Description Table Fields Description *CA Base URL Enter the base URL that will be used to construct the API request. The value is https://apis.cscglobal.com/dbs/api/v2 *API Key Enter the API key which is a unique identifier used to authenticate the user. The value entered will be masked and encrypted. Token Enter the API token which is used to authenticate users or applications and provide access to protected resources. The value entered will be masked and encrypted. *: Mandatory fields -
Click Fetch Domain.
If the data provided is accurate the success message “Domains fetched successfully“ will be displayed and a table is displayed with two columns - Account Number and Domain Name. A list of active domains in AppViewX are listed in the table. Each account can hold multiple domains.
-
Update the following details in the Advanced
Settings section as described in the table.
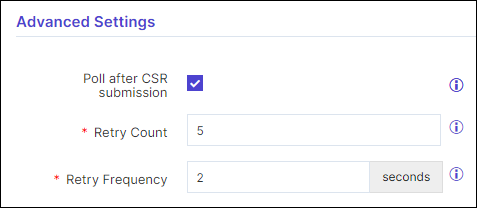
Table 3. Advanced Settings - Field Description Table Fields Description *Poll after CSR submission Selecting the checkbox enables polling after CSR submission. It fetches the certificates immediately after CSR submission on enrollment, renew, and reissue with the retry count and retry frequency specified in the fields below. *Retry Count Enter a value between 1 - 10. *Retry Frequency Enter a value between 1 - 30 seconds. *: Mandatory fields -
Click Save.
- The CA details are saved in the CA instance inventory and the
connection status is initially set to In Progress. Twice
after this, this status is automatically checked and refreshed every
5 seconds. Once the CA instance is successfully configured, the
status is updated to Success. Status checks after the first
two times have to be done via a manual refresh. Note: In case the connection fails, you can manually verify the connection status by clicking the Check button in the Connection Status field.
- The Fetch Custom Fields button is
enabled.Note: In case Fetch Domains and Fetch Custom Fields are not triggered before saving CA settings, this action can explicitly perform both these actions and update the CA.
- The CA details are saved in the CA instance inventory and the
connection status is initially set to In Progress. Twice
after this, this status is automatically checked and refreshed every
5 seconds. Once the CA instance is successfully configured, the
status is updated to Success. Status checks after the first
two times have to be done via a manual refresh.
-
To get the list of custom fields configured (if any), click
Fetch Custom Fields.
If the custom fields are configured they will be displayed in a table with two columns - Name and Mandatory/Optional.
- Enter the values for the custom fields.
- Click Save.The details are saved.Note: These custom fields attributes are displayed in the certificate enrollment form at the time of enrollment.
Validating CSC Global
- On the CSC CA page, the above configured CA will be displayed with a Check button in the last column of the table.
-
Click Check to validate the CA setting that is
created.
The CA communication will be validated and the Connection Status will be shown as either Success or Failure.