Sectigo CA
Prerequisites
- Base URL and login URI
- Username and password for the following roles:
- Master Registration Authority Officer
- Registration Authority Officer
- Organization ID
For links to detailed instructions to get the above information from Sectigo, see the References section.
- Internet access or a proxy configuration for the AppViewX server. Refer the Managing Proxy Settings documentation in the Platform guides.
Configuring Sectigo CA
-
Go to
 (Menu) > CERT+ >
ADMINISTRATION > Certificate
Authority.
(Menu) > CERT+ >
ADMINISTRATION > Certificate
Authority.
-
From the list of CAs displayed on the left, select
Sectigo.
The Sectigo CA account inventory is displayed.
-
If it is your first DigiCert CA integration in AppViewX, click
Configure Now.
The Configure Now button is displayed only if this is the first integration instance.
For the subsequent integrations, from the top-right corner of the page, click Add.
The Sectigo configuration page is displayed. -
Enter/Select the General Information details for the
Sectigo CA configuration.
Table 1. General Information - Field Description Table Fields Description *CA Account name Enter a unique name for the Certificate Account (CA) account, which will be displayed during certificate enrollment and policy creation. Constraints:- Valid special characters: ., -, and _
- CA account name should not begin with a special character and/or a space.
*Purpose/Usage From the dropdown list, select the certificate type(s) for which CLM actions will be enabled. Possible values: Server, Client
Proxy Required For CA communication to happen via a proxy, select this checkbox. Proxy settings configured in the Platform module will be used for communication. To read more on how proxy settings are configured and managed, click here.
Data Center (AppViewX's CA agent) From the dropdown list, select the data center through which the CA communication must happen. *: Mandatory fields -
To invoke the Sectigo CA APIs for certificate management, enter/select the
CA Configuration details.
Table 2. CA Configuration - Field Description Table Fields Description *Base URL Enter the base URL for constructing the API requests. The URL will contain the hostname of the Sectigo CA instance.
*Login URI Enter the login URI for your Sectigo CA account for API authentication. *Authentication Method To connect to the certificate authority, select an authentication method from the following options: - Password: A text-based credential will be used to verify identity and authenticate the connection to the CA.
- Client Certificate: A digital certificate issued to the user is used to authenticate identity securely by validating the certificate.
*User Name Enter the Sectigo portal username to communicate with the CA. *Password Note: This field is displayed when Authentication Method = Password.Enter Sectigo portal password to communicate with the CA.*Client Certificate Note: This field is displayed when Authentication Method = Client Certificate.Upload the client authentication .pfx file to communicate with the CA.To do this:- Click Upload and navigate to the location of the certificate file.
- Select the required certificate file.
The Authentication Details dialog box is displayed.
- In the Enter Password field, enter the selected certificate file's password and clickOK.
Note: Ensure that the end entity has access to enroll a certificate with the required CA.*Organization ID Enter the organization ID used for the certificate lifecycle action. (You will find it in the Organization tab of the Sectigo portal.) *: Mandatory fields -
To fetch the certificate types assigned for you, click Fetch
Certificate Types.
AppViewX connects to Sectigo using the authentication method selected and fetches the certificate types based on the Purpoe/Usage selected. These certificate types will the be used throughout the product for certificate enrollment and policy creation.
-
Enter/Select the Advanced Settings for polling Sectigo after the CSR
request is submitted.
These settings ensure that AppViewX is efficiently and regularly checking for certificate issuance status (after CSR submission for enrollment/renewal/reissue requests) without sending excessive API requests to the CA.
Table 3. Advanced Settings - Field Description Table Fields Description Poll after CSR Submission To enable AppViewX to automatically poll Sectigo after CSR submission, select this checkbox. *Retry Count This field is displayed only when Poll after CSR submission is selected. Enter the number of times AppViewX will retry polling Sectigo before it stops.
For example, if Retry Count = 5, AppViewX will poll Sectigo 5 times before it stops.
Possible values: Between 1 and 10
*Retry Frequency This field is displayed only when Poll after CSR submission is selected. Enter the interval (in seconds) between attempts.
For example, if Retry Frequency = 10, AppViewX will wait for 10 seconds between each polling attempt.
Possible values: Between 1 and 30 seconds
*: Mandatory fields -
Click Fetch Custom Attributes.
Custom attributes defined for the CA account will be fetched from the CA along with the CA and profile names. On successful retrieval, the message CA and profiles fetched is displayed.
-
Click Save.
In the CA instance inventory, the connection status is initially set to In Progress. Twice after this, this status is automatically checked and refreshed every 5 seconds. Once the CA instance is successfully configured, the status is updated to Success. Status checks after the first two times have to be done via a manual refresh.Note: In case the connection fails, you can manually verify the connection status by clicking the Check button in the Connection Status field.
Manually Validating the Sectigo CA Connection Status
-
Go to
(Menu) > CERT+ >
ADMINISTRATION > Certificate
Authority.
- From the displayed CA, select Sectigo.
-
In the Status column of the grid with the listed accounts, click
Check to validate the CA setting that has been
created.
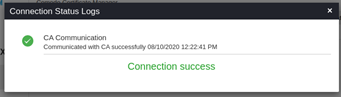
The CA communication will be validated and the Connection Status will be shown as either Success or Failure.
References
Download the Sectigo Certificate Manager Quick Start Guide.
- For the base URL and login URI, refer the section on Logging in to SCM.
- To create an oragnization, refer the section on Adding organizations
and departments. Once you've created an organization, Sectigo
will assign you an organization ID.
To review the organization details in the SCM, navigate to Organizations, select the organization in the list, and click Edit. This displays the Edit Organization dialog box.
- To create administrator roles, such as MRAO and RAO, refer the section
on Adding Administrators.Ensure that these roles have the following privileges:To review the administrator details in the SCM, navigate to Settings > Admins, select the administrator in the list, and click Edit. This displays the Edit Client Admin dialog, Add/Edit the necessary privileges and click Save.
Privileges Allow SSL details changing Enables the new MRAO, RAO SSL, and DRAO SSL to change the details of SSL certificates by navigating to Certificates > SSL Certificates. Allow SSL auto approve SSL certificates requested by the MRAO are automatically approved, and those requested by a RAO SSL and DRAO SSL are automatically approved by the administrator of same level and await approval from higher level administrator.