Thales TCT
Prerequisites
- Ensure the HSM service/pod is up and running before integrating HSM with
AppViewX.
- If on-prem, use avx_platform_hsm as plugin.
- If SaaS, use avx_platform_hsm & all Cloud Connector instances for HSM DC.
- Communication to the HSM and AppViewX nodes in the case of
 and the cloud connector in the case
of
and the cloud connector in the case
of  should be available to integrate
with AppViewX. The port details are as follows:
should be available to integrate
with AppViewX. The port details are as follows:- Port 1792: This port is used for the Secure Trusted Device Communication (STDC) protocol.
- Port 9002: This port is typically used for data encryption/decryption and key management services.
- Users need to provide both the client and Thales server certificates for agent installation. The installation of the agent and verification of the connection should be carried out by the customer with the assistance of HSM vendors.
- Add server and client certificates to establish a connection between AppViewX and HSM.
- From the AppViewX perspective, AppViewX has prepared a sample agent installation guide for Thales. Please refer to it for guidance.
Sample agent installation
To establish communication between the HSM and AppViewX, the installation of the Thales Luna agent is required. The following steps outline the process followed in our lab setup using LunaClient-7.12.0-18.zip.
- Copy the LunaClient.zip file to the appviewx server and unzip it.
- Go to LunaClient location
cd /LunaClient-7.12.0-18/linux/64 - Execute the chmod command as shown
below:
sudo chmod 755 install.shsudo chmod 755 common - Run the install.sh file using the command given
below:
sudo ./install.sh - User will be prompted with the following:
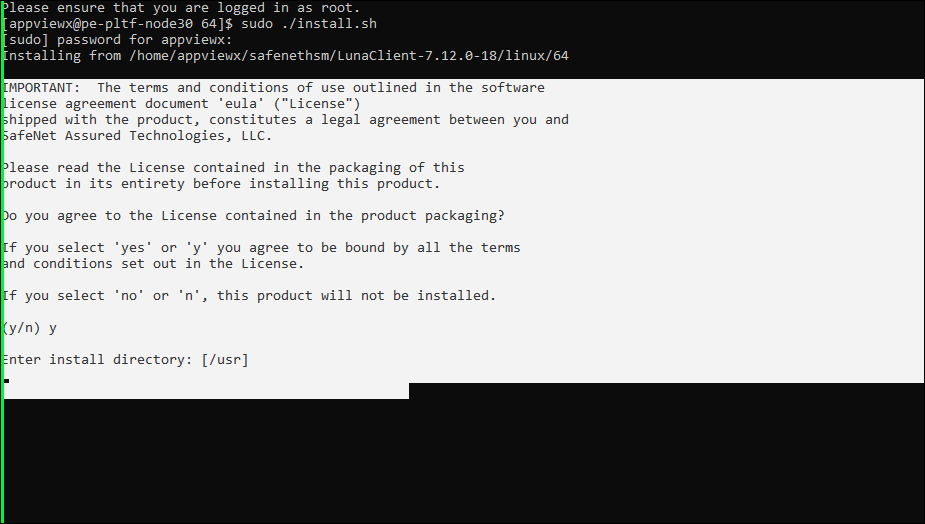 Select Y in the prompt
Enter the install directory as - "/usr"
- When prompted to choose the Luna components to be installed, choose the
following packages:
- Luna Software Development Kit (SDK)
- Luna JSP (Java)
- Luna JCProv (Java)
- Crypto Command Center Provisioning Client (Not applicable for Luna client v7.2)
To select a Luna component, Enter the number marked against it and press Enter. To select multiple Luna components, repeat the above step. Once the required components are selected, enter (I/i) and press enter to initiate the installation process.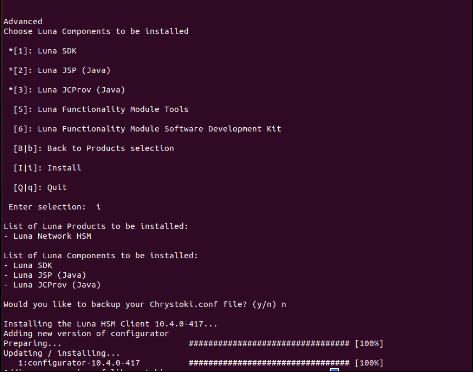 Once the Luna client is installed successfully, you will get the following message in the terminal:
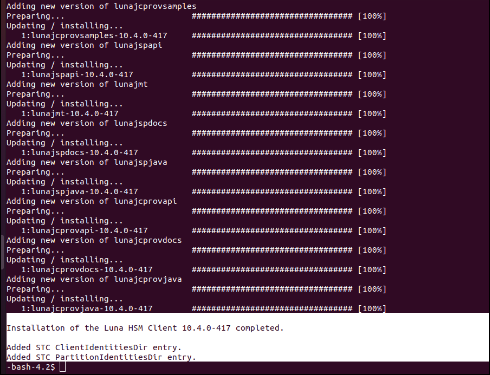
Installation of the Luna HSM Client 7.12.0-18 completed message should be displayed.
- Note: Customer will have to generate the server certificate and the client certificate. Please check with the HSM vendor for support.Copy server.pem file and place it in the bin directory of the luna client installed path.
sudo cp server.pem /usr/safenet/lunaclient/bin - Register the HSM server certificate with the client using the following
command:
sudo /usr/safenet/lunaclient/bin/vtl addServer -n <safenet hsm ip> -c server.pem - Copy the client certificate created to the path.
sudo cp <Generated certname>Key.pem <Generated certname>.pem /usr/safenet/lunaclient/cert/client/
HSM Integration with AppViewX - Manual
To establish communication between the HSM and AppViewX, it is necessary to follow the installation steps provided below.
Installation for Onprem
- After successful installation, copy the Chrystoki.conf to the below
directory from /etc folder
On-prem : "cp /etc/Chrystoki.conf {APPVIEWX_INSTALLATION_PATH}/hsm/"Update the permissions for the Chrystoki.conf file using the command given below:chown appviewx:appviewx Chrystoki.confchmown 755 Chrystoki.conf - Edit Chrystoki.conf file and replace all custom to mount path. Note: You have to change in all the places wherever we see local path to mount path.
- Change local path to mount path
toLibUNIX =/home/appviewx/hsm/safenet/lunaclient/lib/libCryptoki2.so;LibUNIX = /appviewx/dependencies/hsm/safenet/lunaclient/lib/libCryptoki2.so;- Verify the certificate names in the Chrystoki.conf file to the ones that were copied manually.
- Update if the names are incorrect and replace them with mount path in all places.
- Save the Chrystoki.conf file.
- Copy the safenet folder from /usr to the below directory as
follows:
sudo cp safenet -R {APPVIEWX_INSTALLATION_PATH}/hsm - Navigate to {APPVIEWX_INSTALLATION_PATH}/hsm/ and execute the command
below.
chown -R appviewx:appviewx safenet - Validate the availability of the .so files (libCryptoki2_64.so) in the specified path <APPVIEWX_INSTALLATION_PATH>/appviewx/hsm/safenet/lunaclient/lib/
- Navigate to
<APPVIEWX_INSTALLATION_PATH>/appviewx/hsm/safenet/lunaclient/bin
and execute the command
below.
sudo ./vtl verifyThe vtl verify should be successfully executed.
Installation for SaaS
- After successful installation, copy the Chrystoki.conf to the below
directory from /etc folder
cp /etc/Chrystoki.conf {CC Installed Path}/deps/external_libs/hsmUpdate the permissions for the Chrystoki.conf file using the command given below:chown appviewx:appviewx Chrystoki.confchmown 755 Chrystoki.conf - Edit Chrystoki.conf file and replace all custom to mount path. Note: You have to change in all the places wherever we see local path to mount path.
- Change local path to mount path
toLibUNIX =/home/appviewx/cc/deps/external_libs/hsm/safenet/lunaclient/lib/libCryptoki2.so;LibUNIX = /appviewx/dependencies/external_libs/hsm/safenet/lunaclient/lib/libCryptoki2.so;- Verify the certificate names in the Chrystoki.conf file to the ones that were copied manually.
- Update if the names are incorrect and replace them with mount path in all places.
- Save the Chrystoki.conf file.
- Copy the safenet folder from /usr to the below directory as
follows:
sudo cp safenet -R {CC Installed Path}/deps/external_libs/hsm - Navigate to {APPVIEWX_INSTALLATION_PATH}/hsm/ and execute the command
below.
chown -R appviewx:appviewx safenet - Validate the availability of the .so files (libCryptoki2_64.so) in the specified path <CC_INSTALLATION_PATH>/deps/external_libs/hsm/safenet/lunaclient/lib/
- Navigate to
<APPVIEWX_INSTALLATION_PATH>/appviewx/hsm/safenet/lunaclient/bin
and execute the command
below.
sudo ./vtl verifyThe vtl verify should be successfully executed.
Integrating the Thales TCT HSM with the AppViewX onprem
- Login to the AppViewX server on which the AppViewX is installed.
- From the command line interface, navigate to the properties folder path: {APPVIEWX_INSTALLATION_PATH}/appviewx_dependencies/properties
- Open the hsm file using the following command:
vi hsm - Check and confirm if the HSM file has the following lines. If not,
uncomment the following
lines:
export ChrystokiConfigurationPath=/appviewx/dependencies/hsm/ - If the file is edited, you have to restart the avx-platform-hsm pod,
using the following commands:
kubectl get pods -n <namespace>kubectl delete pods -n <namespace> <PodName> - AppViewX can now communicate with HSM devices.
Integrating the Thales TCT HSM with the AppViewX SaaS
- Login to the AppViewX server on which the Cloud Connector is installed.
- From the command line interface, navigate to the properties folder path: {CC_INSTALLATION_PATH}/deps/properties
- Open the hsm file using the following command:
vi hsm - Check and confirm if the HSM file has the following lines. If not,
uncomment the following lines:
export ChrystokiConfigurationPath=/appviewx/dependencies/external_libs/hsm/ - If the file is edited, you have to restart the avx-mid-server-platform
pod, using the following commands:
kubectl get pods -n <namespace>kubectl delete pods -n <namespace> <PodName> - AppViewX can now communicate with HSM devices.
HSM Agent Installation and Configuration in AppViewX - Automation
To avoid above steps of "Sample Agent Installation - Manual" section, appviewx has introduced an automation script that streamlines the installation of the Thales agent and its configuration with AppViewX.
Automation script for onprem
- Go to the path /home/appviewx/appviewx_kubernetes/yaml/appviewx_plugins/avx_platform_hsm/hsm.
- Ensure the availability of the following files:
- avx_hsm_integration.sh
- thales_safenet_hsm_configuration.sh
- Run the command "chmod 777 *" or apply "chmod" specifically for avx_hsm-integration.sh and the required HSM agent.
- Execute "sudo ./avx_hsm_integration.sh".
- Choose the required HSM to configure and select the "Configure" option.
- Proceed with the subsequent steps using the script.
Automation script for SaaS
- Go to the path <cloud connector installed path>/deps/utils/avx-platform-hsm.
- Ensure the availability of the following files:
- hsm-integration.sh
- safenet_config.sh
- Run the command "chmod 777 *" or apply "chmod" specifically for hsm-integration.sh and the required HSM agent.
- Execute "sudo ./hsm-integration.sh".
- Choose the required HSM to configure and select the "Configure" option.
- Proceed with the subsequent steps using the script.