Thales DPoD
Prerequisites
- Ensure the HSM service/pod is up and running before integrating HSM with
AppViewX.
- If on-prem, use avx_platform_hsm as plugin
- If SaaS, use avx_platform_hsm & all Cloud Connector instances for HSM DC.
- Communication to the HSM and AppViewX nodes in the case of
 and the cloud connector in the case of
 should be available to integrate with AppViewX. The
port details are as follows:
should be available to integrate with AppViewX. The
port details are as follows:- Port 443: HTTPS access for secure communication between the client and the DPoD service.
- DPOD client package to be downloaded and copied in the AppViewX node where HSM connection is to be established.
- Connectivity for the DPOD URL to be established.
- HSM slot and PIN should be available for communication.
Sample Agent Installation
The following steps outline the process followed in installing the DPOD Client Package.
- Go to the hsm folder for
 Path:
{APPVIEWX_INSTALLATION_PATH}/hsm/ and for Path:
{CC_INSTALLATION_PATH}/deps/external_libs/hsm/.
Path:
{APPVIEWX_INSTALLATION_PATH}/hsm/ and for Path:
{CC_INSTALLATION_PATH}/deps/external_libs/hsm/. - Create a new folder as a safenet.
- Untar the DPoD tar file inside safenet folder.
- Once extracted inside the safenet, make sure a new folder, dpod, is created and
all the extracted files are present.Note: From the extracted client package, if the dpod folder is not present, please create a folder named dpod inside the safenet and then extract the files.
- Untar the cvclient-min.tar file.
HSM Integration with AppViewX - Manual
To establish communication between the HSM and AppViewX, it is necessary to follow the installation steps provided below.
- Go to the hsm folder for path :
{APPVIEWX_INSTALLATION_PATH}/hsm/safenet/dpod/ and :
{CC_INSTALLATION_PATH}/deps/external_libs/hsm/safenet/dpod.
- Provide chmod 755 permission to the Chrystoki.conf file.
- Edit the Chrystoki.conf file to replace the custom path with the above specified mount path.
- Change the path value in the Chrystoki.conf file to match the mount.
Check the .so file location mentioned in Chrystoki.conf file LibUNIX64 = ./libs/64/libCryptoki2.so
Replace the dot with mount path for
as
/appviewx/dependencies/hsm/safenet/dpod/Sample: /appviewx/dependencies/hsm/safenet/dpod/libs/64/libCryptoki2.so
Replace the dot with mount path for
Sample: /appviewx/dependencies/external_libs/hsm/safenet/dpod/libs/64/libCryptoki2.so as
/appviewx/dependencies/external_libs/hsm/safenet/dpod/ - Update the Chrystoki.conf file by modifying all instances where the path is specified.
- From the command line interface, navigate to the properties folder path.
- For :
{AppViewX_INSTALLATION_PATH}/appviewx_dependencies/properties
- For : <Cloud connector installed path
>/deps/properties.
- For
- Open the hsm file, using the following
command:
vi hsm - Check and confirm if the HSM file has the following lines.
- For :
cd /appviewx/dependencies/hsm/safenet/dpod/ source setenv - For :
cd /appviewx/dependencies/external_libs/hsm/safenet/dpod/
source setenv
- For
- Uncomment all the above lines if commented, and save the file for .
- Add the below command for and then save the
file.
export ChrystokiConfigurationPath=/appviewx/dependencies/external_libs/hsm/safenet/dpod/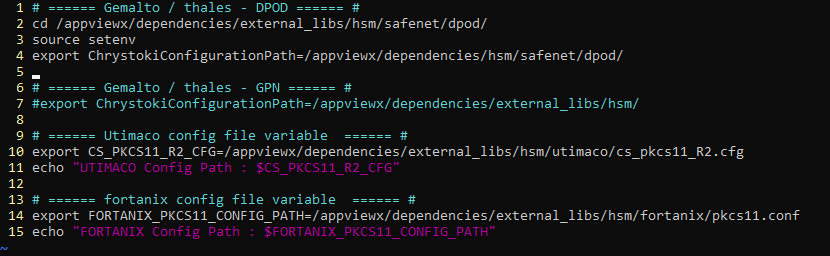
- Restart the avx-platform-hsm pod for , and
avx-mid-server-platform pod for , using the following
commands:
kubectl get pods -n <namespace>kubectl delete pods -n <namespace> <PodName> - AppViewX can now communicate with HSM devices.
HSM Agent Installation and Configuration in AppViewX - Automation
To avoid above steps of "Sample Agent Installation - Manual" section, we have introduced an automation script that streamlines the installation of the Thales agent and its configuration with AppViewX.
Automation script for onprem
- Go to the path /home/appviewx/appviewx_kubernetes/yaml/appviewx_plugins/avx_platform_hsm/hsm.
- Ensure the availability of the following files:
- avx_hsm_integration.sh
- thales_dpod_hsm_configuration.sh
- Run the command "chmod 777 *" or apply "chmod" specifically for avx_hsm-integration.sh and the required HSM agent.
- Execute "sudo ./avx_hsm_integration.sh".
- Choose the required HSM to configure and select the "Configure" option.
- Proceed with the subsequent steps using the script.
Automation script for SaaS
- Go to the path <cloud connector installed path>/deps/utils/avx-platform-hsm.
- Ensure the availability of the following files:
- hsm-integration.sh
- dpod_config.sh
- Run the command "chmod 777 *" or apply "chmod" specifically for hsm-integration.sh and the required HSM agent.
- Execute "sudo ./hsm-integration.sh".
- Choose the required HSM to configure and select the "Configure" option.
- Proceed with the subsequent steps using the script.