Troubleshooting the Windows Agent Setup
Overview
This section helps you troubleshoot the common problems that you might encounter when using Windows Agent Setup. Effective troubleshooting documents depend on the availability of useful, detailed information. This guide will give more troubleshooting processes on Windows Agent Setup. It helps you understand the importance of installing a validator and the method to do so.
Installing a Validator
Validator analyzes an Agent and validates all the prerequisites before installing an agent. It is also used to troubleshoot any issue that occurs in the managed machines that run on a network. Before installing AppViewX gateway and the certificates, make sure you have downloaded the validator to either the Downloads folder or to the Desktop in your local environment.
- Click the AppViewX.CertPlus.Validator.exe file to open the application for validation.
- In the AppViewX CertPlus Validator screen that opens enter all the mandatory fields in the Basic Information section to proceed.
- Select the Agent, Certificate Authority, IIS, and Non-IIS checkbox depending on what you want to validate and manage in the target machine.
- Based on the checkboxes you selected, the fields that are mandatory will be highlighted in Red color.
- The CA Name is required only if the Certificate Authority check box is selected.
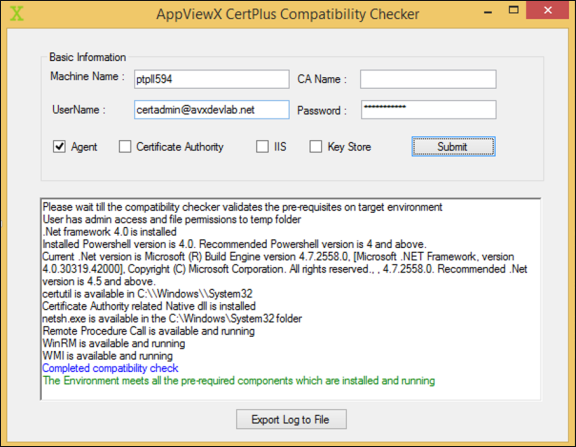
Click Submit and the results are displayed as shown in the following image:
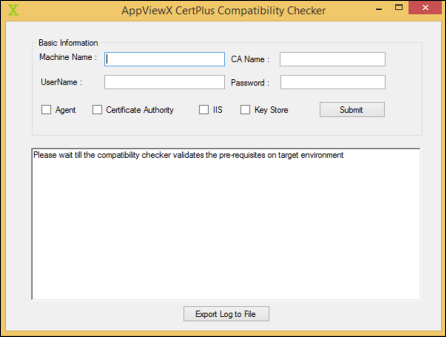
- AppViewX CertPlus Compatibility Checker is used for troubleshooting or validating the prerequisites as part of Windows Agent Installation. It comprises the following fields:
| Name | Description | Condition |
|---|---|---|
| Machine Name | The name of the target machine must be validated. It is a hostname. | Mandatory field |
| CA Name | The name of the CA in the CA config. | Mandatory only when a CA is selected |
| User Name | User Name to be used for validating the target machine. It is in the format "username@domainname". | Mandatory field |
| Password | The password corresponding to the provided user name. | Mandatory field |
Options
- User can select single or multiple options based on the installation/ troubleshooting criteria:
- Agent: Select this option if we need to install an agent in the target machine which is configured in the "Machine Name". It will validate the prerequisites which are required for Agent Installation
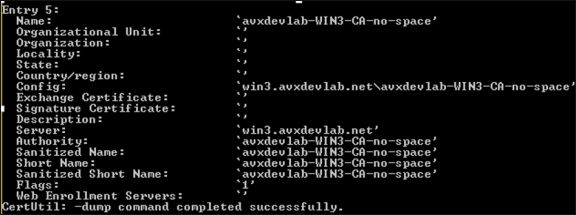
- Certificate Authority: Select this option if we need to validate the Certificate
Authority related functionality. The CA Name is mandatory only in this case. Use the
certutil -dump command to get the CA Name. In the output of certutil command use-value
in the "Server" as the Machine Name and use "Name" as the CA Name.
- Based on the example below the machine Name is win3.avxdevlab.net and CA Name is avxdevlab-WIN3-CA-no-space.
- IIS: Select this option if we need to validate the IIS sites related functionality.
Validations
| Validate | Agent | CA | IIS | Keystore |
|---|---|---|---|---|
| User | Yes | Yes | Yes | Yes |
| .Net framework | Yes | Yes | Yes | Yes |
| Powershell | Yes | Yes | Yes | Yes |
| CertUtil | Yes | Yes | No | No |
| Certadm.dll | Yes | Yes | No | No |
| netsh | Yes | No | No | No |
| RPC | Yes | Yes | Yes | Yes |
| WinRM | Yes | Yes | Yes | Yes |
| WMI | Yes | Yes | Yes | Yes |
| IIS | No | No | Yes | No |
- KeyStore: Select this option if you need to add to validate only the Microsoft Certificate Store related functionality
- User Access: It will validate by connecting to the target machine with the specified username and password and check if it has admin access.
- .Net Framework: It will check if .Net framework 4.5+ is installed and will display the current .Net framework version.
- Powershell version: It will check if Powershell is installed and will display the current Powershell version
- CertUtil: It will check if certutil component is available. This is used to get the CA name and the corresponding templates.
- CertAdm.dll: This is the native component used to access the CA and will check if this component is available in the C:WindowsSystem32 folder. Sometimes, while trying to access this component during the verification it will return an error and hence, a manual check must be performed.
- netsh.exe: This is used to bind the certificate to the installed agent port (8999).
- RPC service: The remote procedure call service must be running to perform all the remote operations and it will validate if the service is installed and running on the target machine.
- WinRM service: Windows Remote Management service is required for the Powershell execution and it will validate if the service is installed and running on the target machine.
- WMI service: Windows Management Instrumentation service is required for WMI and Powershell execution and it will validate if the service is installed and running on the target machine.
- IIS: It will check if the IIS server is installed and identify the current IIS version.
Color Codes during the Execution
- Black: Success information and output
- Red: An error or warning, must take corrective action based on the prerequisite document in case of any issues
- Blue: Completion of the validation process
- Green: Complete process is successful
Export Log to File: This is used for exporting the validation summary into a log file.
Steps to test gateway installation:
To test the installation, go to the following URL:
https://localhost:8999/appviewx/
https://<IP/Hostname>:<Port>/appviewx/rest/help ( Needs the
certificate to be on the store/ browser)
For example, https://xx.xx.xx.xx:8999/appviewx/rest/help
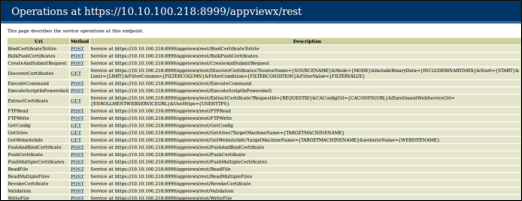
- The above page confirms the accessibility and installation of the service.
- In case, a different client authentication certificate is being used, ensure that the CRL mentioned in the certificate is reachable from the AppViewX Windows gateway hosting server.
- Go to AppViewX>> Settings>> Certificate to register the gateway with AppViewX.
- Register the gateway with the URL format as follows:
https://<IP/Hostname>:<Port>/appviewx
For example, https://xx.xx.xx.xx:8999/appviewx
Modify Agent services with the service Account The Windows gateway agent can be installed using a service account or an admin account.
- If the customer has a policy that states that the service account cannot be part of
the administrator group or that the service account is only a part of the user group,
then:
- The gateway agent service is installed using an admin account.
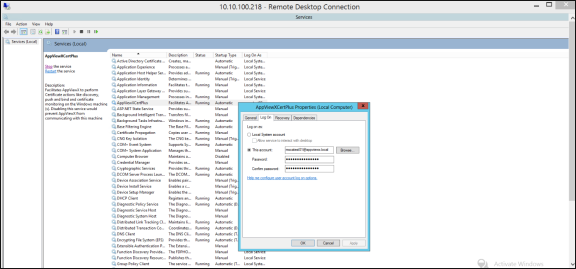
- The installed agent service is updated with the service account details in services.msc. Add the account in the properties of the AppViewXCert Plus service.
- Services.msc -> AppViewXCert Plus -> Right click ( Properties) -> LogOn .> Update the user account in the format of username@domainname.
- Refer to the following image.
- In this case, the following command has to be executed from the PowerShell:
Netsh http add urlacl url=https://+:8999/appviewx/user=appviewx.localmscatest01
- In the above command, the value for user = <domainserviceaccount> and the URL must be changed respectively.
- Once this is done, stop and start the AppViewXCertPlus Service in services.msc.
Windows Gateway Errors and Solutions
| Error | Solution |
|---|---|
| 767cf2b6-bfc3-45a0-9490-a95cf841e693: Connecting to remote server <machine name> failed with the following error message : WinRM cannot process the request. The following error occurred while using Kerberos authentication: The computer <name> is unknown to Kerberos. Verify that the computer exists on the network, that the name provided is spelled correctly, and that the Kerberos configuration for accessing the computer is correct. The most common Kerberos configuration issue is that an SPN with the format HTTP/<machine name> is not configured for the target. If Kerberos is not required, specify the Negotiate authentication mechanism and resubmit the operation. For more information, see the about_Remote_Troubleshooting Help topic. |
|
| Retrieving the COM class factory for remote component with CLSID |
|
| PowerShell ScriptExecution Error: Access is denied. 0x80070005 (WIN32: 5) OR Error Code 0x80070005 - Access is denied |
|
| Connecting to remote server <machine name> failed with the following error message: WinRM cannot process the request. The following error with error code 0x80090322 occurred while using Negotiate authentication: An unknown security error occurred. |
|
| The WinRM client received an HTTP status code of 502 from the remote WS-Management service. For more information, see the about_Remote_Troubleshooting Help topic |
|
| 41783361-015b-453f-b321-e31709b1850c: Connecting to remote server <machine name> failed with the following error message : Access is denied. For more information, see the about_Remote_Troubleshooting Help topic. |
|
| The client cannot connect to the destination specified in the request. Verify that the service on the destination is running and is accepting requests. Consult the logs and documentation for the WS-Management service running on the destination, most commonly IIS or WinRM. If the destination is the WinRM service, run the following command on the destination to analyze and configure the WinRM service: "winrm quickconfig" |
|
| d4f98a6a-41ef-4864-9848-03a07e113d75: CCertRequest::Submit: The RPC server is unavailable. 0x800706ba (WIN32: 1722 RPC_S_SERVER_UNAVAILABLE) | Go to the target machine and start the RPC service if it is stopped. |
| 727838ed-151e-46bf-883c-07ccb3a3989f: Connecting to remote server <machine name> failed with the following error message : The user name or password is incorrect. For more information, see the about_Remote_Troubleshooting Help topic. |
|
| fd3812f9-030a-421c-81e7-0e0510ce49e0: Access to the path '\\<machine name>\C$\\Windows\\Temp\\qgwwkqi3.fff' is denied. |
|
| More than 5 connections are not allowed |
|
| Connecting to remote server failed with the following error message: The WS-Management service cannot process the request. This user is allowed a maximum number of 4 concurrent shells, which has been exceeded. Close existing shells or raise the quota for this user. |
|
| Client Certificate gives Permission Denied 403 errors. This can happen in a certain environment and it's intermittent |
|
| The permission on the certificate template do not allow the current user to enroll for this type of certificate |
|
| An attempt was made to open a Certification Authority database session, but there are already too many active sessions" on a request using CERTADMINLib.IenumCERTVIEWROW.Next(). |
In the CA server, navigate to the registry through the regedit command and set the following:
|
| 803f4314-3a11-486a-87e5-367b8c5c6f9f: The user name or password is incorrect.rn |
|
| 42abe1ef-2bff-40e8-82e2-c97c5707a0c1: Connecting to remote server <machine name> failed with the following error message : The user name or password is incorrect. For more information, see the about_Remote_Troubleshooting Help topic. | The user name or password is incorrect. |
| Connecting to remote server <machine name> failed with the following error message: WinRM cannot complete the operation. Verify that the specified computer name is valid, that the computer is accessible over the network, and that a firewall exception for the WinRM service is enabled and allows access from this computer. By default, the WinRM firewall exception for public profiles limits accesses to remote computers within the same local subnet. For more information, see the about_Remote_Troubleshooting Help topic. |
|
| There is not enough space on the disk | Ensure that your hard disk has enough free space. |
| Management Connect to remote machine <machine name> as user failed with the following error User credentials cannot be used for local connections |
|
| Denied by Policy Module 0x80094800, The request was for a certificate template that is not supported by the Active Directory Certificate Services policy: WebServer1. | Use template name instead of the template display name. |
| Device Communication failed while using Native option to connect to CA remotely |
|
| Certificate Request (CSR) is using a different account to request a certificate from CA as compared to account configured in AppViewX |
|