Onboarding Infoblox DNS
Prerequisites
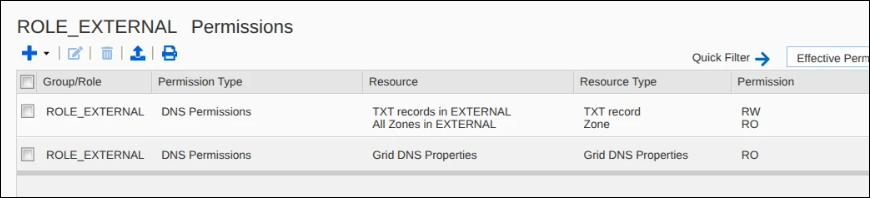
DNS Permissions
| Resource | Resource Type | Permission | Purpose |
|---|---|---|---|
| All TXT Records | TXT Record | Read/Write (RW) | Creates and updates DNS TXT records for DCV validation. |
| All Zones | Zone | Read Only (RO) | Discovers and reads DNS zones. |
Note: To grant access to specific DNS views, add
object-level permissions for the required DNS view objects in the
permissions configuration window.
Note: During DNS automation,
AppViewX retrieves the hosted zones list and validates the existence of
zones as a prerequisite before creating DNS records.
Role and Group Assignment
API Access
| Access Type | Requirement |
|---|---|
| API Access | Required |
| GUI Access | Not required |
| CLI Access | Not required |
Configuring Infoblox
-
Go to
 (.
The Select vendor page is displayed.
(.
The Select vendor page is displayed.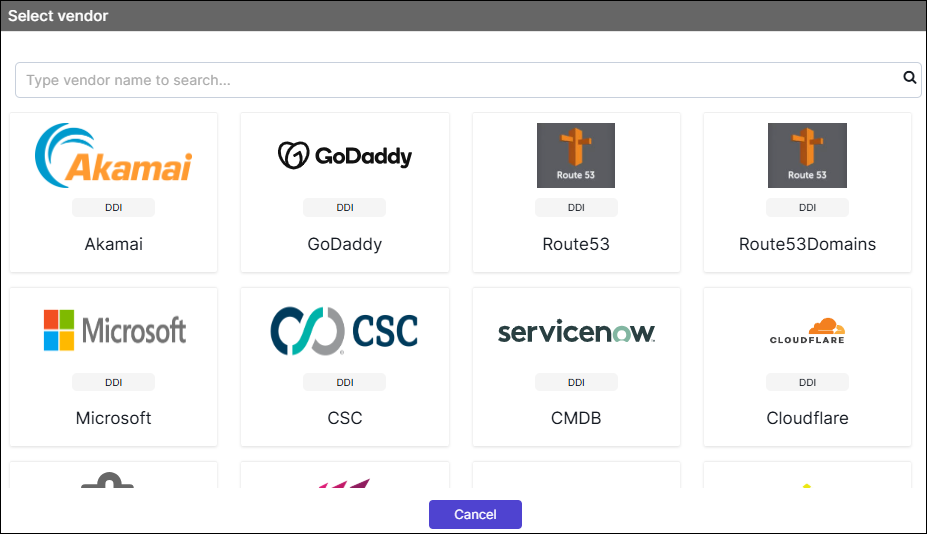
- On the Select Vendor page, click Infoblox.
-
On the Vendor Configuration page, under the
General section, enter or select the required
field information.
The following table describes the various fields in this section:
Field Description *Name Enter a unique name to identify the vendor account which is being configured. Description Enter a description for the purpose of configuring this vendor, if required. Data center Select a data center from the options available in the dropdown list. *: Mandatory fields -
On the Vendor Configuration page, under the Credentials
section, enter or select the required field information.
The following table describes the various fields in this section:
Field Description Auth Type Displays the Basic Auth method of authentication selected by default. *URL Enter API URL for the vendor with the HTTPS/HTTP protocol. Note: The API URL is same as the Hostname URL.Example: https://<device hostname>*Username Enter the username of the Infoblox account configured for AppViewX integration. *Password Enter the password of the Infoblox account configured for AppViewX integration. *: Mandatory fields - Enable Config sync for parsing the vendor.
- Disable Sync IPAM option, as it is not required for DNS validation.
- Disable Sync DNS option, as it is not required for DNS validation.
- On the Vendor Configuration page, under the Configurations section, turn Off the Enable Advanced Config toggle.
-
Click Finish.
A "Vendor configuration saved successfully" confirmation message is displayed.
Validating the Vendor Configuration
- On the Integration Hub page, locate the configured vendor tile.
- Confirm that a green check mark (✔) appears on the tile this indicates the vendor is active and reachable.
-
Click the View status icon on the tile to open the Vendor Status
Log: (Vendor Name) dialog.
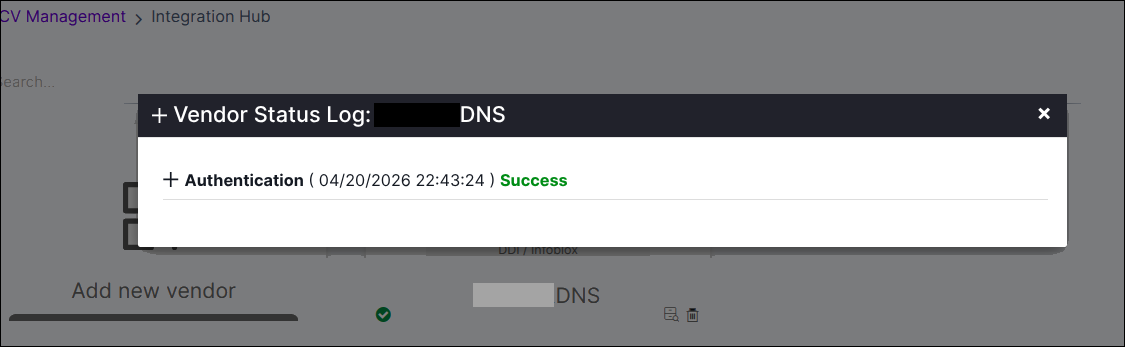
- Verify that the Authentication entry displays a Success status with a recent timestamp.