Adding a New Domain
Prerequisites for Domain Control Validation (DCV) Management in AppViewX include the
following:
- The domain must be registered with a valid DNS provider.
- The domain must also be added and recognized by the Certificate Authority from which certificates will be issued.
- The domain should remain active and resolvable through the configured DNS vendor to ensure successful validation.
In the DCV Management inventory page, click  .
.
The DCV Management > Add Domain page is displayed with a three step
process on the left:
- Domain Information (Please provide your domain details)
- Domain Validation (Validate using HTTP or DNS)
- General Settings
Each stage is described in the sections below.
Domain Information Stage
-
In the Domain Information, provide the enter/select the domain
details as described in the table below:
Table 1. Field descriptions for the Domain Information stage. Fields Description *Domain Name Enter the domain name to be validated (e.g., example.com). Tip:- Domain names can include letters, numbers, hyphens (-), and dots (.).
- It must contain at least one dot to separate the labels.
- Labels cannot start or end with a hyphen or dot.
- Length must be between 3 and 253 characters.
- The top-level domain (TLD) must have at least 2 letters.
- No trailing dot at the end.
I intend to order EV certificate for this domain Select this checkbox if you plan to request an Extended Validation (EV) certificate for the domain. *Select Certificate Authority Choose the Certificate Authority (CA) that will be used to perform the DCV to validate and issue the certificate. Tip:- Only the configured and enabled CAs will be listed in the dropdown.
- The supported CAs for DCV are:
- Sectigo
- Digicert
- GlobalSignAtlas
- GlobalSignMSSL
- SwissSign
*Select Account Select the CA account or profile associated with the chosen Certificate Authority. *Select Organization Choose the organization under which the domain is managed and validated. Note: This field is NOT mandatory when Select Certificate Authority = GlobalSignAtlas*: mandatory fields -
Click Next.
The Domain Validation page is displayed with options as follows:
- HTTP (supports manual validation only)
- DNS-CNAME (supports manual and automated validation)
- DNS-TXT (supports manual and automated validation)
HTTP - Domain Validation
- In the Domain Validation page, select preferred domain validation method as HTTP.
-
Click Add domain and Fetch challenge.
The DCV Domain is added successfully and the following screen is displayed with the Token, HTTP server URL, and the token expiry date and time.
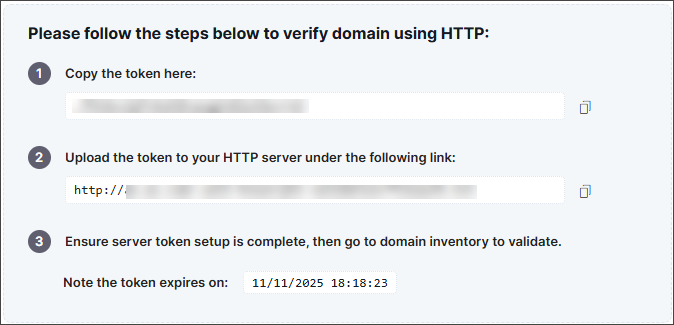
- Click the Copy icons next to the field values to save them to a secure location, and then complete the server token setup.
-
Click Next.
The General Settings stage is displayed.
DNS-CNAME Domain Validation Stage
DNS-CNAME (Manual)
-
In the Domain Validation page, select preferred domain
validation method as DNS-CNAME.
The Type options is displayed with radio buttons for Manual and Automated.
- In the Type options, select Manual.
-
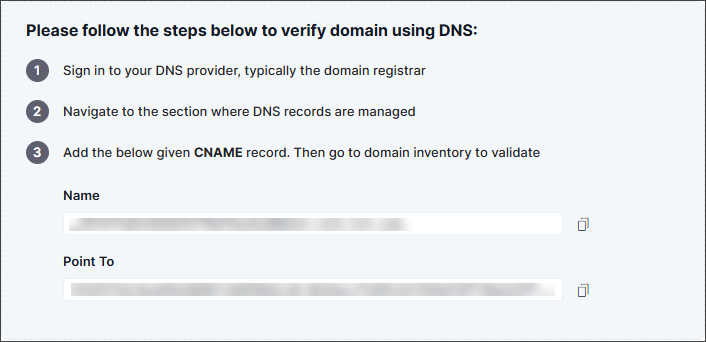
Click Add Domain and Fetch challenge.
The DCV Domain is added successfully and the following screen is displayed with the Token, HTTP server URL, and the token expiry date and time.
-
Click Next.
The General Settings stage is displayed.
DNS-CNAME (Automated)
-
In the Domain Validation page, select preferred domain
validation method as DNS-CNAME.
The Type options is displayed with radio buttons for Manual and Automated.
-
In the Type options, select Automated.
Note: The Automated DNS validation requires a DNS Vendor configured on the DDI Configuration page. To configure a DNS Vendor, navigate to the Workflow IntegrationHub by clicking the Manage DDI Services button from the DCV Inventory.The DNS Server Vendor and DNS Server dropdown fields are displayed.
-
Select a value from the DNS Server Vendor dropdown field.
The corresponding DNS servers mapped to the DNS Server Vendor are listed in the DNS Server dropdown.
- Select a value from the DNS Server dropdown field.
-
Click Next.
The corresponding DNS servers mapped to the DNS Server Vendor are listed in the DNS Server dropdown.
DNS-TXT Domain Validation Stage
DNS-TXT (Manual)
-
In the Domain Validation page, select preferred domain
validation method as DNS-TXT.
The Type options is displayed with radio buttons for Manual and Automated.
- In the Type options, select Manual.
-
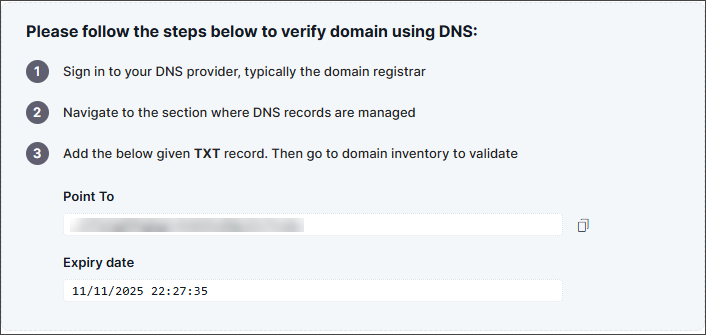
Click Add Domain and Fetch challenge.
The DCV Domain is added successfully and the following screen is displayed with the Token, HTTP server URL, and the token expiry date and time.
-
Click Next.
The General Settings stage is displayed.
DNS-TXT (Automated)
-
In the Domain Validation page, select preferred domain
validation method as DNS-TXT.
The Type options is displayed with radio buttons for Manual and Automated.
-
In the Type options, select Automated.
Note: The Automated DNS validation requires a DNS Vendor configured on the DDI Configuration page. To configure a DNS Vendor, navigate to the Workflow IntegrationHub by clicking the Manage DDI Services button from the DCV Inventory.The DNS Server Vendor and DNS Server dropdown fields are displayed.
-
Select a value from the DNS Server Vendor dropdown field.
The corresponding DNS servers mapped to the DNS Server Vendor are listed in the DNS Server dropdown.
- Select a value from the DNS Server dropdown field.
-
Click Next.
The corresponding DNS servers mapped to the DNS Server Vendor are listed in the DNS Server dropdown.
General Settings Stage
- Enable the toggle button, Enable Notification, to send notifications emails.
-
In the Recipients options, select any of the following radio button
options:
- EmailsNote:
- Only the email addresses configured in the Notifications Center are eligible to receive email notifications.
- To configure these email addresses, go to Action Center > Notification Policies, and in the Event dropdown, select the DCV Action then provide the email addresses by selecting the Email/Distro option.
- Select User Groups - Select one or many user groups from the dropdown.
- Emails
-
Enable the toggle button, Enable Auto Renewal, to set renewal date
before expiry.
Note: The Enable Auto Renewal is only displayed for DNS-CNAME (Automated) and DNS-TXT (Automated).
- In the Renew before expiry field, enter the number of days to trigger the renewal before domain expiry
-
Click Submit Request.
The domain is added successfully.
- [Optional] On the Inventory page, if the Validation Status column shows Pending then click the Validate link next to it. On the Confirm Validation pop-up click Confirm to validate. Only after the validation is complete, the validation status is updated.