Onboarding Akamai DNS
Prerequisites
Note: During DNS automation, AppViewX retrieves the hosted zones list and validates
the existence of zones as a prerequisite before creating DNS
records.
Create an API Client
- Login to Akamai Control Center.
- Navigate to .
- Click Create API Client.
- Under API Type, select Advanced.
-
In the Name field, enter a name for the client,
such as
AppViewX-DNS. Optionally, enter a description in the Description field.
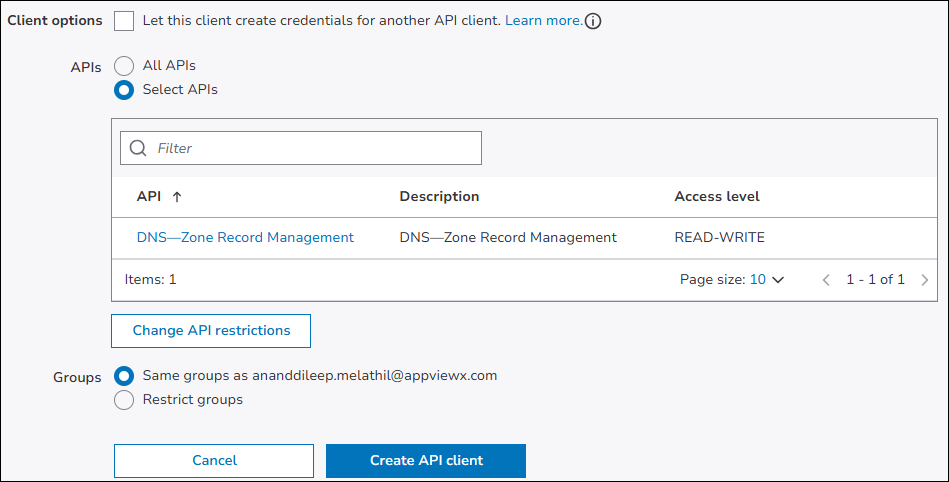
Configure API Permissions
- Under the APIs section, click Select APIs.
- Click Change API Restrictions.
- Clear the current API selection, then search for and add the following API: DNS - Zone Record Management (READ-WRITE).
-
Click Save.
The DNS - Zone Record Management (READ-WRITE) permission enables AppViewX to discover DNS zones, create TXT records for DCV, update existing DNS records, and delete DNS records as needed.Note: Akamai uses API-level permissions. A single API permission covers all DNS zone and record operations; no separate permissions are required for individual zones or record types.
Generate Credentials
-
Click Create API Client.
The system generates the API credentials.
-
Copy or download the following credentials and store them
securely:
Credential Description Client Token Identifies the API client. Client Secret Authenticates the API client. Access Token Grants access to the permitted APIs. Host The API endpoint URL for your Akamai environment. Note: The Client Secret is displayed only once. Ensure you copy and store it before closing this page.
Configuring Akamai
-
Go to
 (.
The Select vendor page is displayed.
(.
The Select vendor page is displayed.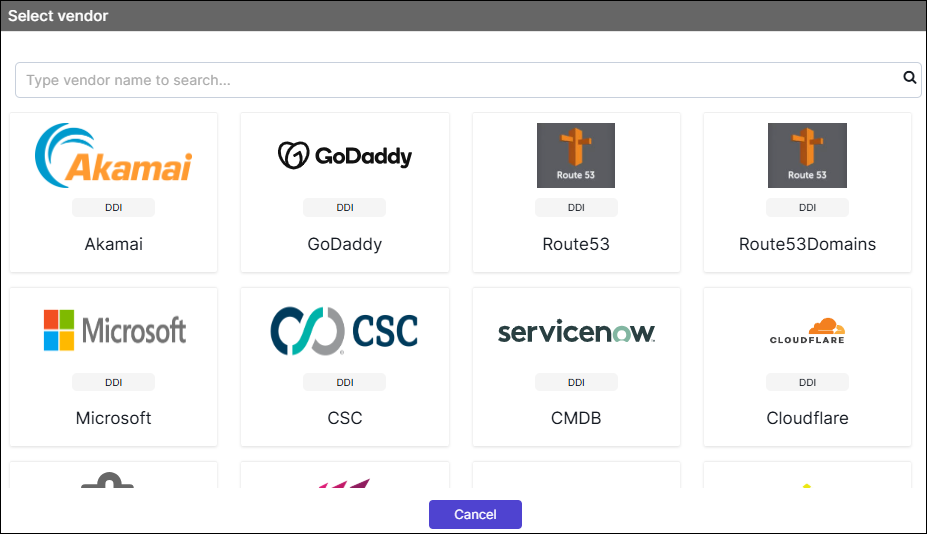
- On the Select Vendor page, click Akamai.
-
On the Vendor Configuration page, under the
General section, enter or select the required
field information.
The following table describes the various fields in this section:
Field Description *Name Enter a unique name to identify the vendor account which is being configured. Description Enter a description for the purpose of configuring this vendor, if required. Data center Select a data center from the options available in the dropdown list. *: Mandatory fields -
On the Vendor Configuration page, under the Credentials
section, enter or select the required field information.
The following table describes the various fields in this section:
Field Description Auth Type Displays the Akamai EdgeGrid method of authentication selected by default. *URL Enter API URL for the vendor with the HTTPS/HTTP protocol. Note: The API URL is same as the Hostname URL.Example: https://<hostname from credential>*Access Token Enter the Access token provided by Akamai. *Client Secret Enter the Client secret provided by Akamai. *Client Token Enter the Client token provided by Akamai. *Contract ID Enter the Akamai contract id for API integration. Advanced Configs If you want to enter the more details click the advanced configs radio button. Note: Default values are automatically generated for some of these below fields unless values are explicitly entered.Fields Description *Nonce Random string generated by the client. *Timestamp UTC time in such format as specified in the API client authentication section of the Akamai developer portal. *Base URL Enter the base URL, without the protocol. *Headers to sign Comma-separated list of headers needs to be signed. *: Mandatory fields - Enable Config sync for parsing the vendor
- On the Vendor Configuration page, under the Configurations section, turn Off the Enable Advance Config toggle.
-
Click Finish.
A "Vendor configuration saved successfully" confirmation message is displayed.
Validating the Vendor Configuration
- On the Integration Hub page, locate the configured vendor tile.
- Confirm that a green check mark (✔) appears on the tile this indicates the vendor is active and reachable.
-
Click the View status icon on the tile to open the Vendor Status
Log: (Vendor Name) dialog.
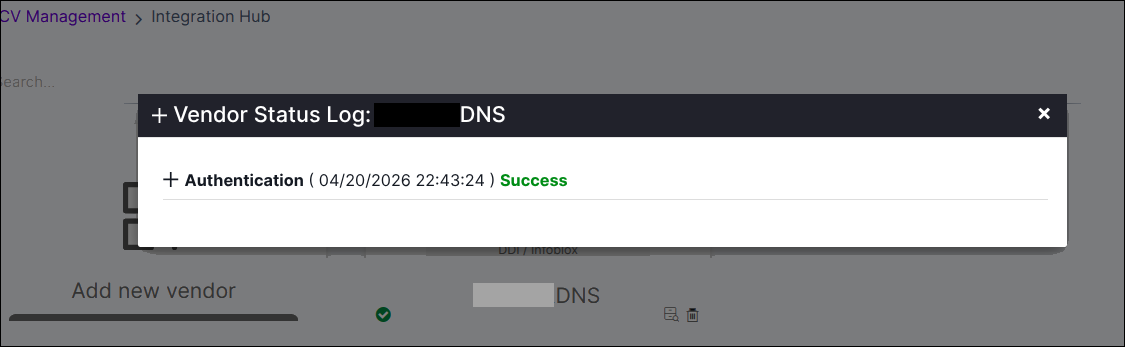
- Verify that the Authentication entry displays a Success status with a recent timestamp.