Onboarding a Standalone Account
AppViewX streamlines the management and visibility of your AWS resources by putting in place a simple workflow that lets you onboard your AWS resources onto AppViewX’s holistic certificate lifecycle management solution. One part of this configuration will be done on the AWS management console and the rest of the configuration will be facilitated via the AppViewX interface.
Prerequisites for Onboarding a AWS Standalone Account in AppViewX
- An IAM role must be created in your AWS account with the required roles and
policies created and mapped. For instructions, refer the documentation here.Note: For additional AWS documentation for creation a standalone account, refer to the links in the References section.
- If credentials for onboarding have to be fetched from a credential list in
CyberArk:
- Ensure that your AWS access credentials are saved in your CyberArk
account. For instructions on creating AWS access details in the
CyberArk account , refer to the documentation here.Important: For this use case, in the Account Parameters, the Password field must be considered a mandatory parameter. This field is used to specify the AWS access secret key information.
- Ensure that CyberArk is integrated with AppViewX and a credential list is created. For instructions, refer to the documentation here.
- Ensure that your AWS access credentials are saved in your CyberArk
account. For instructions on creating AWS access details in the
CyberArk account , refer to the documentation here.
Prerequisites for Migrating AWS Standalone Accounts from Older Versions
- All of their Amazon CA settings
- Any EC2 instances that were added manually from the server inventory (excluding the EC2 instances auto-discovered from the cloud accounts).
- Delete all of their Amazon CA settings before migration.
- Trigger config fetch for all of their cloud accounts after migration.
The following actions have to be performed for the standalone AWS cloud accounts migrated from the above listed versions to version v2022.1 FP1:
For standalone accounts where one of the associated services is not EC2
-
After you have upgraded the product from a version < v2020.3 FP8 to
v2022.1 FP1, from the top left corner of the AppViewX user interface, go
to
 (Menu) > CERT+ >
Administration > Device Management.
The Device :: ADC page is displayed.
(Menu) > CERT+ >
Administration > Device Management.
The Device :: ADC page is displayed. -
From the Device :: ADC page, select Cloud.
The Device :: Cloud page is displayed.

-
From the device accounts listed under Account Name, select the
required migrated standalone accounts.
Troubleshooting: If you cannot see the migrated standalone accounts listed, request the super user to grant you the required permissions. Only superusers and users authorized by the superuser can view these migrated accounts in the list.
-
From the top-right corner of the Device :: Coud page, click the
 (Fetch config).
This step is mandatory to upgrade the data recorded for the older devices to the latest format followed in v2022.1 FP1.
(Fetch config).
This step is mandatory to upgrade the data recorded for the older devices to the latest format followed in v2022.1 FP1.
For standalone accounts where one of the associated services is EC2
In versions v2020.1/v2020.2/v2020.3-v2020.3FP7, for accounts in which multiple regions are associated with the EC2 service, individual S3 buckets are used to store the permissions for each region.
Before Migration
After Migration
-
Select a migrated standalone account from the Device :: Cloud
page.
The Device :: Cloud > Modify page is displayed, with the details of the selected account.
- In the Amazon Cloud Service Settings section, click Fetch collection type.
- From the Collection type dropdown list, select the S3 bucket into which all permissions for this account were merged.
- Click Add.
-
Click Save.
Fetch Config is automatically triggered and the account details are upgraded according to the latest version.
AWS IAM Prerequisites for Standalone Account Onboarding
For Discovering and Managing SSL Certificates in ACM
{
    "Version": "2012-10-17",
    "Statement": [
        {
            "Sid": "VisualEditor0",
            "Effect": "Allow",
            "Action": [
                "acm:DescribeCertificate",
                "acm:RequestCertificate",
                "acm:GetCertificate",
                "ec2:DescribeRegions",
                "acm:ListCertificates",
                "acm:ImportCertificate",
                "acm:AddTagsToCertificate",
                "acm:ListTagsForCertificate",
                "acm:RemoveTagsFromCertificate"
            ],
            "Resource": "*"
        }
    ]
}
For Discovering and Managing SSL Certificates in CloudFront
{
    "Version": "2012-10-17",
    "Statement": [
        {
            "Sid": "VisualEditor0",
            "Effect": "Allow",
            "Action": [
                "iam:GetServerCertificate",
                "acm:GetCertificate",
                "acm:ListCertificates",
                "iam:ListServerCertificates",
                "ec2:DescribeRegions",
                "cloudfront:ListDistributions",
                "acm:ImportCertificate",
                "acm:AddTagsToCertificate",
                "acm:ListTagsForCertificate",
                "acm:RemoveTagsFromCertificate",
                "cloudfront:UpdateDistribution",
                "cloudfront:GetDistributionConfig",
                "cloudfront:ListTagsForResource",
                "iam:UploadServerCertificate",
                "iam:ListServerCertificateTags",
                "iam:TagServerCertificate",
                "iam:UntagServerCertificate"
            ],
            "Resource": "*"
        }
    ]
}
For Managing SSM Permissions for the EC2 Policy
{
    "Version": "2012-10-17",
    "Statement": [
        {
            "Sid": "VisualEditor0",
            "Effect": "Allow",
            "Action": [
                "ssm:SendCommand",
		 "ssm:DescribeDocument",
		 "ec2:DescribeInstances",
		 "s3:ListAllMyBuckets",
		 "ssm:DescribeInstanceInformation",
		 "ssm:GetDocument",
		 "ssm:CreateDocument",
		 "ssm:GetCommandInvocation",
		 "ec2:DescribeRegions"
            ],
            "Resource": "*"
        }
    ]
}
For Managing SSM Permissions for EC2 Role
{
    "Version": "2012-10-17",
    "Statement": [
        {
            "Action": [
                "ssm:DescribeDocument",
                "ec2messages:GetEndpoint",
                "ec2messages:GetMessages",
                "ssmmessages:OpenControlChannel",
                "ec2messages:DeleteMessage",
                "ssm:UpdateInstanceInformation",
                "ec2messages:FailMessage",
                "ssmmessages:OpenDataChannel",
                "ssm:GetDocument",
                "ssm:ListTagsForResource",
                "ec2messages:AcknowledgeMessage",
                "ssmmessages:CreateControlChannel",
                "ssmmessages:CreateDataChannel",
                "ec2messages:SendReply"
            ],
            "Resource": "*",
            "Effect": "Allow"
        },
        {
            "Action": [
                "s3:PutObject",
                "s3:GetEncryptionConfiguration",
                "s3:PutObjectAcl"
            ],
            "Resource": [
                "arn:aws:s3:::appviewx-s3/*",
                "arn:aws:s3:::appviewx-s3"
            ],
            "Effect": "Allow"
        }
    ]
}
For Enabling S3 Bucket Access to AppViewX
{
    "Version": "2012-10-17",
    "Statement": [
        {
            "Sid": "VisualEditor0",
            "Effect": "Allow",
            "Action": [
               "s3:GetObject",
		 "s3:ListBucket",
		 "s3:DeleteObject",
		 "s3:GetBucketLocation"
            ],
            "Resource": [
                "arn:aws:s3:::appviewx-s3/*",
                "arn:aws:s3:::appviewx-s3"
            ],
        }
    ]
}
For Discovering and Managing SSL Certificates in ELB
{
    "Version": "2012-10-17",
    "Statement": [
        {
            "Sid": "VisualEditor0",
            "Effect": "Allow",
            "Action": [
                "iam:GetServerCertificate",
                "elasticloadbalancing:ModifyListener",
                "ec2:DescribeInstances",
                "iam:ListServerCertificates",
                "elasticloadbalancing:DescribeTags",
                "ec2:DescribeRegions",
                "elasticloadbalancing:SetLoadBalancerListenerSSLCertificate",
                "iam:UploadServerCertificate",
                "iam:ListServerCertificateTags",
                "iam:TagServerCertificate",
                "iam:UntagServerCertificate",
                "elasticloadbalancing:DescribeLoadBalancerAttributes",
                "elasticloadbalancing:DescribeLoadBalancers",
                "elasticloadbalancing:DescribeListeners",
                "ec2:DescribeAvailabilityZones",
                "acm:GetCertificate",
                "elasticloadbalancing:DescribeTargetHealth",
                "acm:ListCertificates",
                "elasticloadbalancing:DescribeTargetGroups",
                "acm:ImportCertificate",
                "acm:AddTagsToCertificate",
                "acm:ListTagsForCertificate",
                "acm:RemoveTagsFromCertificate",
                "elasticloadbalancing:AddListenerCertificates",
                "elasticloadbalancing:DescribeListenerCertificates"
            ],
            "Resource": "*"
        }
    ]
}
For Discovering and Managing Certificates in IAM
{
    "Version": "2012-10-17",
    "Statement": [
        {
            "Sid": "VisualEditor0",
            "Effect": "Allow",
            "Action": [
                "iam:GetServerCertificate",
                "iam:ListServerCertificates",
                "iam:UploadServerCertificate",
                "iam:ListServerCertificateTags",
                "iam:TagServerCertificate",
                "iam:UntagServerCertificate",
                "ec2:DescribeRegions"
            ],
            "Resource": "*"
        }
    ]
}
For Discovering and Managing Private CA Certificates
{
    "Version": "2012-10-17",
    "Statement": [
        {
            "Sid": "VisualEditor0",
            "Effect": "Allow",
            "Action": [
                "acm:DescribeCertificate",
                "acm:RequestCertificate",
                "acm:GetCertificate",
                "acm:RenewCertificate",
                "ec2:DescribeRegions",
                "acm:ListCertificates",
                "acm:ImportCertificate",
                "acm:AddTagsToCertificate",
                "acm:ListTagsForCertificate",
                "acm:RemoveTagsFromCertificate",
                "acm-pca:CreateCertificateAuthorityAuditReport",
		"acm-pca:DescribeCertificateAuthorityAuditReport,
		"acm-pca:GetCertificate",
		"acm-pca:ListCertificateAuthorities",
		"acm-pca:IssueCertificate",
		"acm-pca:RevokeCertificate",
		"s3:GetBucketLocation",
		"s3:GetObject"
            ],
            "Resource": "*"
        }
    ]
}
For Discovering and Managing SSL Certificates in SM
{
    "Version": "2012-10-17",
    "Statement": [
        {
            "Sid": "VisualEditor0",
            "Effect": "Allow",
            "Action": [
                "secretsmanager:GetSecretValue",
                "secretsmanager:DescribeSecret",
                "secretsmanager:CreateSecret",
                "secretsmanager:UpdateSecret",
                "secretsmanager:PutSecretValue",
                "secretsmanager:ListSecrets"
            ],
            "Resource": "*"
        }
    ]
}
Onboarding a Standalone Account in AppViewX
-
Go to (Menu) > CERT+ >
ADMINISTRATION > Device Management.
The Device :: ADC page is displayed.
- From the Device :: ADC page, select Cloud.
-
On to the Device :: Cloud page and click
 (Add).
The Device :: Cloud > Add page is displayed.
(Add).
The Device :: Cloud > Add page is displayed. - On the Device :: Cloud > Add page, from the list of Vendors, select AWS.
-
Enter/Select the Basic information.
Table 1. Field description for the Basic Information section Field Description *Account Type From the dropdown list, select Standalone. *Account name Enter your AWS account name. Constraints:
- A duplicate account name should not exist in the cloud inventory.
- The account name should include only alphanumeric and period (.) characters.
Description Enter a description of the device to be added. *Account number Enter your AWS account number. Data center* From the dropdown list, select the data center through which communication with the Certificate Authority will be established. Proxy required To use a proxy server for communication, select this checkbox. Proxy settings configured in the Platform module will be used for communication. To read more on how proxy settings are configured and managed, click here.
*: Mandatory fields -
Enter/Select the Credentials-related information.
Table 2. Field description for the Credentials section Field Description Credential type* From the dropdown list, from the following options, select the authentication method that will be used for integrating AWS with AppViewX: - Manual Entry: The required credentials will be entered manually.
- Credential List - CyberArk: The required credentials will be retrieved from CyberArk, a Privileged Access Management (PAM) solution.
- IAM ROLE ACCESS
 : An IAM role-based
approach is used for authentication instead of
direct access keys.Access is provided based on IAM roles. To enable this feature in your SaaS environment:
: An IAM role-based
approach is used for authentication instead of
direct access keys.Access is provided based on IAM roles. To enable this feature in your SaaS environment:- Create a role in one of your AWS accounts that trusts the AppViewX AWS account.
- From AppViewX, assume the role created in your account.
- Using the assumed role from the above step, assume the roles created in the respective child accounts to perform the required CLM actions.
*Access key This field is displayed when Credential type = Manual Entry. Enter the access key generated for your AWS account.
*Secret key This field is displayed when Credential type = Manual Entry. Enter the secret key generated for your AWS account.
Download Cloud Formation Template (CFT) For Credential type = IAM ROLE ACCESS, to download the CloudFormation template, click the Download Cloud Formation Template link that is displayed below the Credential Type dropdown list. 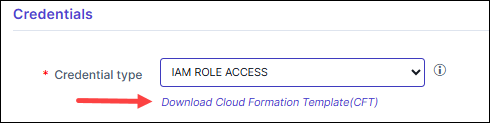 The downloaded CloudFormation template is pre-configured with the AppViewX AWS account details that need to be trusted. Ensure that you:
- Use the downloaded template to create a role in any of your AWS accounts.
- Provide a unique string as the External ID for the role you are creating.
*Master Account Role Enter the Amazon Resource Name (ARN) of the AWS IAM role created using the downloaded CloudFormation Template. The IAM role input for this field can be:- a simple name (as a alpha-numeric string)
- an identifier in a full path format (e.g.,
/service-prefix/role-name)
AWS allows roles to be created within paths to help manage large numbers of roles and delegate permissions. With path support, users can onboard resources where the IAM Role is nested.
*External Id Enter the unique identifier generated to establish a secure trust relationship between AWS and AppViewX. *Credential List This field is displayed when Credential type = Credential List - CyberArk. From the dropdown list, select the CyberArk account with the AWS credentials that will be used for onboarding the standalone account.
The options listed in this dropdown list are the existing CyberArk accounts integrated with AppViewX. For instructions on integrating CyberArk with AppViewX, click here.*: Mandatory Fields -
Enter/Select the details for the Amazon Cloud Service
Settings.
Table 3. Field description for the Amazon Cloud Service Settings section Field Description Services* According to the type of the new cloud device being added, select the corresponding Amazon Cloud Service for the device. Default region* Based on the customer’s requirement, select the default region in which the customer’s AWS cloud account is deployed. AppViewX will use this region to communicate with the other (geographically farther) regions. Service region* Service regions are regions that are supported by the selected service.
From the dropdown list, select the service regions that should be scanned for certificates.
Note: To be able to fetch and select from the available regions, ensure that the credentials have been provided in the Credentials section.CA Operation Mode* Note: This field is displayed only when the Amazon Private CA service is selected.From the following options, select one/both operation mode(s) for discovering all the certificates enrolled by the Private Certificate Authority:-
ACM
-
PCA
S3 Bucket* Note: This field is displayed only when the PCA CA operation mode is selected.Enter the S3 bucket name.
Discovery Certificate Note: This field is displayed only when one/both of the CA operation modes are selected.To enable instance certificate discovery at the time of device addition, select this checkbox.Cert sync Select from one of the following options:
- Managed: AppViewX will connect with the customer’s AWS account and discover certificates. These certificates will be added to the inventory. Users with the relevant permissions can then perform the required certificate-related actions.
- Monitored: AppViewX will connect with the customer’s AWS account and discover certificates. These certificates will be added to the inventory where the users will be allowed to only view the certificates.
- Ignored: AppViewX will connect with the customer’s AWS account but certificate discovery will be disabled.
*: Mandatory Fields -
-
Click Add.
Account details are now available in the device inventory. Once the account is onboarded, you can discover the corresponding certificates and manage them.
What's Next?
Account Level/Inner Inventory
| Field | Description |
|---|---|
| Account Name | Name of the account to which the cloud device belongs |
| Role Name | Role name of the account creator |
| Service Region | The service region selected for the account |
| Service | Service integrated for the cloud device |
| Status | Status of the discovered accounts. This field
takes the following values:
|
| Resource Discovery Status |
Note: Resource discovery status is not
applicable for master accounts. For master accounts, the
resource discovery status is set to Not
Applicable.
This field indicates the status of the resource discovery for
the individual entities belonging to a discovered account
using the following values:
|
| Cert Discovery Status |
Note: Cert discovery status is not
applicable for master accounts. For master accounts, the
cert discovery status is set to Not
Applicable.
This field indicates the status of the certificate discovery
for the individual entities belonging to a discovered
account using the following values:
Note: The cert discovery status is based
on the status of only those entities for which the cert
discovery status is not Not Applicable.
|
| Cert sync | Cert sync type (Managed, Monitored, Ignored) selected for the entity |
| State | Outcome of the device addition (Success, Failed) |