Service Accounts
Accessing the Service Account Page
| New Menu | Old Menu |
|---|---|
| In the Platform module, from the navigation pane on
the left, under IDENTITY, select Service
Account. The Service Account page is displayed, with all the service accounts listed with their Name, Client Id, and other related information. |
From the main navigation menu, select Account >
Service Account. The Service Account page is displayed, with all the service accounts listed with their Name, Client Id, and other related information. |
| For more information on how to switch between menus, click here. | |
Service Account Inventory
| Columns | Description |
|---|---|
| Name | Name of the service account. Note: Based on the access provided in the Roles ACF for Service Accounts, either all
service accounts are displayed or only those created by
the specific user. |
| Client ID | Client id generated after creating the service account. |
| Description | Description text for the service account. |
| Authentication mode | Shows the internal or external authentication mode selected. |
| Last access time | Date and time when the account was last accessed. |
| Account status | Status of the account (active, inactive, or deleted). |
| Client Secret Status | Client secret status (active or inactive). |
| Email address | Email address for notification. |
| Created time | Date and time when the service account was created. |
| Client Secret Expiry | Date when the client secret expires. |
| Created by | Username who created the service account. |
Service Account User Actions
- Search - Enter search text to filter the inventory list.
- Add Account - Click the + Add Account to create a new service account.
- Actions - Select the check box in the inventory to enable the
Actions button. It has the following options:
- Delete
- Enable
- Disable
Note: Actions can be performed only for service accounts based on the access provided in the Roles ACF for Service Accounts. - Refresh - Click
 (Refresh) to view updates in the inventory list.
 - Show Records - Click
 to select the number of records to be displayed per
page.
to select the number of records to be displayed per
page. - Page Navigation - Click the arrow buttons to view next or previous pages in the inventory.
Client Credentials Grant Type
Create Service Account
-
Go to the Service Account page, click + Add Account.
The Service Account > Add page is displayed.
-
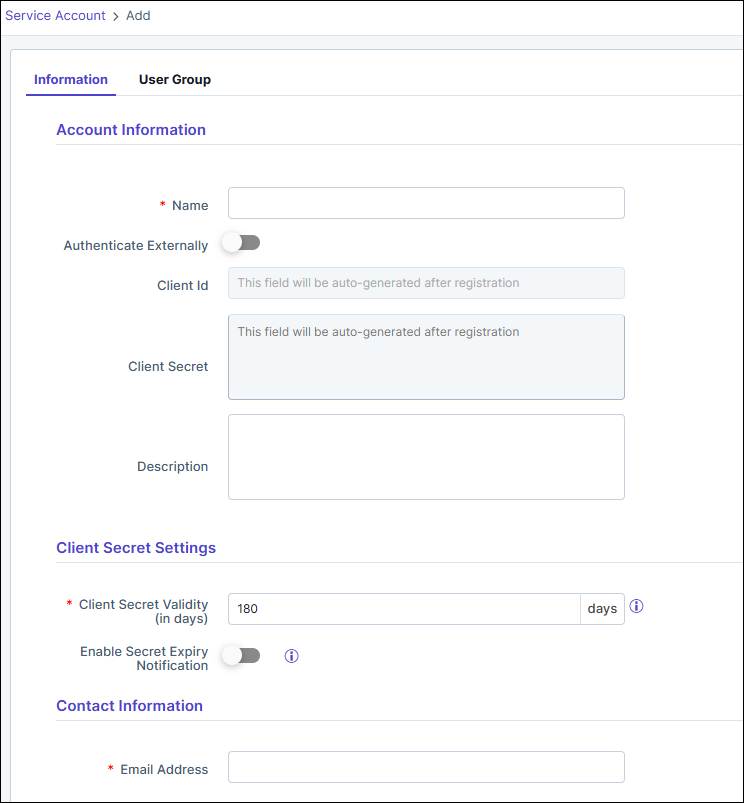
Enter/Select the following details in the Account Information
section:
Table 1. Field descriptions for Account Information Fields Description *Name Name of service account. Authenticate Externally Enable the toggle to authenticate external service account using client Id. Client Id This field is mandatory only when Authenticate Externally toggle is enabled. Enter the external Client Id for authentication.
When Authenticate Externally is disabled the Client Id field will be auto-generated after registration.
Client Secret This field is enabled only when Authenticate Externally toggle is disabled. The Client Secret field will be auto-generated after registration.
Description Brief description of the service account. *: Mandatory fields -
Enter/Select the following details in the Client Secret Settings
section. This section is displayed only if the Authenticate
Externally toggle is disabled.
Table 2. Field descriptions for Client Secret Settings Fields Description *Client Secret Validity (in days) Specifies the number of days for which the generated client secret remains valid. Enable Secret Expiry Notification When enabled, the system sends notifications to designated users or admins before a client secret expires. Alerts will be sent at intervals of 90, 60, 30, 7, and 1 day(s) before expiry and 1 day after expiry. *: Mandatory fields -
In the Contact Information section, enter the Email Address
details
Note: This section is displayed when Authenticate Externally toggle is disabled.
-
Click Save.
The service account is created and included in the service account list. The fields Client Id and Client Secret are populated and masked.
- Click the User Group tab.
- From the list of user groups displayed, select one or more user groups using
the checkbox.
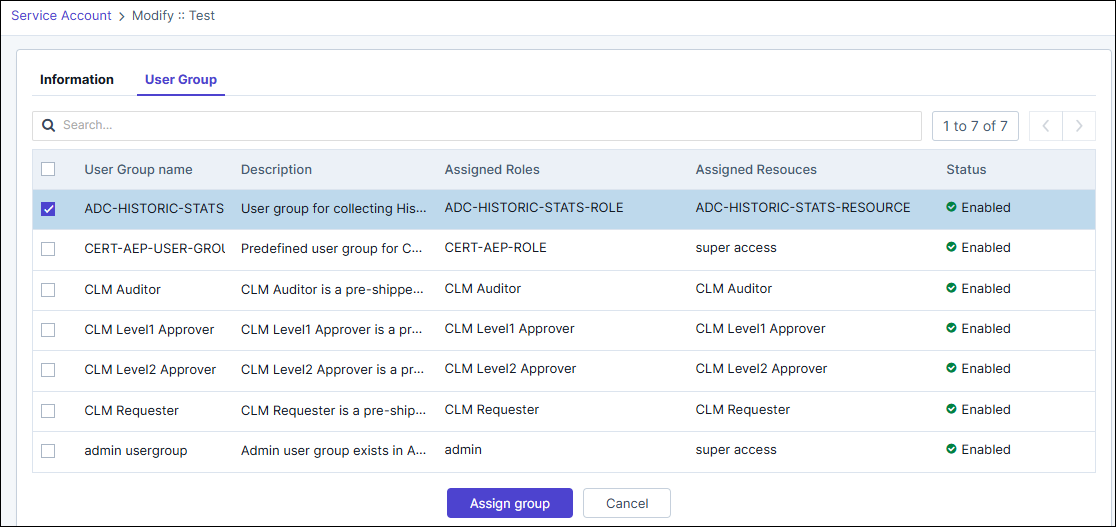
- Click Assign group.
Managing Service Account
-
Go to the Service Account page.
The screenshot below shows an existing Service Account.
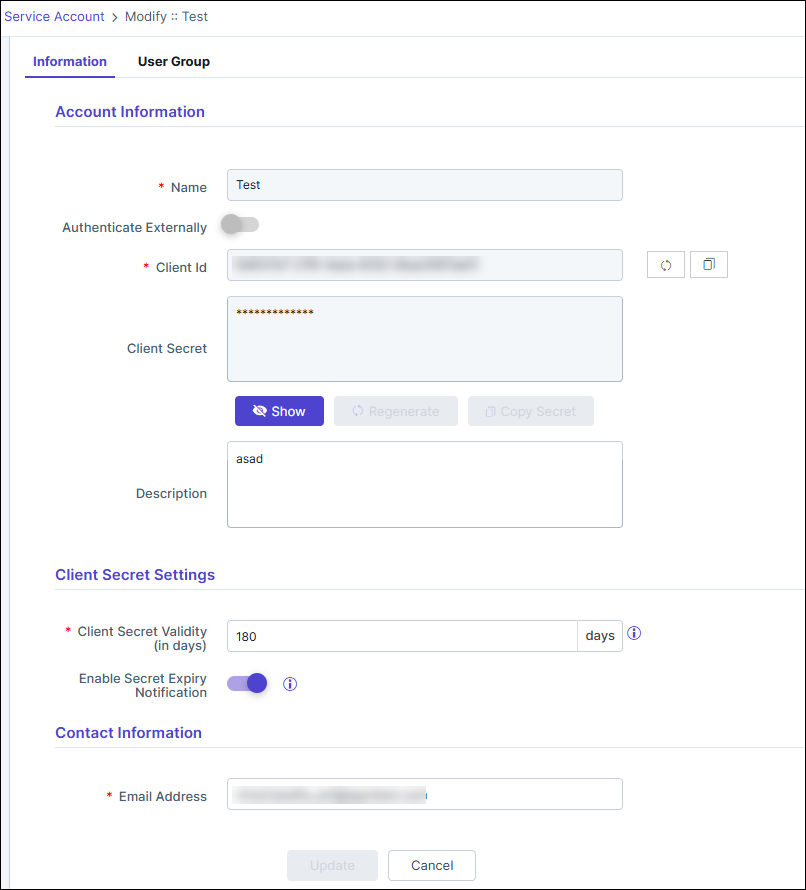
- The client secret is a is a 32 character alphanumeric string with special characters and is hidden by default. Click Show button to view the secret.
- The Client ID and Client Secret can be regenerated anytime using the corresponding regenerate buttons. When a Client ID is regenerated, the corresponding Client Secret is also regenerated.
- Post the expiry the Client Secret can be regenerated. (First click Show and then Regenerate.)
- The client credentials can be copied using the corresponding copy buttons.
- The Access tokens generated by the previous set of Client ID and Client Secret will still work until the token gets expired.
- In the Account Information section, the Name and Authenticate Externally fields are disabled. The Description can be edited.
-
From the Client Secret Settings section, edit or update the
following fields:
Table 3. Field descriptions for Client Secret Settings Field Description *Client Secret Validity The number of days of validity for the client secret. Enter a value between 1 and 365. By default the value set is 180 days. Enable Secret Expiry Notification Enable the toggle button to receive notification of the client secret expiry. Alerts will be sent at an interval of 90, 60, 30, 7, and 1 day(s) before the client expiry and 1 day after it has expired. *: Mandatory fields Note: The grace period for the client secret is configurable from the backend. The default is 0 and can be configured for a maximum of 24 hrs (1 day). Kindly contact the AppViewX Support team if you need this updated. - In the Contact Information section, edit the Email Address as required.
- Click Update.