Managing Users
To create user accounts, you must be assigned the Administrator
role. Administrators can define how users should be authenticated to AppViewX. User
authentication can either be an internal authentication or external authentication
via LDAP, RADIUS, TACACS, and Single Sign-on.
Note: You must
add a user to the user group as the roles and resources cannot be directly
associated with the user.
Accessing the User Page
| New Menu | Old Menu |
|---|---|
| In the Platform module, from the navigation pane on
the left, under IDENTITY, select User. The User page is displayed, with all the user groups listed with their Name, Full Name, and other related information. |
From the main navigation menu, select Account >
User. The User page is displayed, with all the user groups listed with their Name, Full Name, and other related information. |
| For more information on how to switch between menus, click here. | |
Note: In the User Inventory:
- A delegated admin sees has access to users created by or under their delegated group.
- Users from other delegated groups or higher levels are completely hidden.
Creating a User
-
On the User page, from the top right corner of the screen, click
 (Add) icon.
The Add page is displayed, with the Information tab open by default.
(Add) icon.
The Add page is displayed, with the Information tab open by default. -
In the Account Information section, enter the
following details:
Table 1. Field descriptions for Account Information Field Description *User name Enter the user name for the new user. *Password Enter the password for the new user. The new password should have:- At least one uppercase, lowercase, and numeric character
- At least one special character (~!@#$^&*_-+=|())
- 12 to 128 characters.
The new password should not contain:- The user name
- The same character more than three times consecutively
- Blank space and special characters other than (~!@#$^&*_-+=|()).
*Confirm Password Reenter the password for confirmation. Authenticate externally To allow authentication by external enterprise servers such as LDAP, TACACS, RADIUS, and so on, select this check box. Note: The Password and Confirm Password fields are disabled if Authenticate externally option is selected.First name New user’s first name. Last name New user’s last name. Description Descriptive information about the user such as their work location, workgroup, specialty, or any other details. *: Mandatory fields -
In the Contact Information section, enter the
following details:
Table 2. Field descriptions for Contact Information Field Description *Preferred mode of contact From the following options, select the user’s preferred mode of contact: - Email address
- Phone number.
*Email address New user’s email address. *Phone number New user’s phone number. Note: This field is required only when the preferred mode of contact is a phone number.*: Mandatory fields -
Click Save.
Note: To log into AppViewX and access the product, users need to be assigned or mapped to a user group.
-
To add the user to a group, click the User group
tab.

- To add the user to a group, select the check box for that user group.
-
Click Save.
The newly added user will appear in the User Inventory with additional information such as Created time, and Modified time.
Modifying a User
- On the User page, select the check box against the user you want to modify.
-
From the top right corner of the screen, click
 (Modify) icon.
- The Modify page is displayed, with the Information tab open by default.
-
In the Account Information section, update the
required details:
Table 3. Field descriptions for Account Information Field Description *User name Enter the user name for the new user. *Password Enter the password for the new user. The new password should have:- At least one uppercase, lowercase, and numeric character
- At least one special character (~!@#$^&*_-+=|())
- 12 to 128 characters.
The new password should not contain:- The user name
- The same character more than three times consecutively
- Blank space and special characters other than (~!@#$^&*_-+=|()).
*Confirm Password Reenter the password for confirmation. Authenticate externally To allow authentication by external enterprise servers such as LDAP, TACACS, RADIUS, and so on, select this check box. Note: The Password and Confirm Password fields are disabled if Authenticate externally option is selected.First name New user’s first name. Last name New user’s last name. Description Descriptive information about the user such as their work location, workgroup, specialty, or any other details. *: Mandatory fields -
In the Contact information section, update the
required details:
Table 4. Field descriptions for Contact Information Field Description *Preferred mode of contact From the following options, select the user’s preferred mode of contact: - Email address
- Phone number.
*Email address New user’s email address. *Phone number New user’s phone number. Note: This field is mandatory only if the preferred mode of contact is Phone number.*: Mandatory fields - Click Save.
-
To modify the user and user group mapping, by adding a new user
group/deleting an existing user group, click the User
group tab.
- To add the user to a group, select the check box for that user group.
- Click Save.
Deleting a User
- On the User page, select the check box against the user you want to delete.
-
From the top right corner of the screen, click
 (Delete) icon.
-
In the Confirmation dialog box, click Yes.
The selected user is deleted.
Forcing Logout
- On the User page, select the check box against the user you want to delete.
-
From the top right corner of the screen, click
 (Force Logout) icon.
-
In the Confirmation dialog box, "Force logout will immediately
terminate the user's active sessions. Do you want to proceed?"click
Yes.
The selected user is deleted.
Enabling a User
- On the User page, select the check box against the user you want to enable.
-
From the top right corner of the screen, click
 (Enable) icon.
-
In the Confirmation dialog box, click Yes.
The selected user is enabled.
Disabling a User
- On the User page, select the check box against the user you want to disable.
-
From the top right corner of the screen, click
 (Disable) icon.
-
In the Confirmation dialog box, click Yes.
The selected user is disabled.
Importing a User
-
On the User page, from the top right corner of the screen, click
 (Import) icon.
The Import screen is displayed.
(Import) icon.
The Import screen is displayed.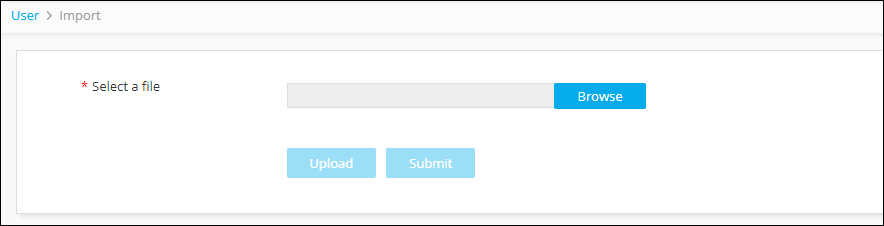
-
Click Browse, and then select the user file to
upload.
Note: The file must be in .csv format. To download a sample template file click the
 icon on the top-right corner.Tip: The most efficient way to import user details is to download the sample import file that is available by clicking the (Sample file) icon in the Command bar of
the Import screen, modify the contents, save it, and then import it into
the system. This reduces the chance of error messages appearing during
the import process.
icon on the top-right corner.Tip: The most efficient way to import user details is to download the sample import file that is available by clicking the (Sample file) icon in the Command bar of
the Import screen, modify the contents, save it, and then import it into
the system. This reduces the chance of error messages appearing during
the import process. -
Click Upload to see the user details displayed in
the user interface.
Note: The user details displayed at this point are only for review; the user details have not been imported yet.
- Review the details of each user in the import file. If you do not want to import specific users, deselect the checkboxes beside their names.
- Click Submit.