Creating a Policy for Certificate Revocation
Specifying the Policy Action
-
Go to
 .
The Policy Inventory page is displayed with all policies displayed across the Kube, Certificate, and Device categories.
.
The Policy Inventory page is displayed with all policies displayed across the Kube, Certificate, and Device categories. -
To create a new policy, click
 .
The Create Policy dialog box is displayed.
.
The Create Policy dialog box is displayed.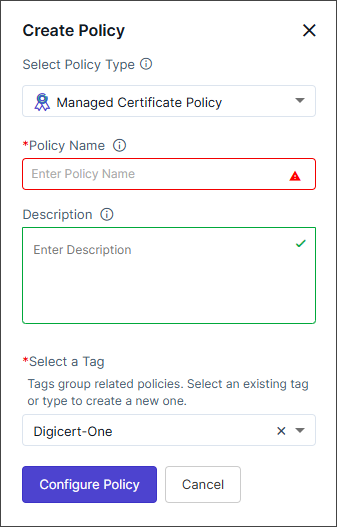
-
Enter/Select the policy creation details.
Field Description Select Policy Type From the dropdown list, select Managed Certificate Policy. *Policy Name Enter a policy name. Valid characters: Alphabets, numbers, - (dash), _ (underscore)
Description Enter any additional details relevant for the policy. *Select a Tag Select an existing tag or type to create a new one. Tags group related policies. Note: Selecting the appropriate policy type allows you to group policies logically, simplifying organization and management based on specific criteria.*: Mandatory field -
Click Configure Policy.
The Create a Certificate Enrollment Policy in 7 Simple Steps pop-up is displayed with a short description of each step.
-
Click Close to close the pop-up.
The first of the seven steps, Action, is enabled.
- On the Select an Action page, select Revoke Certificate.
-
In the Display Name for Action field, enter a name that is to be
displayed to users instead of the full policy name in Quick Actions.
Hover over the info icon to preview the Quick Actions screen.
This field accepts alphanumeric values and special characters - (dash), _ (underscore), and space.
-
Click Next.
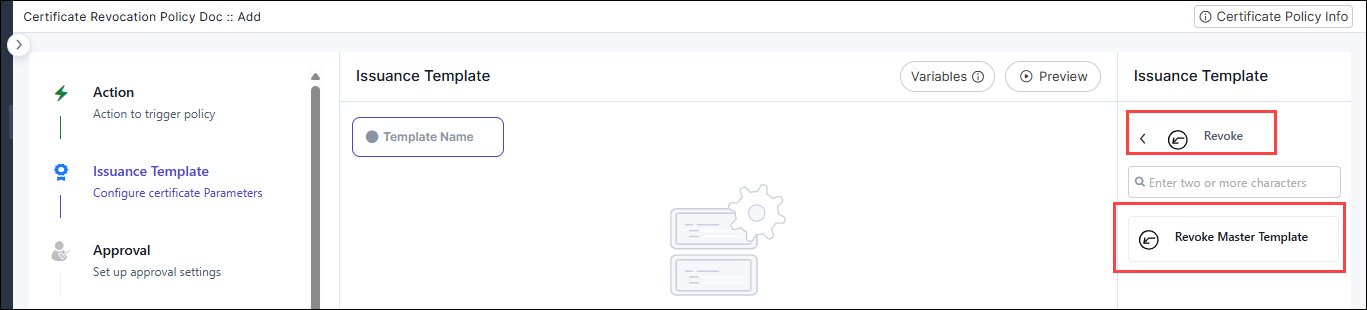
The Issuance Template page is displayed.
Configuring the Issuance Template for the Policy
-
On the Issuance Template page, from the Issuance Template
list in the right, click Revoke > Revoke
Master Template.
-
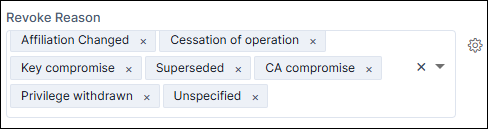
In the Revoke Reason field, enter the list of valid revoke reasons
that will be displayed as user input values for this field in the revocation
form.
-
To add any custom fields to this template, click
 .
The Add Custom Field dialog box is displayed.
.
The Add Custom Field dialog box is displayed. -
Configure the field customization as required and click
Add.
Field Description Include this Custom Field as a Certificate Attribute Enable or disable the toggle button to include or exclude the custom field as a certificate attribute. Store this field value in an encrypted format Enable or disable the toggle button to store the field value in an encrypted or non-encrypted format. *Field Name Provide a field name for the custom field in alphanumeric format. *Field Type Select a field type for the custom field. The available types are: - Label
- Text Box
- Text Area
- Radio Button
- Checkbox
- Select Box
- Multi-select Box
Field Value Specify a default value for the field. The value can be modified according to the field type. For fields that accept multiple entries, use a comma-separated format. *: Mandatory field The custom field you configured is added to the template along with a (Settings) icon to edit the customization
and a
(Settings) icon to edit the customization
and a  (Delete) icon to remove the custom field from the form.Tip: Click
 (Preview) to view the form
information.
(Preview) to view the form
information.You can copy predefined variables (e.g., ${user.firstName}, ${user.lastName}) using the
 option. Variables can be inserted into
text content and at runtime, they are replaced with actual
values.
option. Variables can be inserted into
text content and at runtime, they are replaced with actual
values. -
Click Next.
The Approval page is displayed.
Configuring Approvals for the Revocation Process
Skipping Approvals for the Revocation Process
-
On the Approval page, to skip approvals for the revocation
process, turn on the Auto Approve (Skip Approval)
key.
Approvals are disabled for the revocation process; revocation requests are auto approved.
-
Click Next.
The Pre Issuance Tasks page is displayed.
Adding Approvals for the Revocation Process
-
On the Approval page, to add approvals for the revocation
process, click
 .
The Configure Approval dialog box is displayed.
.
The Configure Approval dialog box is displayed. - In the Configure Approval dialog box, under the Approval Settings tab, select an Approval Type.
-
For Approval Type = User Group, from the
dropdown list, Select User Group that has to approve the
revocation request.
For Approval Type = User, from the dropdown list, Select User that has to approve the revocation request.For Approval Type = Email, in the Select Email field, enter the email address of the user who has to approve the revocation request.For Approval Type = LDAP Manager:Note: Approvals via email do not require login. Ensure only authorised users can access the link.
- From the Select LDAP Server dropdown list, select the
LDAP server that will be connected to for fetching user and
manager details.To add a LDAP server from the Platform module, click the link below the dropdown list to be redirected to the corresponding product screen.For documentation on adding a LDAP server, see the LDAP Authentication documentation.

- To customize the LDAP query, turn on the Customize
LDAP Query key and enter the following query
customization details:
Field Description User Filter Attribute Enter the LDAP attribute to locate the requesting user. User Return Attribute Enter the LDAP attribute that should be retrieved from the user’s record to identify their manager. Manager Filter Attribute Enter the LDAP attribute that will be used to locate the manager’s record in LDAP. Manager Return Attribute Enter the attribute value from the manager’s record that should be returned and used as the approver’s identifier (for example: email address). *: Mandatory field
- From the Select LDAP Server dropdown list, select the
LDAP server that will be connected to for fetching user and
manager details.
-
As required, turn on/off the toggle keys for the following Advanced
Options:
- Allow request resubmission after rejection
- Enable Approver Comments
- Click Add.
-
To add another approval level, click and repeat steps 1 to 5.
-
Click Next.
The Pre Issuance Tasks page is displayed.
Configuring Pre-Issuance Tasks for Revocation Requests
-
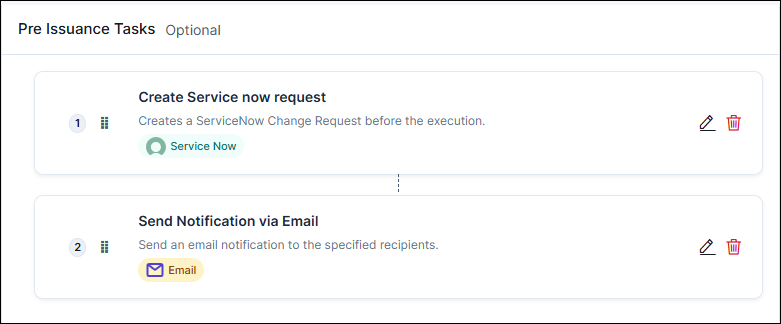
From the right panel, select one (or more) from the following five
pre-issuance tasks available for revocation requests:
- Create Service now request (creates a ServiceNow change request before executing the revocation)
- Send Notification via Email (sends an email notification to the specified recipients)
- Send Notification via Slack (sends a Slack notification to the specified recipients)
- Configure Change Window (Allows you to configure a change window during which the policy tasks should be executed)
- Hook Execution (Initiates the execution of the selected hook)
The corresponding dialog box, for configuring the selected task, is displayed. -
Follow the instructions in the subsequent sections to configure the
required pre-issuance tasks.
- For instructions to configure a ServiceNow request, click here.
- For instructions to send notifications via email, click here.
- For instructions to send notifications over Slack, click here.
- For instructions to configure the change window, click here.
- For instructions to set up the hook execution, click here.
-
To add another pre-issuance task, repeat steps 1 and 2.
The configured pre-issuance tasks are listed in the template.By default, the pre-issuance tasks are executed in the order in which they are configured, as indicated by the serial number assigned to each task.
-
To reorder the pre-issuance tasks, place your mouse pointer over the
 icon and drag the task up/down the tasks list,
as required.
icon and drag the task up/down the tasks list,
as required.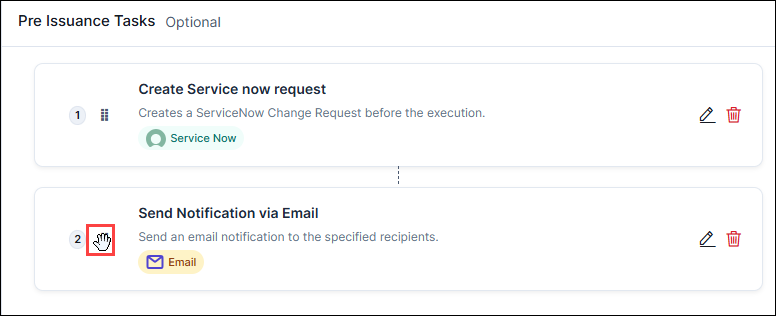 The tasks are reordered and will now be executed in the new order.
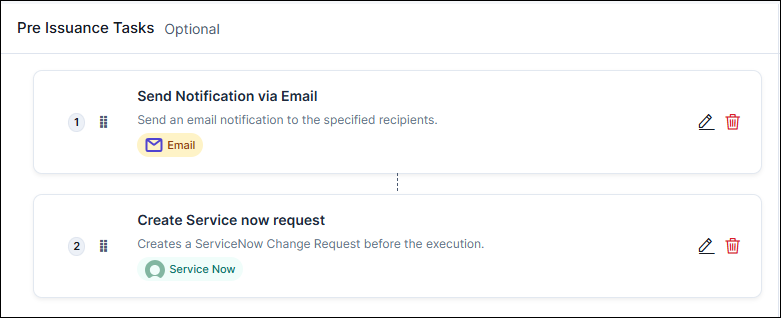
- Click Next.
Create Service now request
-
Enter/Select the ServiceNow Configuration details for creating a
ServiceNow request.
Field Description *Configure ServiceNow Instance Select or configure the type of ServiceNow instance. Change Request Fields Type Defines the type of ServiceNow request to be created (For example: Normal, Emergency, Standard). Select the value from the dropdown. Priority Specifies the urgency level or importance of the change request. Select the value from the dropdown (1-Critical, 2-High, 3-Moderate, 4-Low). Short Description A brief summary or title describing the purpose of the change request. Description A detailed explanation of the change request, including context or justification. Category Classifies the change under a specific functional or operational category. Risk Select the potential risk level associated with implementing the change. Select the value from the dropdown (VeryHigh, High, Moderate, Low, None). Impact Specifies the extent to which the change might affect users, services, or infrastructure. Select the value from the dropdown (1-High, 2-Medium, 3-Low). Urgency Reflects how quickly the change needs to be addressed or implemented. Select the value from the dropdown (1-High, 2-Medium, 3-Low). Assignment Group The ServiceNow group responsible for reviewing and implementing the change. CAB Required Specifies whether the change requires approval from the Change Advisory Board (CAB). Select value True or False. Wait for State Change Determines whether AppViewX should pause workflow execution until the ServiceNow change request reaches a specific state. Select value True or False. *: Mandatory field -
Enter/Select the ServiceNow General Settings for creating a
ServiceNow request.
Field Description Continue On Failure Determines whether the policy execution should complete even after the task fails. The toggle button is disabled by default. *: Mandatory field -
Click Confirm.
The task is added to the list of pre-issuance tasks enabled for the revocation request.
Send Notification via Email
-
Enter/Select the Configuration details for the notification
email.
Field Description *Recipient Type Select either or all of the following: - User Group
- User
*User Group This field is enabled when Recipient Type = User Group. Select single or multiple user groups.
*User This field is enabled when Recipient Type = User Select single or multiple users.
*Email This field is enabled when Recipient Type = Email. Enter a valid email address. Use either comma-separated email IDs, or a single variable like ${template_email}.
*Template Name Select the email template name. *Email Subject This field is enabled when Notify Via = Email. Enter the subject for the email. Use the Variables option to add database values as variables.
*Message Content Enter the message content for the email or slack. Use the Variables option to add database values as variables. *: Mandatory field -
Enter/Select the General Settings for the notification
email.
Field Description Continue On Failure Determines whether the policy execution should complete even after the task fails. The toggle button is disabled by default. *: Mandatory field Tip: You can copy predefined variables (e.g., ${user.firstName}, ${user.lastName}) from the option from the top-right of the
pop-up. Variables can be inserted into text content and at runtime,
they are replaced with the actual values. -
Click Confirm.
The task is added to the list of pre-issuance tasks enabled for the revocation request.
Send Notification via Slack
-
Enter/Select the Configuration details for the notification text
on Slack.
Field Description *Slack Channel This field is enabled when Notify Via = Slack. Select the slack channel.
*Message Content Enter the message content for the email or slack. Use the Variables option to add database values as variables. *: Mandatory field -
Enter/Select the General Settings for the notification
text.
Field Description Continue On Failure Determines whether the policy execution should complete even after the task fails. The toggle button is disabled by default. *: Mandatory field Tip: You can copy predefined variables (e.g., ${user.firstName}, ${user.lastName}) from the option from the top-right of the
pop-up. Variables can be inserted into text content and at runtime,
they are replaced with the actual values. -
Click Confirm.
The task is added to the list of pre-issuance tasks enabled for the revocation request.
Configure Change Window
-
Enter/Select the Configuration details for the change
window.
Field Description Change Window Configuration Configure when policy changes are allowed to run. Use the Preview Windows option to visualize the scheduled change windows based on the selected configuration. *Mode Selection Choose the frequency or recurrence pattern for the change window. The options available are as follows: - Daily: Executes policy tasks during the defined window each day.
- Weekly: Executes tasks on specific days of the week.
- Monthly: Executes tasks on specified dates or weeks within a month.
- User Defined: Allows users to define a custom schedule or window duration.
Daily Schedule Settings This section is enabled when Mode Selection = Daily. Enter the values in the following fields:- *Start Time (HH:MM)
- *End Time (HH:MM)
Weekly Schedule Settings This section is enabled when Mode Selection = Weekly. Enter the values in the following fields:- *Day of the Week - (select Monday, Tuesday etc.)
- End Day of Week (Optional) (select Monday, Tuesday etc.)
- *Start Time (HH:MM)
- *End Time (HH:MM)
Monthly Schedule Settings This section is enabled when Mode Selection = Monthly. Enter the values in the following fields:- *Day of the Month - (select date between 1-31)
- End Day of Month (Optional) (select date between 1-31)
- *Start Time (HH:MM)
- *End Time (HH:MM)
Custom Date & Time This section is enabled when Mode Selection = User Defined. Enter the values in the following fields:- *Explicit Start Time (YYYY-MM-DDTHH:MM:SSZ)
- *Explicit End Time (YYYY-MM-DDTHH:MM:SSZ)
*Missed Window Policy Determines the system behavior if a task misses its scheduled change window. Options include: - Run Next Window: The task will automatically run during the next available window.
- Skip: The missed task will be skipped without execution.
- Fail Immediately: The task will fail immediately if it cannot execute within the defined window.
Allow Override Enables authorized users or groups to allow execution outside the defined change window. Override Type This field is enabled when Allow Override toggle is enabled. Select from User Group or User.
User Group This field is enabled when Allow Override toggle is enabled and Override Type = User Group Select User Group from the dropdown.
User This field is enabled when Allow Override toggle is enabled and Override Type = User Select User from the dropdown.
*: Mandatory field -
Enter/Select the General Settings for the change window.
Field Description Continue On Failure Determines whether the policy execution should complete even after the task fails. The toggle button is disabled by default. *: Mandatory field Tip: You can copy predefined variables (e.g., ${user.firstName}, ${user.lastName}) from the option from the top-right of the
pop-up. Variables can be inserted into text content and at runtime,
they are replaced with the actual values. -
Click Confirm.
The task is added to the list of pre-issuance tasks enabled for the revocation request.
Hook Execution
-
Enter/Select the Configuration details for the hook.
Field Description Hook (Select a hook from the available inventory that you want to execute.) Task Name Displays the default name of the task (Hook Execution). You can rename it if needed for clarity in the workflow. Select Hook Choose the specific hook (script or API integration) to be executed within the workflow. Expose Variables Do you want to expose hook response as variables for following tasks? Toggle this option to expose the hook’s response as variables for use in subsequent workflow tasks. Enables or disables the ability to pass hook output values as input variables to later tasks in the workflow.
Output Variable Mapping Map output variables from the hook response to custom keys for easier reference in subsequent tasks. Paste the expected JSON response from the hook to view and select available variables. Fields:
- Variable Key: Enter a custom key name for the variable.
- Output Variable: Select the output
variable path from the JSON response (options
include
$.output,$.path,$.type).
 button.
Expected Response Format Paste a sample JSON response from the hook in the output {}section. This helps AppViewX identify available response parameters for variable mapping and validation.*: Mandatory field -
Enter/Select the General Settings for the hook.
Field Description Continue On Failure Determines whether the policy execution should complete even after the task fails. The toggle button is disabled by default. *: Mandatory field Tip: You can copy predefined variables (e.g., ${user.firstName}, ${user.lastName}) from the option from the top-right of the
pop-up. Variables can be inserted into text content and at runtime,
they are replaced with the actual values. -
Click Confirm.
The task is added to the list of pre-issuance tasks enabled for the revocation request.
Configuring the Certificate Revoke Action
Configuring Post-Issuance Tasks for Revocation Requests
-
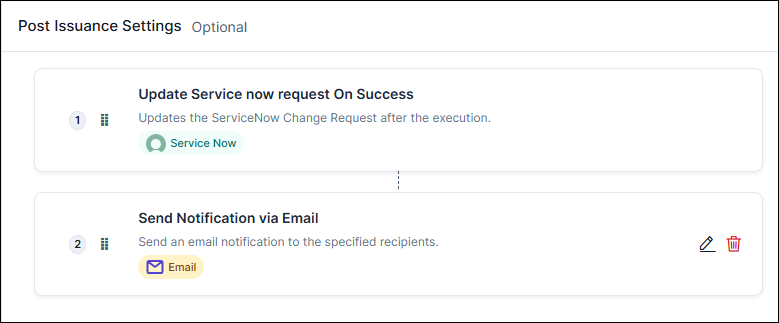
From the right panel, select one (or more) from the following post-issuance
tasks available for revocation requests:
- Update Service now request on success (updates the ServiceNow change request after the revocation request has been successfully executed)
- Send Notification via Email (sends an email notification to the specified recipients)
- Send Notification via Slack (sends a Slack notification to the specified recipients)
- Hook Execution (initiates the execution of the selected hook)
The corresponding dialog box, for configuring the selected task, is displayed. - Follow the instructions in the subsequent sections to configure the required preissuance tasks.
-
To add another pre-issuance task, repeat steps 1 and 2.
The configured post-issuance tasks are listed in the template.By default, the post-issuance tasks are executed in the order in which they are configured, as indicated by the serial number assigned to each task.
-
To reorder the post-issuance tasks, place your mouse pointer over the
icon and drag the task up/down the tasks list,
as required.
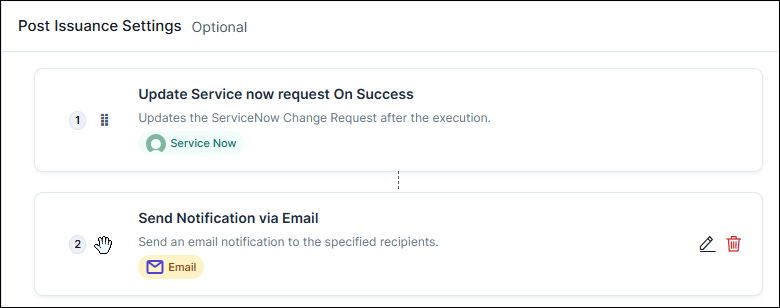 The tasks are reordered and will now be executed in the new order.
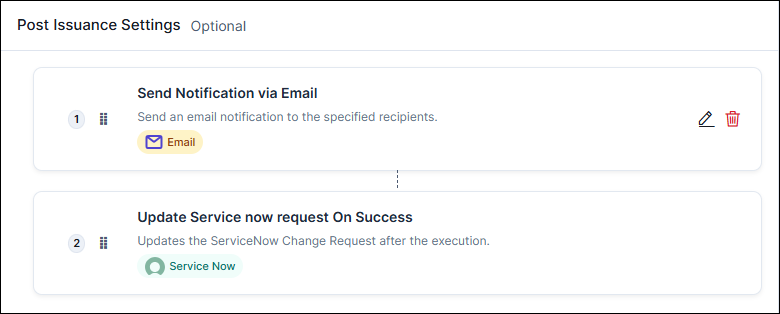
- Click Next.
Update the Service now change request on success
Send Notification via Email
-
Enter/Select the Configuration details for the notification
email.
Field Description *Recipient Type Select either or all of the following: - User Group
- User
*User Group This field is enabled when Recipient Type = User Group. Select single or multiple user groups.
*User This field is enabled when Recipient Type = User Select single or multiple users.
*Email This field is enabled when Recipient Type = Email. Enter a valid email address. Use either comma-separated email IDs, or a single variable like ${template_email}.
*Template Name Select the email template name. *Email Subject This field is enabled when Notify Via = Email. Enter the subject for the email. Use the Variables option to add database values as variables.
*Message Content Enter the message content for the email or slack. Use the Variables option to add database values as variables. *: Mandatory field -
Enter/Select the General Settings for the notification
email.
Field Description Continue On Failure Determines whether the policy execution should complete even after the task fails. The toggle button is disabled by default. *: Mandatory field Tip: You can copy predefined variables (e.g., ${user.firstName}, ${user.lastName}) from the option from the top-right of the
pop-up. Variables can be inserted into text content and at runtime,
they are replaced with the actual values. -
Click Confirm.
The task is added to the list of post-issuance tasks enabled for the revocation request.
Send Notification via Slack
-
Enter/Select the Configuration details for the notification text
on Slack.
Field Description *Slack Channel This field is enabled when Notify Via = Slack. Select the slack channel.
*Message Content Enter the message content for the email or slack. Use the Variables option to add database values as variables. *: Mandatory field -
Enter/Select the General Settings for the notification
text.
Field Description Continue On Failure Determines whether the policy execution should complete even after the task fails. The toggle button is disabled by default. *: Mandatory field Tip: You can copy predefined variables (e.g., ${user.firstName}, ${user.lastName}) from the option from the top-right of the
pop-up. Variables can be inserted into text content and at runtime,
they are replaced with the actual values. -
Click Confirm.
The task is added to the list of post-issuance tasks enabled for the revocation request.
Hook Execution
-
Enter/Select the Configuration details for the hook.
Field Description Hook (Select a hook from the available inventory that you want to execute.) Task Name Displays the default name of the task (Hook Execution). You can rename it if needed for clarity in the workflow. Select Hook Choose the specific hook (script or API integration) to be executed within the workflow. Expose Variables Do you want to expose hook response as variables for following tasks? Toggle this option to expose the hook’s response as variables for use in subsequent workflow tasks. Enables or disables the ability to pass hook output values as input variables to later tasks in the workflow.
Output Variable Mapping Map output variables from the hook response to custom keys for easier reference in subsequent tasks. Paste the expected JSON response from the hook to view and select available variables. Fields:
- Variable Key: Enter a custom key name for the variable.
- Output Variable: Select the output
variable path from the JSON response (options
include
$.output,$.path,$.type).
button.Expected Response Format Paste a sample JSON response from the hook in the output {}section. This helps AppViewX identify available response parameters for variable mapping and validation.*: Mandatory field -
Enter/Select the General Settings for the hook.
Field Description Continue On Failure Determines whether the policy execution should complete even after the task fails. The toggle button is disabled by default. *: Mandatory field Tip: You can copy predefined variables (e.g., ${user.firstName}, ${user.lastName}) from the option from the top-right of the
pop-up. Variables can be inserted into text content and at runtime,
they are replaced with the actual values. -
Click Confirm.
The task is added to the list of post-issuance tasks enabled for the revocation request.
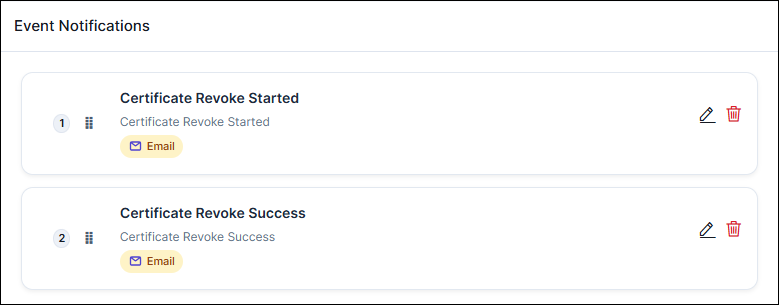
Configuring Event Notifications for the Revocation Process
- Certificate Revoke Started
- Certificate Revoke Success
- Certificate Revoke Failure
-
From the Event Notifications pane in the right, select the required
event.
The corresponding event notification dialog box is displayed.
-
Enter/Select the event notification details.
While separate notifications are sent for each event type, the configuration fields, explained in the table below, are common to all three events.
Field Description *Notify Via Select from the following: - Slack
*Recipient Type This field is displayed when Notify Via = Email. Select one or more from the following recipient types:
- User Group
- User
*Slack Channel This field is enabled when Notify Via = Slack. Select the slack channel.
*User Group This field is enabled when Notify Via = Email and Recipient Type = User Group. Select single or multiple user groups.
*User This field is enabled when Notify Via = Email and Recipient Type = User Select single or multiple users.
*Email This field is enabled when Notify Via = Email and Recipient Type = User Email. Enter a valid email address. Use either comma-separated email IDs, or a single variable like ${template_email}.
*Template Name This field is enabled when Notify Via = Email. Select the email template name.
*Email Subject This field is enabled when Notify Via = Email. Enter the subject for the email. Use the Variables option to add database values as variables.
*Message Content Enter the message content for the email or slack. Use the Variables option to add database values as variables. *: Mandatory field - Click Add.
-
To add another notification configuration for the same or a different
event, repeat steps 2 and 3.
The configured event notifications are listed in the template.
-
Click Finish.
The Submit Policy dialog box is displayed.
-
In the Submit Policy dialog box, click Save and Enable
Policy.
When revocation request execution is configured to use the policy engine, the configurations defined for this policy are used to execute the revocation request.