Configuring AppViewX EST Server
Prerequisites
- Make sure that the following pods are running in the cluster by using
the
command:
kubectl get pods -A | grep
                                est
- Make sure that <avx-platform-gateway-est> and
<avx-vendor-cert-est-agent> services are
running in the cluster by
running:
kubectl get svc -A | grep est
SaaS
- Navigate to the installation directory of the cloud connector software.
- Run
cd deps/tools - Run
./k3s kubectl get svc -A | grep mtlsNote: It should have the avx-mid-server-gateway-mtls under namespace cc.
Enabling EST Services
- Log onto the AppViewX installer node.
- Go to
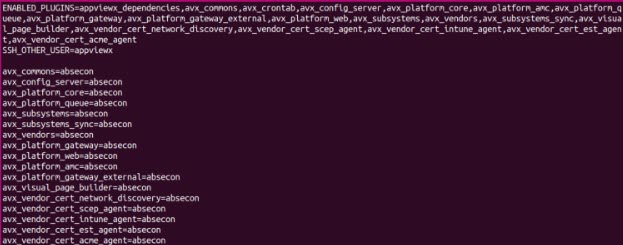
</installation_folder/appviewx_kubernetes/scripts>folder. - Add the
avx-vendor-cert-est-agentandavx_platform_gateway_externalinENABLED_PLUGINSin theappviewx.conffile. - Specify the datacenter (DC) where the gateway must be deployed:
- avx_vendor_cert_est_agent=<dc name>
- avx_platform_gateway_external=<dc name>
- Run
<plugins_install.sh> - Verify if EST is enabled by running
kubectl get pods -A | grep est
- Verify the plugin status and port number:
- Make sure that avx-vendor-cert-est-agent
and avx-vendor-cert-est-agent are running
by using the
command:
kubectl get services -A | grep est
- Make sure that the port number is 5301:30021 in
avx-platform-gateway-est.Note: The number 30021 must be used in the UI configuration.
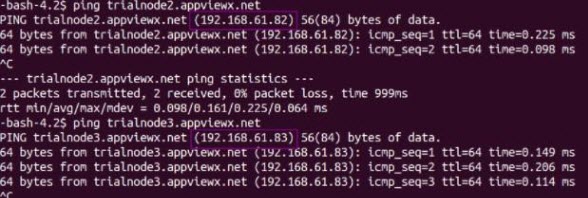
- Identify the nodes running the EST service. EST is available on
all the nodes where the external system runs by
running:
<kubectl get pods -n external-system -o wide>
- Ping to the node names to fetch the IP addresses.
- Make sure that avx-vendor-cert-est-agent
and avx-vendor-cert-est-agent are running
by using the
command:
For SaaS
- Log onto the cloud connector installed node.
- Go to cc_installed_path/deps/properties.
- Open appviewx.properties and set the following
fields as true:
- AUTO_ENROLL_ENABLED=true
- ENABLE_MTLS_PROFILE=true
- ENABLE_HTTP_PROFILE=true
- ENABLE_HTTPS_PROFILE=true
- Scale down the avx-mid-server-platform pod.
- Restart the avx-mid-server-starter pod.Note: Ensure that avx-mid-server-gateway-https is present under namespace cc.
Configuring EST Server
-
Go to
 (Menu) > CERT+ .
The left navigation pane appears.
(Menu) > CERT+ .
The left navigation pane appears. - Select Administration > Auto Enrollment > EST.
-
(Optional) To enable/disable IoT device registration for each EST
configuration and also link specific Azure IoT Hub account from the
Integration Hub, click the
 (Setting) icon and enable/disable the Enable IoT Device
Registration toggle button.
(Setting) icon and enable/disable the Enable IoT Device
Registration toggle button. 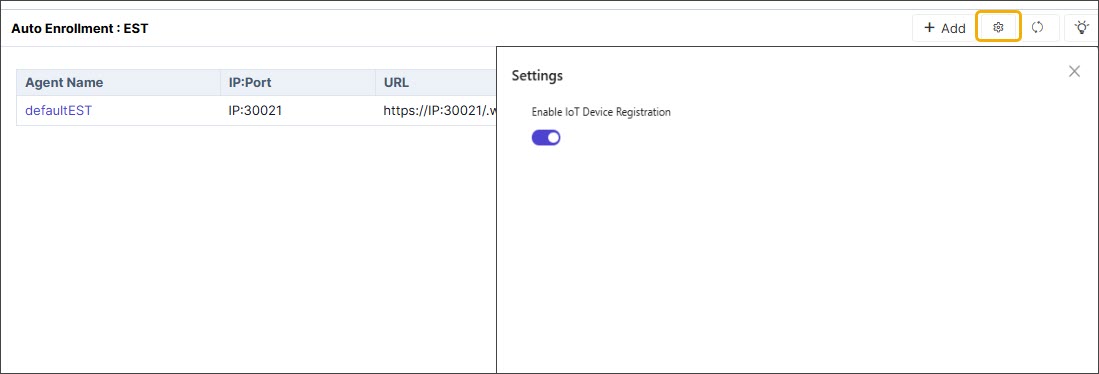
-
Click + Add icon on the top-right.
The Auto Enrollment : EST page is displayed.
-
Enter the following details:
Table 1. Endpoint Details - Field Description Table Fields Description Endpoint Details *Name A unique name (alphanumeric string) to identify the agent setting. Name should not start with special characters. Acceptable characters: A-Z, a-z, 0-9, '.', '_', '-'
*IP/FQDN For On-prem - Without load balancer: Must contain the
FQDN of the node where the external gateway is
running. To get the details, run
 kubectl
                                                  get pods -n external-system -o wide
. If the external gateway is running on multiple nodes, you can specify any one of those nodes. - With load balancer: Must be the FQDN of the load balancer.
For SaaS:
Using On-premises CC:- Without load balancer: Must be the FQDN of the cloud connector where the auto-enrollment gateway is running.
- With load balancer: Must be the FQDN of the load balancer.
Using Direct Gateway
In the SaaS setup, to use the direct AEP gateway without installing the cloud connector, the FQDN/IP address will be the tenant URL with "-aep" before the domain name. The format is as follows: <tenant>-aep.<domainname>.
*Port For On-prem - Without load balancer: By default, it is port 30021. Leave it as is.
- With load balancer: Port must be the listening port of the load balancer.
For SaaS:
Using On-premises CC:- Without load balancer: By default, it is port 30021. Leave it as is.
- With load balancer: Port must be the listening port of the load balancer.
Note: (For Onprem and Saas)- It is recommended to set the listening port as 30021, which is the same as AppViewX.
- If the load balancer's listening port is different from 30021, then update the respective port.
Using Direct Gateway
In the SaaS setup, to consume the direct AEP gateway without installing the cloud connector, use only port 443.
Client Authentication Authentication Mode Select any one authentication method to be carried out during communication with clients: - Only Certificate TLS: During client authentication, only certificate TLS based authentication will be performed.
- Certificate TLS with HTTPS fallback: During client authentication, when the certificate TLS fails, HTTPs based authentication is performed as fallback.
- Both Certificate TLS and HTTPs: During client authentication, both certificate TLS and HTTPs authentication are performed one after the successful completion of the other.
Using Direct Gateway
In the SaaS setup, to consume the direct AEP gateway without installing the cloud connector, use only Certificate TLS with HTTPS fallback as the Authentication mode.
*Issuer Certificate Select one or more issuer certificates that need to be checked for the client certificate authentication. *Client Certificate Revocation Check By default, the value is set to No Revocation Check. Choose from any of these values:- No Revocation Check: Client certificates will not be checked for revocation.
- Perform Revocation Check: Certificates will be validated against revocation mechanisms using CRL or OCSP.
- Check Inventory for Revocation: Certificates will be checked against the certificate inventory for revocation status.
*HTTP Authentication Mode This field appears when Authentication Mode = Certificate TLS with HTTPS fallback or Both Certificate TLS and HTTPs. Select the type of HTTP auth mode either Basic/Digest.- Basic: During client authentication, only the username and password values are considered for HTTPs based authentication.
- Digest: During client authentication, nonce and realm values are also supported along with username and password.
*Fallback Credentials This field appears when Authentication Mode = Certificate TLS with HTTPS fallback or Both Certificate TLS and HTTPs. Select Manual/Logged on user credentials - based on the selection users can configure the credentials manually or save as credentials equivalent to the logged in user.- Manual: The Username and Password fields will be displayed to enter values.
- Logged on user credentials: The Username and Password fields will not be displayed.
*Username Enter username for HTTP authentication. *Password This field appears when Authentication Mode = Certificate TLS with HTTPS fallback or Both Certificate TLS and HTTPs. Enter password for HTTP authentication.
CA Accounts *Certificate Group Select a specific group under which certificate needs to be enrolled. *Certificate Category Select a specific certificate type (Server / Client / Intermediate) to be enrolled. Note: The intermediate radio button, filters templates to show only SUB-CA templates suitable for intermediate CA issuance designed for the microCA functionality.*Select CA Select the required CA from the available options. The certificate is enrolled under the selected CA. The CAs associated with the Default certificate group are:- AppViewX
- AppViewX PKIaaS
- AppViewX PKIaaS Native
- Amazon Private CA
- DigiCert
- DigiCert One
- EJBCA
- Entrust
- Entrust MPKI
- GlobalSign Atlas
- GlobalSign MSSL
- HydrantID
- IDnomic
- Microsoft Enterprise
- Microsoft Standalone
- Nexus
- OpenTrust
- Sectigo (Comodo Certificate Manager)
- SwissSign
*: Mandatory fields Load Balancer Configuration
It is recommended to set the listening port as 30021, which is the same as AppViewX.
Health check URL for load balancer:
- HTTP method: GET
- Healthcheck API: https://<hostname>:30021/
- FQDN: FQDN of cloud connector enabled with the MTLS gateway.
- Expected response code: 401. As the load balancer is accessing the URL without any parameters, it will receive a 401 response.
The load balancer needs to be configured to forward client certificates (used for MTLS authentication) to AppViewX.
CA configuration
When AppViewX is selected as CA, the fields for AppViewX CA are as follows:
Table 2. Details for AppViewX CA - Field Description Table Fields Description *CA Account Select a specific CA Account from the selected CA which is to be used for certificate creation operations. *Certificate Profile Type 3 or more letters of the certificate keywords after which a list of server certificates issued from the above selected CA account will be displayed, one certificate can be selected for further communications with SCEP client machine. *CA Certificate Select the specific issuer certificate that will be used for signing CSR by the certificate authority. Certificates available in the root or intermediate certificate inventory are displayed. *CA Connector Name Name of the CA connector after the certificate is being enrolled. *Certificate Validity Validity of the certificate to be enrolled. Note: For some CAs, the validity available in their respective CA portal is considered despite the specified certificate validity.*: Mandatory fields When AppViewX PKIaaS Native is selected as CA, the fields for AppViewX PKIaaS Native CA are as follows:
Table 3. Details for AppViewX PKIaaS Native - Field Description Table Fields Description *CA Account Select a specific CA Account from the selected CA which is to be used for certificate creation operations. Template Name Select a template name from the dropdown list. *Issuer Name Select an issuer name to issue the certificate. *CA Certificate Select the specific issuer certificate that will be used for signing CSR by the certificate authority. Certificates available in the root or intermediate certificate inventory are displayed. *CA Connector Name Name of the CA connector after the certificate is being enrolled. *Certificate Validity Validity of the certificate to be enrolled. Note: For some CAs, the validity available in their respective CA portal is considered despite the specified certificate validity.*: Mandatory fields When Amazon Private CA is selected as CA. The fields for Amazon Private CA are as follows:
Table 4. Details for Amazon Private CA - Field Description Table Fields Description *CA Account Select a specific CA Account from the selected CA which is to be used for certificate creation operations. *Region Select a valid region associated with the CA account. The dropdown is populated with the first available value. Select an appropriate value as required.
*Issuer Select a valid issuer associated with the CA account. The dropdown is populated with the first available value. Select an appropriate value as required.
*Signature Algorithm Select a valid issuer associated with the CA account. The dropdown is populated with the first available value from the group's associated policy. Select an appropriate value as required.
*CA Certificate Select the specific issuer certificate that will be used for signing CSR by the certificate authority. Certificates available in the root or intermediate certificate inventory are displayed. *CA Connector Name Name of the CA connector after the certificate is being enrolled. *Order Validity Validity of the certificate to be enrolled. *: Mandatory fields When AppViewX PKIaaS is selected as CA. The fields for AppViewX PKIaaS CA are as follows:
Table 5. Details for AppViewX PKIaaS CA - Field Description Table Fields Description *CA Account Select a specific CA Account from the selected CA which is to be used for certificate creation operations. *Certificate Profile Type 3 or more letters of the certificate keywords after which a list of server certificates issued from the above selected CA account will be displayed, one certificate can be selected for further communications with SCEP client machine. *Issuer Location Select the issuer location associated with the CA account. *Issuer Name Select a valid issuer associated with the CA account. *CA Certificate Select the specific issuer certificate that will be used for signing CSR by the certificate authority. Certificates available in the root or intermediate certificate inventory are displayed. *CA Connector Name Name of the CA connector after the certificate is being enrolled. *Certificate Validity Validity of the certificate to be enrolled. *: Mandatory fields When DigiCert is selected as CA. The fields for DigiCert CA are as follows:
Table 6. Details for DigiCert CA - Field Description Table Fields Description *CA Account Select a specific CA Account from the selected CA which is to be used for certificate creation operations. *Division Select a division associated with the CA account. The dropdown is populated with the first available value. Select an appropriate value as required.
*Certificate Type Select a valid certificate type associated with the CA account. The dropdown is populated with the first available value. Select an appropriate value as required.
*CA Certificate Select the specific issuer certificate that will be used for signing CSR by the certificate authority. Certificates available in the root or intermediate certificate inventory are displayed. *CA Connector Name Name of the CA connector after the certificate is being enrolled. *Order Validity Validity of the certificate to be enrolled. *: Mandatory fields If the Select CA = DigiCert, then a separate section Vendor Specific Details is displayed after the CA Accounts section with two fields described below.
Table 7. Vendor Specific Details for Digicert CA - Field Description Table Fields Description *Server Type Select a server type. The dropdown is populated with the first available value. Select an appropriate value as required.
*Payment Method Select a payment method. The possible options are: - Bill To Account Balance - Pay with the account balance. Returns an error if this option is disabled for the account or if the account has an insufficient fund.
- Bill To Default Credit Card - Pay with the account's default credit card. Returns an error if no default credit card is configured for the account
*: Mandatory fields When DigiCert One is selected as CA. The fields for DigiCert One CA are as follows:
Table 8. Details for DigiCert One CA - Field Description Table Fields Description *CA Account Name A unique name to identify the CA setting. Note: No special characters other than ‘.’, ‘-’,’_’ are allowed. Names should not start with special characters.*Purpose/Usage Certificate Type for which CLM actions will be enabled. For example, Server or Client. Proxy Required Enable this field if the CA communication needs to happen via proxy. The proxy details configured in general settings will be used for communication. Data Center (AppViewX's CA agent) Select the data center for CA communication, with the CC node being the recommended option. The selected node will handle the communication through the chosen CC node. CA Configuration *Base URL This URL will contain the hostname of the DigiCert CA instance and used for constructing the API requests. *Authentication method By default, API Token is selected. *API Token Enter the API token to authorize the communication between AppViewX and DigiCert One. Allow Seat ID during enrollment Enabling this field displays a Seat ID field in the Auto enrollment settings that you can use instead of the CA settings. *Seat ID Unique value assigned to identify an entity in the DigiCert One account.You can provide multiple ID separated by a comma. They can be used for enrollment, renewal, and regeneration. Use DigiCert One to switch certificates from DigiCert MPKI Enable this field to automatically switch your DigiCert MPKI certificates to DigiCert One with auto-enrollment/auto-regenerate. *: Mandatory fields When EJBCA is selected as CA. The fields for EJBCA CA are as follows:Table 9. Details for EJBCA CA - Field Description Table Fields Description *CA Account Select a specific CA Account from the selected CA which is to be used for certificate creation operations. *CA Certificate Select the specific issuer certificate that will be used for signing CSR by the certificate authority. Certificates available in the root or intermediate certificate inventory are displayed. *CA Connector Name Name of the CA connector after the certificate is being enrolled. *: Mandatory fields If the selected CA is EJBCA, a separate section Vendor specific details is displayed after the CA Accounts section. The fields for Vendor specific details are as follows:Table 10. Vendor Specific Details for EJBCA CA - Field Description Table Fields Description *End Entity Profile Name Select a profile of an end entity. End entity user name Enter the user name for the end entity. *Issuer Common Name Select a common name of an issuer. *Certificate Profile Name Select a profile name of certificate. *: Mandatory fields When Entrust is selected as CA. The fields for Entrust CA are as follows:Table 11. Details for Entrust CA - Field Description Table Fields Description *CA Account Select a specific CA Account from the selected CA which is to be used for certificate creation operations. *Certificate Type Select a valid certificate type associated with the CA account. - If the Certificate Category radio button is selected to Server, the dropdown list is populated with the first available value. Select an appropriate value as required.
- If the Certificate Category radio button is selected to Client, the dropdown list is populated with ‘None’ as the default value.
*CA Certificate Select the specific issuer certificate that will be used for signing CSR by the certificate authority. Certificates available in the root or intermediate certificate inventory are displayed. *CA Connector Name Name of the CA connector after the certificate is enrolled. *Certificate Validity Validity of the certificate to be enrolled (in days/months/years). *: Mandatory fields If the selected CA is Entrust, a separate section displaying Vendor specific details and Custom Attributes is displayed after the CA Accounts section.Note: Based on the Entrust ECS account configuration Custom Attributes section may also be displayed.Table 12. Vendor Specific Details for Entrust CA - Field Description Table Fields Description Additional Emails Enter the valid email address in the field. Requester Name Enter the requester name. Requester Email Enter a valid email ID. Requester Phone Enter the 10-digit phone number. *: Mandatory fields When Entrust MPKI is selected as CA. The fields for Entrust MPKI CA are as follows:Table 13. Details for Entrust MPKI CA - Field Description Table Fields Description *CA Account Select a specific CA Account from the selected CA which is to be used for certificate creation operations. *CA Certificate Select the specific issuer certificate that will be used for signing CSR by the certificate authority. Certificates available in the root or intermediate certificate inventory are displayed. *CA Connector Name Name of the CA connector after the certificate is enrolled. *: Mandatory fields If the selected CA is Entrust MPKI, a separate section Vendor Specific Details is displayed after the CA Accounts section. The fields for Vendor specific details are as follows:Table 14. Vendor Specific Details for Entrust MPKI CA - Field Description Table Fields Description *CA Name Select a CA name from the dropdown list. *Certificate Profile Select a certificate profile from the dropdown list. *: Mandatory fields When GlobalSign Atlas is selected as CA. The fields for GlobalSign Atlas CA are as follows:Table 15. Details for GlobalSign Atlas CA - Field Description Table Fields Description *Select CA Select a specific CA Account from the selected CA which is to be used for certificate creation operations. *API Credential Friendly name Select a CA Account to communicate with during the certificate enrollment actions. *Certificate Profile Select the certificate Profile from the dropdown list. *CA Certificate Select the specific issuer certificate that will be used for signing CSR by the certificate authority. Certificates available in the root or intermediate certificate inventory are displayed. *CA Connector Name Name of the CA connector after the certificate is enrolled. *Certificate Validity Validity of the certificate to be enrolled (in days/months/years). *: Mandatory fields A Generic Fields section is also displayed below the CA Accounts section. It contains the fields related to the CSR parameters based on the profile (API Credential Friendly name) selected. Only the Organization field is mandatory and is fetched from the selected profile. Rest of the fields are optional.
When GlobalSignMSSL is selected as CA. The fields for GlobalSign MSSL CA are as follows:The following field is displayed in the Vendor Specific Details section as per the selected CA:Table 16. Details for GlobalSign MSSL CA - Field Description Table Fields Description *CA Account Select a specific CA Account from the selected CA which is to be used for certificate creation operations. *Product Type Select the specific Certificate Type. The values are fetched from the CA Settings configuration.
*CA Certificate Select the specific issuer certificate that will be used for signing CSR by the certificate authority. Certificates available in the root or intermediate certificate inventory are displayed. CA Connector Name Name of the CA connector after the certificate is enrolled. Certificate Validity Validity of the certificate to be enrolled (in days/months/years). *: Mandatory fields The following field is displayed in the Point of Contact section as per the selected CA. The CA mandates the point of contact information for traceability. All auto-enrollment requests via this endpoint will be registered with the point of contact information entered here.Table 17. Vendor Specific Details for GlobalSign MSSL CA - Field Description Table Fields Description *Profile name Select the Profile based on the configurations made in the Certificate Authority setting. *: Mandatory fields Table 18. Point of Contact Details for GlobalSign MSSL CA - Field Description Table Fields Description *First Name Enter the first name. *Email Address Enter the valid email address. *Phone Number Enter the valid phone number. *: Mandatory fields When Google is selected as CA. The fields for Google CA are as follows:Table 19. Details for Google CA - Field Description Table Fields Description *CA Account Select a specific CA Account from the selected CA which is to be used for certificate creation operations. *Certificate Profile Select the certificate profile type. *Issuer Location Select an issuer location that is associated with the CA account. *Pool Name Select a pool name to issue the certificate. Template Name Select the appropriate template name. *Issuer Name Select an issuer name to issue the certificate. *CA Certificate Select the specific issuer certificate that will be used for signing CSR by the certificate authority. Certificates available in the root or intermediate certificate inventory are displayed. *CA Connector Name Name of the CA connector after the certificate is being enrolled. *Certificate Validity Validity of the certificate to be enrolled. *: Mandatory fields When HydrantID is selected as CA. The fields for HydrantID CA are as follows:Table 20. Details for HydrantID CA - Field Description Table Fields Description *CA Account Select a specific CA Account from the selected CA which is to be used for certificate creation operations. *HydrantID Policy Select the policy associated with the CA Account to be used for certificate operations. *CA Certificate Select the specific issuer certificate that will be used for signing CSR by the certificate authority. Certificates available in the root or intermediate certificate inventory are displayed. *CA Connector Name Name of the CA connector after the certificate is being enrolled. *Certificate Validity Validity of the certificate to be enrolled. *: Mandatory fields When IDnomic is selected as CA. The fields for IDnomic CA are as follows:Table 21. Details for IDnomic CA - Field Description Table Fields Description *CA Account Select a specific CA account from the selected CA which is to be used for certificate creation operations. *Certificate Profile Select the certificate profile from the dropdown list. *CA Connector Name Name of the CA connector after the certificate is enrolled. *Certificate Validity Validity of the certificate to be enrolled (in days/months/years). *: Mandatory fields When Microsoft Enterprise is selected as CA. The fields for Microsoft Enterprise CA are as follows:Table 22. Details for Microsoft Enterprise CA - Field Description Table Fields Description *CA Account Select a specific CA Account from the selected CA which is to be used for certificate creation operations. *CA Certificate Select the specific issuer certificate that will be used for signing CSR by the certificate authority. Certificates available in the root or intermediate certificate inventory are displayed. *CA Connector Name Name of the CA connector after the certificate is enrolled. *: Mandatory fields If the selected CA is Microsoft Enterprise, a separate section Vendor specific details is displayed with a Template Name dropdown after the CA Accounts section.
When Microsoft Standalone is selected as CA. The fields for Microsoft Standalone CA are as follows:Table 23. Details for Microsoft Standalone CA - Field Description Table Fields Description *CA Account Select a specific CA Account from the selected CA which is to be used for certificate creation operations. *CA Certificate Select the specific issuer certificate that will be used for signing CSR by the certificate authority. Certificates available in the root or intermediate certificate inventory are displayed. *CA Connector Name Name of the CA connector after the certificate is enrolled. *: Mandatory fields When Nexus is selected as CA. The fields for Nexus CA are as follows:The following field is displayed in the Vendor Specific Details section as per the selected CA:Table 24. Details for Nexus CA - Field Description Table Fields Description *CA Account Select a specific CA Account from the selected CA which is to be used for certificate creation operations. *CA Certificate Select the specific issuer certificate that will be used for signing CSR by the certificate authority. Certificates available in the root or intermediate certificate inventory are displayed. *CA Connector Name Name of the CA connector after the certificate is enrolled. *Certificate Validity Validity of the certificate to be enrolled (in days/months/years). *: Mandatory fields Table 25. Vendor Specific Details - Field Description Table Fields Description *Procedure Select the procedure based on the configurations made in the Certificate Authority Setting. *: Mandatory fields When OpenTrust is selected as CA. The fields for OpenTrust CA are as follows:
Table 26. Details for OpenTrust CA - Field Description Table Fields Description *CA Account name A unique name to identify the CA setting. Note: No special characters other than ‘.’, ‘-’,’_’ are allowed. Names should not start with special characters.*Certificate Management Profile Select the certificate issuance policy defined in OpenTrust CA. Zone The AppViewX configuration wrapper that maps to a CA + profile, and is used by end-users or automation to request certificates consistently. *CA Certificate Select the specific issuer certificate that will be used for signing CSR by the certificate authority. Certificates available in the root or intermediate certificate inventory are displayed. *CA Connector Name Name of the CA connector after the certificate is enrolled. *: Mandatory fields A Profile Parameters section is also displayed below the CA Accounts section. It contains the fields such as *Common Name, Organizational Unit, *Organization, *Email, *Password. or as configure in the Certificate Authority settings page.
When Sectigo (Comodo Certificate Manager) is selected as CA. The fields for Sectigo (Comodo Certificate Manager) CA are as follows:
Table 27. Details for Sectigo (Comodo Certificate Manager) CA - Field Description Table Fields Description *CA Account name A unique name to identify the CA setting. Note: No special characters other than ‘.’, ‘-’,’_’ are allowed. Names should not start with special characters.
*Certificate Type Certificate Type for which CLM actions will be enabled. *CA Certificate Select the specific issuer certificate that will be used for signing CSR by the certificate authority. Certificates available in the root or intermediate certificate inventory are displayed. *CA Connector Name Name of the CA connector after the certificate is enrolled. *Certificate Validity Validity of the certificate to be enrolled (in days/months/years). *: Mandatory fields When SwissSign is selected as CA. The fields for SwissSign CA are as follows:
Table 28. Details for SwissSign CA - Field Description Table Fields Description *CA Account Select a specific CA Account from the selected CA to be used for certificate creation operations. *Client Name Select the specific client. *Product Select the specific product. *CA Certificate Select the specific issuer certificate that will be used for signing CSR by the certificate authority. Certificates available in the root or intermediate certificate inventory are displayed. *CA Connector Name Name of the CA connector after the certificate is being enrolled. *Certificate Validity Validity of the certificate to be enrolled. *: Mandatory fields - Without load balancer: Must contain the
FQDN of the node where the external gateway is
running. To get the details, run
-
Configure the Advanced Settings details as follows:
The following table provides the field description for Advanced Settings:
Table 29. Advanced Settings - Field Description Table Fields Description *Switch to Enroll Select Yes or No. Selecting the radio button as Yes will convert the re-enrollment requests to enrollment requests.
*Fetch Certificate Parameters Select Yes or No. Setting the radio button to Yes will enable the system to automatically fetch certificate parameters from a Suggestive Policy, and append them to the client CSRs.
*Include Truststore Certificates Select whether the issuer certificate needs to be sent to client machines after enrollment. *High Speed Transactions Based on the selection of this field, the endpoint will be configured with or without High Performance transaction times. Request information pertaining to High-Performance can be viewed on the Direct Requests page. *Enable IoT Device Registration This option is available only if IoT Device Registration toggle Enable IoT Device Registration is enabled. The default value is set to NO; click YES to register devices with Azure IoT Hub during EST Enrollment.
*Vendor Settings This option is available only if radio button for Enable IoT Device Registration is Yes. Select the Azure IoT Hub Integration configured in Integration Hub. The selected vendor setting is used for device registration when IoT device registration is enabled.
*Return Existing Certificate If this option is enabled (Yes) then for request with AppViewX should check and return the existing valid certificate for the same CSR & public key from inventory if available otherwise it should proceed with enrollment and return the certificate. - If it is set to Yes, the Certificate Threshold field is displayed.
- If the option is disabled (No), then AppViewX will do the default behavior of enrolling a new certificate for each request.
Certificate Threshold This field is enabled only if Return Existing Certificate = Yes. Enter the number of days in this field. This value is used to Initiate a new certificate request if the certificate is nearing the expiry date i.e., if existing certificate validity is less than the entered value.
*Retry Count Values accepted between 5 - 99. Based on this value, the EST agent will trigger the number of calls to collect the certificate from AppViewX until it is received.
*Retry Frequency Values accepted between 10 - 99. The value specified in this field determines the duration taken between the trigger calls by the EST agent.
*: Mandatory fields
Iptables and Pod Scaling in Worker Nodes
As part of the CIS benchmark compliance for AppViewX on-prem servers, only the default ports are whitelisted by default. Any additional ports—such as 30021 or 30022 required for Auto Enrollment Protocol operations—must be explicitly allowed in the iptables configuration.
In this case, port 30021 (EST) is an additional plugin port that must be permitted in the iptables rules to enable external communication.
Follow these steps to add the required rule to the iptables configuration:
- Connect to the worker nodes:
vi /etc/iptables/rules.v4 - Add lines to the IPtables to ACCEPT traffic30021,
30022:
iptables-restore < /etc/iptables/rules.v4 - To scale the pods on a worker node:
kubectl scale --replicas=2
                                deploy/avx-platform-gateway -n external-system
- Open the rules.v4 file:
sudo -ivi /etc/iptables/rules.v4 - Append the following lines to allow the required ports:
-A
                                    INPUT -p tcp -m tcp --dport <port> -j ACCEPT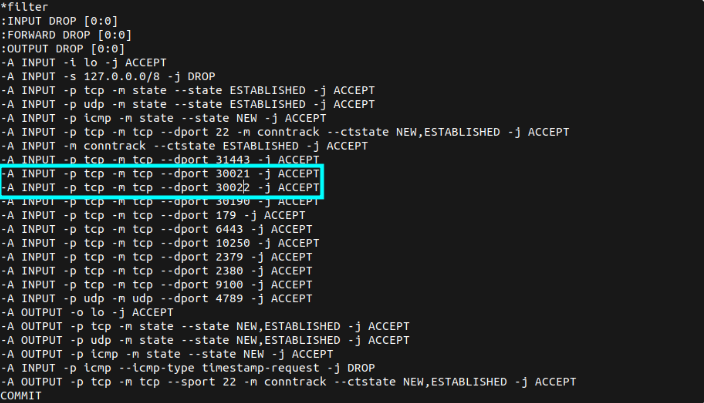
Here, we have added 30021 and 30022 ports.
- Save and apply the rules:
iptables-restore <
                                    /etc/iptables/rules.v4
Verifying EST Server
-
The agent configuration must be in valid status.

-
If the configuration is completed and agent status is valid, refresh the
EST URL from the web browser. The expected response must be:
{"appStatusCode":"AVX_GW_021","message":"Client certificate authentication failed"}As no client certificate is provided when entering this URL, there will be a failure response.
Supported Operations
| Supported Operation | Operation Path |
|---|---|
| Distribution of CA certificates | /cacerts |
| Enrollment of clients | /simpleenroll |
| Re-enrollment of clients | /simplereenroll |
Actions using EST Server
Enrolling Server Certificate
CERT_AUTO_ENROLLMENT_ENABLE_REENROLL is enabled,
AppViewX can detect previously enrolled certificates. If it finds
certificates with the same Common Name (CN) from the same device, it will
treat them as re-enrollment and preserve their history. Otherwise, it will
proceed with the standard enrollment process. This ensures that certificate
history is maintained, even after the EST client is
reinstalled.To use a client-authentication AppViewX CA certificate:
- Log on to the AppViewX application with valid credentials.
-
Go to
(Menu) > CERT+ .
-
Select Certificate Action > Enroll Certificate > Server.
The Enroll Server Certificate page appears.
- In the General Information section of the Enroll Server Certificate page, select the desired Assign Group from the dropdown list. By default, the Default option is selected.
-
Enter the CA Details.
Table 30. Field descriptions for the CA Details section Fields Description *Certificate Authority From the dropdown list, select the CA. *Renew Automatically Note: Changing the group inherited renew period overwrites the renewal period for this certificate.Select the toggle button to On or Off.
- When the toggle is enabled, the Start Renewing option is enabled.
- Enter the number of days to renew the certificate automatically.
*Regenerate Automatically Select the toggle button to On or Off. - When the toggle is enabled, the Start Regenerating option is enabled.
- Enter the number of days to renew the certificate automatically.
*CA Account From the dropdown list, select the CA account to which the certificate enrollment request is submitted. Certificate Profile From the dropdown list, select the profile with which the certificate must enroll. *RA Workflow This field is displayed when Certificate Authority = IDnomic and a CA+RA setting is selected from the CA Accounts dropdown list. From the dropdown list, select the RA workflow that is used for certificate enrollment.
For the details of a workflow, you can check them on your CA portal on IDnomic.
*Issuer Location Note: This field is applicable only for Google CA.From the dropdown list, select the issuer location associated with the CA account.
*Issuer Name Note: This field is applicable only for Google CA.From the dropdown list, select the issuer name for issuing the certificate.
*Connector Name Enter the friendly name for the CA connector. On saving this form, the name entered here is displayed in the holistic view.
Description Note: Character limit: 2000 charactersEnter the description in this field.
*CSR Generation Note: This field is applicable for all CAs except Amazon.From the following options, select the required method for generating the CSR:
- AppViewX: Private key and CSR are created in AppViewX based on CSR parameters given.
- Upload CSR: You can
upload a file that contains the CSR details. This
source file is used to populate the CSR
parameters, which is submitted to the CA.
- Under CSR Generation, select Upload
CSR.
The Please paste your CSR field is displayed.
- From the Please paste your CSR field, select Browse.
- Navigate to the location of your CSR file, and click Open.
- Click Upload.
- Under CSR Generation, select Upload
CSR.
- HSM: Note: This option is disabled when Certificate Authority = Google.To generate the private key and the CSR, based on the CSR parameters given, in an HSM device:
- Under CSR Generation, select HSM.
-
Fields for gathering your HSM-related inputs are displayed.
Table 31. To generate the private key and the CSR, enter/select the following details: Field Description *Device Type From the dropdown list, from the following options, select the type of device on which the private key and the CSR are generated: - HSM Devices
- ADC Devices
*Vendors This field is applicable only when Device Type = ADC Devices. *Devices This field is populated based on the Device Type and Vendors selected. From the dropdown list, select the required HSM/ADC device.
*Key Handler Name This field is applicable only when Device Type = HSM Devices.Enter the key handler name. *Key Reference Name This field is applicable only when Device Type = ADC Devices. Enter the key reference name.
- End Point: Note: This option is disabled when Certificate Authority = Google.
Table 32. To generate the private key and the CSR in the selected end point device, enter/select the following inputs: Field Description Category From the following options, select the ADC device category: - ADC
- Server
- Firewall
Vendor From the dropdown list, select the vendor of the end point device. Note: This field is populated based on the Category selected.*Devices This field lists the end point devices present in your environment that belong to the above selected Category and Vendor. From the dropdown list, select the end point device on which you want to generate the private key and the CSR.
Tenant This field is applicable only when Category = ADC. Enter the tenant ID. CSR Location This field is applicable only when Category = Server. Partition This field is applicable only when Category = Firewall. *CSR File Name Enter the name of the file that contains the CSR parameters. As the extension is already included in the field, ensure that you enter the file name without the file extension. Note: Starting v2023.1.0 FP2, this field is labeled as CSR File Location for enrolling Apache server certificates.*Key File Name Enter the name of the file that contains the private key details. As the extension is already included in the field, ensure that you enter the file name without the file extension.
Note: Starting from v2023.1.0 FP2, this field is labeled as Key File Location for enrolling Apache server certificates.
*: Mandatory fields -
For the certificate being enrolled, enter the CSR
Parameters.
Table 33. Field descriptions for the CSR Parameters Field Description *Common Name Enter the certificate's common name. The common name is one of the key values of Certificate Signing Request (CSR) to be present in the certificate. For example, <appviewx>.
Note: No special characters allowed except underscore (_) and hyphen (-).Subject Alternative Name Enter/From the dropdown list, select the Subject Alternative Name for the certificate being enrolled. You can see the count of subject alternative names (SAN) available for a certificate in the CSR parameter section, inventory grid, and CA connector page.Note:- Multiple values must be separated by a comma.
-
The cumulative count of SANs is displayed in the certificate property pop-up window from the holistic view.
*Organization The organization name is one of the CSR parameters to be present in the certificate. This field is auto-filled and editable based on the configuration in the selected group’s policy. Organization Unit Organization Unit name is one of the CSR parameters to be present in the certificate. This field is auto-filled and editable based on the configuration in the selected group’s policy. Locality The locality name is one of the CSR parameters to be present in the certificate. This field is auto-filled and editable based on the configuration in the selected group’s policy.
State The state name is one of the CSR parameters to be present in the certificate. This field is auto-filled and editable based on the configuration in the selected group’s policy. Country Country name is one of the CSR parameters to be present in the certificate. This field is auto-filled and editable based on configuration. It must be a 2-letter country code (for example, US, and so on). Email Address Enter a valid email address of the person responsible for maintaining the certificate. *Validity To specify the validity of the certificate being enrolled: - From the first dropdown list, select the number of days/months/years.
- From the second dropdown list, select the unit
of the duration from the following values:
Days/Months/Year.For example, if the validity of the certificate is 2 months:
- From the first dropdown list, select 2.
- From the second dropdown list, select Months.
Challenge Password Challenge password is one of the CSR parameters to be present in the certificate. Password must contain at least one alphabet (uppercase and lowercase), one number, and one special character. Confirm Password Re-enter the password from the Challenge Password field. *Hash Function The Hash function with which the CSR has to be signed. Any information specific to any CA or vendor has to be covered in the Note section. This field is auto-filled and editable based on the configuration in the selected group’s policy. Note: For Certificate Authority = HydrantID, irrespective of the hash function selected, by default, the CA returns a certificate with SHA256. Therefore, admins must restrict users from creating a certificate with a hash function other than SHA256. To accomplish this, create policy with a single hash value (SHA256).*Key Type The key type is used while creating a private and public key pair. This field is auto-filled and editable based on the configuration in the selected group’s policy. *Bit Length The bit length is used while creating a private and public key pair. This field is auto-filled and editable based on the configuration in the selected group’s policy. *: Mandatory fields -
In the Attachments section, upload any additional documents that
are relevant to the enrollment of the certificate (for example, approval
emails).
Table 34. Field descriptions for the Attachments section Field Description Name Enter a name for the document. This need not be the actual name of the document; it can be an alternate name that will be used only for reference. Comments Enter any details relevant to the document being attached. Note: Character limit: 2000 charactersUpload File To upload an attachment: - Click Upload.
- Navigate to the location of the document to be uploaded.
- Select the document to be document and click
Open.
The selected document is uploaded and listed in the table displayed below these fields in the Attachments section.
Tip: If you have uploaded multiple attachments, use the Search field to find the required one.
*: Mandatory fields -
In the testAttributelabelTest field of the Certificate
Attributes section, enter the organization-specific values that
need to be mentioned along with the CSR.
These values are not part of the certificate but are available in the AppViewX inventory. For example, cost center.Note: This additional information can be used to filter certificate details in the inventory.
-
Enter the relevant details in the Generic Fields. These are
default fields for maintaining the IP address and device information, if
required.
Table 35. Field descriptions for the Generic Fields Field Description Device Name Enter the name of the device. Application IP Address Enter the IP address of the application. Tracking ID A free-form business alpha-numerical identifier, included in the audit logs, that may be used to correlate audit log entries (typically enrollment and revocation events) Certificate holder Email This field is displayed only when a CA setting with a registration authority is selected for certificate enrollment. An email address that may be used to send notifications to certificate holder depending on the notification policies configured for the requested workflow.
First name This field is displayed only when a CA setting with a registration authority is selected for certificate enrollment. First name (as a metadata) associated with the certificate to be enrolled.
Last name This field is displayed only when a CA setting with a registration authority is selected for certificate enrollment. Last name (as a metadata) associated with the certificate to be enrolled.
Organization This field is displayed only when a CA setting with a registration authority is selected for certificate enrollment. Organization name (as a metadata) associated with the certificate to be enrolled.
Comment This field is displayed only when a CA setting with a registration authority is selected for certificate enrollment. Additional information (as a metadata) associated with the certificate to be enrolled.
UUID This field is displayed only when a CA setting with a registration authority is selected for certificate enrollment. Universal Unique Identifier, or UUID, (as a metadata) associated with the certificate to be enrolled.
-
In the Vendor-Specific Details section, enter
the CA-specific details. Some of the CAs will expect additional details
other than CSR parameters for their operational purposes.
- By default, the Certificate ID is auto-populated based on the value entered in the Common Name field (in the CSR Parameters section).
- The Certificate ID can be modified by the user.
- If the user edits the Certificate ID, any change to the Common Name will not reflect in the Certificate ID.
- If the user deletes the Certificate ID, the value of the Certificate ID field is set to the Common Name suffixed with the timestamp.
-
Click Add.
Once the details are added, you are redirected to a page where the CSR and CA details are added as a connector. This page is called the holistic view and from here, any action on the certificate can be performed including provisioning the certificate to a server.
-
On the holistic view, click the Submit button to
trigger the request.
The submit action is triggered and the Submit dialog box is displayed.
-
Enter your comments in the text field and click
Yes.
If the approval required option is enabled in the CA policy, the request is moved to the Approve and Implementation stages.
-
Click Approve to proceed.
The Approve dialog box is displayed.
-
Enter your comments in the text field.
Note: If the workflow request has to be approved automatically in the future, click the Schedule later button .
-
Click Yes.
Once the approval process is complete, the Implement option is displayed in the holistic view.
-
Click Implement.
The Implement dialog box is displayed.
-
Enter your comments in the text field.
If the workflow request has to be implemented automatically in the future, click Schedule later .
-
Click Yes.
CSR Submission to CA is in progress. Once the CSR submission is successful, the request state changes to Submit certificate - retrieval in progress state.
If the enrollment request is compliant with conditions defined and auto-approval enabled in the targeted CA, the certificate is fetched in a few seconds.
If auto-approval disabled in the targeted CA, you have to be logged into the CA and approve the request.
Once the certificate is issued successfully, the certificate is retrieved into AppViewX.
Testing EST Enrollment
- After successful verification, create a test folder in the Linux client machine.
-
Download the client authentication certificate
(est_auth.crt) and the key
(est_auth.key).
Note: The common name of the client authentication certificate can be any value, but the file name of the client certificate to be used in EST client must be est_auth.crt and est_auth.key.
- Trigger the GetCA certificates request using the curl command.
-
Make sure that the authentication certificate and the key are present
in the same location: <curl -k --cert ./est_auth.crt --key
./est_auth.key<EST Endpoint URL from AppViewx GUI>/cacerts -o
cacert.p7>.
 You will get the <cacert.p7> file with the enrolled CA certificate in Step 9.
 -
Convert the received CA certificate to pem:
openssl base64 -d -in cacert.p7 | openssl pkcs7 -inform DER -outform PEM -print_certs -out cacert.pem> -
Trigger the enrollment request by using the curl
command. Make sure that the authentication certificate, key, and CSR are
present in the same location.
curl -kv --cert ./est_auth.crt --key ./est_auth.key <EST Endpoint URL from AppViewx GUI>/simpleenroll -o ./signed_cert.p7 --data-binary @req.p10 -H "Content-Type: application/pkcs10" --dump-header ./resp.hdr
-
Verify the content of <signed_cert.p7>.
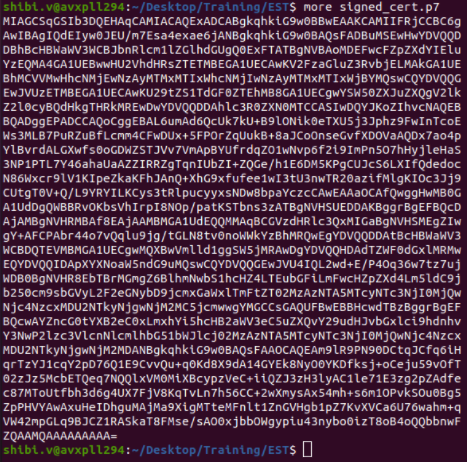
-
Convert the enrolled p7 certificate into pem:
<openssl base64 -d -in signed_cert.p7 | openssl pkcs7 -inform DER -outform PEM -print_certs -out signed_cert.pem> - Make sure that you received the <cacert.p7> file with the enrolled CA certificate.
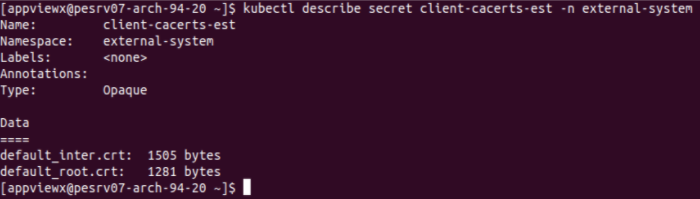
[Optional] Adding External CA Trust Certificate for EST Client Authentication
On-prem
- By default, the AppViewX intermediate and the AppViewX root certificates are available in the location with filenames default_inter.crt and default_root.crt.
- Run:
- Download the required issuer certificates in .crt format and move them to the AppViewX installer node.
- Open appviewx.conf file in appviewx_kubernetes/scripts folder.
- Add the absolute path of the issuer certificates as key separated value
in EST_TRUSTED_CA_CERTS.

- Add these plugins in the ENABLED_PLUGINS list: ENABLED_PLUGINS=appviewx_dependencies,avx_platform_gateway_external,avx_platform_gateway
- Run
./plugins_install.sh
SaaS
EST Client Authentication in Cloud Connectors
This section describes the steps to replace the Default TLS Certificate with Signed Certificate and to add a CA issuer certificate for EST client authentication in CC (Cloud Connector).
By default, AppViewX provides a default certificate in the gateway. To enable TLS validation youvalidationFor ACME you must bind a valid certificate (Certificate with CC hostname) with the gateway.
[Optional for EST] To bind a TLS certificate to gateway:
- The certificate’s common name must be the hostname of the CC.
- Download the certificate with .crt format and key file.
To update the certificate:
- Copy the certificate and the key file to <cc_installation_folder>/deps/properties/ directory.
- Go to the cc_installation_folder and
run:
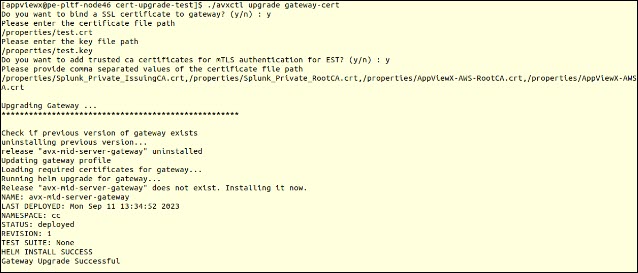
./avxctl upgrade gateway-cert - You will be prompted with the question, Do you want to bind a SSL
certificate to gateway? (y/n):
- To bind a certificate to the gateway, enter y.
- You will then be asked for the certificate path and the
key path. Provide the relative path of the files as
indicated:If the certificate and key file is copied into <cc_installation_folder>/deps/properties/ folder, then the path should be:
- Please enter the certificate file path: /properties/test.crt
- Please enter the key file path: /properties/test.key
- If this step is not required, enter n.
- You will now be prompted with, Do you want to add trusted CA
certificates for mTLS authentication for EST? (y/n):
- To give the issuer certificate list of the client certificate used in EST enter y.
- You will then be asked for the certificate path. You may
give more than one certificate path using a comma (,).
If the issuer certificates are copied to <cc_installation_folder>/deps/properties/ folder, then the path should be:
Please provide comma separated values of the certificate file path: /properties/test.crt - If this step is not required, enter n.
- Wait for the script to complete and the gateway will be upgraded.
[Optional] Changing SSL Certificate for EST-HTTPS Communication
- By default, there is a self-signed certificate available in the location.
- Add the following plugins in the ENABLED_PLUGINS list:ENABLED_PLUGINS=appviewx_dependencies,avx_platform_gateway_external,avx_platform_gateway

- Run
./plugins_install.sh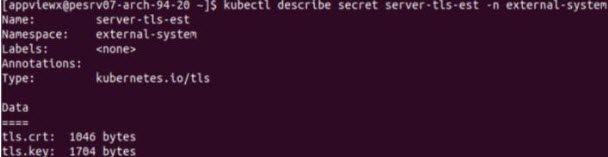
Best Practices
- Certificate Group and CA Policy Setup:
- Create a dedicated certificate group and CA policy specifically for auto-enrollment in AppViewX.
- While configuring the policy, ensure only the required key bit-length is selected (minimum: 2048-bit).
- Machine Enrollment Controls: Define an expected domain pattern (e.g., *.appviewx.com) in the CA policy to restrict certificate issuance to authorized machine domains.
- Security Recommendations:
- TLS Authentication is strongly recommended for all EST client communications with AppViewX.
- Use only private/internal CAs as trusted issuers for client certificate authentication.
- If client certificates from non-AppViewX CAs are used, ensure the
Intermediate and Root CA certificates are properly bound
to:
- The AppViewX external gateway (for on-prem deployments)
- The AppViewX mid-server gateway (in Cloud Connector for SaaS deployments)
- Certificate Type Selection: Choose the correct certificate category: Server category for server certificates only, and Client category for machine and user certificates
- High Availability and Load Balancing: When multiple external gateways (on-prem) or Cloud Connectors (SaaS) are in use, it is recommended to deploy a Load Balancer with mTLS. This ensures secure and reliable EST client authentication using the certificate and key-based requests.
Example of URLs
- For default:
<https://est.appviewx.com:<port_number>/.well-known/est> - For AppViewX enrollment:
<https://est.appviewx.com:<port_number/.well-known/est/appviewx/simpleenroll> - For AppViewX re-enrollment:
<https://est.appviewx.com:<port_number/.well-
    known/est/appviewx/simplereenroll>