Configuring AppViewX EST Client
Prerequisites
- Configure EST server in AppViewX.
- Administrator access is required to run AppViewX EST client 1.5.0.
- Ensure that the firewall configuration permits communication from the EST client. (Port 30021 for both on-prem and SaaS setup.)
- If a load balancer is part of the network infrastructure for the endpoint to communicate with the EST agent, make sure the load balancer does not terminate the client authentication certificate. If it does terminate, then configure the EST authentication mode as Certificate TLS with HTTP as a fallback in the EST endpoint configuration in AppViewX.
System Requirements
Linux
| Operating System | Version |
|---|---|
| Red Hat | v8.6 and later |
| Ubuntu | v20.04 and later |
| CentOS | v7.9 and later |
| Debian | v11.0 and later |
| Mint | v18.2 and later |
| openSUSE | v15.0 and later |
Mac
| Operating System | Version |
|---|---|
| Sonoma | v14.0 and later |
| Ventura | v13.0 and later |
Windows
Installing EST Client
- Downloading and extracting the EST client on Linux and Mac machines and Windows machine.
- Configuring the EST client.
- Running Generator and Installer EST client on Linux and Mac machines and Windows machine.
On Linux and Mac
- Log on to the AppViewX release portal.
-
Download:
- For Linux: est-client-linux-1.X.0.zip
- For Mac: est-client-mac-1.X.0.zip
-
Extract the above zip file to the desired file location.
The extracted file contains two subfolders:
- appviewx_est_client_installer
- appviewx_est_client_installer_generator
- input
- Linux: contains appviewx_client, config.json, DATA
- Mac: contains appviewx_client, appviewx_client.app, config.json
-
- Linux: appviewx_est_client_installer
- Mac: appviewx_est_client_installer.app
- current_crontab.txt (present only for Linux)
- README.md
- uninstall.sh
- input (contains credentials, est_auth.crt, est_auth.key, secure_config.json)
-
- Linux: appviewx_est_client_installer_generator
- Mac: appviewx_est_client_installer_generator.app
- appviewx_est_client_installer_generator.app
- README.md
Configuring EST Client
-
Navigate to the following extracted folder:
- For Linux and Mac: appviewx_est_client_installer_generator > input
- For Windows: AppViewX_EST_Windows_Client > Generator > input
-
Replace the following files from the input folder with
your authentication key and certificate with the same names. Ensure that the
key file is not encrypted and the certificate file is in .crt format. (This
certificate must be trusted by the EST server. The issuer certificate must
be configured in the EST server setting under Client Authentication >
Issuer Certificate):
- est_auth.crt
- est_auth.key
-
Open the credentials file in the Notepad editor and
add the following details in two separate lines:
<username> <password>Note:- The username and password are the values that are configured in the agent setting under Client Authentication in the EST Agent Server Settings.
- This step is not required when the Authentication Mode is set to Only Certificate TLS in AppViewX EST agent setting.
- When the Fallback credentials under Client Authentication is set to Logged on user credentials on the server side, enter the AppViewX web username and password (used to login into the AppViewX web page/UI) in the credentials file. (This feature is only available from AppViewX server version Ganga - 2022.1.0 and later)
-
Open the secure_config.json file and edit the
configuration file.
The details of the parameters are as described:
Structure of the secure_config.json file:
- General parameters: Comprises the general configuration parameters such as allowed domain names and the option for silent uninstallation.
- EST server parameters: In this section, you can provide the configuration details of EST server such as hostname, port number, and agent name (which represents the agent name in the server settings) specific to the certificate type.
- Certificate parameters: For the mentioned certificate_type in the EST server parameters, you can provide certificate-specific details in this section. These details include CSR parameters, SAN details, and the configuration related to re-enrollment.
For more details regarding the parameters, see the following tables:Figure 1. Sample secure_config.json file 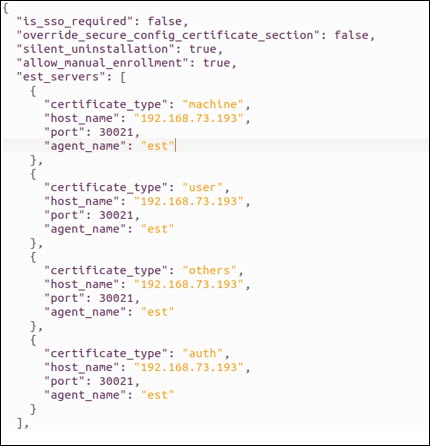
Table 1. Field descriptions for the General Section parameters Parameter Type Mandatory Description EST Client Version silent_uninstallation Boolean No This field is accessed by secure_config.json during the installation process. - By default, this value is false. You will be prompted to uninstall the previous client.
- If the value is true, then you will be prompted to uninstall the previously installed versions.
all versions allow_manual_enrollment Boolean No - By default, this value is true allowing you to enroll and re-enroll the certificates using the commands.
- If the value is false, then the certificates are allowed to enroll and re-enroll the certificates using the commands.
all versions install_for_all_users Boolean No (applicable only for Windows) Accessed by secure_config.json. This field is used to avoid multiple installations of AppViewX client in multiple places. - By default, this value is
false, then
- no admin access is required and the client is installed in HKEY_LOCAL_MACHINE registry
- EST task schedulers are not created as this task creation requires admin privileges. This option is mainly used for non C:\ folder installation and manual EST auto commands.
- If the value is true, then you must have admin privileges to install. AppViewX client is installed in the HKEY_CURRENT_USER registry.
- If the client is reinstalled, the installed path is retrieved from the Windows registry based on this flag, and the client is uninstalled before being reinstalled.
all versions override_user Boolean No The Boolean value determines the certificate parameters to be considered during installation. - By default, this value is false.
- If the value is true, then you can override the config.json’s certificate parameters value over the secure_config.json’s value. This is applicable only for the certificate section field values. Precedence table based on this field is as given below.
all versions perform_revocation_check_for_non_auth_certs Boolean No Enables revocation checks for enrolled certificates that are not of the authentication type. If any such certificate is found to be revoked, it will be renewed immediately, regardless of the configured number of days for re-enrollment. This parameter is available in both secure_config.json and config.json, with secure_config.json taking precedence. Default value:
falsev1.5.5 and onwards initial_auth_cert_enrollment Boolean No Enables the enrollment of an authentication certificate as the initial certificate using the machine’s hostname followed by “_authentication”. This flag is available in both secure_config.json and config.json, with secure_config.json taking precedence. Default value:
falsev1.5.5 and onwards scheduler_run_frequency_in_minutes Int No (applicable only for Windows) Defines the time interval (in minutes) at which the Windows EST Client scheduler runs. This flag is available only in secure_config.json. Default value:
720 minutes (12 hours)v1.5.5 and onwards trigger_scheduler_immediately_post_installation Boolean No (applicable only for Windows) Allows the scheduler to be triggered immediately after installation if set to true. This flag is available only in secure_config.json.Default value:
falsev1.5.5 and onwards Table 2. Precedence table for Certificate Section based on the override_user Flag override_user flag Values in secure_config.json Values in config.json Result - Values taken from FALSE Present Absent secure_config.json Absent Present config.json Absent Absent Do nothing Present Present secure_config.json TRUE Present Absent secure_config.json Absent Present config.json Absent Absent Do nothing Present Present config.json Table 3. Field descriptions for the EST Server section parameters Parameter Type Mandatory Description certificate_type String Yes This parameter is case-insensitive. It can have the following values: - auth
- user
- machine
- others
Duplicate values are not allowed.
host_name String Yes A valid IP/FQDN provided in EST endpoint configuration. For SAAS, use Cloud Connector IP/FQDN as provided in the endpoint configuration. The supported formats are IPv4 and IPv6 and hostname formats.
port_number Integer Yes Can have a value between 1 and 65535. Make sure it matches the port number specified in the EST endpoint configuration on the AppViewX GUI (Default port is 30021). path_seg String Yes This is the EST endpoint setting name from the AppViewX GUI. It must not include any spaces. If the agent name is not present in either the secure_config.json or config.json, the defaultEST agent name is used. After configuring the server and the general parameters, the certificate section must be configured. The following image provides the example of the certificate section. The certificate section must be configured for the certificate_types mentioned in the EST server section.
Table 4. Field descriptions for the Certificate Section parameters Parameter Type Mandatory Description EST Client Version certificate_type - Linux and Mac: appviewx_est_client_installer_generator
- Windows: Generator
String Yes This parameter is case-insensitive. It can have the following values: - auth: Generates the common name
based on the est_auth.crt auth file present in the
input subfolder within the folder mentioned.
If the certificate authentication is nearing expiry based on the value of
reenrollment_trigger_before_no_of_days_of_expiry, it will be automatically renewed. The renewed certificate will be updated in the EST Client and used for all subsequent communications with the AppViewX server. - user: Generates Logged in Username as CN for the CSR.
- machine: Generates logged in machine name as CN for the CSR.
- others: Generates configured common_name as CN for the CSR and installs the certificate in the key_store.
all versions certificate_id Integer Yes Contains the certificate ID. Duplicate values are not allowed. all versions certificate_country String No The country code must be in ISO standards (2-letter code). all versions certificate_province String No The province name; it can be up to 128 characters. all versions certificate_locality String No The locality name; it can be up to 128 characters. all versions certificate_organization String No The organization name; it can be up to 64 characters. all versions certificate_organizationUnit String No The organization unit; it can be up to 64 characters. all versions reenrollment_trigger_before_no _of_days_of_expiry Integer Yes The number of days before re-enrollment can be triggered. The value can be up to 36500. all versions common_name String Yes (only for others certificate type) Cannot have more than 64 characters. all versions allowed_san_domains List [string] No This field can only be used in secure_config.json and will not be considered even if it is provided in config.json. Must contain proper domain names.
For example, if the allowed_san_domains contain ["a.com","b.com","c.com"] and the san_dns_names contains ["test.a.com","test.b.com","test.c.com", "test.d.com"], then only the first three domain names from san_dns_names are considered and used.
If allowed_san_domains parameter is absent in the file, then all the SAN restrictions are removed.
all versions san_dns_names List [string] No Cannot have more than 255 characters - Must be a proper FQDN all versions key_type List [string] No Specifies the type of cryptographic key to be generated (for example, RSA or ECDSA). Present in both secure_config.json and config.json. Precedence:
- secure_config.json takes precedence when
override_useris false. - config.json takes precedence when
override_useris true
v1.5.5 and onwards key_size List [string] No Defines the size (in bits) of the cryptographic key for the selected key type (2048, 3072, 4096, 7680 or 8192 are applicable for RSA key type). Present in both secure_config.json and config.json. Precedence:
- secure_config.json takes precedence when
override_useris false.. - config.json takes precedence when
override_useris true
all versions hash_function List [string] No Indicates the hash algorithm to be used for signing certificate requests (SHA256, SHA384, SHA512). Present in both secure_config.json and config.json. Precedence:
- secure_config.json takes precedence when
override_useris false. - config.json takes precedence when
override_useris true
all versions ec_curve_type List [string] No Specifies the elliptic curve type to be used when the key type is EC (P256, P384, P521 are applicable for ECDSA key type). Present in both secure_config.json and config.json. Precedence:
- secure_config.json takes precedence when
override_useris false. - config.json takes precedence when
override_useris true
all versions pfx_encryption_method String No Specifies the symmetric encryption algorithm used to protect the PFX (PKCS#12) contents, applicable only for Windows client. Possible Values are AES (or) DES only. By default AES algorithm will be used. v1.5.6 and onwards san_ip_addresses List [string] No Must be valid IP addresses. all versions store_name [Applicable for Windows ONLY] String No If the certificate type is others, then the store name must be either user or machine. all versions certificate_email_address String No Cannot have more than 255 characters - Must be a valid email address all versions custom_values Custom values provided are framed during EST client run time to frame the field values that trigger the enrollment. They can be accessed by both config.json and secure_config.json. The custom values are defined below: Example to use custom_values is "custom_values":[
]{"field_name":"common_name", "base_value":"$MACHINE", "additional_value": ".appviewx.com", "operation":"prepend"}Here the common will be changed to machinename.appviewx.com
all versions field_name N/A Yes Common_name or san_rfc822 name to which the values must be added. all versions base_value N/A Yes Value can be $MACHINE or $USER or any other value. - If value is $MACHINE, then the machine name is considered.
- If value is $USER, then it will be the machine logged in user name.
all versions additional_value N/A Yes Any specific value. all versions operation N/A Yes Values can be append or prepend. - If the value is append, then the final value is fieldvalue = base_value + additional_value.
- If the value is prepend, then the final value is fieldvalue = additional_value +base_value. If the field name is san_rfc822name, then the final value is added in CSR’s SAN value.
all versions Note:- The above parameters are accessed by config.json and secure_config.json files unless specified.
- For the following parameters key_type,
key_size, hash_function, and
ec_curve_type (applicable to both Windows
and Linux):
- Auth cert always uses the existing authentication key to generate the key and CSR; therefore, custom key fields are not applicable for this certificate type.
- In custom key fields provided through the EST Client, if there are any restrictions or policies defined on the CA side, those key fields will be considered during certificate creation only for the CAs that enforce such policies.
- Having all types in the config.json file is not mandatory. You can retain only the necessary type and remove the rest. For example, if you want to enroll only User CERT, then you can delete machine and other types from the list.
- If there are any absent fields or parameters in the secure_config.json, they are disregarded and not enforced as mandatory. This is because you can set up the missing fields in the config.json file located in the installer folder.
Running Generator and Installer on Linux
Running EST Installer Generator
- Go to the appviewx_est_client_installer_generator folder.
- Right-click and select Open in terminal.
-
Run:
./appviewx_est_client_installer_generator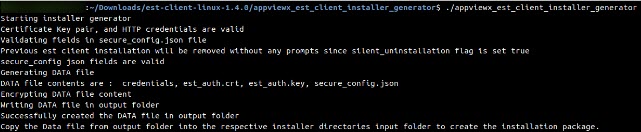 Troubleshooting: If the output has errors, correct the values or parameters in the secure_config.json file and re-run the command until it successfully creates the DATA file. The DATA file is created in the output subfolder within the appviewx_est_client_installer_generator folder.
 - To create the installation package, go to appviewx_est_client_installer_generator > output and copy the DATA file present there and paste it into the appviewx_est_client_installer > input folder.
-
In the same input folder, verify the
config.json file.
Note: Repeat the steps for the secure_config.json file as mentioned in the Section Configuring EST Client . If you want to modify the values set by the admin in secure_config.json, you can do so in config.json provided the override_user_flag is set to true. (See Precedence table for Certificate Section based on the override_user Flag.)The EST client folder (AppViewX_EST_Installer) can be distributed to the client machines for installing the AppViewX EST client. The admin only needs to generate the installer once, which can then be shared with other users. The DATA file within the AppViewX_EST_Installer folder contains all the configuration details from the generation of the AppViewX EST client installer.
Installing EST Client
This task must be completed on each machine where the EST client installation is required, while the generation of the installer is a one-time process carried out by the admin.
Only if the override_user flag is set to true when generating the EST agent can you modify the certificate section in the config.json file located within the appviewx_est_client_installer > input folder.
To install EST client:
- Go to the appviewx_est_client_installer folder, right-click and select Open in terminal.
-
Run:
./appviewx_est_client_installer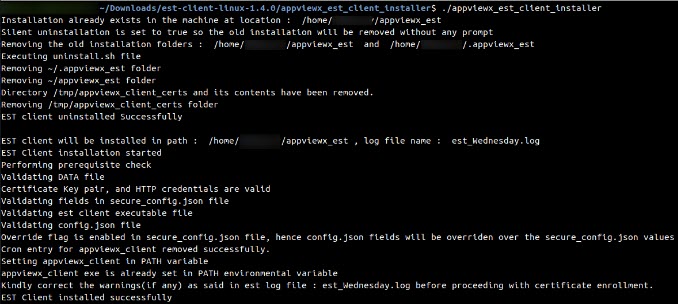
- If there are errors in the config.json file, then correct the errors and run the installer again. (The log files for the installation are saved in the appviewx_est_client_installer > appviewx_est_client_installer.log file.)
- During the installation process, all fields in the secure_config.json and config.json files are verified and compared according to the override_user flag outlined in the table below. If any mandatory fields are found to be missing or invalid, all errors are gathered and presented to you for correction before proceeding with enrollment and installation.
- If
there is an existing client installation in the
home folder and the
silent_uninstallation flag is enabled, you will not
receive a prompt for uninstallation. However, if the flag is
disabled, you will be prompted to uninstall the previous installation.
If you enter Y and continue, you will be asked to remove the old installation folders. If you confirm by entering Y, the old installation is deleted thus allowing the new installation to proceed; otherwise, the program will exit.
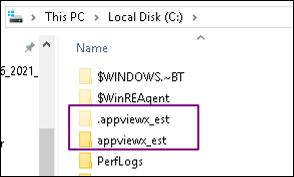
- The EST client is automatically installed in your
Home folder. The following folders are
created in the Home folder after
installation is complete:
- appviewx_est
- .appviewx_est
- Certificates are stored in the keystore folder under /Home/<username>/.appviewx_est/key_store/key_store. This can only be found after fetching the required certificates from the server.
- If you accidentally deleted the appviewx_est and .appviewx_est home folders, then the installation is considered as a new installation.
- You can run the appviewx_client command from any location on the machine as this executable is part of the environment PATH variable. To enable this functionality, make sure to reload the .bashrc file, which is required only during the initial installation. You can do this by running the source ~/.bashrc command or by closing and reopening the terminal.
- The most recent log file for the AppViewX EST client is named est_<CurrentDayName>.log (for example, est_Friday.log), while older files are stored based on their days. These logs are located within the appviewx_est directory in the Home folder.
-
To install with cron expression, run:
./appviewx_est_client_installer -cron “* * * * *”- This command installs the EST client and sets up a crontab on the Linux/Mac machine using the specified cron expression. The Linux/Mac crontab daemon then automatically runs the appviewx_client est auto command at the designated time interval.
- The above cron expression is a sample command to trigger the EST auto after every minute.
- To verify the cron jobs, run:
crontab -l
The generated installation logs are captured in appviewx_est_client_installer.log located in the same folder where the installer file is located.
Verifying EST Client Installation
-
To list the commands to be run for verification, run:
appviewx_client -h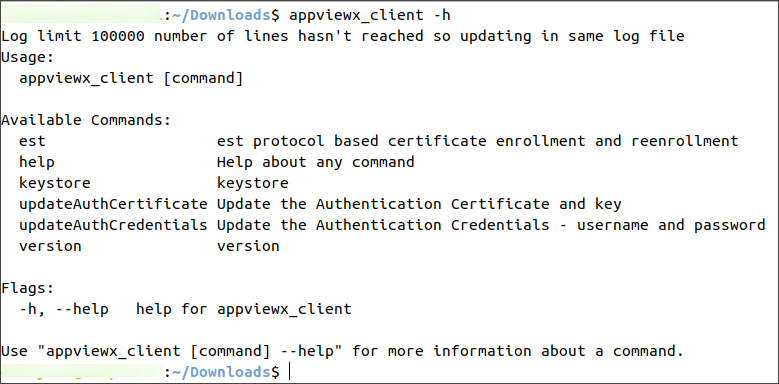
-
For more information about a command, run:
appviewx_client --helpIf the command does not work for any reason, then go to the ~/appviewx_est folder and run one from the following commands:- To list the commands,
run:
./appviewx_client -h - For more information about a command,
run:
./appviewx_client --help
- To list the commands,
run:
Triggering Enrollment Request
- Go to the Home/appviewx_est folder, right-click and select Open in Terminal.
-
Run:
appviewx_client est auto
Running Generator and Installer on Windows
Running EST Installer Generator
- Go to the AppViewX_EST_Windows_Client > Generator > input extracted folder.
-
Run appviewx_est_client_installer_generator.exe
(right-click the file and select Run as
administrator).
A folder named output is generated in the same directory. If the output folder is not created, review the secure_config.json file for potential errors and repeat the step.
-
Go to the AppViewX_EST_Windows_Client > Generator > output
folder.
A file named DATA is created as a result of the execution of the above installer file.
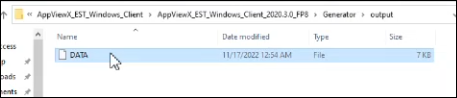
- Copy this DATA file and place it in the AppViewX_EST_Installer > input folder.
-
In the same input folder, verify the
config.json file.
Note: Repeat the steps for the secure_config.json file as mentioned in the Configuring the EST Client section. If you want to modify the values set by the admin in secure_config.json, you can do so in config.json provided the override_user flag is set to true. See the Precedence table for Certificate Section based on the override_user Flag).
-
Go to the Scheduler folder
(AppViewX_EST_Installer > Scheduler) and verify
the files as shown:
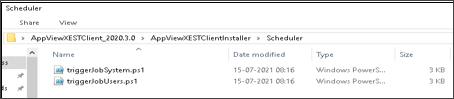 It contains the following details:
- triggerJobSystem.ps1: PowerShell Script for creating machine enrollment schedule task. The default trigger is at User LogOn.
- triggerJobUsers.ps1: PowerShell Script for creating user enrollment schedule task. The default trigger is at User LogOn.
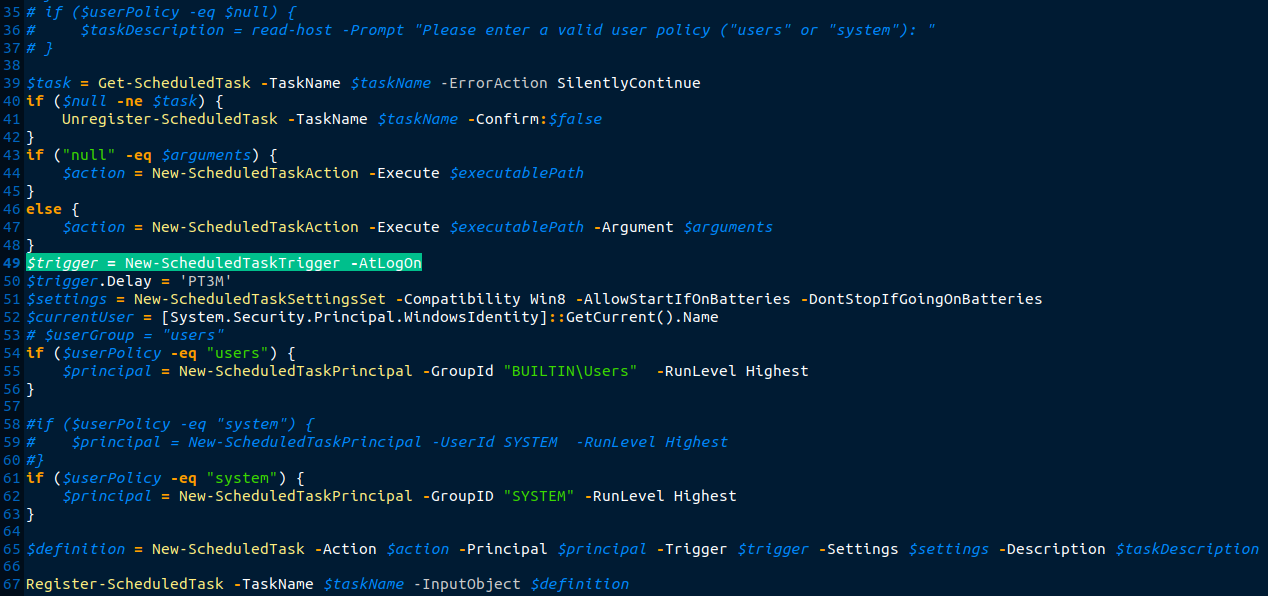
Attention: By default, the triggers will be in LogOn. You can customize it by following the following steps to change this to trigger at a particular time daily:- Open the triggerJobSystem.ps1 that is responsible for scheduling the task for auth and machine certificate. Replace the following line that triggers a task by log-on (shown in the following image) to $trigger = New-ScheduledTaskTrigger -Daily -At HH:MM. This triggers the task everyday at the specified time HH:MM.
- Make the similar changes in the triggerJobUsers.ps1 file. Ensure that both tasks are scheduled with sufficient time difference between them.
 The EST client folder (AppViewX_EST_Installer) can be distributed to the client machines for installing the AppViewX EST client. The admin only needs to generate the installer once, which can then be shared with other users. The DATA file within the AppViewX_EST_Installer folder contains all the configuration details from the generation of the AppViewX EST client installer.
Installing EST Client
This task must be completed on each machine where the EST client installation is required, while the generation of the installer is a one-time process carried out by the admin.
Only if the override_user flag is set to true when generating the EST agent can you modify the certificate section in the config.json file located within the appviewx_est_client_installer > input folder.
-
To install EST client:
-
After the installation:
-
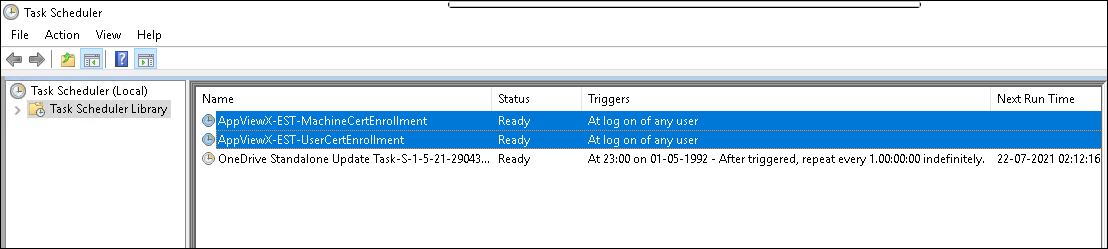
Create Machine and User enrollment tasks in the
task scheduler.
-
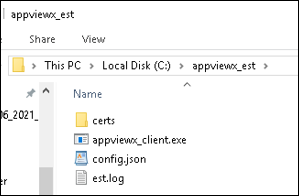
Copy the files to the C: drive
 .
Note: Check if appviewx_est and .appviewx_est have all the permissions to write, read, and modify. If not, provide the necessary permissions.
.
Note: Check if appviewx_est and .appviewx_est have all the permissions to write, read, and modify. If not, provide the necessary permissions. -
Validate whether the config.json file is
present in
C:/appviewx_est/config.json.
-
Run:
appviewx_client.exe -hA list of commands is displayed to help users with different processes as shown: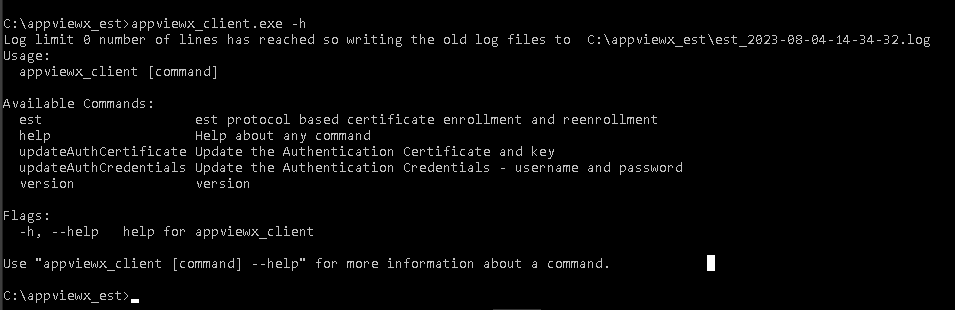
-
Create Machine and User enrollment tasks in the
task scheduler.
-
Note: This agent can either be triggered automatically when you log in or can be triggered manually from the Task Scheduler.To trigger the enrollment task:
-
Right-click and select Run to run the tasks.
Note: Only User scheduler works this way as Machine scheduler requires system user permission to run it. The certificates are installed in the store within 30 seconds.
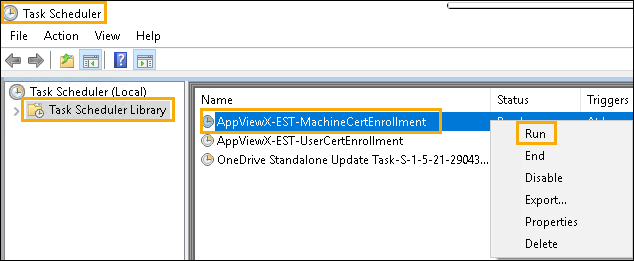
-
Right-click and select Run to run the tasks.
- Open the command prompt with administrator privileges, and go to C:/appviewx_est.
- Run:
appviewx_client.exe est auto
The latest log file for the AppViewX EST client can be found in est_<CurrentDayName>.log (for example, est_Friday.log) while the old files are saved based on the day. These logs are found in the appviewx_est folder present in the C:/ drive.
Actions using EST Client
Available Commands and their Descriptions
| Available Command | Description |
|---|---|
| est | EST protocol based certificate enrollment and re-enrollment. |
| help | Help about any command. |
| keystore | Listing the certificates in the keystore. |
| updateAuthCertificate | Update the Authentication certificate and key.
Example: appviewx_client updateAuthCertificate
--authCert “<certificate path>” --authKey
“<keypath>” |
| updateAuthCredentials | Update the Authentication Credentials - username and password. You are prompted to enter the username and the password. |
| version | Version details. |
Auto-Enrollment and Re-Enrollment
- To perform auto-enrollment or re-enrollment, run:
This enrolls certificates based on the secure_config and the config files.appviewx_client est auto - If certificates are already enrolled, then the validity of the certificates are checked against the reenrollment_trigger_before_no_of_days_of_expiry value present in the configuration files. If the certificate's expiry in number of days from today is less than reenrollment_trigger_before_no_of_days_of_expiry value, then re-enrollment will be triggered. Example: If the reenrollment_trigger_before_no_of_days_of_expiry value is 30 and if the certificate is going to expire in the next 20 days, then the re-enrollment will be triggered.
Manual Enrollment and Re-Enrollment
- Manual enrollment and re-enrollment are possible only if allow_manual_enrollment is set to true in the secure_config.json file.
- Before running the manual enrollment and re-enrollment commands, Linux and Mac users must navigate to appviewx_est in their home directory, while Windows users must navigate to appviewx_est in the C: drive.
- Manual enrollment and re-enrollment do not come under any certificate type mentioned in the configuration files.
- Manual enrollment is accessed through the following command:Example 1:
Example 2:appviewx_client est manual-enrollment csr-mode --csr-file <csr-file-complete-path> --est-server-url <est-server-url>
The description for every parameter is given in the following table:appviewx_client est manual-enrollment csr-mode --csr-file <csr-file-complete-path> --est-server-hostname <est-server-hostname> --est-server-pathseg <est-server-pathsegment/agent name>Flags Input Type Description --csr-file string Input CSR filename. For example: /home/user/test.csr --est-server-hostname string EST server hostname --est-server-pathseg string EST server name present in the EST server setting (default value: defaultEST) --est-server-port int EST server port number configured in the EST server settings (default value: 30021) --est-server-url string EST server URL present in the EST server setting page. (Not required if the hostname, port, and agent name are given.) - Manual re-enrollment is triggered using two modes:
-
csr-mode
Ensure that the certificate corresponding to the CSR sent is present in the inventory before triggering re-enrollment.
Example 1:
Example 2:appviewx_client est manual-reenrollment csr-mode --csr-file <csr-file-complete-path> --est-server-url <est-server-url>appviewx_client est manual-reenrollment csr-mode --csr-file <csr-file-complete-path> --est-server-hostname <est-server-hostname> --est-server-pathseg <est-server-pathsegment/agent name>Note: See the table in the manual-enrollment, for the description of these parameters. -
cert-mode
Similar to the manual re-enrollment using csr-mode, the certificates must be enrolled and must be present in the inventory before triggering re-enrollment.
Example:
Descriptions for the flags/parameters for the manual cert-mode are as follows:appviewx_client est manual-reenrollment cert-mode --cert-file <cert-file-complete-path> --cert-file-type <cert-file/extension-type> --est-server-hostname <est-server-hostname> --est-server-pathseg <est-server-pathsegment/agent name> --output-privatekey-file <path-to-store-private-key> --key-size <Key-length>Table 6. Flags and their description Flags Input Type Description --cert-file string Input Certificate filename. For example: /home/user/test.crt --cert-file-type string Input Certificate file types ( cer, crt, pem, p7b ) --key-size int Key size of the generated private key. If not given, the key size is taken from the old certificate. --output-privatekey-file string Output private key filename. Example: /home/user/output/hostname.key
--est-server-hostname string EST server hostname --est-server-pathseg string EST server name present in the server setting (default value: defaultEST) --est-server-port int EST server port number configured in the EST server settings(default value: 30021) --est-server-url string EST server URL present in the EST server setting page. (Not required if hostname, port, and agent name are given )
-
csr-mode
Keystore
On Linux
- To view the list of certificates created, run:
appviewx_client keystore list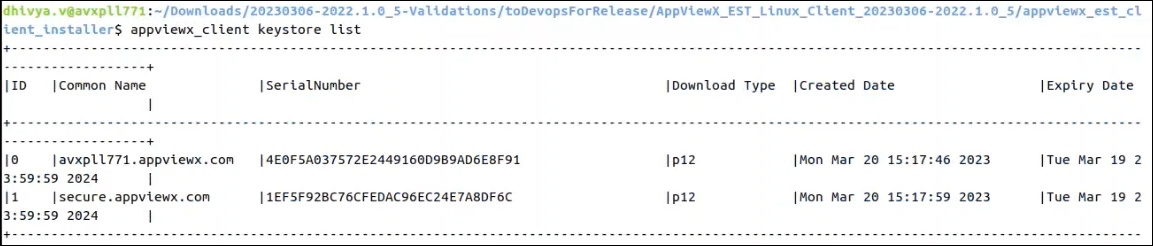
- To download the certificates based on id specified when using
the
listcommand above, run:appviewx_client keystore download --id <id> --filepath <path to store the cert with file name and extension>Note: To download PFX file, provide the password with --password field
On Windows
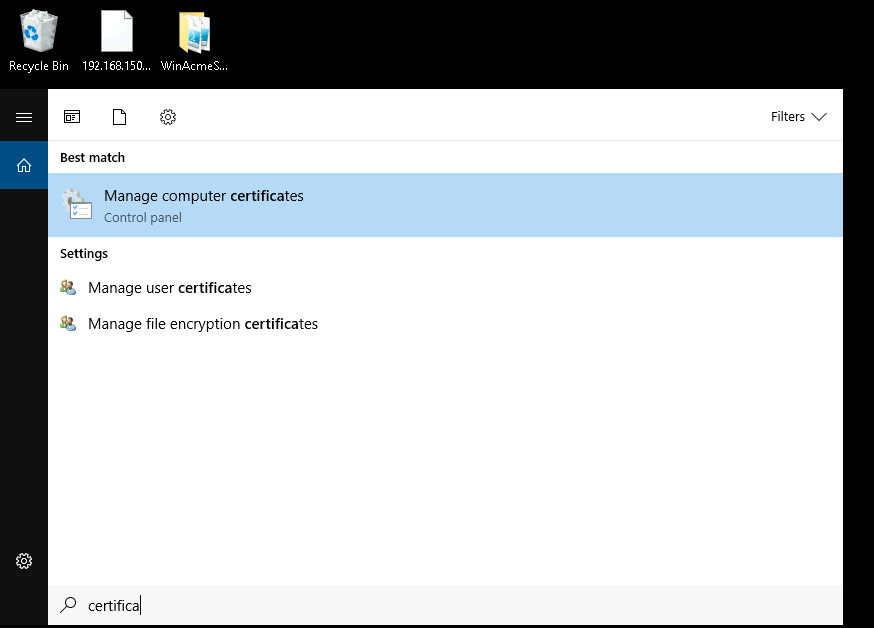
- To access Machine Certificate Type, go to Start > Manage Computer Certificates.
- To access User and Others Certificate Type, go to Start > Manage User Certificates.
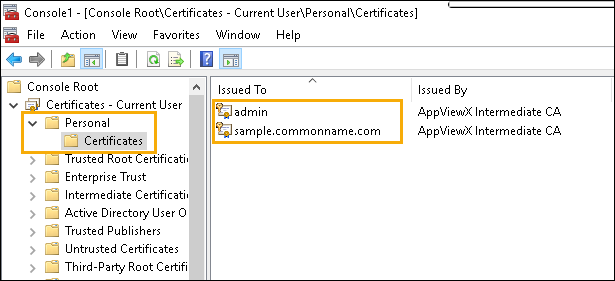
- To view the certificates, go to Personal > Certificates.

Uninstalling the EST Client
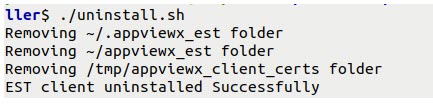
The AppViewX EST client is successfully uninstalled.
Best Practices
- Log Reference for Troubleshooting: For any issues related to installation, enrollment, or re-enrollment, consult the installer logs or EST client logs for detailed diagnostic information.
- Installer Behavior and Cleanup: The installer places the AppViewX EST Client in the user’s home directory. It is recommended to delete the installer from the machine after successful installation to maintain security hygiene.
- Machine Binding and Security Restrictions: The EST client is bound to the machine on which it is installed. Transferring or using EST client artifacts (e.g., .exe files) on other machines is not permitted due to strict security controls.
- Windows-Specific Installation Steps:
- Always use installer.bat for Windows installations to ensure proper creation of Task Scheduler entries.
- After installation, users must sign out and then sign back in. Upon
re-login:
- User and Others certificate type enrollment will begin immediately.
- Machine and Authentication certificate type enrollment will occur after approximately 3 minutes.
- This timing and behavior can be customized by:
- Modifying the Task Scheduler settings post-installation, or
- Editing the PowerShell (.ps) file before installation.
- Certificate Store Behavior: Reinstalling the EST client does not delete the existing certificates from the Windows certificate store or macOS keychain.
- CSR Parameter Configuration:
- To define mandatory CSR fields, update the secure_config.json file located in the Installer Generator folder.
- Use the provided sample config.json and secure_config.json files as templates. Remove any unused fields based on your requirements.
- Configuration Best Practices:
- Always use the Fully Qualified Domain Name (FQDN) instead of the server IP address in both config.jsonandsecure_config.json.
- This ensures proper communication with the EST server during enrollment and re-enrollment.
- Regenerating Data After Config Updates:
- Any change made to the secure_config.json file requires the DATA file to be regenerated.
- The installation process must be re-executed following this update.
Troubleshooting
Connection Errors
- Check whether the IP address and the port number are correctly configured in the secure_config.json file located in the AppViewX_EST_Windows_Client > Generator > Input folder.
- Verify if the firewall policies permit the connection between the EST client and the server.
Error Code: 401 Unauthorized
- Ensure the client sends the authentication certificate (try enrollment
request from
curlusing the same client certificates). - Check the trusted CA added in the EST agent settings to validate whether the client authentication certificate is signed by the same CA.
- If the client authentication certificate is signed by a CA other than AppViewX, make sure it is added in the trusted CA list from the CLI.
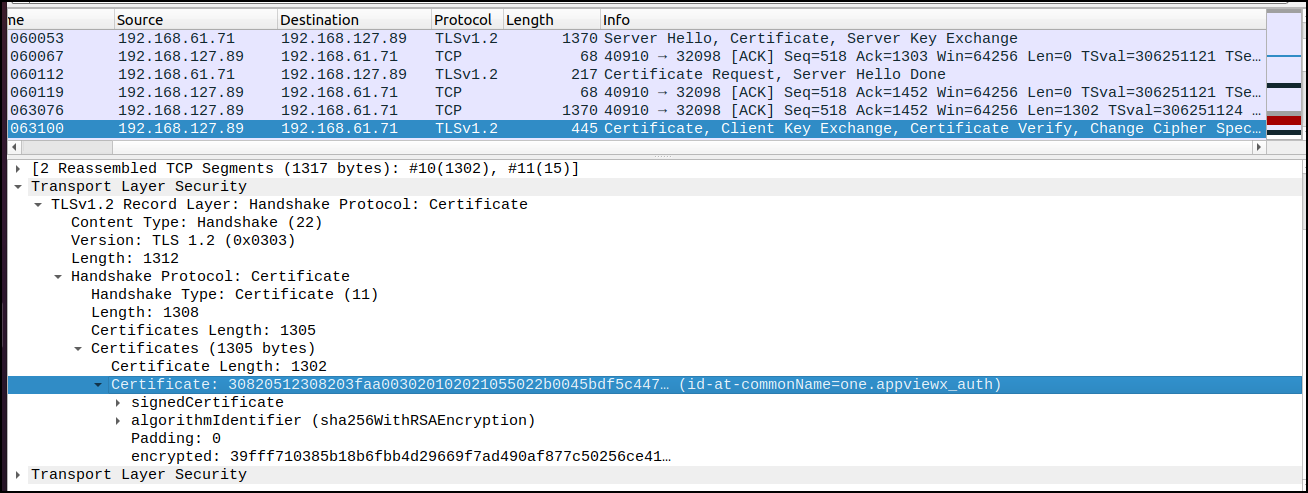
- Do a TCP dump and analyze the TLS transactions between server and client
to make sure the client receives the Distinguished Name of the Trusted
CA.
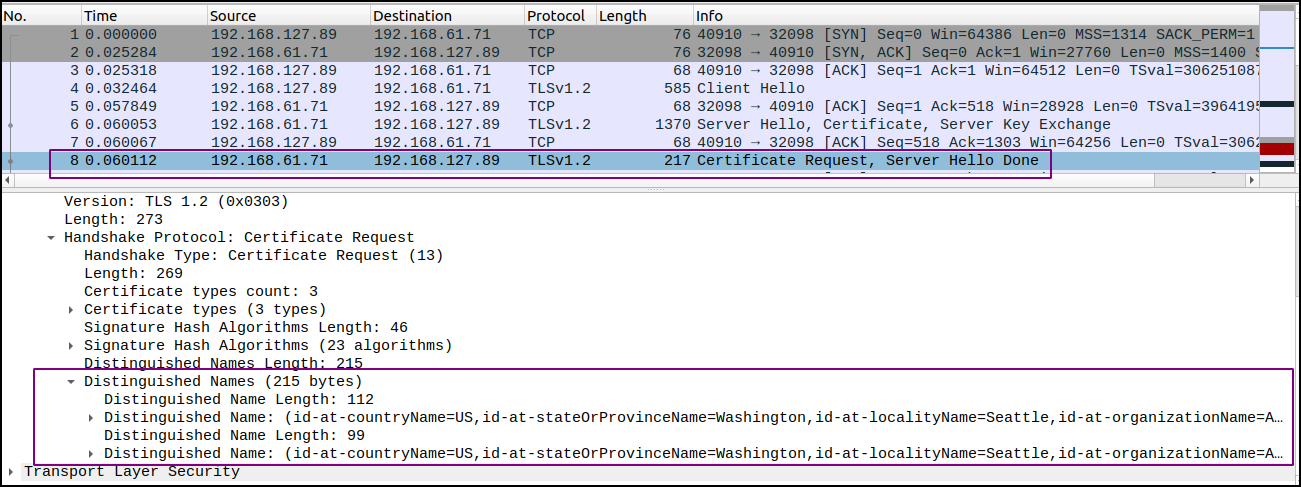
- In the TCP dump, make sure the client sends the Authentication
Certificate in the Certificate Response field.
500-Internal Server Error
- Make sure EST service is running on the AppViewX server.
- Check the EST server status. (Refer section: Verify EST Server Status (Enabled/Disabled).)
- Check the EST enrollment using
curl. (Refer section: Testing EST Enrollment by using CURL.)
Error Codes
| S. No. | Status Code | Error Codes | Error Messages | Description |
|---|---|---|---|---|
| 1 | 500 - Internal Server Error | CERT-ENROLLMENT-001 | Agent settings are not found (or) invalid for this agent | When there is no agent found for EST with the specified name. |
| 2 | 500 - Internal Server Error | CERT-ENROLLMENT-002 | Agent settings are not valid | When EST agent settings are invalid. |
| 3 | 401 - Unauthorized | CERT-ENROLLMENT-003 | Authentication failed for the auto-enrollment protocol | TLS / Basic / Digest authentication failed for the provided authentication parameters. |
| 4 | 401 - Unauthorized | CERT-ENROLLMENT-006 | Provided NONCE is invalid |
|
| 5 | 500 - Internal Server Error | CERT-ENROLLMENT-007 | Failure while creating nonce | When creating Nonce to send to the client in case of Digest HTTP authentication. |
| 6 | 500 - Internal Server Error | CERT-ENROLLMENT-008 | Certificate conversion failed | While converting the certificate contents to PKCS7 format which is to be sent as a response to the client. |
| 7 | 500 - Internal Server Error | CERT-ENROLLMENT-009 | Error while converting to JSON | Error during map to JSON conversion. |
| 8 | 401 - Unauthorized | CERT-ENROLLMENT-010 | No client certificate was obtained to perform authentication. | When a client certificate is not found in the request to perform the TLS authentication. |
| 9 | 401 - Unauthorized | CERT-ENROLLMENT-023 | Neither client certificate nor HTTP Authentication parameters are found to perform authentication | Error when both client certificates and the HTTP Authentication Parameters are not found in the request to perform the TLS and HTTP authentication. |
| 10 | 401 - Unauthorized | CERT-ENROLLMENT-024 | HTTP Authentication parameters are not found to perform authentication. | Error when HTTP Authentication Parameters are not found in the request to perform the TLS and HTTP authentication. |
| 11 | 404 - Not Found | CERT-ENROLLMENT-025 | CSR content is not found to perform Enrollment/Re-enrollment. | Error when CSR content is not found in the request payload to perform Enrollment/Re-enrollment. |
| 12 | 404 - Not Found | CERT-ENROLLMENT-1063 | Issuer of the Client certificate is not listed in the agent setting. | Error when the issuer of the client certificate obtained in the request for authentication is not listed in the agent settings Issuer certificate list. |
| 13 | 401 - Unauthorized | CERT-ENROLLMENT-1061 | HTTP Authentication failed due to invalid credentials. | Error when the provided HTTP Parameters does not match with the credentials provided in the agent settings. |
| 14 | 500 - Internal Server Error | CERT-EST-001 | Unable to get certificates requested by the client device | Could not obtain the certificates which were requested from the agent. |
| 15 | 500 - Internal Server Error | CERT-EST-003 | Certificate cannot be obtained after polling from the agent. | A certificate cannot be obtained even after retrying for the provided amount of time interval. |
| 16 | 500 - Internal Server Error | CSR parameters already available for selected CA. | When there is a request already present in the certificate inventory and a similar CSR is obtained for enrollment/re-enrollment. | |
| 17 | 500 - Internal Server Error | CERT-ENROLLMENT-PROTOCOL-1020 | Certificate enrollment failed for the provided CSR. |
|
| 18 | 404 - Not Found | CERT-ENROLLMENT-PROTOCOL-1019 | Certificate enrollment request does not exist. Check the request sent from the AppViewX agent | The request from the EST agent is not found when received in subsystem certificate NB. |
| 19 | 401 - Unauthorized | CERT-ENROLLMENT-PROTOCOL-1014 | Authentication failed for the autoenrollment protocol. | When TLS authentication fails. |
| 20 | 500 - Internal Server Error | CERT-ENROLLMENT-PROTOCOL-1005 | Error while fetching policy settings for an agent | When obtaining group or policy details. |
| 21 | 400 - Bad Request | CERT-SCEP-1011 | Unable to extract CSR in the SCEP request | Occurs when the CSR extraction fails. |
| 22 | 404 - Not Found | CERT-SCEP-1012 | Policy is not associated with the given certificate group | When the certificate policy for the provided agent is not present. |
| 23 | 404 - Not Found | CERT-SCEP-1013 | Group policy does not have the given certificate authority | All the errors from 18 to 29 are to validate the CSR parameters against policy. |
| 24 | 404 - Not Found | CERT-SCEP-1014 | Group policy does not have the given hash function | - |
| 25 | 404 - Not Found | CERT-SCEP-1015 | Group policy does not have the given key type | - |
| 26 | 404 - Not Found | CERT-SCEP-1016 | Group policy does not have the given key length | |
| 27 | 400 - Bad Request | CERT-SCEP-1017 | Given common name must end with as per the common name defined in group policy | - |
| 28 | 400 - Bad Request | CERT-SCEP-1018 | Given common name can not be same as the common name defined in group policy | - |
| 29 | 400 - Bad Request | CERT-SCEP-1019 | Given organization must match with organization defined in group policy | - |
| 30 | 400 - Bad Request | CERT-SCEP-1020 | Given organization unit must match with organization unit defined in group policy | - |
| 31 | 400 - Bad Request | CERT-SCEP-1021 | Given locality must match with locality defined in group policy | - |
| 32 | 400 - Bad Request | CERT-SCEP-1022 | Given state must match with the state defined in group policy | - |
| 33 | 400 - Bad Request | CERT-SCEP-1023 | Given country must match with country defined in group policy | - |
| 34 | 404 - Not Found | CERT-SCEP-1024 | Group policy does not have the given certificate type | - |
| 35 | 400 - Bad Request | CERT-CSR-0002 | Failed to parse CSR, validate the content. | CSR content is not proper while uploading it for submission |
| 36 | 404 - Not Found | CERT-CA-0001 | CA settings are not available. | CA setting selected in EST settings is not found. |
| 37 | 404 - Not Found | CERT-KEY-0003 | Certificate/private key retrieval failed. | DAO exception while fetching certificate. |
| 38 | 417 - Expectation Failed | CERT-CSR-0005 | Csr submission failed. ${ERROR_MSG} | Custom error message from CA. |
| 39 | 500 - Internal Server Error | More than one data returned from collection while fetching SAN list from the DB for the given server name. | More than one entry of SAN is present for the same server name. | |
| 40 | 500 - Internal Server Error | Error while processing. | Hookname is not mapped with the EST agent setting. Run the DB query to add the hookname. |
EST Client Enhancements
- v1.5.4
- v1.5.5
AppViewX EST Client Installation and Usage
EST Client Features
- Custom PowerShell scripts can be added to the AppViewX_Installer/Resources folder before installing the EST Client. After installation, all files from this package are copied to the C:\appviewx_est folder.
- After certificate enrollment, the specified PowerShell scripts are automatically executed to bind the enrolled certificate to the service defined within each script.
- The
certificate_typecan be machine, user, or others. Based on thecertificate_type, the corresponding enrolled certificate is used to bind to the appropriate Remote Desktop (RD) service. - Multiple scripts can be configured to run for a single certificate type.
- To enable post-enrollment script execution, add a
post_certificate_creation section to the
config.jsonfile located in C:\appviewx_est. This ensures the designated PowerShell scripts run immediately after certificate creation."post_certificate_creation": [ { "certificate_type": "machine", "script_path": "C:\\appviewx_est\\RDSCertBindWithRestart.ps1", "script_type": "powershell" }, { "certificate_type": "machine", "script_path": "C:\\appviewx_est\\UploadCAChain.ps1", "script_type": "powershell" } ]
Note:- The EST Linux Client automatically downloads the certificate
and key to the
appviewx_est/Certificatesfolder and provides these paths as input parameters. Scripts can use these paths to bind the certificates to Apache or other services. - When the post_certificate_creation option is used to execute a script, the parameters newCertThumbprint and newCertSerialNumber can be provided as input arguments to the script. (Applicable to both Windows and Linux).
Attention: Limitations - Installation and enrollment of the EST Linux Client must be performed using the root user, as certificate binding requires root privileges. - The EST Linux Client automatically downloads the certificate
and key to the
- The following powershell scripts have been validated from AppViewX:
Enhanced Security
Improved Windows EST Client Functionality
- Automated Machine Scheduler: The Machine scheduler in the EST Windows Client now triggers automatically one minute after installation and subsequently every 12 hours, without requiring a machine logout or login. Refer the script triggerJobSystem.ps1.
- Windows 11 24H2 Compatibility: Issues related to deprecated WMIC commands in Windows 11 24H2 have been resolved by removing all instances where these commands were used.
- Certificate Re-enrollment Logic: If an enrolled certificate is removed from the Windows Keystore, the EST Client will now enroll the certificate during its next execution.
Validated Windows Versions
- Windows 10
- Windows 11 23H2
- Windows 11 24H2
- Windows Server 2019 and 2022
PowerShell Script Compatibility with the Latest EST Client
triggerJobSystem.ps1
param(
    [Parameter(Mandatory = $false, Position = 1)][string]$taskName = "AppViewX-EST-MachineCertEnrollment",
    [Parameter(Mandatory = $false, Position = 2)][string]$taskDescription = "This task Installs Certificates issued via AppViewX in Machine Store",
    [Parameter(Mandatory = $false, Position = 3)][string]$userPolicy = "system",
    [Parameter(Mandatory = $false, Position = 4)][string]$executablePath = "powershell",
    [Parameter(Mandatory = $false, Position = 5)][string]$arguments = "-ExecutionPolicy Bypass -WindowStyle Hidden C:\appviewx_est\appviewx_client.exe est auto"
)
# .Net methods for hiding/showing the console in the background
Add-Type -Name Window -Namespace Console -MemberDefinition '
[DllImport("Kernel32.dll")]
public static extern IntPtr GetConsoleWindow();

[DllImport("user32.dll")]
public static extern bool ShowWindow(IntPtr hWnd, Int32 nCmdShow);
'
function Hide-Console
{
    $consolePtr = [Console.Window]::GetConsoleWindow()
    #0 hide
    [Console.Window]::ShowWindow($consolePtr, 0)
}
#Hide-Console
# if ($taskName -eq $null) {
#     $taskName = read-host -Prompt "Please enter a proper task name: "
# }
# if ($taskDescription -eq $null) {
#     $taskDescription = read-host -Prompt "Please enter a valid task description: "
# }
# if ($executablePath -eq $null) {
# $executablePath = read-host -Prompt "Please enter a valid executable path: "
# }
# if ($userPolicy -eq $null) {
#     $taskDescription = read-host -Prompt "Please enter a valid user policy ("users" or "system"): "
# }

$task = Get-ScheduledTask -TaskName $taskName -ErrorAction SilentlyContinue
if ($null -ne $task) {
    Unregister-ScheduledTask -TaskName $taskName -Confirm:$false
}
if ("null" -eq $arguments) {
    $action = New-ScheduledTaskAction -Execute $executablePath
}
else {
    $action = New-ScheduledTaskAction -Execute $executablePath -Argument $arguments
}

$startTime = (Get-Date).AddMinutes(1)

# Trigger: every 1 minute, for 1 day
$trigger = New-ScheduledTaskTrigger -Once -At $startTime `
    -RepetitionInterval (New-TimeSpan -Hours 12) `
    -RepetitionDuration (New-TimeSpan -Days (365*60))

$settings = New-ScheduledTaskSettingsSet -Compatibility Win8 -AllowStartIfOnBatteries -DontStopIfGoingOnBatteries
$currentUser = [System.Security.Principal.WindowsIdentity]::GetCurrent().Name
# $userGroup = "users"
if ($userPolicy -eq "users") {
    $principal = New-ScheduledTaskPrincipal -GroupId "BUILTIN\Users"  -RunLevel Highest
}

#if ($userPolicy -eq "system") {
#    $principal = New-ScheduledTaskPrincipal -UserId SYSTEM  -RunLevel Highest
#}
if ($userPolicy -eq "system") {
    $principal = New-ScheduledTaskPrincipal -GroupId "SYSTEM" -RunLevel Highest
}

$definition = New-ScheduledTask -Action $action -Principal $principal -Trigger $trigger -Settings $settings -Description $taskDescription

Register-ScheduledTask -TaskName $taskName -InputObject $definition

$task = Get-ScheduledTask -TaskName $taskName -ErrorAction SilentlyContinue

if ($null -ne $task) {
    Write-Output "Created scheduled task: '$($task.ToString())'."
}
else {
    Write-Output "Created scheduled task: FAILED."
}
RDSCertBindWithRestart.ps1
param (
    [string]$newCertThumbprint
)
$cert = Get-ChildItem Cert:\LocalMachine\My | Where-Object { $_.Thumbprint -eq "$newCertThumbprint" }
Add-Type -AssemblyName System.Security
$key = [System.Security.Cryptography.X509Certificates.RSACertificateExtensions]::GetRSAPrivateKey($cert)
$un= $key.Key.UniqueName
$keyPath     = "C:\ProgramData\Microsoft\Crypto\Keys\$un"
$acl = Get-Acl $keyPath
$rule = New-Object System.Security.AccessControl.FileSystemAccessRule("NETWORK SERVICE","FullControl","Allow")
$acl.AddAccessRule($rule)
Set-Acl -Path $keyPath -AclObject $acl
$hex = $cert.Thumbprint -replace ' ', ''
$bin = for ($i=0; $i -lt $hex.Length; $i+=2) { [Convert]::ToByte($hex.Substring($i,2),16) }
# Write binary value into registry
Set-ItemProperty -Path "HKLM:\SYSTEM\CurrentControlSet\Control\Terminal Server\WinStations\RDP-Tcp" -Name "SSLCertificateSHA1Hash" -Value $bin -Type Binary
Restart-Service TermService -Force
ChainCertificatesImport.ps1
$CertDirectory = "C:\appviewx_est"
$RootCertFile = "Root-CA.crt"
$IntermediateCertFile = "Issuing-CA.crt"

# Build full paths
$RootCertPath = Join-Path -Path $CertDirectory -ChildPath $RootCertFile
$IntermediateCertPath = Join-Path -Path $CertDirectory -ChildPath $IntermediateCertFile

# Validate files exist
if (!(Test-Path $RootCertPath)) {
    Write-Error "Root certificate file not found: $RootCertPath"
    exit 1
}
if (!(Test-Path $IntermediateCertPath)) {
    Write-Error "Intermediate certificate file not found: $IntermediateCertPath"
    exit 1
}

# Import Root Certificate
Write-Output "Importing Root certificate: $RootCertPath"
Import-Certificate -FilePath $RootCertPath -CertStoreLocation Cert:\LocalMachine\Root | Out-Null

# Import Intermediate Certificate
Write-Output "Importing Intermediate certificate: $IntermediateCertPath"
Import-Certificate -FilePath $IntermediateCertPath -CertStoreLocation Cert:\LocalMachine\CA | Out-Null

Write-Output "Certificates imported successfully."