AppViewX Enrollment Server
Introduction
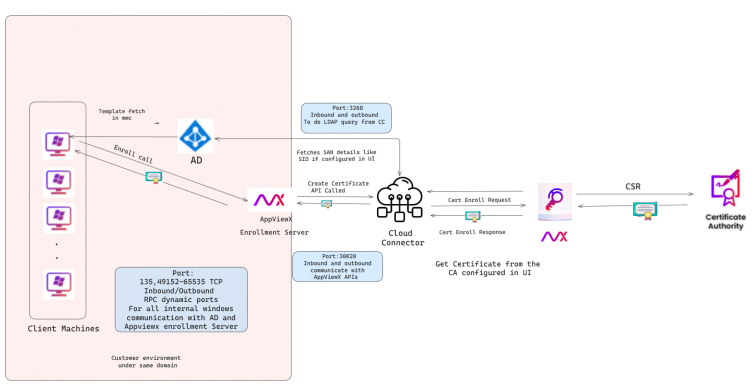
The AppViewX Enrollment Server processes and automates certificate deployment and renewal for users and computers within an Active Directory domain. The process begins when the Windows autoenrollment client sends a certificate request to the AppViewX Enrollment Server. The server validates the request against the user’s account in Active Directory, retrieving additional attributes as needed to meet template requirements defined by organizational policy. It then forwards the request to the Certificate Authority (CA), which processes it according to the certificate profile configured in the AppViewX UI. Once issued, the certificate is returned to the Enrollment Server and delivered to the requesting client. If enabled, the server can also publish the certificate to Active Directory for wider accessibility.
System Requirements and Service Account Configuration
-
A valid Service Account with the below permissions
- Enterprise Admin
- Domain Admin
- Remote Management Users
- Administrator
- Domain User
-
CC Service Setup
- Install ACME-HTTPS and SCEP-HTTP services on the CC.
- Configure WAEP in the AppViewX GUI specific to CC.
-
Domain Machine Requirements
- SaaS Setup
- Outbound Calls
- Port 30020 for unidirectional communication from domain machines to CC.
- Port 30022 for CRL verification.
- Inbound Calls
- Port 5985 for auto-fetch requests from CC to the Enrollment Server machine.
- Outbound Calls
- On-prem Setup
- Outbound Calls
- Port 31443 for unidirectional communication from domain machines to AppViewX Node from Enrollment Server Machine.
- Port 30022 for CRL verification.
Note: Auto fetch/lift and shift functionalities are only supported in the SaaS model. - Outbound Calls
- SaaS Setup
-
Domain and Connectivity
- AppViewX Enrollment Server must be in the same domain as the AD, with connectivity to the AD server.
- Ensure a valid DNS record for the CC/AppViewX node exists in domain machines.
-
Certificate and Trust Configuration
- Issue the certificate using AppViewX PKIaaS CA and enable trust on Windows domain machines.
- Steps to add root and intermediate certificates to the
Windows domain machines:
- Log onto the AD machine using your service account.
- Move the root and intermediate certificates that need to be trusted to the appropriate location.
- Open the command prompt with administrator privileges.
- To publish the Issuing CA certificate,
run:
certutil -dspublish -f <PathToCertFile.cer> SubCA - To publish the Root CA certificate,
run:
certutil -dspublish -f <PathToCertFile.cer> RootCA - Run the following command to force a policy update and push
the certificates to the domain
machines:
gpupdate /force
Downloading the AppViewX Enrollment Server
-
Go the AppViewX homepage and click the ? icon as shown below.
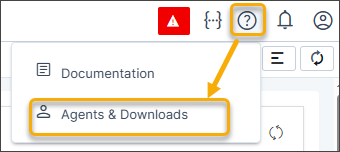
- Click Agents and Downloads.
-
Click Download from the AppViewX Enrollment Server
widget.
The AppViewX_Enrollment_Server_Installer.zip is downloaded and saved in the Downloads folder.
-
Extract the contents from the zip file.
The AppViewX_Enrollment_Server_Installer.exe file is available.
- Run the .exe file and follow the on-screen instructions to install the AppViewX Enrollment Server agent.
Configuring WAEP Templates
Manual Fetch Configuration
- Generate CSV file (Applicable only for manual upload of
templates)
To generate CSV file:
- Run Windows PowerShell.
- To extract information of the certificate name,
certificate template OID, validity period, and renewal period
from the templates published on the ADCS server, run the command
on the ADCS
server:
Certutil -adtemplate -v | select-string distinguishedName,msPKI-Cert-Template-OID,pKIExpirationPeriod,pKIOverlapPeriod - Copy the certificate name, certificate template OID, validity
period, and renewal period for Computer_Auto_enrollment template
and User_autoenrollment template as shown.
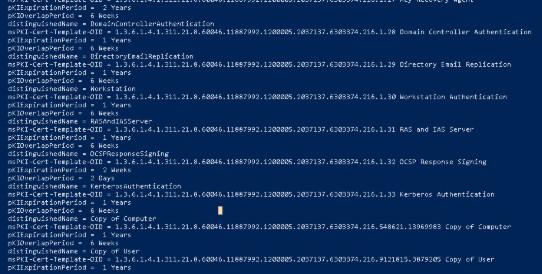 Note: The Copy of Computer template is used to enroll devices while the Copy of User template is used to enroll users.
 - Open a spreadsheet and create column headings:
- templateName: In this column, add entries as Computer_Auto_enrollment template and User_autoenrollment.
- templateOID: In this column, paste the OIDs copied in Step 3 against the respective template.
- validityPeriod: In this column, enter the value as 365, which is the default value of the validity period.
- validityPeriodUnit: In this column, enter the value as days, weeks, months, or years.
- renewalPeriod: In this column, enter
the value as 30, which is the default value of the
renewal period.Note: The renewal period must be less than the validity period.
- renewalPeriodUnit: In this column, enter the value as hours, days, weeks, months, or years.
- Once done, save the file in .xls, or .xlsx, or csv format.
Auto-Fetch Configuration
Templates can also be automatically fetched from the Windows machines using WAEP. To use auto-fetch:
Enable WinRM services in AD and AppViewX Enrollment machine
For the Lift & Shift feature to work, enable the WinRM service on the AppViewX Enrollment machine and the AD servers configured in WAEP for global fetch configuration and publication of templates.
To configure WinRM service (Applicable only for automatic upload of templates):
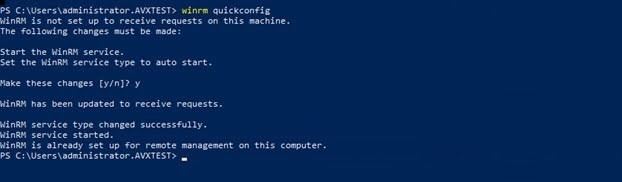
- Run winrm quickconfig on the PowerShell window as an administrator.
- Type y when prompted to start the WinRM service.
The service account, for example: <waep_kerberos>, must be part of the Remote Management Users group.
- To validate if the Remote Management Users group has
permissions to execute the scripts, run the below command on the AD
server and the AppViewX Enrollment Server:
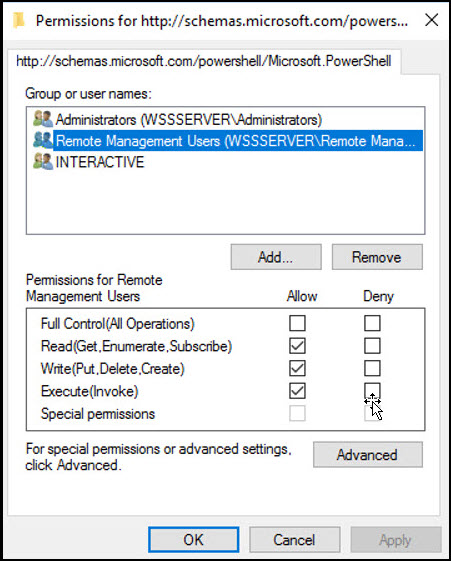
Set-PSSessionConfiguration -ShowSecurityDescriptorUI -Name Microsoft.PowerShell - Add the service account to the Remote Management Users group in AD.
- Assign Read,Write, and Execute permissions to the group.
- Enable Credential Security Support Provider (CredSSP) authentication on
the enrollment server and the AD servers by running the following
command:
Enable-WSManCredSSP -Role Server - Once the server role is enabled, ensure the parameters, Kerberos,
Negotiate, CredSSP, are set to true and CbtHardingLevel is set to
Relaxed as shown:

Configuring Windows Auto-Enrollment Proxy
- Log onto the AppViewX application using your credentials.
-
Go to
 (Menu) icon > CERT+.
The CERT+ left navigation pane appears.
(Menu) icon > CERT+.
The CERT+ left navigation pane appears. -
Expand the Administration menu and select Auto Enrollment >
WAEP.
The Windows AEP auto-enrollment page is displayed.
-
Click +New Setting to add a WAEP auto-enrollment request.
The Windows AEP : New Setting page is displayed.
-
Enter the following fields:
Table 1. Field Description for Windows AEP: New Setting page Field Description Endpoint Details *Name Provide a unique name for the WAEP setting. Note: Only alphanumeric and the following special characters are allowed: period (.), hyphen (-), and underscore (_). The name cannot begin with a special character.*IP/FQDN The dropdown list field contains a list of FQDN's from the stored data. Users can choose from the available values. The hostname format is <tenant>-aep.<domainname>. For Onprem the list is populated with the On-Prem node details. Select any one of the values.
For SaaS the list is populated with the hostname of the Cloud Connector and AEP Gateway details.- Using On-premises CC
- Without load balancer:It is the hostname of the cloud connector where the auto-enrollment gateway is running.
- With load balancer: Manually enter the hostname of the cloud connector.
- Using Direct Gateway: In the SaaS setup, to use the direct AEP gateway without installing the cloud connector, the FQDN/IP address will be the tenant URL with "-aep" before the domain name.
*Port The port number is auto-populated based on the selected IP/FQDN value. If the IP/FQDN value is entered manually, then enter the appropriate port number.- HTTPS URL (always)
- Onprem - 31443
- SAAS - 30020
*Data Center Select the data center. The value is auto-populated based on the cloud connector. Active Directory Configuration *Policy Server Provide the IP address or the hostname of the machine where AppViewX Enrollment Server is installed. *LDAP Server Select or enter the hostname of the AD/LDAP server. *Service Account with Base Provide the service account created for bind. For example: cn=test_service, ou=Kerberos_accounts, dc=avxtest, dc=com *Service Account Password Provide the service account password. Active Directory Sync This field is optional for manual import of templates.Enable this toggle button to fetch all the global catalog servers in your forest. Note: This feature is available only for SaaS deployments.Global Catalog Configuration *LDAP URL List of LDAP/LDAPS configurations fetched from Platform. Configure LDAP Page A link below the LDAP URL field that redirects to Platform page to add the LDAP/LDAPS configurations. Refer to the section Configuring LDAP for WAEP for more details.
Sync Fetches latest LDAP configuration data from Platform. *LDAP Base DN This field is displayed after selecting value in the LDAP URL field. If AD sync is enabled, the LDAP base DN is auto-populated based on the IP address of the global catalog server selected from the LDAP URL dropdown list.
Import Templates *Type By default, Manual is selected. It is recommended that you select the Auto option to automatically fetch your templates from your AD. If you have selected Manual, then drag and drop your template that you created or browse to the location it is saved.
For more details, see Configuring WAEP Templates.
Fetch Templates The templates are fetched and populated in the Certificate Templates screen. Note: Fields marked with red asterisk (*) symbol are mandatory. - Using On-premises CC
-
Click Next. A message that templates are imported successfully
appears.
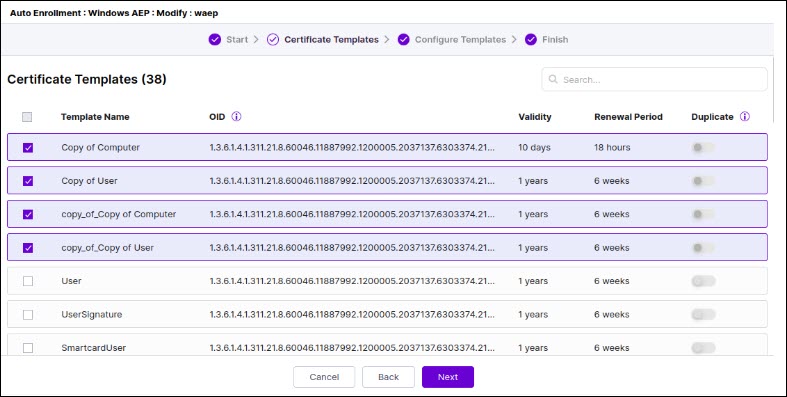
The Certificate Templates page appears along with all the fetched templates along with the details populated in the table as shown.
-
Select the templates you want to configure and click Next.
The Certificate Templates Configuration page appears.Note: [Applicable only if you have chosen automatic upload of templates] If you want to make a copy of an existing template, then select the checkbox against that template and slide the toggle button under the Duplicate column. The duplicated template name appears with the prefix: copy_of_ along with the template name on the next page. For example, if you made a duplicate of the DB_Test_Template template, then the duplicate template appears with the name, copy_of_DB_Test_Template, which you can edit on the next page.
-
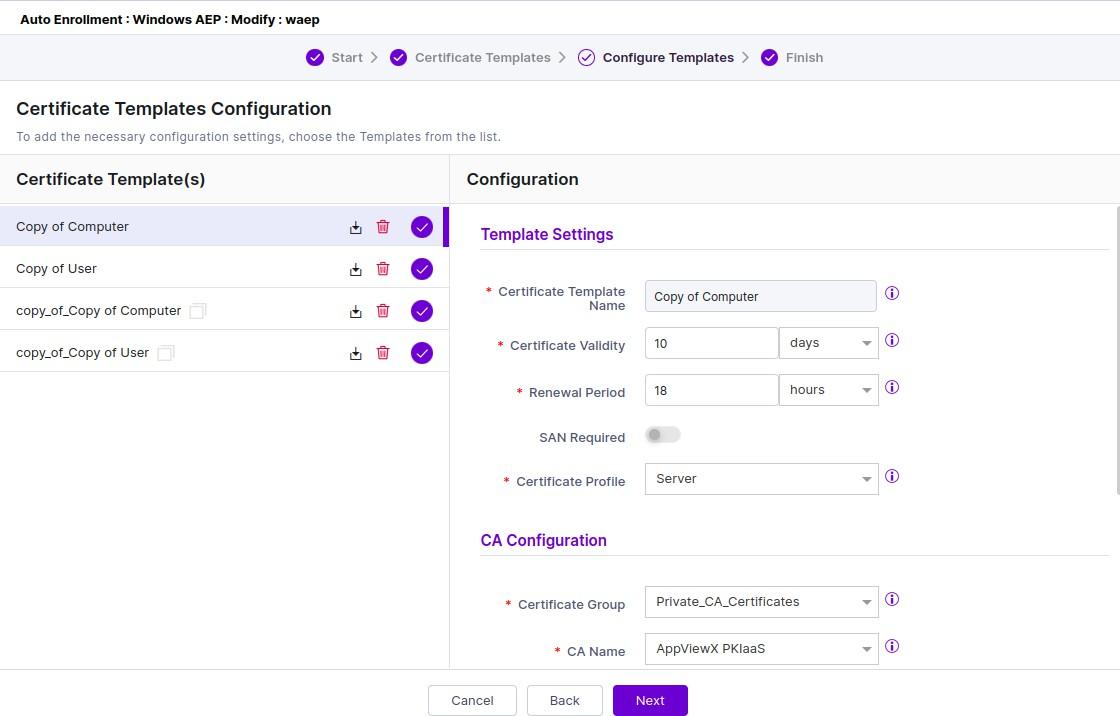
Click the template you want to configure and fill out the details in the
Configuration page that appears on the RHS of the page.
-
Enter the following fields:
Table 2. Field Description for Certificate Template Configuration page Field Description Template Settings *Certificate Template Name Enter the name of the certificate template if you created a copy of it. *Certificate Validity Enter the expiry time limit for certificates. *Renewal Period Enter the renewal time limit for the template. SAN Required This is disabled by default. *Subject Alternative Names This field appears only when you select the SAN Required toggle is enabled. Select from the following values:- DNS
- User Principal Name
- Service Principal Name
Note: You can either choose DNS/Email or both, or customized SAN such as User Principal Name/Service Principal Name or both. For example, if you select DNS/Email or both, you cannot select User Principal Name/Service Principal Name and vice versa.Replace Common Name with DNS If enabled, the issued certificate's common name will be replaced with the value retreived from the specified LDAP field name. SID Required If enabled, the Securty Identifier (SID) will be included in the certificate. *LDAP Search Attribute The dropdown is populated with commonly used LDAP attributes such as sAMAccountName, cn, and userPrincipalName. Select any attribute from this list based on the AD environment. Additionally, you may provide a custom attribute that is not part of the predefined list. The selected LDAP search attribute is used as a search key when performing LDAP queries in WAP.
Issue certificate using machine name from CSR Enable this option to issuse a machine certificate using the machine name extracted from the CSR client information. This is useful for MMC based enrollment. When this option is disabled, the certificate is issued using the CSR's common name.
CA Configuration *Certificate Group Select the certificate group for managing the certificates. *CA Name Select a CA for WAEP to communicate for certificate enrollment. *CA Account The field values are listed only when the account is added to CA settings. *CA Certificate Select issuer certificate. It is recommended to select intermediate CA certificates to sign all the client certificates. *Issuer Name Select the issuer name for the certificate. *Template Select the template frm the drowdown. *Issuer Location Select the issuer location for the certificate. *CA Connector Name By default, this is a CA Connector. If you created a CA connector manually, then provide that name here. On completion, you get a message that the template is saved successfully and a blue tick mark appears across the configured template.Note:- You can select or clear the templates by going back to the previous page.
- You cannot click Next until all the selected templates are configured.
- Click the
 (Download) icon to download
a selected template (appears only if you have chosen automatic
upload of templates) or click the
(Download) icon to download
a selected template (appears only if you have chosen automatic
upload of templates) or click the  (Delete) to delete a selected template.
-
Click Save.
The Apply changes to other templates? pop-up is displayed.
-
Template configuration details may be updated to all or selected templates,
or just the current template being configured as mentioned below:
Case 1: Applying changes to all or selected templates.
- From the Selected Template dropdown in the pop-up, choose one or more templates to apply the changes or choose All to apply to all the templates.
- Click Apply to selected templates.
Case 2: Applying changes only to the curent template.- Do not select any value in the dropdown, and simply click Apply only to this template.
-
Click Next.
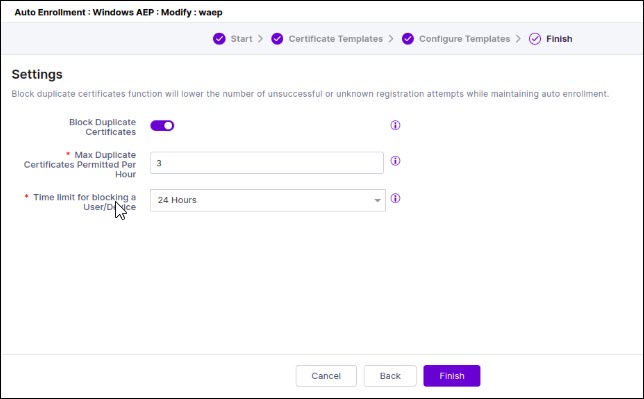
The Settings page appears. By default, the Block Duplicate Certificates toggle button is disabled. If you enable it, you can customize the values for blocking the maximum number of duplicate certificates in an hour and the time limit to block a user/device issuing the certificates.Note: By default, the time limit for a user/device is 24h. If you change this value, ensure to update the Occurrence Type by navigating to CERT+ > Administration > Job Scheduler and selecting Pkiaas AEP Purge log Job. If you have set the time limit as 12h or 24h, then choose Occurrence Type as Daily. For values more than 24h, choose Occurrence Type as Weekly.
-
Click Finish.
A message that the WAEP settings is saved successfully appears.
Configuring LDAP for WAEP
-
In the General Information section, enter the following details
(sample values are shown in the image).
Table 3. Field descriptions for General Information Field Description *Host Host name (domain name) of the LDAP server. *Port Enter port as follows: - 3269 (Global Catalog over secure) for LDAPS
- 3268 (Global Catalog) for LDAP
LDAPS The LDAPS protocol is used for secure communication between AppViewX and Active Directory/Open LDAP. To enable use of the LDAPS (Global Catalog over secure) protocol authentication, instead of the LDAP protocol, turn on this toggle.
Upload certificate This field is displayed only when the LDAPS is enabled. Upload the issuer CA certificate of the certificate bound to the LDAPS server (Global Catalog over a secure protocol).
To upload a LDAP server certificate:
- Click Browse .
- Navigate to the location of the
.pem certificate file.
If the LDAP servers are load balanced with VIP, upload the root certificate of the LDAP server instead of the server certificate.
- Select the certificate to be uploaded and click Open.
Note: Only a single certificate can be uploaded for each server.Bind DN Provide the service account created for bind. For example: cn=test_service, ou=Kerberos_accounts, dc=avxtest, dc=com Bind Password Provide the service account password used to authenticate with the LDAP server.. Authorization To check user permissions at the time of authentication, select this check box. In addition to authentication, AppViewX also lets you perform user authorization against the LDAP server. To enable authorization along with authentication, select this check box. Note: If Authorization is not enabled, AppViewX will only carry out LDAP authentication for the given user.Enable Nested Groups Enables AppViewX to resolve and include users who belong to nested LDAP groups when determining group membership and access permissions. LDAP Sync To enable the use of the SSH module in AppViewX for SSH key discovery use case, turn on this toggle. *: Mandatory fields -
After entering the above connection details, to test if the host is
reachable and the port is valid for establishing an LDAP/LDAPS connection,
click Test Connection.
Note: You can test the connection of LDAPS only when you save all of the configuration details. Bind DN and Bind password details cannot be validated through a test connection.
-
The User Search section collects information to validate a user’s
presence in the Active Directory. In the User Search section, enter
the following details:
Table 4. Field descriptions for User search Field Description *User search base Base directory where the user is present. Sample user search base: DC=avxwaep,DC=net *Search filter Criteria for searching for the user from the search base. Enter the value: sAMAccountName={0} User return attribute User information to be retrieved from the search base. Note:- This field is enabled only when the Authorization toggle (in the General Information section) is turned on.
- You can specify only User return attribute.
*: Mandatory fields -
Click Add.
The user search values are displayed in a table, with the Action column that has a Test Query option.
- After entering the above details, to test if the user is present in the Active Directory, click Test query.
-
In the User search result action pane, enter the
Test username and click
Test.
Note: You are allowed to check the query response for User search and Group search only when the connection is valid.
-
To test which user group the user belongs to, in the Group search
section, enter the following details:
Note: This section is enabled only when the Authorization toggle (in the General Information section) is turned on.
Table 5. Field descriptions for Group search Field Description Group search base Base directory where the user group is present. Search filter Criteria to search the user group from the search base. Group return attribute User group information to be retrieved from the search base. Note:- You are allowed to check the query response for User search and Group search only when the connection is valid.
- Group search can be performed only if the customer’s LDAP is of type Open LDAP. Microsoft Active Directory does not need group search configuration. For Open LDAP, group search needs to be configured mandatorily. The User return attribute in the User search section does not return the group membership details.
- In the case of multiple LDAP servers, to define/update the order in which the servers will be authenticated, drag and drop the entries in this table.
Auto-Enrollment Server
Introduction
The AppViewX Enrollment Server is a service that runs on a Windows machine, automating the deployment and renewal of certificates for users and computers within an Active Directory domain.
Prerequisites
- Recommended Operating Systems: The following operating
systems are supported for client and server installations of the
AppViewx Enrollment Server.
Role Operating System Client Machines(Machines requesting for Certificates) Windows 10 Windows 11 Windows Server 2016 Windows Server 2019 Windows Server 2022 Server(Machines were AppViewX enrollment Server can be installed) Windows Server 2016 Windows Server 2019 Windows Server 2022 - Software
2.1 .NET Framework
- Version: .NET Framework 4.7.1
- Download Link: Microsoft Download Center
- Hardware
Recommended System Requirements
- Memory: 16 GB RAM
- Hard Disk: 100 GB available space
- Processor: Quad-core or higher
- Preparing the Windows Environment
Domain and Active Directory Requirements
- A domain admin account is required for installing the AppViewx Enrollment Server.
- A service account with admin privilege is required to perform LDAP queries from Appviewx and to fetch global configuration.
- The AppViewX Enrollment Server machine must be installed in a Microsoft Windows domain with at least one Domain Controller.
- Do NOT install the AppViewX Enrollment Server on the same machine running Microsoft Certificate Authority Services.
- Adding the Certificate Template Snap-InInstall the Certificate Template Snap-In for mmc to edit certificate template permissions. Follow the steps to add the certificate template snap-on as a domain administrator:
- Go to Start > Administrative Tools > Server Manager.
- Right-click Server Manager and select Add Features.
- Open Remote Server Administration Tools > Role Administration Tools > Active Directory Certificate Services Tools and select Certification Authority Tools.
- Click Next.
- Click Install.
- Allow Publishing to Active Directory
The computer that runs the AppViewX Enrollment Server must be a member of the Active Directory group Cert Publishers for all domains, including the root domain. This grants the server the necessary permissions to publish newly issued certificates to Active Directory.
To add the server’s computer account to the Cert Publishers group on machines with the Active Directory Domain Services role enabled:- Log on as the AppViewX Enrollment Server Administrator or as another user who is a member of the Enterprise Administrators group.
- Go to Administrative Tools > Active Directory Users and Computers.
- In the tree view on the left, expand your domain and click Users.
- In the right panel, double-click the Cert Publishers group and go to the Members tab.
- Click Add and add the computer account for the server running the AppViewX Enrollment Server. (You may need to include Computers in the Object Types filter to search for the computer name.)
- Repeat these steps for the Cert Publishers group
in every domain across your forest, including the
root domain. For the new group membership to take effect, run this command on the machine where the AppViewX Enrollment Server is installed:
gpupdate /force
- Network and Firewall Requirements
Required Ports
The machines using Enrollment server to request certificates must have the following ports open for communication with the AppViewX Enrollment Server:Port Protocol Direction Purpose 135 TCP Inbound/Outbound RPC endpoint mapper 49152–65535 TCP Inbound/Outbound RPC dynamic ports Note: The Enrollment server machines require both inbound and outbound access through port 30020 to communicate with the AppViewX APIs and request certificates from the CA.Port 3268: Between the CC and the AD/LDAP server (used for LDAP queries if the template needs any ldap values to be embedded in SAN field or SID values).
Installing AppViewX Enrollment Server
- Download: Download the Appviewx_Enrollment_Server.zip file.
- Extract: Extract the contents of the downloaded Appviewx_Enrollment_Server.zip file. Locate and extract the Appviewx_Enrollment_Server.exe file.
- Run as Administrator: Right-click the Appviewx_Enrollment_Server.exe file and select Run as administrator to start the installation process and register it as a server.
- Welcome/Next: In the installation wizard, select Next to proceed.
- Accept Agreement: Accept the license agreement and select
Next.
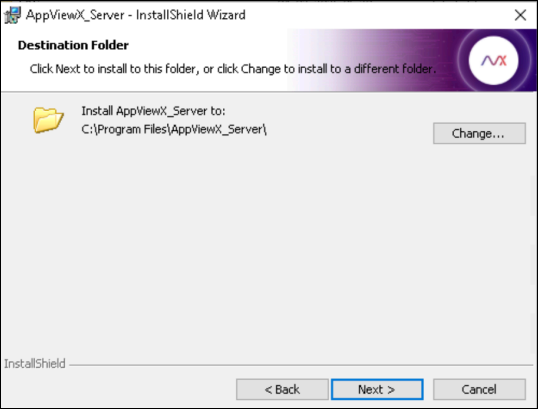
- Select Installation Location: Choose the installation location for the service. The default location is recommended to be Program Files (x86). Select Next after choosing the location.
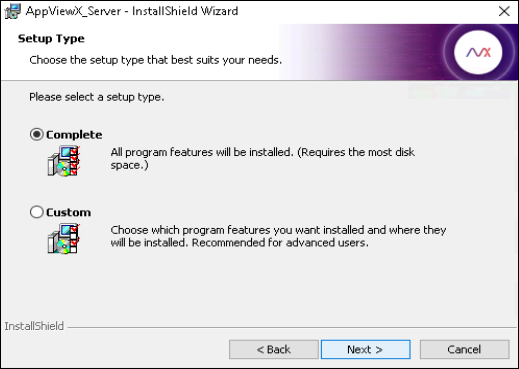
- Complete Installation: Select the Complete installation
option to proceed with the standard installation.
- Finish: Complete the installation process by following any remaining prompts and selecting Finish.
- Modify the config files: The configuration files are located in
the Installation Directory, typically C:\Program
Files\AppViewX_Enrollment_Server.
Update the main configuration file
Path:AppViewX_Enrollment_Server.ini
- Modify the hostname field with the (hostname/ip) of AppViewX Cloud Connector if CC is deployed or the on-premises deployment node or in case of multi-node please enter the details of the node in which the ms-proxy pod is installed.
- Set the port value to 30020 if using SaaS, or 31443 if using an on-premises deployment, or 443 if using a Load Balancer.
Update the client credentials file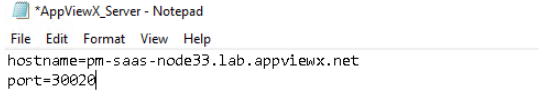 Path: Client_details.ini
- Update the client-id and client-secret fields with the CERT_AEP_SERVICE_ACCOUNT service account under platform tab in AppViewX GUI credentials.
- During the first-time setup client_id and client_secret_key
are initially stored in plain text. On the first server
startup, the client_id and client_secret_key are
automatically encrypted and the file is updated
securely.

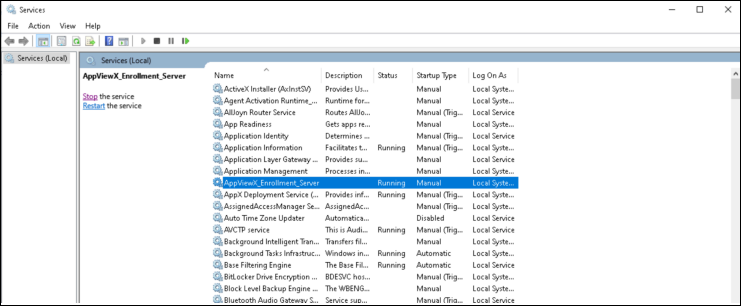
- Start-Service: Go to Services and start the
AppViewX_Enrollment_Server.
Configuring Permissions for AppViewX
- Enable DCOM on the Machine where the AppViewX Enrollment Server
is
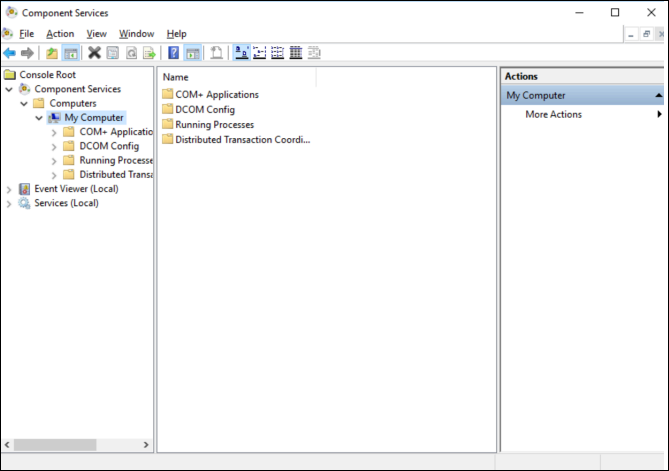
- Open Component Services from Administrative Tools.
- On the left pane, expand Component Services > Computers > My Computer.
- Right-click My Computer, select Properties.
- Go to the Default Properties tab.
- Ensure Enable Distributed COM on this computer is checked.
- Click Apply and then OK.
- Configure DCOM Access and Launch Permissions
Set Global DCOM Access Permissions
- Open Component Services again.
- Right-click My Computer and go to the COM Security tab.
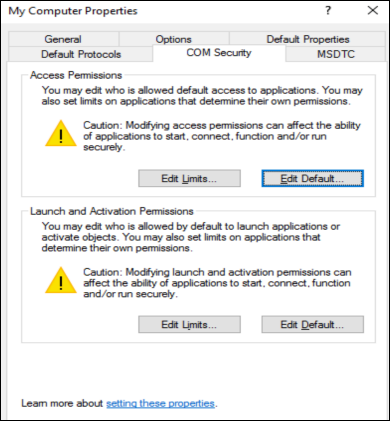
- Under Access Permissions, grant Local Access
and Remote Access to:
- Domain Computers
- Domain Controllers
- Domain Users
- Under Launch and Activation Permissions, click
Edit Limits:
- Grant Local Activation and Remote Activation.
- Do not select Local Launch or Remote Launch.
- Apply the same permissions to:
- Domain Computers
- Domain Controllers
- Domain Users
- Set Permissions for AppViewX Enrollment Server
- In Component Services, expand DCOM Config.
- Find and right-click AppViewX, select
Properties.
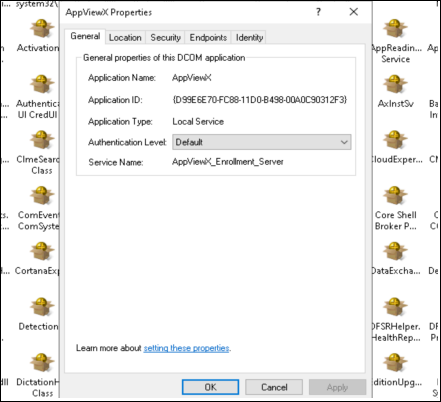
- Go to the Security tab.Launch and Activation Permissions:
- Choose Customize and click Edit.
- Grant Local Activation and Remote Activation to the same groups.
- Apply to:
- Domain Computers
- Domain Controllers
- Domain Users
- or Everyone, if no special security requirements exist
- Choose Customize and click Edit.
- Grant Local Activation and Remote Activation to the same groups.
Adding CA as Enrollment Service in AD
- Run the following PowerShell command in the AD Machine with admin
privileges and respective CA name and Domain name.
Sample code:
$CAName = "<CA_NAME>" $Hostname = "<Hostname of Enrollment Server installed Machine>" $Domain = "<Domain name>" $domainComponents = $Domain.Split(".") $DNComponents = $domainComponents | ForEach-Object { "DC=$_" } $DomainDN = ($DNComponents -join ",") # Construct DN path for Enrollment Services $DNPath = "CN=Enrollment Services,CN=Public Key Services,CN=Services,CN=Configuration,$DomainDN" # Construct FQDN for the CA machine dynamically $CAAddress = "$Hostname.$Domain" $certBase64 = @" <BASE64 of the Root CA certificate — you can download this from the AppViewX UI as a .crt file. After downloading, open the file and copy only the contents between -----BEGIN CERTIFICATE----- and -----END CERTIFICATE----- (excluding those lines). Then paste that text here. This Base64 string is used to register the CA enrollment service, install the certificate into the local machine Trusted Root Certification Authorities store, and finally publish it to Active Directory using certutil -dspublish -f <cert_file> RootCA so it is trusted domain-wide.> "@ -replace "`r`n", "" $certBytes = [System.Convert]::FromBase64String($certBase64) # --------------------------------------------- # OPTION 1: Get all certificate templates from Active Directory # Uncomment the below lines if you want to support ALL templates dynamically. # Replace $DomainDN with your actual domain DN (e.g., DC=example,DC=com) # $templates = Get-ADObject -Filter 'ObjectClass -eq "pKICertificateTemplate"' ` # -SearchBase "CN=Certificate Templates,CN=Public Key Services,CN=Services,CN=Configuration,$DomainDN" ` # -Properties Name # $templateNames = $templates | ForEach-Object { $_.Name } # --------------------------------------------- # OPTION 2: Define a specific list of template names to support only selected ones $templateNames = @("DomainController", "User", "Computer") # --------------------------------------------- # Create the AD object New-ADObject -Name $CAName ` -Type "pKIEnrollmentService" ` -Path $DNPath ` -OtherAttributes @{ cACertificateDN = "CN=$CAName,$DomainDN"; dNSHostName = $CAAddress; displayName = $CAName; certificateTemplates= $templateNames; cACertificate = $certBytes }Example:$CAName = "testCA" $Hostname = "Client" $Domain = "avxweap.net" $domainComponents = $Domain.Split(".") $DNComponents = $domainComponents | ForEach-Object { "DC=$_" } $DomainDN = ($DNComponents -join ",") # Construct DN path for Enrollment Services $DNPath = "CN=Enrollment Services,CN=Public Key Services,CN=Services,CN=Configuration,$DomainDN" # Construct FQDN for the CA machine dynamically $CAAddress = "$Hostname.$Domain" $certBase64 = @" MIIFQTCCAyugAwIBAgIQdXPtR8Zx+3ZjghhwLLLODDALBgkqhkiG9w0BAQswLDER MA8GA1UECgwIQXBwVmlld1gxFzAVBgNVBAMMDkRlbW8gTmF0aXZlIENBMB4XDTI2 MDMxNzAwMDAwMFoXDTM2MDMxNzIzNTk1OVowLDERMA8GA1UECgwIQXBwVmlld1gx FzAVBgNVBAMMDkRlbW8gTmF0aXZlIENBMIICIjANBgkqhkiG9w0BAQEFAAOCAg8A MIICCgKCAgEAzHheWoays24RehALANPO9KWEas4mjoAHT31aFUAwvcULsK5vngnH 8/GGPlqpwSo8hGrv5drRQzyHiA2pzq9/F0WumOOCUQd5VocSIclMOrHx3VrBGqSe nOSivDpHd3UV0IasY5CgqgV4jnAbOXIM9O0uF0oUDz6iBKVog4lKWPGiNAmHufdc FNFXFvK7zzxlKjqRd5zI3De0qxXLQE2lxhsVvxUR3b37Leqwb/hWL+VzQ5UTpXmi LZRaWmE5XUlpyfbXnH3icSnmWM6LxDA6i/2rFWny/xB4qROfNGXzYEVOdhT1sWu/ M91PhNT+U6jDWeVkxuz7aDMGNG2cEVNlVvvKR0/A8clHJoc7rAqtUNQxtnigpbas 4/Qrgk09SBMkKNPwx/l4EB7EUSnUwb5lCKopGU+eeJExBfW8PRF6ghW1ZrRFjKyJ kW0lJZ5of4jFFAA3IHnXSvKby50D1+VO0ZJo+BJKJOYhukRPQrNpYwrcT/ACfNlJ 2JLIJuLBXVZfnMNSz98jfXal9HOg7g9zvLirSwJ4CGAIRj/sq9A5zKICsPpEwEAv +fuYV1ffwWx8L9C09Y35+a9hEuQmXPfpWgHhUOOAilnbzolRip4cDUGU+K2GAGMh Gcm9LTE1rdBp4ixFEX97FWfhQs+ETi6T+EL9fQxnQQxfG33jNFEgBwUCAwEAAaNj MGEwHQYDVR0OBBYEFEawaFEFv4+T3ttHBQw3F/KlkuYTMB8GA1UdIwQYMBaAFEaw aFEFv4+T3ttHBQw3F/KlkuYTMA4GA1UdDwEB/wQEAwIBhjAPBgNVHRMBAf8EBTAD AQH/MAsGCSqGSIb3DQEBCwOCAgEAFpMgMIcQluckq5aW7v21/z7mVSVt8F0c8QuG UBh2G84f782wJ/8JuXDStZPPc8PJCZUd5jDrw56eBDgsDcTIhyxUFY+cAXw6fcXa 4OZHRsp1UYwxXsFLnbviy9Q+vB8zKCTkWjgJ7Er/odApSdK82MjcaH2LIF9INqK9 IoLrwx2DJjTpVKIt/LlqQuibK0VwqrbJCnxHLPz29ZlGo8BqVpiYkUICxI+rB3WJ pwHs4hd5RSbi/4zuFZZGBlCICGnNKq/QbQQO3JI4PDnz230JyYj9UXQcos993LXP nJgPJvCFuB8k+C9Nc6XTFXtQ+KsmZroY4eDuP1sbusH7OPhPa7SfEo1daUpCv3Wl aCU75e4H0h7YnQZIS0V0nsweW5H6uuKOplDOCQTTcKYUYGUfesY2yXswkSumaqpu jlKQJ3o/EDjvObUnQqRQjzzRYKPQDHAfr63IBVtLiKpU3YmkO9iZOXHdJSZtCNsd sFx+cQJSXmA90SaxaWVTGpioflJ6J2pKKcLitwoCkhVBea52/cEeL38eZ92yaEFI qJ8VpsqCMweaTsZVffS5p3dmnbqh8aH+xFNIXVEAGl3WjcawOBO+JikwAduDawm+ eYHgMjcyuBJk1HVBcEKxSGBvsGu1el5Kh97vzvF0SGfrZSVwC+KWtW28ENjneVZ/ 2GpMDUE= "@ -replace "`r`n", "" $certBytes = [System.Convert]::FromBase64String($certBase64) # --------------------------------------------- # OPTION 1: Get all certificate templates from Active Directory # Uncomment the below lines if you want to support ALL templates dynamically. # Replace $DomainDN with your actual domain DN (e.g., DC=example,DC=com) # $templates = Get-ADObject -Filter 'ObjectClass -eq "pKICertificateTemplate"' ` # -SearchBase "CN=Certificate Templates,CN=Public Key Services,CN=Services,CN=Configuration,$DomainDN" ` # -Properties Name # $templateNames = $templates | ForEach-Object { $_.Name } # --------------------------------------------- # OPTION 2: Define a specific list of template names to support only selected ones $templateNames = @("DomainController", "User", "Computer") # --------------------------------------------- # Create the AD object New-ADObject -Name $CAName ` -Type "pKIEnrollmentService" ` -Path $DNPath ` -OtherAttributes @{ cACertificateDN = "CN=$CAName,$DomainDN"; dNSHostName = $CAAddress; displayName = $CAName; certificateTemplates= $templateNames; cACertificate = $certBytes } - AD administrative access is also required for one time setup to run the PowerShell script to register the AppViewX Enrollment Service as enrollment service object within Active Director.
- The AD registering script template file is attached in the installation directory of the enrollment server which can be used for registering.
- Copy the full script and edit the values as needed. You can either paste and run it as one command in PowerShell or save it as a .ps1 file and execute that file.
- Install the root certificate in the Trusted Root Authority Cert
Store and publish it in domain
using:
certutil -dspublish -f <RootCA.crt> RootCA - Test the AppViewX Enroll ServerRun the following PowerShell command select the CA-Name setup in the previous command:
certutil -config - -ping
Adding Certificate Template to CA via ADSI Edit
- Open ADSI Edit
Press Win + R, type adsiedit.msc, and press Enter.
- Connect to the Configuration Naming Context
- In ADSI Edit, right-click on ADSI Edit in the left pane and select Connect to.
- In the Connection Point, choose:
Distinguished Name (DN) and enter:
CN=Configuration, DC=yourdomain, DC=com (Replace yourdomain.com with your actual domain name)
- Navigate to the Enrollment Services Node
Expand the tree in the left pane:
CN=Configuration, DC=yourdomain, DC=com
→ CN=Services
→ CN=Public Key Services 16
→ CN=Enrollment Services
- Select Your CA (Enrollment Service)
- Under CN=Enrollment Services, locate the object with the name of your CA (e.g., CN=YourCAName).
- Right-click it and select Right-click it and select Properties.
- Edit the certificateTemplates Attribute
- On the Properties window, find the certificateTemplates attribute.
- Click Edit, then click Add to add the name of the certificate template you want to support (e.g., User, Computer, CustomTemplateName).
- Apply and Close
Click OK to close all dialogs and apply changes.
Log Location
The logs generated by the AppViewX Enrollment Server are stored in the C:\ProgramData\Appviewx_Enrollment_Server folder.
High Availability (HA) Setup
High availability can be achieved by installing the Enrollment Server on multiple machines. Certificate templates can be configured to requests through all deployed AppViewX Enrollment Servers, ensuring failover and load distribution.
Citrix FAS Integration
Configure Default FAS Rule
- Obtain Authorization Certificate
- Remove Existing Authorization Certificate (If Already
Configured): If an authorization certificate already
exists:Open the Citrix FAS Console.
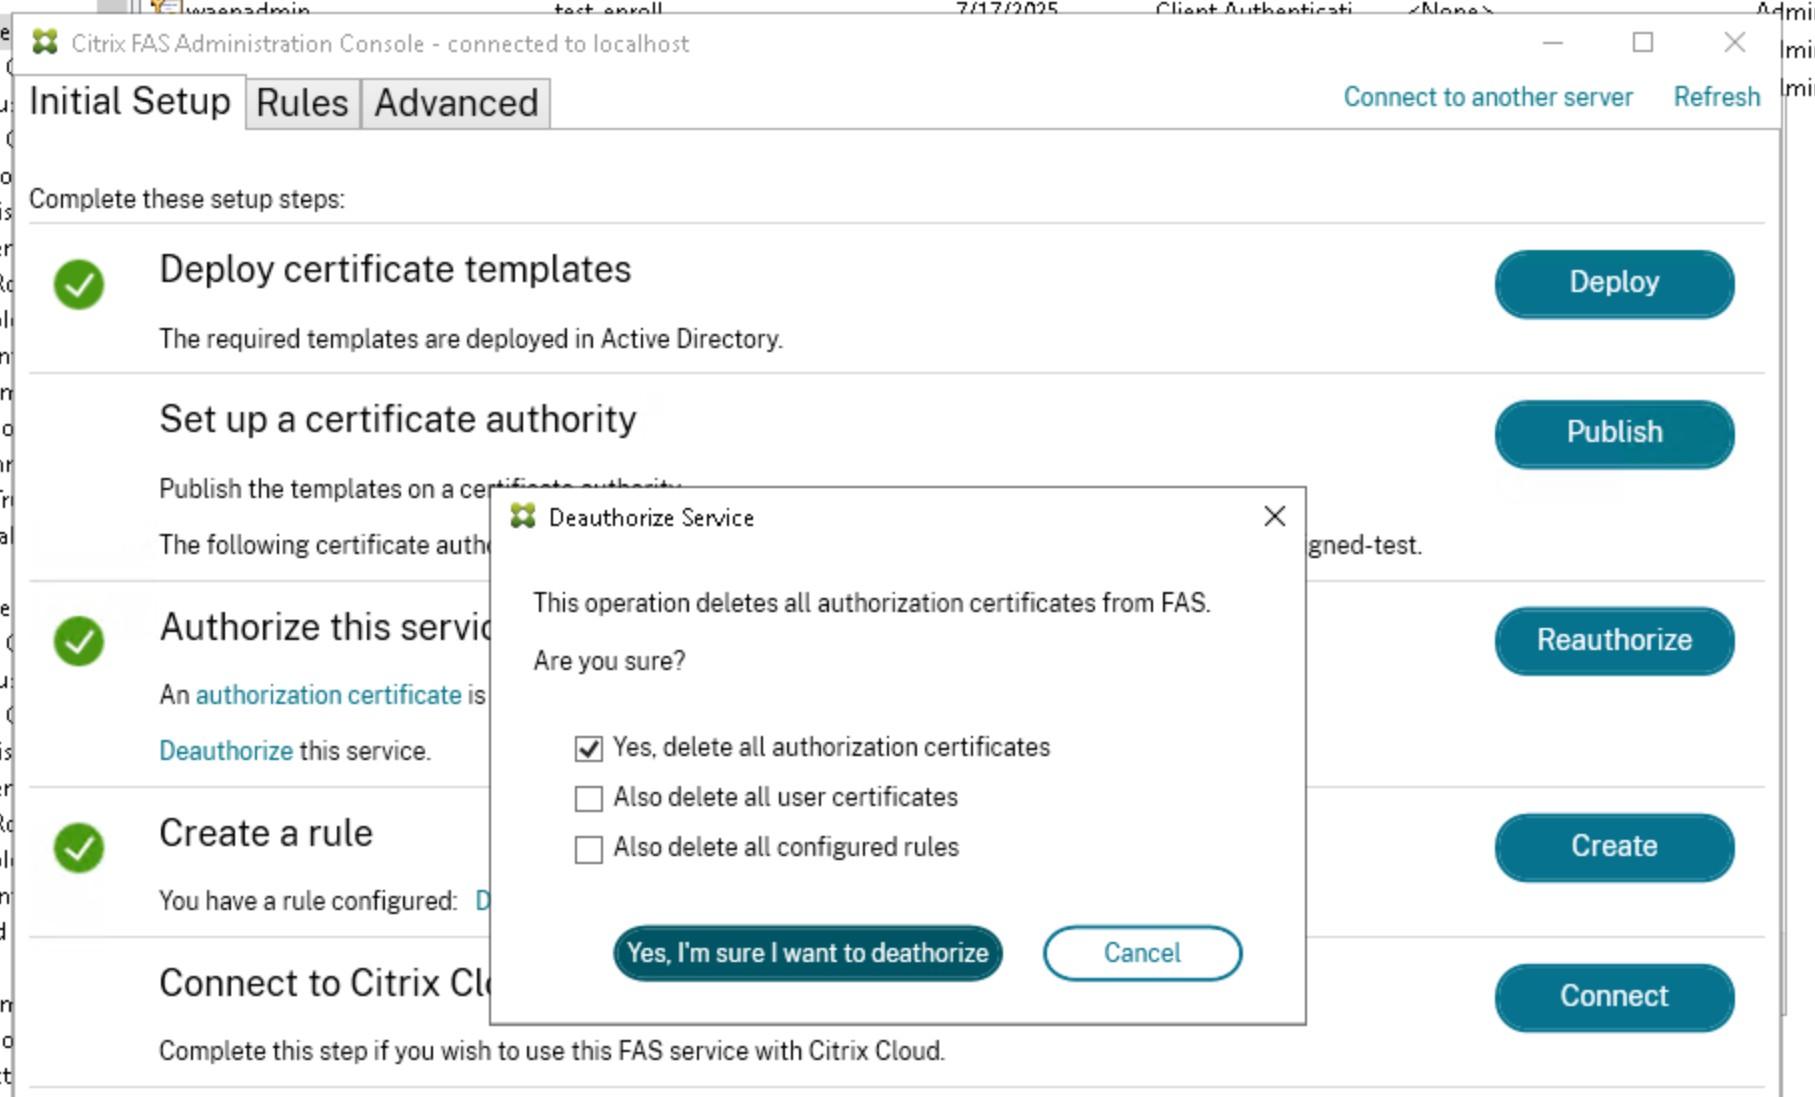
- Delete the existing authorization certificate.
- Remove Existing Authorization Certificate (If Already
Configured): If an authorization certificate already
exists:
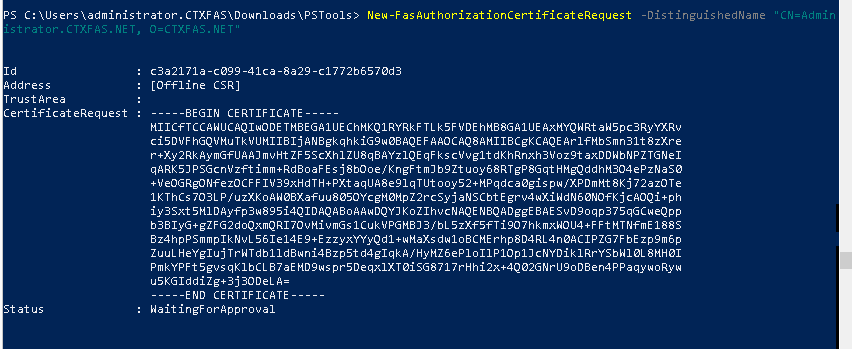
- Generate Authorization Certificate Request
- On the Citrix FAS server, run the following PowerShell command
with administrator
privileges:
New-FasAuthorizationCertificateRequest -DistinguishedName "CN=<Administrator.account_name>.<Domain>.NET, O=<Domain>.NET" - Replace <AdministratorAccountName> and <Domain> with
appropriate values.
- On the Citrix FAS server, run the following PowerShell command
with administrator
privileges:
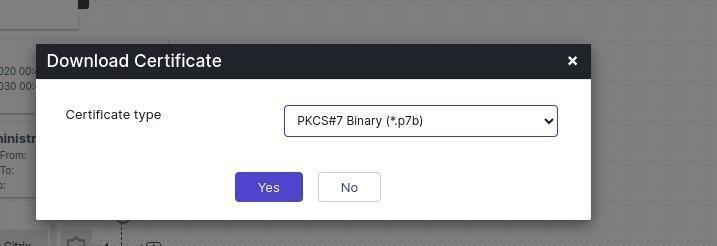
- Submit CSR to AppViewX
- Copy the generated Certificate Signing Request (CSR).
- Navigate to the Certificate page in the AppViewX Cert+ UI.
- Upload the CSR and download the issued certificate in PKCS#7
(.p7b) binary format.
- Import the Authorization Certificate
- Run the following command to import the certificate
response:
Import-FasAuthorizationCertificateResponse -Id <IdFromPreviousCommand> -Pkcs7CertificateFile "<PathToCertificate.p7b>"The Id is the value returned from the New-FasAuthorizationCertificateRequest command. Note: The ID is acquired from the first PowerShell command
- Run the following command to import the certificate
response:
- Apply Changes in FAS Console
Open the FAS Console and click Update Configuration to apply the new authorization certificate.
Result
The authorization certificate is now successfully installed and applied to the Citrix FAS server.
- Test Smart Card Certificate IssuanceTo validate the setup, run the following PowerShell command:
New-FasUserCertificate -UserPrincipalName "<[email protected]>" -Rule Default -CertificateDefinition Default_Definition