Jenkins pipeline for Application provisioning
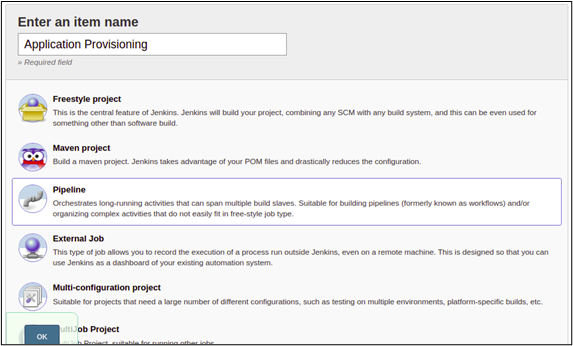
- Click New Item in the upper left corner of the admin console.
- Enter the name of the project.
-
Select Pipeline.
-
Under Pipeline, enter the pipeline script, refer to the
example pipeline script given here.
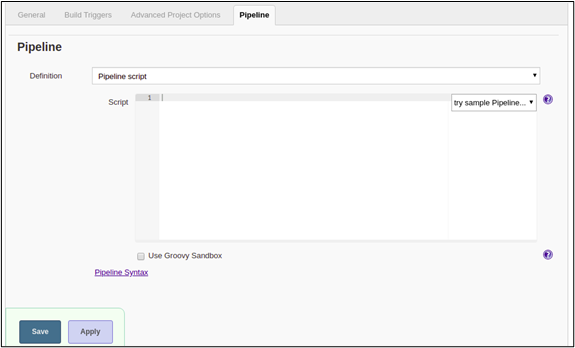
Example Pipeline Script:
node("master") { stage ('Start') { appViewXRaiseRequest(siteName: "admin@https://192.168.142.172:5300", payload:"{\"payload\":{\"data\":{\"input\":{\"requestData\":[{\"sequenceNo\":1, \"scenario\":\"scenario\",\"fieldInfo\":{\"fqdn\":\"${AppName}\",\"port\":\"${Port} \",\"name\":\"admin\"}}]},\"task_action\":1},\"header\":{\"workflowName\": \"Application Provisioning\"}}}",workflow:"Application Provisioning") script { env.logContent = Jenkins.getInstance().getItemByFullName(env.JOB_NAME) .getBuildByNumber(Integer.parseInt(env.BUILD_NUMBER)).logFile.text scr = ''' LOG="$logContent" arr=() while read -r line; do arr+=("$line") done <<< "$LOG" for (( counter = 0; counter <= 15; counter++ )) do if grep -q "requestId" <<< ${arr[counter]}; then echo ${arr[counter]} | sed -e 's/ //g' | cut --complement -d ":" -f 1 fi done ''' env.RequestId = sh (script: scr,returnStdout: true).trim() echo "Request Id - ${RequestId}" } } stage ('ServiceNow - Create Change') { appViewXCheckStageStatus(siteName:"admin@https://192.168.142.172:5300", requestId: "${RequestId}", startTask: "", endTask: "servicenow_create_change_2_1_1_2_2_1_3_1_1_1:Create Change Ticket") } stage('DNS Provisioning') { appViewXCheckStageStatus (siteName:"admin@https://192.168.142.172:5300", requestId: "${RequestId}", startTask: "", endTask: "script_1:Infoblox - Fetch Free IP's") } stage('Certificate Generation') { appViewXCheckStageStatus (siteName:"admin@https://192.168.142.172:5300", requestId: "${RequestId}", startTask: "", endTask: "script_2:Certificate Generation") } stage('F5 BIG IP Provisioning') { appViewXCheckStageStatus(siteName:"admin@https://192.168.142.172:5300", requestId: "${RequestId}", startTask: "", endTask: "endWorkOrder_1:WorkOrder") } stage('Firewall Provisioning') { appViewXCheckStageStatus (siteName:"admin@https://192.168.142.172:5300", requestId: "${RequestId}", startTask: "", endTask: "bigip_firewall_policy_1:bigip_firewall_policy") } stage ('ServiceNow - Close Change') { appViewXCheckStageStatus(siteName:"admin@https://192.168.142.172:5300", requestId: "${RequestId}", startTask: "", endTask: "servicenow_close_change_1_1_1_2_1_1:Close Change Ticket") } } - Add the contents and click Save.
-
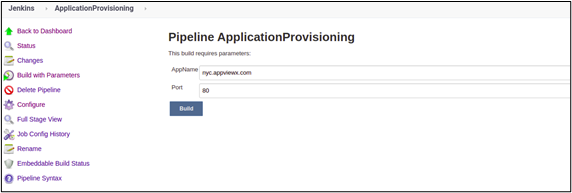
On the stage view page, where the Pipeline build will be executed, choose
Build with Parameters option.
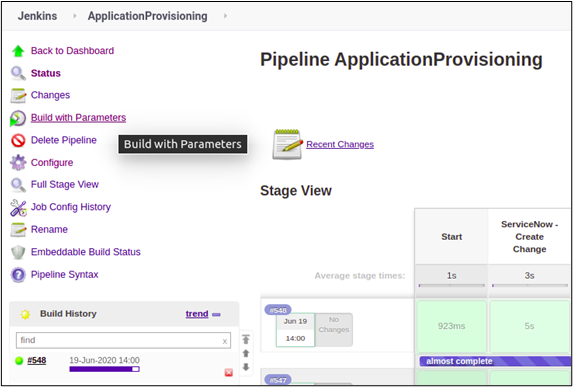
-
Enter the required inputs to run the workflow and click
Build.
-
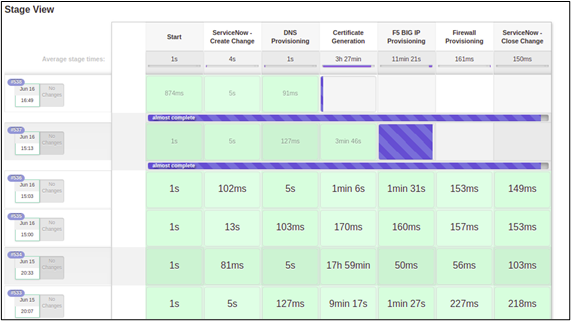
The stage view and console output can be seen when the pipeline is
executed.
- Pipeline stages
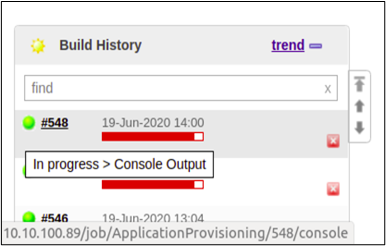
- Console Output: Select the globe near the build number under Build
History to see the outputs.
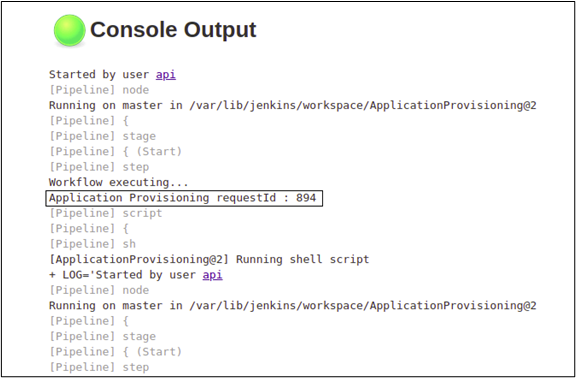
- The request Id of the workflow is shown in the console logs.
- Pipeline stages
-
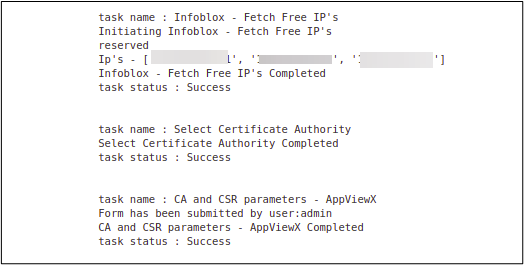
The task name, task logs and task status for each task in the workflow also
shown in the console logs.
-
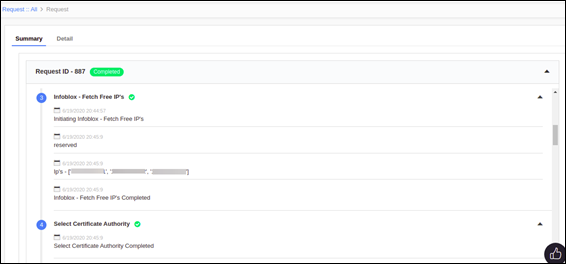
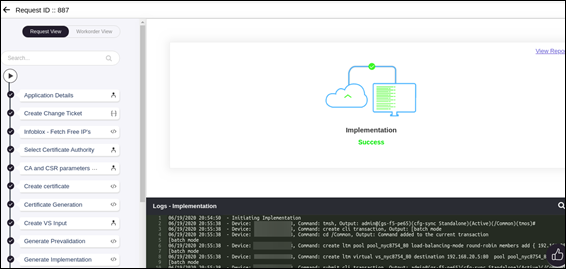
On the Request :: All page, click on the
Request ID of any workflow to see the execution of
each task in the workflow.
-
To see the summary of each task in the workflow, under
Activity, click View.