With ACM Integration
AWS Certificate Manager (ACM)
Onboarding AWS Resources with ACM Integration in AppViewX
Onboarding AWS Standalone Accounts in AppViewX
Prerequisites for Migrating AWS Standalone Accounts from Older Versions
- AWS standalone device migration is supported only from the following versions of CERT+ SaaS: v2020.1, v2020.2, v2020.3 - v2020.3 FP7. The following prerequisites are also applicable to only these versions.
- AWS device migration is not supported from the following versions of CERT+ SaaS: v2012.x, v2019.x, and v2021.x. For these versions, it is recommended that you delete all AWS devices (both, standalone and cross accounts) before migration and add them after the migration to 22.1 is complete.
- For customers migrating from versions 20.1.x, 20.2.x, and
20.3.6, AppViewX recommends that you delete the following before
migration:
- All of their Amazon CA settings
- Any EC2 instances that were added manually from the server inventory (excluding the EC2 instances auto-discovered from the cloud accounts).
- For customers migrating from version v2020.3.10 (mandatory):
- Delete all of their Amazon CA settings before migration.
- Trigger config fetch for all of their cloud accounts after migration.
- After you have upgraded the product from a version < v2020.3
FP8 to v2022.1 FP1, from the top left corner of the AppViewX
user interface, go to
 (Menu) > CERT+ >
Administration > Device Management.
(Menu) > CERT+ >
Administration > Device Management.The Device :: ADC page is displayed.
- From the Device :: ADC page, select Cloud.
The Device :: Cloud page is displayed.
- From the device accounts listed under Account Name,
select the required migrated standalone accounts.Troubleshooting: If you cannot see the migrated standalone accounts listed, request the super user to grant you the required permissions. Only superusers and users authorized by the superuser can view these migrated accounts in the list.
- From the top-right corner of the Device :: Coud page,
click the
 (Fetch config).
This step is mandatory to upgrade the data recorded for the older devices to the latest format followed in v2022.1 FP1.
For standalone accounts where one of the associated services is EC2
In versions v2020.1/v2020.2/v2020.3-v2020.3FP7, for accounts in which multiple regions are associated with the EC2 service, individual S3 buckets are used to store the permissions for each region.
- Before migration
- Merge permissions from all individual buckets into any one S3 bucket.
- After migration
- Select a migrated standalone account from the Device ::
Cloud page.
The Device :: Cloud > Modify page is displayed, with the details of the selected account.
- In the Amazon Cloud Service Settings section, click Fetch collection type.
- From the Collection type dropdown list, select the S3 bucket into which all permissions for this account were merged.
- Click Add.
- Click Save.
Fetch Config is automatically triggered and the account details are upgraded according to the latest version.
- Select a migrated standalone account from the Device ::
Cloud page.
Permissions Required for Onboarding Standalone Accounts
IAM Prerequisites for Discovering and Managing SSL Certificates in ACM
{
    "Version": "2012-10-17",
    "Statement": [
        {
            "Sid": "VisualEditor0",
            "Effect": "Allow",
            "Action": [
                "acm:DescribeCertificate",
                "acm:RequestCertificate",
                "acm:GetCertificate",
                "ec2:DescribeRegions",
                "acm:ListCertificates",
                "acm:ImportCertificate",
                "acm:AddTagsToCertificate",
                "acm:ListTagsForCertificate",
                "acm:RemoveTagsFromCertificate"
            ],
            "Resource": "*"
        }
    ]
}
Onboarding AWS Standalone Accounts with ACM Integration
-
Go to (Menu) > CERT+ >
ADMINISTRATION > Device Management.
The Device :: ADC page is displayed.
- From the Device :: ADC page, select Cloud.
-
On to the Device :: Cloud page and click
 (Add).
The Device :: Cloud > Add page is displayed.
(Add).
The Device :: Cloud > Add page is displayed. - On the Device :: Cloud > Add page, from the list of Vendors, select AWS.
-
Enter/Select the Basic information.
Table 1. Field description for the Basic Information section Field Description Account Type* From the dropdown list, select Standalone.
Account name* Enter the customer’s unique AWS account name.
Constraints:
- A duplicate account name should not exist in the cloud inventory.
- The account name should include only alphanumeric and period (.) characters.
Description Enter a description of the device to be added. Account number* Enter the customer’s AWS account number. Data center* From the dropdown list, select the data center through which communication with the Certificate Authority will be established. Proxy required To use a proxy server for communication, select this checkbox. *: Mandatory fields -
Enter/Select the Credentials-related information.
Table 2. Field description for the Credentials section Field Description Credential type* From the dropdown list, from the following options, select the authentication method that will be used for integrating AWS with AppViewX: - Manual Entry: The required credentials will be entered manually.
- Credential List - CyberArk: The required credentials will be retrieved from CyberArk, a Privileged Access Management (PAM) solution.
- IAM ROLE ACCESS
 : An IAM role-based
approach is used for authentication instead of
direct access keys.Access is provided based on IAM roles. To enable this feature in your SaaS environment:
: An IAM role-based
approach is used for authentication instead of
direct access keys.Access is provided based on IAM roles. To enable this feature in your SaaS environment:- Create a role in one of your AWS accounts that trusts the AppViewX AWS account.
- From AppViewX, assume the role created in your account.
- Using the assumed role from the above step, assume the roles created in the respective child accounts to perform the required CLM actions.
*Access key This field is displayed when Credential type = Manual Entry. Enter the access key generated for your AWS account.
*Secret key This field is displayed when Credential type = Manual Entry. Enter the secret key generated for your AWS account.
Download Cloud Formation Template (CFT) For Credential type = IAM ROLE ACCESS, to download the CloudFormation template, click the Download Cloud Formation Template link that is displayed below the Credential Type dropdown list. 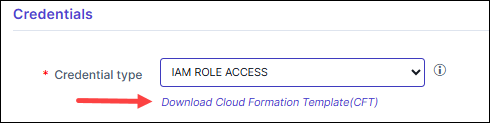 The downloaded CloudFormation template is pre-configured with the AppViewX AWS account details that need to be trusted. Ensure that you:
- Use the downloaded template to create a role in any of your AWS accounts.
- Provide a unique string as the External ID for the role you are creating.
*Master Account Role Enter the Amazon Resource Name (ARN) of the AWS IAM role created using the downloaded CloudFormation Template. The IAM role input for this field can be:- a simple name (as a alpha-numeric string)
- an identifier in a full path format (e.g.,
/service-prefix/role-name)
AWS allows roles to be created within paths to help manage large numbers of roles and delegate permissions. With path support, users can onboard resources where the IAM Role is nested.
*External Id Enter the unique identifier generated to establish a secure trust relationship between AWS and AppViewX. *Credential List This field is displayed when Credential type = Credential List - CyberArk. From the dropdown list, select the CyberArk account with the AWS credentials that will be used for onboarding the standalone account.
The options listed in this dropdown list are the existing CyberArk accounts integrated with AppViewX. For instructions on integrating CyberArk with AppViewX, click here.*: Mandatory Fields -
Enter/Select the details for the Amazon Cloud Service
Settings.
Table 3. Field description for the Amazon Cloud Service Settings section Field Description Services* According to the type of the new cloud device being added, select the corresponding Amazon Cloud Service for the device. Default region* Based on the customer’s requirement, select the default region in which the customer’s AWS cloud account is deployed. AppViewX will use this region to communicate with the other (geographically farther) regions. Service region* Service regions are regions that are supported by the selected service.
From the dropdown list, select the service regions that should be scanned for certificates.
Note: To be able to fetch and select from the available regions, ensure that the credentials have been provided in the Credentials section.CA Operation Mode* Note: This field is displayed only when the Amazon Private CA service is selected.From the following options, select one/both operation mode(s) for discovering all the certificates enrolled by the Private Certificate Authority:-
ACM
-
PCA
S3 Bucket* Note: This field is displayed only when the PCA CA operation mode is selected.Enter the S3 bucket name.
Discovery Certificate Note: This field is displayed only when one/both of the CA operation modes are selected.To enable instance certificate discovery at the time of device addition, select this checkbox.Cert sync Select from one of the following options:
- Managed: AppViewX will connect with the customer’s AWS account and discover certificates. These certificates will be added to the inventory. Users with the relevant permissions can then perform the required certificate-related actions.
- Monitored: AppViewX will connect with the customer’s AWS account and discover certificates. These certificates will be added to the inventory where the users will be allowed to only view the certificates.
- Ignored: AppViewX will connect with the customer’s AWS account but certificate discovery will be disabled.
*: Mandatory Fields -
-
Click Add.
Account details are now available in the device inventory. Once the account is onboarded, you can discover the corresponding certificates and manage them.
Onboarding AWS Cross Accounts in AppViewX
AppViewX streamlines the management and visibility of your AWS resources by putting in place a simple workflow that lets you onboard your AWS resources onto AppViewX’s holistic certificate lifecycle management solution. One part of this configuration will be done on the AWS management console and the rest of the configuration will be facilitated via the AppViewX interface.
You can onboard the following AWS account types to AppViewX: a standalone account (all resources are available in the same account) and a cross or federated account (resources are distributed across multiple accounts).
This section of the documentation will guide you through the process of onboarding an AWS cross account, for both discovery types, in AppViewX. In AWS, cross-account discovery can be set up in two ways:
- Organization-based: A centralized discovery mechanism that automatically finds and accesses resources across accounts in your AWS Organization using built-in trust and roles
- IAM Policy-based: A more flexible discovery mechanism that allows to connect to only the required accounts by manually configuring roles and permissions
Note: The following steps cover only the bare minimum requirements for onboarding a cross account AWS account in AppViewX. The optional fields are out of scope and their configuration is left to the discretion of the user.
Prerequisites for Onboarding a AWS Cross Account in AppViewX
- Ensure that the following configurations are done on the AWS
Management Console:
- In your AWS master account:
- Create an IAM user in the AWS master account.
- Generate user identity.
- Attach policies to the created user.
For the AWS IAM permissions to be added for the master account, click here.
- In your AWS child account:
- Create a role in the child account in AWS.
- Attach policies to the created role.
For the AWS IAM permissions to be added for the child account, click here.
- Create an EC2 role. This will be used to manage the existing EC2 instance in the AppViewX device inventory.
- Attach policies to the EC2 role.
For the AWS IAM permissions for the EC2 policy, click here.
For the AWS IAM permissions for the EC2 role, click here.
Note: For detailed instructions, you can access the corresponding AWS documentation using the references given here. - In your AWS master account:
- If credentials for onboarding have to be fetched from a credential
list in CyberArk:
- Ensure that your AWS access credentials are saved in your
CyberArk account. For instructions on creating AWS access
details in the CyberArk account , refer to the documentation
here.Important: For this use case, in the Account Parameters, the Password field must be considered a mandatory parameter. This field is used to specify the AWS access secret key information.
- Ensure that CyberArk is integrated with AppViewX and a credential list is created. For instructions, refer to the documentation here.
- Ensure that your AWS access credentials are saved in your
CyberArk account. For instructions on creating AWS access
details in the CyberArk account , refer to the documentation
here.
Onboarding a Cross Account in AppViewX for Organization-based Discovery
-
Go to (Menu) > CERT+ >
ADMINISTRATION > Device Management.
The Device :: ADC page is displayed.
- From the Device :: ADC page, select Cloud.
-
On to the Device :: Cloud page and click (Add).
The Device :: Cloud > Add page is displayed.
- On the Device :: Cloud > Add page, from the list of Vendors, select AWS.
-
Enter/Select the Basic information.
Table 4. Field description for the Basic Information section Field Description *Account Type From the dropdown list, from the following options, select Cross or Federated. *Account name Enter your AWS account name. Constraints:
- A duplicate account name should not exist in the cloud inventory.
- The account name should include only alphanumeric and period (.) characters.
Description Enter a description of the device to be added. *Account number Enter your AWS account number. *Data center From the dropdown list, select the data center through which communication with the Certificate Authority will be established. Proxy required To use a proxy server for communication, select this checkbox. Proxy settings configured in the Platform module will be used for communication. To read more on how proxy settings are configured and managed, click here.
*: Mandatory fields -
Enter/Select the Credentials-related information.
Table 5. Field description for the Credentials section Field Description *Credential type From the dropdown list, from the following options, select the authentication method that will be used for integrating AWS with AppViewX: - Manual Entry: The required credentials will be entered manually.
- Credential List - CyberArk: The required credentials will be retrieved from CyberArk, a Privileged Access Management (PAM) solution.
- IAM ROLE ACCESS: An IAM role-based
approach is used for authentication instead of
direct access keys.Access is provided based on IAM roles. To enable this feature in your SaaS environment:
- Create a role in one of your AWS accounts that trusts the AppViewX AWS account.
- From AppViewX, assume the role created in your account.
- Using the assumed role from the above step, assume the roles created in the respective child accounts to perform the required CLM actions.
*Access key This field is displayed when Credential type = Manual Entry. Enter the access key generated for your AWS account.
*Secret key This field is displayed when Credential type = Manual Entry. Enter the secret key generated for your AWS account.
Download Cloud Formation Template (CFT) For Credential type = IAM ROLE ACCESS, to download the CloudFormation template, click the Download Cloud Formation Template link that is displayed below the Credential Type dropdown list. The downloaded CloudFormation template is pre-configured with the AppViewX AWS account details that need to be trusted. Ensure that you:- Use the downloaded template to create a role in any of your AWS accounts.
- Provide a unique string as the External ID for the role you are creating.
*Master Account Role Enter the Amazon Resource Name (ARN) of the AWS IAM role created using the downloaded CloudFormation Template. The IAM role input for this field can be:- a simple name (as a alpha-numeric string)
- an identifier in a full path format (e.g.,
/service-prefix/role-name)
AWS allows roles to be created within paths to help manage large numbers of roles and delegate permissions. With path support, users can onboard resources where the IAM Role is nested.
*External Id Enter the unique identifier generated to establish a secure trust relationship between AWS and AppViewX. *Credential List This field is displayed when Credential type = Credential List - CyberArk. From the dropdown list, select the CyberArk account with the AWS credentials that will be used for onboarding the standalone account.
The options listed in this dropdown list are the existing CyberArk accounts integrated with AppViewX. For instructions on integrating CyberArk with AppViewX, click here.*: Mandatory fields -
Enter/Select the information required to Discover
Resources.
Table 6. Field description for the Discover Resources section Field Description Auto Discover Resources To discover all the cross or federated/child accounts for the master account details provided, enable this field. Advanced Settings To customize the auto discovery process, enable this field. Auto Discovery Mode* To onboard a cross account for organization-based discovery: - Select Organization Based
Discovery.
The Organization based Discovery dialog box is displayed.
- Enter/Select the details required to configure organization-based discovery.
Note: For the Auto Discovery Mode, you can select both options, Organization Based Discovery as well as Policy Based Discovery. For instructions on configuring Policy Based Discovery, click here.Service* From the Select the Service(s) dropdown list, select the ACM service component(s) required for the CLM operations. Depending on the service component(s) selected, additional fields are displayed. The instructions for these fields are covered in the subsequent steps.
Service Region* To select a service region: - To fetch the service regions for the account
information provided, click Fetch
Region.
The retrieved service regions are populated in the Select the Region(s) dropdown list.
- From the Select the Region(s) dropdown list, select the required service region.
Cert Sync* Select from one of the following options: - Managed: AppViewX will connect with the customer’s AWS account and discover certificates. These certificates will be added to the inventory. Users with the relevant permissions can then perform the required certificate-related actions.
- Monitored: AppViewX will connect with the customer’s AWS account and discover certificates. These certificates will be added to the inventory where the users will be allowed to only view the certificates.
- Ignored: AppViewX will connect with the customer’s AWS account but certificate discovery will be disabled.
Auto Sync To enable/disable automatic synchronization, use the Auto Sync key. If Auto Sync is enabled, select the checkbox for the type of synchronization from the following options:
*: Mandatory fields - Select Organization Based
Discovery.
-
Enter/Select the required details in the ACM Certificate
Authority Service section.
Note: This section is displayed only when one or both ACM services are selected from the Services dropdown list.
Table 7. Field description for the ACM Certificate Authority Service Field Description Role Setting Preference* Note: This field is displayed only when both auto discovery modes (Organization Based Discovery and IAM Policy Based Discovery) are selected.From the dropdown list, select one of the following options:- Organization Based Discovery
- IAM Policy Based Discovery
Route53 Zone Auto Approval To support DNS validation as an automatic process, enable this toggle. *: Mandatory fields -
Enter/Select the required details in the ACM Private CA
section.
Note: This section is displayed only when the ACM (Amazon Private CA) service is selected for a Cross or Federated account.
Table 8. Field description for the ACM Private CA section Field Description CA Operation Mode* From the following options, select one/both operation mode(s) for discovering all the certificates enrolled by the Private Certificate Authority:
-
ACM
-
PCA
S3 Bucket* NOTE: This field is displayed only when the PCA operation mode is selected.
-
Enter the S3 bucket name.
-
Click
 .
.The ARN Advanced Settings action pane is displayed.
-
In the ARN Advanced Settings action pane, enter the following details:
Field Description Role ARN* Amazon Resource Name of the role that the caller is assuming The IAM role input for this field can be:- a simple name (as a alpha-numeric string)
- an identifier in a full path format (e.g.,
/service-prefix/role-name)
AWS allows roles to be created within paths to help manage large numbers of roles and delegate permissions. With path support, users can onboard resources where the IAM Role is nested.
Role Session name Role Session name is an identifier for the assumed role session.
Use the Role Session name to uniquely identify a session when the same rule is assumed by different principals or for different reasons.Duration Seconds Enter the duration, in seconds, for which the credentials should remain valid.
Acceptable durations for IAM user sessions:
-
Minimum: 900 seconds (15 minutes)
-
Maximum: 129,600 seconds (36 hours)
External Id External Id is a unique identifier that might be required when you assume a role in another account. Source Identity The source identity is specified by the principal that is calling the AssumeRole operation. Session Tags Session Tags are key-value pairs that you pass when you assume an IAM role or federate a user in AWS STS.
To create a session tag:
-
In the Enter Key field, enter a key for the key-value pair.
-
In the Enter Value field, enter a value for the key-value pair.
-
Click Add.
The added key-value pair is shown in the table below the fields.
- Click Apply.
Discover Certificate To enable instant certificate discovery at the time of device addition, select this checkbox. *: Mandatory fields -
- To add the new device to the cloud device inventory, click Add.
-
Click Save.
The added device is listed in the outer inventory on the Device :: Cloud page.
Configuring Organization Based Discovery
-
In the Organization based discovery
popup window, under Organisation Accounts, enter/select
the discovery details.
Table 9. Field description for the Organisation Accounts section Field Description Role Name* Enter the IAM role name for the target account here. The IAM role input for this field can be:- a simple name (as a alpha-numeric string)
- an identifier in a full path format (e.g.,
/service-prefix/role-name)
AWS allows roles to be created within paths to help manage large numbers of roles and delegate permissions. With path support, users can onboard resources where the IAM Role is nested.
Account Number* By default, the AWS account number is automatically fetched from the value entered in the Account Number field in the Basic information section.
To enter a different account number:
- From the Account Number
field in the Organization based discovery
popup window, click
Self.

- Enter the required account number.
Role Session Name Role Session Name is an identifier for the assumed role session.
Use the Role Session Name to uniquely identify a session when the same rule is assumed by different principals or for different reasons.
Duration Seconds Enter the duration, in seconds, for which the credentials should remain valid.
Acceptable durations for IAM user sessions:- Minimum: 900 seconds (15 minutes)
- Maximum: 129,600 seconds (36 hours)
- Default: 3600 seconds (1 hour)
External Id External Id is a unique identifier that might be required when you assume a role in another account. Source Identity The source identity is specified by the principal that is calling the AssumeRole operation. Session Tags Session Tags are key-value pairs that you pass when you assume an IAM role or federate a user in AWS STS.
To create a session tag:- In the Enter Key field, enter a key for the key-value pair.
- In the Enter Value field, enter a value for the key-value pair.
- Click Add.
The added key-value pair is shown in the table below the fields.
*: Mandatory fields -
Enter/Select the required details in the Child Accounts
section.
Table 10. Field description for the Child Accounts section Field Description Role Name* Enter the IAM role name for the target account here. The IAM role input for this field can be:- a simple name (as a alpha-numeric string)
- an identifier in a full path format (e.g.,
/service-prefix/role-name)
AWS allows roles to be created within paths to help manage large numbers of roles and delegate permissions. With path support, users can onboard resources where the IAM Role is nested.
Role Session Name Role Session Name is an identifier for the assumed role session.
Use the Role Session Name to uniquely identify a session when the same rule is assumed by different principals or for different reasons.
Duration Seconds Enter the duration, in seconds, for which the credentials should remain valid.
Acceptable durations for IAM user sessions:- Minimum: 900 seconds (15 minutes)
- Maximum: 129,600 seconds (36 hours)
- Default: 3600 seconds (1 hour)
External Id External Id is a unique identifier that might be required when you assume a role in another account. Source Identity The source identity is specified by the principal that is calling the AssumeRole operation. Session Tags Session Tags are key-value pairs that you pass when you assume an IAM role or federate a user in AWS STS.
To create a session tag:- In the Enter Key field, enter a key for the key-value pair.
- In the Enter Value field, enter a value for the key-value pair.
- Click Add.
The added key-value pair is shown in the table below the fields.
*: Mandatory fields -
Click Save.
The Organization based discovery popup window is closed and you will be navigated back to the Discover resources section.Note:
- If the popup is closed without values entered for at least one field, then the Organization based discovery checkbox will be unchecked.
- Values once saved in the popup will be stored and made available on the screen always, regardless of the number of times the Organization based discovery checkbox is checked or unchecked, unless the values are updated.
Configuring Trigger Based Sync
-
In the Discover Resources section, enable
Auto Sync and select
Trigger Based.
The Trigger Based Sync popup window is displayed.
-
Enter/Select the required Queue Parameter details.
Table 11. Field description for the Queue Parameter section Field Description SQS URL* Enter the URL of the SQS queue. Dead Letter Queue Enter the URL of the Dead Letter Queue.
Note: This field is optional and can be used for user reference purposes only. Currently, AppViewX does not have any insights based on DLQ messages.*: Mandatory fields -
Enter/Select the STS Token details.
Table 12. Field description for the STS Token section Field Description Role ARN* Enter the Amazon Resource Name that will interact with the SQS queue through the AWS STS. The IAM role input for this field can be:- a simple name (as a alpha-numeric string)
- an identifier in a full path format (e.g.,
/service-prefix/role-name)
AWS allows roles to be created within paths to help manage large numbers of roles and delegate permissions. With path support, users can onboard resources where the IAM Role is nested.
Role Session name Role Session Name is an identifier for the assumed role session.
Use the Role Session Name to uniquely identify a session when the same rule is assumed by different principals or for different reasons.
Duration Seconds Enter the duration, in seconds, for which the credentials should remain valid.
Acceptable durations for IAM user sessions:- Minimum: 900 seconds (15 minutes)
- Maximum: 129,600 seconds (36 hours)
- Default: 3600 seconds (1 hour)
External Id External Id is a unique identifier that might be required when you assume a role in another account. Source Identity The source identity is specified by the principal that is calling the AssumeRole operation. Session Tags Session Tags are key-value pairs that you pass when you assume an IAM role or federate a user in AWS STS.
To create a session tag:- In the Enter Key field, enter a key for the key-value pair.
- In the Enter Value field, enter a value for the key-value pair.
- Click Add.
The added key-value pair is shown in the table below the fields.
*: Mandatory fields -
Enter/Select the SQS Attributes.
Table 13. Field description for the SQS Attributes section Field Description SQS Polling Interval* Enter an interval value for the SQS message polling from AppViewX. Max Number of Messages* Enter the maximum number of messages that will be returned by the queue per request. Visibility Timeout in Minutes* After messages are retrieved by a ReceiveMessage request, they need to be made invisible to subsequent retrieve requests for a custom duration.
In this field, enter this duration in minutes.
Wait time in seconds* Enter a duration, in seconds, for which a call will wait for a message to arrive in the queue before returning. *: Mandatory fields - In the Auto Sync Services section, select the list of services for which the trigger-based sync mechanism is required.
-
In the Service Specific Parameters section, from the
EC2 Sync Delay Time dropdown list,
select the delay interval (in hours) for the synchronization of
EC2 instances when they are discovered for the first time.
Note: This section is displayed only if the EC2 service is selected in the Auto Sync Services section.
- Click Apply.
Configuring Schedule Based Sync
-
In the Discover Resources section, enable
Auto Sync and select
Schedule Based.
The Schedule Based Sync popup window is displayed.
-
Enter/Select the General Information.
Table 14. Field description for the General Information section Field Description Frequency of Sync* To schedule the sync, set a frequency using the two dropdown lists for this field. For example, to set the frequency to 1 day:
- From the first dropdown list, select 1.
- From the second dropdown list, select
Days.

Advance Settings For the current release, this field is set to Off and is disabled. This field and the associated features will be enabled in the upcoming release. *: Mandatory fields - Click Apply.
Onboarding a Cross Account in AppViewX for IAM Policy-based Discovery
-
Go to (Menu) > CERT+ >
ADMINISTRATION > Device Management.
The Device :: ADC page is displayed.
- From the Device :: ADC page, select Cloud.
-
On to the Device :: Cloud page and click (Add).
The Device :: Cloud > Add page is displayed.
- On the Device :: Cloud > Add page, from the list of Vendors, select AWS.
-
Enter/Select the Basic information.
Table 15. Field description for the Basic Information section Field Description *Account Type From the dropdown list, from the following options, select Cross or Federated. *Account name Enter your AWS account name. Constraints:
- A duplicate account name should not exist in the cloud inventory.
- The account name should include only alphanumeric and period (.) characters.
Description Enter a description of the device to be added. *Account number Enter your AWS account number. *Data center From the dropdown list, select the data center through which communication with the Certificate Authority will be established. Proxy required To use a proxy server for communication, select this checkbox. Proxy settings configured in the Platform module will be used for communication. To read more on how proxy settings are configured and managed, click here.
*: Mandatory fields -
Enter/Select the Credentials-related information.
Table 16. Field description for the Credentials section Field Description *Credential type From the dropdown list, from the following options, select the authentication method that will be used for integrating AWS with AppViewX: - Manual Entry: The required credentials will be entered manually.
- Credential List - CyberArk: The required credentials will be retrieved from CyberArk, a Privileged Access Management (PAM) solution.
- IAM ROLE ACCESS: An IAM role-based
approach is used for authentication instead of
direct access keys.Access is provided based on IAM roles. To enable this feature in your SaaS environment:
- Create a role in one of your AWS accounts that trusts the AppViewX AWS account.
- From AppViewX, assume the role created in your account.
- Using the assumed role from the above step, assume the roles created in the respective child accounts to perform the required CLM actions.
*Access key This field is displayed when Credential type = Manual Entry. Enter the access key generated for your AWS account.
*Secret key This field is displayed when Credential type = Manual Entry. Enter the secret key generated for your AWS account.
Download Cloud Formation Template (CFT) For Credential type = IAM ROLE ACCESS, to download the CloudFormation template, click the Download Cloud Formation Template link that is displayed below the Credential Type dropdown list. The downloaded CloudFormation template is pre-configured with the AppViewX AWS account details that need to be trusted. Ensure that you:- Use the downloaded template to create a role in any of your AWS accounts.
- Provide a unique string as the External ID for the role you are creating.
*Master Account Role Enter the Amazon Resource Name (ARN) of the AWS IAM role created using the downloaded CloudFormation Template. The IAM role input for this field can be:- a simple name (as a alpha-numeric string)
- an identifier in a full path format (e.g.,
/service-prefix/role-name)
AWS allows roles to be created within paths to help manage large numbers of roles and delegate permissions. With path support, users can onboard resources where the IAM Role is nested.
*External Id Enter the unique identifier generated to establish a secure trust relationship between AWS and AppViewX. *Credential List This field is displayed when Credential type = Credential List - CyberArk. From the dropdown list, select the CyberArk account with the AWS credentials that will be used for onboarding the standalone account.
The options listed in this dropdown list are the existing CyberArk accounts integrated with AppViewX. For instructions on integrating CyberArk with AppViewX, click here.*: Mandatory fields -
Enter/Select the information required to Discover
Resources.
Table 17. Field description for the Discover Resources section Field Description Auto Discover Resources To discover all the cross or federated/child accounts for the master account details provided, enable this field. Advanced Settings To customize the auto discovery process, enable this field. Auto Discovery Mode* To onboard a cross account for IAM policy-based discovery: - Select Policy Based
Discovery.
The Policy based Discovery dialog box is displayed.
- Enter/Select the details required to configure IAM policy-based discovery.
Note: For the Auto Discovery Mode, you can select both options, Organization Based Discovery as well as Policy Based Discovery. For instructions on configuring Organization Based Discovery, click here.Service* From the Select the Service(s) dropdown list, select the ACM service component(s) required for the CLM operations. Depending on the service component(s) selected, additional fields are displayed. The instructions for these fields are covered in the subsequent steps.
Service Region* To select a service region: - To fetch the service regions for the account
information provided, click Fetch
Region.
The retrieved service regions are populated in the Select the Region(s) dropdown list.
- From the Select the Region(s) dropdown list, select the required service region.
Cert Sync* Select from one of the following options: - Managed: AppViewX will connect with the customer’s AWS account and discover certificates. These certificates will be added to the inventory. Users with the relevant permissions can then perform the required certificate-related actions.
- Monitored: AppViewX will connect with the customer’s AWS account and discover certificates. These certificates will be added to the inventory where the users will be allowed to only view the certificates.
- Ignored: AppViewX will connect with the customer’s AWS account but certificate discovery will be disabled.
Auto Sync To enable/disable automatic synchronization, use the Auto Sync key. If Auto Sync is enabled, select the checkbox for the type of synchronization from the following options:
*: Mandatory fields - Select Policy Based
Discovery.
-
Enter/Select the required details in the ACM Certificate
Authority Service section.
Note: This section is displayed only when one or both ACM services are selected from the Services dropdown list.
Table 18. Field description for the ACM Certificate Authority Service Field Description Role Setting Preference* Note: This field is displayed only when both auto discovery modes (Organization Based Discovery and IAM Policy Based Discovery) are selected.From the dropdown list, select one of the following options:
- Organization Based Discovery
- IAM Policy Based Discovery
Route53 Zone Auto Approval To support DNS validation as an automatic process, enable this toggle. *: Mandatory fields -
Enter/Select the required details in the ACM Private CA
section.
Note: This section is displayed only when the ACM (Amazon Private CA) service is selected for a Cross or Federated account.
Table 19. Field description for the ACM Private CA section Field Description CA Operation Mode* From the following options, select one/both operation mode(s) for discovering all the certificates enrolled by the Private Certificate Authority:
-
ACM
-
PCA
S3 Bucket* NOTE: This field is displayed only when the PCA operation mode is selected.
-
Enter the S3 bucket name.
-
Click
.The ARN Advanced Settings action pane is displayed.
-
In the ARN Advanced Settings action pane, enter the following details:
Field Description Role ARN* Amazon Resource Name of the role that the caller is assuming The IAM role input for this field can be:- a simple name (as a alpha-numeric string)
- an identifier in a full path format (e.g.,
/service-prefix/role-name)
AWS allows roles to be created within paths to help manage large numbers of roles and delegate permissions. With path support, users can onboard resources where the IAM Role is nested.
Role Session name Role Session name is an identifier for the assumed role session.
Use the Role Session name to uniquely identify a session when the same rule is assumed by different principals or for different reasons.Duration Seconds Enter the duration, in seconds, for which the credentials should remain valid.
Acceptable durations for IAM user sessions:
-
Minimum: 900 seconds (15 minutes)
-
Maximum: 129,600 seconds (36 hours)
External Id External Id is a unique identifier that might be required when you assume a role in another account. Source Identity The source identity is specified by the principal that is calling the AssumeRole operation. Session Tags Session Tags are key-value pairs that you pass when you assume an IAM role or federate a user in AWS STS.
To create a session tag:
-
In the Enter Key field, enter a key for the key-value pair.
-
In the Enter Value field, enter a value for the key-value pair.
-
Click Add.
The added key-value pair is shown in the table below the fields.
- Click Apply.
Discover Certificate To enable instant certificate discovery at the time of device addition, select this checkbox. *: Mandatory fields -
-
To add the new device to the cloud device inventory, click
Add.
Tip: To select multiple services for a device, after you click Add, go back to the Services dropdown list and select the next service you want to enable for the device. Enter/select the rest of the details and click Add. Repeat this process for as many services you want to enable for the new device. The table is populated with a separate entry for each service.
- Details of the child accounts for the added master account are displayed in the inner inventory table at the bottom of the page. The details captured in the inner inventory are explained here.
- Details of the master account are listed on the CERT+ > Administration > Certificate Authority > <Selected CA> page.
Note: For a public Certificate Authority, only the child account details are listed on the CERT+ > Administration > Certificate Authority > Amazon > ACM CA page. There is no inner inventory for a public certificate authority. - To add the new device to the cloud device inventory, click Add.
-
Click Save.
The added device is listed in the outer inventory on the Device :: Cloud page.
Configuring IAM Policy Based Discovery
-
In the IAM Policy based discovery popup
window enter/select the Child Accounts details.
Table 20. Field description for the Child Accounts section Field Description Role Session Name Role Session Name is an identifier for the assumed role session.
Use the Role Session Name to uniquely identify a session when the same rule is assumed by different principals or for different reasons.
Duration Seconds Enter the duration, in seconds, for which the credentials should remain valid.
Acceptable durations for IAM user sessions:- Minimum: 900 seconds (15 minutes)
- Maximum: 129,600 seconds (36 hours)
- Default: 3600 seconds (1 hour)
External Id External Id is a unique identifier that might be required when you assume a role in another account. Source Identity The source identity is specified by the principal that is calling the AssumeRole operation. Session Tags Session Tags are key-value pairs that you pass when you assume an IAM role or federate a user in AWS STS.
To create a session tag:- In the Enter Key field, enter a key for the key-value pair.
- In the Enter Value field, enter a value for the key-value pair.
- Click Add.
The added key-value pair is shown in the table below the fields.
-
Click Save.
The IAM Policy based discovery popup window is closed and you will be navigated back to the Discover resources section.Note:
- If the popup is closed without values entered for at least one field, then theIAM Policy based discovery checkbox will be unchecked.
- Values once saved in the popup will be stored and made available on the screen always, regardless of the number of times the IAM Policy Based Discovery checkbox is checked or unchecked, unless the values are updated.
Configuring Trigger Based Sync
-
In the Discover Resources section, enable
Auto Sync and select
Trigger Based.
The Trigger Based Sync popup window is displayed.
-
Enter/Select the required Queue Parameter details.
Table 21. Field description for the Queue Parameter section Field Description SQS URL* Enter the URL of the SQS queue. Dead Letter Queue Enter the URL of the Dead Letter Queue.
Note: This field is optional and can be used for user reference purposes only. Currently, AppViewX does not have any insights based on DLQ messages.*: Mandatory fields -
Enter/Select the STS Token details.
Table 22. Field description for the STS Token section Field Description Role ARN* Enter the Amazon Resource Name that will interact with the SQS queue through the AWS STS. The IAM role input for this field can be:- a simple name (as a alpha-numeric string)
- an identifier in a full path format (e.g.,
/service-prefix/role-name)
AWS allows roles to be created within paths to help manage large numbers of roles and delegate permissions. With path support, users can onboard resources where the IAM Role is nested.
Role Session name Role Session Name is an identifier for the assumed role session.
Use the Role Session Name to uniquely identify a session when the same rule is assumed by different principals or for different reasons.
Duration Seconds Enter the duration, in seconds, for which the credentials should remain valid.
Acceptable durations for IAM user sessions:- Minimum: 900 seconds (15 minutes)
- Maximum: 129,600 seconds (36 hours)
- Default: 3600 seconds (1 hour)
External Id External Id is a unique identifier that might be required when you assume a role in another account. Source Identity The source identity is specified by the principal that is calling the AssumeRole operation. Session Tags Session Tags are key-value pairs that you pass when you assume an IAM role or federate a user in AWS STS.
To create a session tag:- In the Enter Key field, enter a key for the key-value pair.
- In the Enter Value field, enter a value for the key-value pair.
- Click Add.
The added key-value pair is shown in the table below the fields.
*: Mandatory fields -
Enter/Select the SQS Attributes.
Table 23. Field description for the SQS Attributes section Field Description SQS Polling Interval* Enter an interval value for the SQS message polling from AppViewX. Max Number of Messages* Enter the maximum number of messages that will be returned by the queue per request. Visibility Timeout in Minutes* After messages are retrieved by a ReceiveMessage request, they need to be made invisible to subsequent retrieve requests for a custom duration.
In this field, enter this duration in minutes.
Wait time in seconds* Enter a duration, in seconds, for which a call will wait for a message to arrive in the queue before returning. *: Mandatory fields - In the Auto Sync Services section, select the list of services for which the trigger-based sync mechanism is required.
-
In the Service Specific Parameters section, from the
EC2 Sync Delay Time dropdown list,
select the delay interval (in hours) for the synchronization of
EC2 instances when they are discovered for the first time.
Note: This section is displayed only if the EC2 service is selected in the Auto Sync Services section.
- Click Apply.
Configuring Schedule Based Sync
-
In the Discover Resources section, enable
Auto Sync and select
Schedule Based.
The Schedule Based Sync popup window is displayed.
-
Enter/Select the General Information.
Table 24. Field description for the General Information section Field Description Frequency of Sync* To schedule the sync, set a frequency using the two dropdown lists for this field. For example, to set the frequency to 1 day:
- From the first dropdown list, select 1.
- From the second dropdown list, select
Days.
Advance Settings For the current release, this field is set to Off and is disabled. This field and the associated features will be enabled in the upcoming release. *: Mandatory fields - Click Apply.
Account Level/Inner Inventory
| Field | Description |
|---|---|
| Account Name | Name of the account to which the cloud device belongs |
| Role Name | Role name of the account creator |
| Service Region | The service region selected for the account |
| Service | Service integrated for the cloud device |
| Status | Status of the discovered accounts.
This field takes the following values:
|
| Resource Discovery Status |
Note: Resource discovery status is
not applicable for master accounts. For master
accounts, the resource discovery status is set to
Not Applicable.
This field indicates the status of the resource
discovery for the individual entities belonging to a
discovered account using the following values:
|
| Cert Discovery Status |
Note: Cert discovery status is not
applicable for master accounts. For master accounts,
the cert discovery status is set to Not
Applicable.
This field indicates the status of the certificate
discovery for the individual entities belonging to a
discovered account using the following values:
Note: The cert discovery status is
based on the status of only those entities for which
the cert discovery status is not Not
Applicable.
|
| Cert sync | Cert sync type (Managed, Monitored, Ignored) selected for the entity |
| State | Outcome of the device addition (Success, Failed) |
AWS IAM Prerequisites for Master Account
Permissions for Discovering Child Accounts using Policy-based Discovery
{
  "Version": "2012-10-17",
  "Statement": [
    {
      "Sid": "VisualEditor0",
      "Effect": "Allow",
      "Action": [
        "iam:GetPolicyVersion",
        "iam:GetPolicy",
        "iam:GetUserPolicy",
        "iam:ListGroupsForUser",
        "iam:ListGroupPolicies",
        "iam:ListAttachedUserPolicies",
        "iam:ListAttachedGroupPolicies",
        "iam:ListUserPolicies",
        "iam:GetGroupPolicy",
        "iam:GetUser"
      ],
      "Resource": "*"
    }
  ]
}
Permissions for Discovering Child Accounts using AWS Organization Services
{
    "Version": "2012-10-17",
    "Statement": [
        {
            "Sid": "VisualEditor0",
            "Effect": "Allow",
            "Action": [
                "organizations:Describe*",
                "organizations:List*"
            ],
            "Resource": "*"
        }
    ]
}
Permissions for Enabling Assume Role Access to all AWS Accounts
{
  "Version": "2012-10-17",
  "Statement": [
    {
      "Sid": "VisualEditor0",
      "Effect": "Allow",
      "Action": "sts:AssumeRole",
      "Resource": [
        "arn:aws:iam::<child account 1>:role/<Assume-role>",
        "arn:aws:iam::<child account 2>:role/< Assume-role>",
        "arn:aws:iam::<child account 3>:role/< Assume-role>"
      ]
    }
  ]
}
Permissions for Enabling Assume Role Access for a Specific Child Account
{
  "Version": "2012-10-17",
  "Statement": [
    {
      "Sid": "VisualEditor0",
      "Effect": "Allow",
      "Action": [
        "sts:AssumeRole"
      ],
      "Resource": "arn:aws:iam::<child-account>:role/AppViewX"
    }
  ]
}
Permissions for Enabling S3 Bucket Access to the AppViewX Platform
{
    "Version": "2012-10-17",
    "Statement": [
        {
            "Sid": "VisualEditor0",
            "Effect": "Allow",
            "Action": [
                "sts:AssumeRole"
            ],
            "Resource": "arn:aws:iam::<child-account>:role/AppViewX-S3-Bucket-Access"
        }
    ]
}
Permissions for Accessing Organization Services to Discover AWS Accounts
{
  "Version": "2012-10-17",
  "Statement": [
    {
      "Sid": "VisualEditor0",
      "Effect": "Allow",
      "Action": [
        "sts:AssumeRole"
      ],
      "Resource": "arn:aws:iam::<child-account>:role/AppViewX"
    }
  ]
}
AWS IAM Prerequisites for Child Account
Permissions for Establishing a Trust Relationship in Child Accounts
{
  "Version": "2012-10-17",
  "Statement": [
    {
      "Effect": "Allow",
      "Principal": {
        "AWS": "arn:aws:iam::master-account-number:root"
      },
      "Action": "sts:AssumeRole",
      "Condition": {}
    }
  ]
}
Permissions for Discovering and Managing SSL Certificates in ACM
{
    "Version": "2012-10-17",
    "Statement": [
        {
            "Sid": "VisualEditor0",
            "Effect": "Allow",
            "Action": [
                "acm:DescribeCertificate",
                "acm:RequestCertificate",
                "acm:GetCertificate",
                "ec2:DescribeRegions",
                "acm:ListCertificates",
                "acm:ImportCertificate",
                "acm:AddTagsToCertificate",
                "acm:ListTagsForCertificate",
                "acm:RemoveTagsFromCertificate"
            ],
            "Resource": "*"
        }
    ]
}
Permissions for Discovering and Managing Private CA Certificates
{
    "Version": "2012-10-17",
    "Statement": [
        {
            "Sid": "VisualEditor0",
            "Effect": "Allow",
            "Action": [
                "acm:DescribeCertificate",
                "acm:RequestCertificate",
                "acm:GetCertificate",
                "acm:RenewCertificate",
                "ec2:DescribeRegions",
                "acm:ListCertificates",
                "acm:ImportCertificate",
                "acm:AddTagsToCertificate",
                "acm:ListTagsForCertificate",
                "acm:RemoveTagsFromCertificate",
                "acm-pca:CreateCertificateAuthorityAuditReport",
		"acm-pca:DescribeCertificateAuthorityAuditReport,
		"acm-pca:GetCertificate",
		"acm-pca:ListCertificateAuthorities",
		"acm-pca:IssueCertificate",
		"acm-pca:RevokeCertificate",
		"s3:GetBucketLocation",
		"s3:GetObject"
            ],
            "Resource": "*"
        }
    ]
}
Permissions for Managing SSM Permissions for the EC2 Policy
{
    "Version": "2012-10-17",
    "Statement": [
        {
            "Sid": "VisualEditor0",
            "Effect": "Allow",
            "Action": [
                "ssm:SendCommand",
		 "ssm:DescribeDocument",
		 "ec2:DescribeInstances",
		 "s3:ListAllMyBuckets",
		 "ssm:DescribeInstanceInformation",
		 "ssm:GetDocument",
		 "ssm:CreateDocument",
		 "ssm:GetCommandInvocation",
		 "ec2:DescribeRegions"
            ],
            "Resource": "*"
        }
    ]
}
Permissions for Managing SSM Permissions for EC2 Role
{
    "Version": "2012-10-17",
    "Statement": [
        {
            "Action": [
                "ssm:DescribeDocument",
                "ec2messages:GetEndpoint",
                "ec2messages:GetMessages",
                "ssmmessages:OpenControlChannel",
                "ec2messages:DeleteMessage",
                "ssm:UpdateInstanceInformation",
                "ec2messages:FailMessage",
                "ssmmessages:OpenDataChannel",
                "ssm:GetDocument",
                "ssm:ListTagsForResource",
                "ec2messages:AcknowledgeMessage",
                "ssmmessages:CreateControlChannel",
                "ssmmessages:CreateDataChannel",
                "ec2messages:SendReply"
            ],
            "Resource": "*",
            "Effect": "Allow"
        },
        {
            "Action": [
                "s3:PutObject",
                "s3:GetEncryptionConfiguration",
                "s3:PutObjectAcl"
            ],
            "Resource": [
                "arn:aws:s3:::appviewx-s3/*",
                "arn:aws:s3:::appviewx-s3"
            ],
            "Effect": "Allow"
        }
    ]
}
Onboarding Certificates for AWS Resources in AppViewX
- Via certificate discovery, for existing certificates
- Via certificate enrollment, for new certifcates
Discovering Certificates for AWS Resources
-
Go to
 (Menu) > CERT+ > CERTIFICATE
DISCOVERY > Discovery > Cloud Scan.
The Discovery : Cloud Scan : Add Discovery page is displayed.
(Menu) > CERT+ > CERTIFICATE
DISCOVERY > Discovery > Cloud Scan.
The Discovery : Cloud Scan : Add Discovery page is displayed. -
To initiate a cloud certificate discovery scan, enter the Discover
Details.
-
Enter the details for initiating an on-demand cloud certificate
discovery scan.
Table 26. Field descriptions for on-demand discovery Frequency Type Description Discovery Instance Name Enter a name for the discovery instance. Description Enter additional details related to the discovery option. Note: Character limit: 2000 charactersOR
Enter the details for initiating a scheduled cloud certificate discovery scan.
Table 27. Field descriptions for scheduled discovery Frequency Type Description Discovery Instance Name Enter a name for the discovery instance. Description Enter additional details related to the discovery option. Note: Character limit: 2000 characters*Time Zone From the dropdown list, select the time zone in which the scheduled discovery instance will be triggered. Occurrence Type From the dropdown list, from the following options, select an occurrence frequency: - Daily
- Weekly
- Monthly
- Yearly
*Repeat On Note: This field is displayed only when Occurrence Type = Weekly.Select the checkbox corresponding to the day of the week on which you want the discovery occurrence to repeat.*Starts On Click  (Calendar widget) to select a date to start
the scheduled discovery.
(Calendar widget) to select a date to start
the scheduled discovery.*Ends From the following options, select when the scheduled discovery is to end: - Never: Discovery never stops.
- After: Discovery stops after the number of occurrences specified in the text field.
- On: Discovery stops on the date
selected using
(Calendar widget)
Summary Displays a summary of the selections made for scheduled discovery *: Mandatory fields
-
Enter the details for initiating an on-demand cloud certificate
discovery scan.
-
To filter the discovered certificates, enter the Discover
By details.
Table 28. Field descriptions for the Discover By section Field Description *Discovery From From the dropdown list, select Cloud (the source to discover a certificate from). *Vendor From the dropdown list, select AWS. *Account type From the following options, select the AWS account type for certificate discovery: - Stand-alone account sign-in (In a stand-alone account, the user account and the resources are available in the same account.)
- Cross account sign-in (In a cross-account resources are available across multiple accounts and users are given role-based access.)
*Select Account View Note: This field is displayed only when you've selected Account type = Cross account sign-in.From the given options, select one to specify if the discovery will be performed for the master account or for the child accounts.*Select Filter Type Note: This field is enabled when:From the following options, select one to specify how the discovery results should be filtered:-
- Account type = Stand-alone account sign-in
- Account type = Cross account sign-in AND Select Account View = Child Account.
- Account View
- Service View
Selected Resources To search for a resource: - (Optional) In the Type your search and press Enter field, enter a search keyword to filter the list of resources.
- Select the checkbox corresponding to the required resource.
To add an existing resource to the list:- Click
 .
. - From the Add Accounts dialog box, select the checkbox corresponding to the required resource(s).
- Click Add Selected.Note: The Add Selected button is enabled after at least one resource is selected.
To delete a resource from the list:- Select the checkbox corresponding to the resource you want to delete.
- From the Action field, click
 .
.OR
Click .Note: To delete multiple resources at once:
- Select the checkboxes for the resources to be deleted.
- Click .
Execute Batches Sequentially To execute the discovery operation on the specified batches sequentially, select this checkbox. *Interval Between Batches If Execute Batches Sequentially is selected, enter an interval duration (in minutes) in this field. The sequential execution of the batches is spaced according to the interval value entered here. *: Mandatory fields -
In the Discovery Rules section, from the Associate Rule
dropdown list, select a rule that will be used to filter the discovered
certificates.
A set of filters is combined to create a rule, from the Rules menu. The selection of rules will apply respective filters on discovered certificates.
-
In the After Discover section, enter the following details:
Table 29. Field descriptions for the After Discover section Field Description *Move Certificate to Inventory with Status Select from one of the following options: - Do not move: The newly discovered certificates and their objects will not be moved to the inventory.
- Managed: The newly discovered certificates and their objects will be moved to the inventory with the status set to Managed.
- Monitored: The newly discovered certificates and their objects will be moved to the inventory with the status set to Monitored.
Use Access Control Rule To apply the rule configured using Access Control, select this checkbox. Note: If this checkbox is enabled, the certificate group will be associated automatically by the rule in access control.*Certificate Group From the dropdown list, select a certificate group to which the discovered certificates will be associated. Based on the group association, a policy will also be applied to these certificates, which will help ascertain compliance or non-compliance.
*: Mandatory fields -
In the Discovery Notifications section, to receive discovery status
update notifications:
-
Click Discover/Schedule to trigger the on-demand/scheduled
discovery, respectively.
The discovered certificates are listed in the certificate inventory.
Enrolling Certificates
Enrolling Server Certificates
-
Go to (Menu) > CERT+ > CERTIFICATE
ACTION > Enroll Certificate >
Server
The Enroll Server Certificate page is displayed.
- In the General Information section, from the dropdown list, select the required Assign Group.
-
Enter the CA Details.
Table 30. Field descriptions for the CA Details section Field Description *Certificate Authority From the dropdown list, select the certificate authority to request the certificate enrollment. Note: The IDnomic CA can be used for issuing certificates only in an on-prem deployment. Certificates issued through IDnomic CA can be renewed only if they are enrolled using a Registration Authority workflow.*Renew Automatically Note:To automatically renew this certificate:- If the Override feature is enabled for the certificate group selected from the Assign Group dropdown list, auto renew settings done in the enrollment page will be overwritten by the group level settings.
- If Regenerate Automatically has been enabled for the selected certificate group, the Renew Automatically field is not displayed here.
- Turn on the Renew
Automatically toggle.
The *Start Renewing field is displayed.
- In the Days Before Expiry field, specify
how many days prior to a certificate's expiry the
renewal process should start.
Valid range for number of days: 1 to 120
Note: The auto renew settings from the parent certificate will be transferred to the child certificate only if the toggle was enabled; they will not transfer if the certificate was renewed manually. After migration, these settings will be disabled for the parent certificate, so enable them manually if needed.*Regenerate Automatically To automatically regenerate this certificate: - Turn on the Regenerate Automatically
toggle.
The *Start Regenerating field is displayed.
- In the Days Before Expiry field, specify
how many days prior to a certificate's expiry the
regeneration process should start.
Valid range for number of days: 1 to 120
Note: This value can exceed the certificate's validity in case of short-lived certificates.
Note:- This feature can be enabled only for valid certificates (not for revoked/suspended and expired certificates).
- The auto regenerate settings from the parent certificate will be transferred to the child certificate only if the toggle was enabled; they will not transfer if the certificate was regenerated manually. After migration, these settings will be disabled for the parent certificate, so enable them manually if needed.
*Re-enroll Automatically To automatically regenerate this certificate: - Turn on the Re-enroll Automatically
toggle.
The *Start Re-enrollng field is displayed.
- In the Days Before Expiry field, specify
how many days prior to a certificate's expiry the
regeneration process should start.
Valid range for number of days: 1 to 120
Note: This value can exceed the certificate's validity in case of short-lived certificates.
Note: User overrides are allowed unless Group Override is active, in which case the group's configuration takes precendence.*CA Account From the dropdown list, select the CA account to which the certificate enrollment request will be submitted. Certificate Type From the dropdown list, select the required certificate type. *Division Note: This field is applicable only for Digicert CA.From the dropdown list, select the division with which the certificate will be enrolled.Certificate Profile Note: This field is displayed for only selected CAs. For the IDnomic CA, this field is displayed when only-CA setting is selected from the CA Account dropdown list.From the dropdown list, select the certificate profile with which the certificate must enroll.
*RA Workflow Note: This field is displayed when Certificate Authority = IDnomic and a RA setting is selected from the CA Accounts dropdown list.From the dropdown list, select the RA workflow that will be used for certificate enrollment.For the details of a workflow, you can check them on your CA portal on IDnomic.
*Issuer Location Note: This field is applicable only for Google CA.From the dropdown list, select the issuer location associated with the CA account.
*Issuer Name Note: This field is applicable only for Google CA and AppViewX PKIaaS Native.From the dropdown list, select the issuer name for issuing the certificate.
Template Name Note: This field will be displayed only when Certificate Authority = AppViewX Native CA.Select a template name from the dropdown list.
Template Name is editable. The selected template will be displayed in the Template/Profile column of the Server Certificate Inventory irrespective of the Managed/Monitor status. You can also search and filter certificates based on the template name within the CERT+ Inventory.
*Issuance Policy Note: This field is applicable only for Futurex.From the dropdown list, select the issuing policy for this certificate.An issuance policy defines the rules Futurex must follow to process the certificate enrollment request. The selected issuance policy will determine the approval requirements for the certificate, the cryptographic settings, notification triggeres and other configuration parameters.
*Root CA Note: This field is applicable only for Futurex.From the dropdown list, select the root CA for the certificate being enrolled.This is the trusted root certificate authority that anchors the certificate chain. All issued certificates will ultimately chain up to this root.
*Signing CA Note: This field is applicable only for Futurex.From the dropdown list, select the Certificate Authority that will sign the requested certificate.*Extension Profiles Note: This field is applicable only for Futurex.Extension profiles enable you to further modify your certificates with additional field, attributes, and requirements.From the dropdown list, select the extension profile that will be used for the certificate being enrolled.
To read more on and for instructions to create extension profiles, refer the Futurex documentation. For links, see the References section.
*Approval Group Name Note: This field is applicable only for Futurex.An approval group is a predefined set of users or roles authorized to approve the certificate enrollment request.From the dropdown list, select the approval group to authorize this enrollment request.
To read more on and for instructions to create and manage approval groups, refer the Futurex documentation. For links, see the References section.
*Connector Name Enter a friendly name for the CA connector. On saving this form, the name entered here will be displayed in the holistic view.
Description Note: Character limit: 2000 charactersEnter the description in this field.
*CSR Generation Note: This field is applicable for all CAs except Amazon.From the following options, select the required method for generating the CSR:
- AppViewX: Private key and
CSR will be created in AppViewX based on CSR
parameters given.Note: If auto regeneration has been enabled for this cerificate, AppViewX can be enforced as the default CSR generation source (irrespective of any selections made here) every time the certificate is regenerated. To do this, execute the following db script:
db.cert_metadata.insertOne({"_id":"CERT_AUTO_REGENERATE_DEFAULT_APPVIEWX_CSR", "flag":true}) - Upload CSR: You can
upload a file that contains the CSR details. This
source file will be used to populate the CSR
parameters, which will then be submitted to the
CA.
- Under CSR Generation, select Upload
CSR.
The Please paste your CSR field is displayed.
- From the Please paste your CSR field, select Browse.
- Navigate to the location of your CSR file, and click Open.
- Click Upload.
On successful upload of this file, the CSR fields are populated with the corresponding details.
- Under CSR Generation, select Upload
CSR.
- HSM: Note: This option is disabled/not displayed when Certificate Authority = Google, CSC Global, and DigiCert One.To generate the private key and the CSR, based on the CSR parameters given in an HSM device:
- Under CSR Generation, select HSM.
- To enter the configuration details for CSR generation, refer the field descriptions given here.
- End
Point: Note: This option is disabled when Certificate Authority = Google and CSC Global.To generate the private key and the CSR, based on the CSR parameters given in an endpoint device:
- Under CSR Generation, select End Point.
- To enter the configuration details for CSR generation, refer the field descriptions given here.
*: Mandatory fields Table 31. Field descriptions for using HSM as the CSR generation source Field Description *Device Type From the dropdown list, from the following options, select the type of device on which the private key and the CSR will be generated: - HSM Devices (AppViewX will directly communicate with the HSM device for the CSR generation.)
- ADC Devices (The selected ADC device will interact with the HSM to generate the CSR and subsequently transmit the relevant details to AppViewX.)
*Vendors This field is displayed only when Device Type = ADC Devices. From the dropdown list, select the required ADC device vendor.
Module Number This field is displayed when Device Type = ADC Devices and Vendors = Thales. In the event that multiple HSMs are configured on a system, module number is a unique identifier assigned to each HSM.
In this field, enter the module number assigned to the selected Thales device.*Devices From the dropdown list, select the required HSM/ADC device. This field is populated based on the Device Type and Vendors selected.
- For Device Type = HSM
Devices
The dropdown list is populated with HSM devices that were enabled for CSR generation at the time of onboarding and have been successfully onboarded. To read more on onboarding HSM devices in AppViewX, click here.
- For Device Type = ADC
Devices
The dropdown list is populated with F5 devices that are in the Managed state.
Currently, AppViewX enables HSM key generation only through F5 devices for the following HSM vendors and their respective supported versions:- Fortanix (v14 and onwards)
- Thales (v12 and onwards)
- Safenet (v12 and onwards)
*Key Handler Name This field is displayed when Device Type = HSM Devices. Key handler name refers to an identifier used to reference a cryptographic key managed by an HSM device.
Enter the desired handler name in the field.*Key Reference Name This field is displayed when Device Type = ADC Devices. Key reference name refers to an identifier used to reference a private key that is stored locally on an ADC device or is securely accessible to the device via an external HSM.
In this field, enter the reference name assigned to the private key stored in/accessible to the selected ADC device.Table 32. Field descriptions for using an endpoint device as the CSR generation source Field Description Category From the following options, select the ADC device category: - ADC
- Cloud
- Server
- WAF
- Firewall
Note:- Run the following script to enable endpoint
CSR generation support for
GlobalSignAtlas:
db.getCollection('cert_metadata').insertOne({ "_id": "CSR_GENERATION_ENDPOINT_SUPPORTED_VENDOR_GLOBALSIGNATLAS", "objectMap": { "Server": [ "ABAP", "Web Dispatcher" ] } }); - On selecting GlobalSignAtlas CA, Category is automatically populated as Server.
Vendor The dropdown list for this field is populated based on the Category selected. From the dropdown list, select the vendor for the end point device. Note:- On selecting GlobalSignAtlas CA, Vendor is populated with ABAP and Web Dispatcher.
*Devices This field lists the end point devices present in your environment that belong to the above selected Category and Vendor. From the dropdown list, select the end point device on which you want to generate the private key and the CSR.Note: On selecting Vendor = Fortinet, both Fortigate and FortiManager devices are populated. Auto-regeneration of certificates with FortiManager as endpoint is not supported.*Profile This field is applicable only when Category = Server/WAF. Select a profile from the dropdown list. Note: On selection of Vendor = Imperva, CSR generation at the endpoint is supported only for SaaS platforms. Profiles will not be displayed for AWS/on-prem deployments.*Tenant This field is applicable only when Category = AD. Enter the tenant ID. *Service name From the dropdown list, select the cloud service running on the selected cloud Devices. CSR Location This field is applicable only when Category = Server. *Template Name This field is applicable only when Category = Firewall. Select the required template from the dropdown list.
Note:- This field will be enabled when the Platform = Panorama while onboading PaloAlto device at Menu > CERT+ > Device Management > Inventory> Firewall > Add.
- Templates and partitions are used to enroll certificates at the template level. To enroll a certificate at the Panorama level, set the template to None.
Partition This field is applicable only when Category = Firewall. *CSR File Name Enter the name of the file that contains the CSR parameters. Note:- As the extension is already included in the field, ensure that you enter the file name without the file extension.
- Starting v2023.1.0 FP2, for enrolling Apache server certificates, this field is labeled as CSR File Location.
*Key File Name Enter the name of the file that contains the private key details. Note:- As the extension is already included in the field, ensure that you enter the file name without the file extension.
- Starting v2023.1.0 FP2, for enrolling Apache server certificates, this field is labeled as Key File Location.
*Certificate File Name This field is displayed only when Category = Cloud. Enter the certificate file name. *Key vault This field is displayed only when Category = Cloud, Vendor = Azure, and Service name = Key Vault (Azure). *Service Note: This field is displayed when Category = Server and Vendor = Microsoft Server.This dropdown list is populated based on the Device selected.From the options in the dropdown list, select the service.
*Exchange Server Note: This field is displayed when Category = Server and Vendor = Microsoft Server.From the dropdown list, select the name of the MS Exchange server for which the certificate is being enrolled. -
For the EJBCA certificate authority, enter the vendor details.
Table 33. Field descriptions for the EJBCA Vendor Specific Details section Field Description * End Entity Profile Name From the dropdown list, select the end entity profile name. End entity user name Enter the name of the end user entity. * Issuer Common Name From the dropdown list, select the issuer common name. *Certificate Profile Name From the dropdown list, select the certificate profile name. *: Mandatory fields Note: When generating a new private key on an endpoint, existing keys (including .txt encrypted key files) are not overwritten immediately.- For non–password-protected certificate types (PEM-.crt, PEM-.cer, PEM-.pem, DER-.der, DER-.cer, PKCS7-.p7b, PKCS7-.p7c), the .txt file is decrypted into the original key filename (keyfile.key) during the push. If a key with the same name already exists, it will be replaced.
- For password-protected certificate types (Default
JKS-.jks, JKS-.keystore, PKCS12-.p12, PKCS12-.pfx):
- During the push , the encrypted .txt file is decrypted into a temporary, timestamped key file (keyfile_.key).
- This decrypted key is then combined with the certificate
to create the final bundled output (e.g.,
.pfx,.jks). - After bundling, the temporary timestamped key file is deleted; Because the decrypted key file is temporary and timestamped, no key replacement occurs, and no existing key files are overwritten.
This is currently applicable for:- Linux vendors - Generic Linux, Apache Linux, Tomcat Linux, and Nginx Linux.
- Windows vendors - Windows Apache, Windows Tomcat, and Microsoft SQL.
-
For the certificate being enrolled, enter the CSR Parameters.
Note: For DigiCert One, all CSR parameters that are assigned static values in the certificate profile will be auto-populated and disabled for editing.
Table 34. Field descriptions for the CSR Parameters Field Description Replace PSE File The Replace PSE File checkbox enables users to generate the CSR or private key in the Server. This checkbox is displayed only in the case described below: - Select the CSR Generation radio button as Endpoint.
- Select Category as Server, Vendor as ABAP or Web Dispatcher The Profiles dropdown is the only other field displayed below it and is populated with a list of .pse file names.
- Select the required Profile from the dropdown. Based on the values selected, the fields in the CSR Parameters section are auto-populated.
The Replace PSE File checkbox is disabled by default and the SAN details fields in CSR Parameters section are also disabled. Selecting the checkbox will make the SAN details enabled and allow for values to be updated.
*Common Name Enter the certificate's common name. The common name is one of the key values of Certificate Signing Request (CSR) to be present in the certificate. For example, <appviewx>.
Note: Constraints:- Character limit: 64 characters
- No special characters allowed except en dash (_) and hyphen (-).
- For VMware vCenter, enter the device's FQDN to avoid certificates being rejected. If left blank, the FQDN will be auto-detected and populated.
Subject Alternative Name From the dropdown list, select the Subject Alternative Name category for the certificate being enrolled. In the corresponding field(s) displayed for the selection made, enter the required values.
Note:- Multiple values must be separated by a comma.
- After enrollment, the cumulative count of SANs is displayed in the certificate property pop-up window from the holistic view.
- For VMWare vCenter, enter the device's FQDN to avoid certificates being rejected. If left blank, the FQDN will be auto-detected and populated.
DNS Mutiple SAN values must be separated by a comma (,). Organization The organization name is one of the CSR parameters to be present in the certificate. This field will be auto-filled and editable based on the configuration in the selected group’s policy. Note: For VMWare vCenter, this is a mandatory field.Organization Unit Organization Unit name is one of the CSR parameters to be present in the certificate. This field will be auto-filled and editable based on the configuration in the selected group’s policy. Note: For VMWare vCenter, this is a mandatory field.Locality The locality name is one of the CSR parameters to be present in the certificate. This field will be auto-filled and editable based on the configuration in the selected group’s policy. Note: For VMWare vCenter, this is a mandatory field.State The state name is one of the CSR parameters to be present in the certificate. This field will be auto-filled and editable based on the configuration in the selected group’s policy. Note: For VMWare vCenter, this is a mandatory field.Country Country name is one of the CSR parameters to be present in the certificate. This field will be auto-filled and editable based on configuration. It must be a 2-letter country code (for example, US, and so on). Note:- For renewal of the certificate being enrolled, country name is required.
- For VMWare vCenter, this is a mandatory field.
Email Address Enter a valid email address of the person responsible for maintaining the certificate. Note: For VMWare vCenter, this is a mandatory field.*Validity To specify the validity of the certificate being enrolled: - From the first dropdown list, select the number of days/months/years.
- From the second dropdown list, select the unit
of the duration from the following values:
Days/Months/Year.For example, if the validity of the certificate is 2 months:
- From the first dropdown list, select 2.
- From the second dropdown list, select Months.
Note: The uploaded certificate validity for Globalsign MSSL is set to 365 days.Challenge Password Challenge password is one of the CSR parameters to be present in the certificate. Password must contain at least one alphabet (uppercase and lowercase), one number, and one special character. Confirm Password Re-enter the password entered in the Challenge Password field. *Hash Function The Hash function with which the CSR has to be signed. Any information specific to any CA or vendor has to be covered in the Note section. This field will be auto-filled and editable based on the configuration in the selected group’s policy. Note: For Certificate Authority = HydrantID, irrespective of the hash function selected, by default, the CA returns a certificate with SHA256. Therefore, admins must restrict users from creating a certificate with a hash function other than SHA256. To accomplish this, create policy with a single hash value (SHA256).*Key Type The key type is used while creating a private and public key pair. This field will be auto-filled and editable based on the configuration in the selected group’s policy. Note:- FortiManager supports only RSA key type of 512, 1024, 1536, 2048, 3072, 4096 bits.
- VMWare supports only RSA of 2048, 3072, 4096, 7680, 8192 bits and EC key type.
*Bit Length The bit length is used while creating a private and public key pair. This field will be auto-filled and editable based on the configuration in the selected group’s policy. *: Mandatory fields -
In the Attachments section, upload any additional documents that are
relevant to the enrollment of the certificate (for example, approval
emails).
Table 35. Field descriptions for the Attachments section Field Description Name Enter a name for the document. This need not be the actual name of the document; it can be an alternate name that will be used for reference only. Comments Enter any details relevant to the document being attached. Note: Character limit: 2000 charactersUpload File To upload an attachment: - Click Upload.
- Navigate to the location of the document to be uploaded.
- Select the document to be document and click
Open.
The selected document is uploaded and listed in the table displayed below these fields in the Attachments section.
Tip: If you have uploaded multiple attachments, use the Search field to find the required one.
*: Mandatory fields -
In the Certificate Attributes section, enter organization-specific
values, for the certificate attributes and custom attributes for the issuing
CA, that need to be mentioned along with the CSR.
These values will not be a part of the certificate but will be available in the AppViewX inventory. For example, cost center.Note: This additional information can be used to filter certificate details in the inventory.
-
Enter the relevant details in the Generic Fields. These are default
fields for maintaining the IP address and device information, if
required.
Table 36. Field descriptions for the Generic Fields Field Description Device Name Enter the name of the device. Application IP Address Enter the IP address of the application. Tracking ID A free-form business alpha-numerical identifier, included in the audit logs, that may be used to correlate audit log entries (typically enrollment and revocation events) Certificate holder Email Note: For the IDnomic CA, this field is displayed only when the selected CA account has been configured using a Registration Authority (RA).An email address that may be used to send notifications to certificate holder depending on the notification policies configured for the requested workflowFirst name Note: For the IDnomic CA, this field is displayed only when the selected CA account has been configured using a Registration Authority (RA).First name (as a metadata) associated with the certificate to be enrolledLast name Note: For the IDnomic CA, this field is displayed only when the selected CA account has been configured using a Registration Authority (RA).Last name (as a metadata) associated with the certificate to be enrolledOrganization Note: For the IDnomic CA, this field is displayed only when the selected CA account has been configured using a Registration Authority (RA).Organization name (as a metadata) associated with the certificate to be enrolledComment Note: For the IDnomic CA, this field is displayed only when the selected CA account has been configured using a Registration Authority (RA).Additional information (as a metadata) associated with the certificate to be enrolledUUID Note: For the IDnomic CA, this field is displayed only when the selected CA account has been configured using a Registration Authority (RA).Universal Unique Identifier, or UUID, (as a metadata) associated with the certificate to be enrolled -
In the Vendor-Specific Details section, enter the
CA-specific details. Some of the CAs will expect additional details other
than CSR parameters as meta data for their operational purposes. Details
common to all CAs will be taken from the AppViewX user information of the
logged in user.
Table 37. Field descriptions for the common vendor specific details Field Description Certificate ID The Certificate ID is auto-populated based on the value entered in the Common Name field (in the CSR Parameters section). - The Certificate ID can be modified by the user.
- If the user edits the Certificate ID, any change to the Common Name will not reflect in the Certificate ID.
- If the user deletes the Certificate ID, the value of the Certificate ID field is set to the Common Name suffixed with the timestamp.
Table 38. Field descriptions for the CSC Global CA vendor specific details Field Description *Server Type From the dropdown list, select the server on which the application that requires the requested certificate is hosted. *Business Unit Enter the name of the business unit that is requesting the certificate. *Organization Contact Enter the email address of the contact in the organization requesting the certificate. *Phone Number Enter the phone number of the Organization Contact in the followung format: +<country code>-<phone number>. Note: For CSC Global, the phone number is not fetched from the AppViewX user information because of the difference in format.*Domain Control Validation Type From the following options in the dropdown list, select the method CSC Global will use for authentication before issuing a certificate: - EMAIL: CSC Global will send an approval/confirmation request to the registered email ID. Certificate issuance happens only after approval is received.
- CNAME: On requesting certificate issuance, CSC Global will provide you with a dynamic string. Add a CNAME record with this string to your DNS settings. CSC will issue the certificate requested only after validating this CNAME record.
Note: CSC Global will perform domain validation for all CLM actions.*: Mandatory fields Table 39. Field descriptions for the Custom CA vendor specific details Field Description *CRL and OCSP required To control the inclusion of CRL and OCSP settings, turn this toggle button on/off as required. *: Mandatory fields Table 40. Field descriptions for the DigiCert CA vendor specific details Field Description *Server Type From the dropdown list, select the server on which the application that requires the requested certificate is hosted. *Payment Method From the dropdown list, select one from the following payment methods: - Bill To Account Balance:
This option allows you to pay for the DigiCert
certificate using the available balance in your
DigiCert account.Note: Ensure that the option to bill to account balance is enabled for the account and the account has sufficient balance.
- Bill To Default Credit
Card: This option will charge the cost
of the DigiCert certificate to the credit card set
as the default payment method in your DigiCert
account.Note: Ensure that a credit card is configured as the default payment method for your account.
Additional Email Enter email addresses that will receive notifications for renewals, reissues, and duplicates for the specified order. Renewal Message Enter a custom message that will be sent with the renewal notifications. Notes Enter a custom note that will be sent with the order. *: Mandatory fields Table 41. Field descriptions for the DigiCert One CA vendor specific details Field Description Seat ID Enter the seat ID that will be assigned to the certificate being enrolled. Seat ID is a unique user-defined value assigned to identify an entity in the DigiCert One account. The seat ID for a certificate is used for certificate enrollment, renewal, and regeneration.Note: The Seat ID field is displayed only if the Allow Seat ID during enrollment option is selected for the CA account. In this case, the value entered in the Seat ID field is now a unique identifier for the certificate being enrolled. Otherwise, a common seat ID is assigned to all certificates enrolled for the selected CA accountTable 42. Field descriptions for the GlobalSign MSSL CA vendor specific details Field Description *Profile name A profile name is defined at the time of creating an account on the GlobalSign MSSL portal. AppViewX retrieves all your profile names from the GlobalSign MSSL portal and populates them in this dropdown list. From the dropdown list, select the profile name the enrolled certificate should be mapped to.
*: Mandatory fields Table 43. Field descriptions for the Hydrant ID CA vendor specific details Field Description Expiry Emails Enter a comma-separated list of email addresses that will receive the certificate expiry notification from HydrantID. Note: HydrantID CA does not accept updates to these email addresses during the renewal process.Table 44. Field descriptions for the Nexus CA vendor specific details Field Description Procedures The Procedures dropdown list will display only the procedures mapped to the server and the default procedure. From the dropdown list, select the required procedure. Table 45. Field descriptions for the LetsEncrypt CA vendor specific details Field Description *Challenge Type Specifies the method for verifying domain ownership. Select the required domain for the validation. The available challenge types are: - HTTP
- DNS.
Challenge Verify Determines how the DNS challenge will be verified. Select the required verification process. The available challenge verifies are: - Manual
- Automatic.
Note: This field appears when the challenge type is selected as DNS.Vendor Indicates the DNS provider responsible for managing DNS records. The available DNS service providers are: - Cloudflare
- Azure.
Note: This field appears when the challenge verify is selected as Automatic.*Settings Allows for additional configuration settings related to the DNS challenge. The selected value None implies that no extra settings are applied. Note: This field appears when the challenge verify is selected as Automatic.Note:- Make sure that you have enabled LetsEncrypt DNS Automation from the workflow.
- To add new vendors for the integration and configuration, refer to Integration topic in the Automation Guide.
*: Mandatory fields -
Click Add.
Once the details are added, you will be redirected to a page where the CSR and CA details are added as a connector. This page is called the holistic view and from here, any action on the certificate can be performed including provisioning the certificate to a server.
-
On the holistic view, click the Submit button to
trigger the request.
The submit action is triggered and the Submit dialog box is displayed.
-
Enter your comments in the text field and click Yes.
If the approval required option is enabled in the CA policy, the request is moved to the Approve and Implementation stages.
-
Click Approve to proceed.
The Approve dialog box is displayed.
-
Enter your comments in the text field.
Note: If the workflow request has to be approved automatically in the future, click the Schedule later button .
-
Click Yes.
Once the approval process is complete, the Implement option is displayed in the holistic view.
-
Click Implement.
The Implement dialog box is displayed.
-
Enter your comments in the text field.
If the workflow request has to be implemented automatically in the future, click Schedule later .
-
Click Yes.
CSR Submission to CA is in progress.Once the CSR submission is successful, the request state will be changed to Submit certificate - retrieval in progress state.
If the enrollment request is compliant with conditions defined and auto-approval enabled in the targeted CA, the certificate will be fetched in a few seconds.
If auto-approval disabled in the targeted CA, you will have to be logged into the CA and approve the request.
Once the certificate is issued successfully, the certificate will be retrieved into AppViewX. You can now push the enrolled certificate(s) to the required endpoint.
Enrolling Client Certificates
-
Go to (Menu) > CERT+ > CERTIFICATE
ACTION > Enroll Certificate >
Client
The Enroll Client Certificate page is displayed.
- In the General Information section, from the dropdown list, select the required Assign Group.
-
Enter/Select the CA Details.
Table 46. Field descriptions for the CA Details section Field Description *Certificate Authority Note: Depending on the CA selected, the rest of the fields will be displayed.From the dropdown list, select the required certificate authority (CA).Note: For enrolling certificates with policies using Google CA, consider the following points:Certificate Enrollment - Strict Policy- The Common Name will not be pre-filled from the policy.
- The following validation will be seen based on
strict policy guidelines.
- If the Common Name’s domain name is not present in the Allowed Domain Name list, an error validation will be shown upon saving the policy details.
Certificate Enrollment - Suggestive Policy- The Common Name will not be pre-filled from the policy
- The following validation will be seen based on
strict policy guidelines.
- If the Common Name’s domain name is not present in the Allowed Domain Name list, the non-compliant policy will be created.
- If the Common Name’s domain name is present in the Blocked Domain Name list, an error validation will be shown upon saving the policy details.
Note: For Certificate Authority = EJBCA, an additional set of fields, Vendor specific details is displayed after the CA Details section. Instructions on specifying the vendor specific details are covered in step 4.*Renew Automatically Note:To automatically renew this certificate:- If the Override feature is enabled for the certificate group selected from the Assign Group dropdown list, auto renew settings done in the enrollment page will be overwritten by the group level settings.
- If Regenerate Automatically has been enabled for the selected certificate group, the Renew Automatically field is not displayed here.
- Turn on the Renew
Automatically toggle.
The *Start Renewing field is displayed.
- In the Days Before Expiry field, specify how
many days prior to a certificate's expiry the
renewal process should start.
Valid range for number of days: 1 to 120
Note: The auto renew settings from the parent certificate will be transferred to the child certificate only if the toggle was enabled; they will not transfer if the certificate was renewed manually. After migration, these settings will be disabled for the parent certificate, so enable them manually if needed.Note: The IDnomic CA can be used for issuing certificates only in an on-prem deployment. Certificates issued through IDnomic CA can be renewed only if they are enrolled using a Registration Authority workflow.Subscribe Email Alerts for Auto-Renewal This field is displayed when Renew Automatically is enabled. To receive email notifications every time this certificate is auto-renewed, select this checkbox.
The email notification includes certificate details, the type of auto action (renewal, in this case), and the outcome (success/failure). These notifications help administrators stay informed of automated lifecycle actions, reducing the overhead to manually track them.
If enabled here, this setting overrides the group setting for email alerts subscription, unless group-level overrides have been enforced.
*Regenerate Automatically To automatically regenerate this certificate: - Turn on the Regenerate Automatically
toggle.
The *Start Regenerating field is displayed.
- In the Days Before Expiry field, specify how
many days prior to a certificate's expiry the
regeneration process should start.
Valid range for number of days: 1 to 120
Note: This value can exceed the certificate's validity in case of short-lived certificates.
Note:- This feature can be enabled only for valid certificates (not for revoked/suspended and expired certificates).
- The auto regenerate settings from the parent certificate will be transferred to the child certificate only if the toggle was enabled; they will not transfer if the certificate was regenerated manually. After migration, these settings will be disabled for the parent certificate, so enable them manually if needed.
Subscribe Email Alerts for Auto-Regenerate This field is displayed when Regenerate Automatically is enabled. To receive email notifications every time this certificate is auto-regenerated, select this checkbox.
The email notification includes certificate details, the type of auto action (regeneration, in this case), and the outcome (success/failure). These notifications help administrators stay informed of automated lifecycle actions, reducing the overhead to manually track them.
If enabled here, this setting overrides the group setting for email alerts subscription, unless group-level overrides have been enforced.
*Re-enroll Automatically To automatically regenerate this certificate: - Turn on the Re-enroll Automatically
toggle.
The *Start Re-enrollng field is displayed.
- In the Days Before Expiry field, specify how
many days prior to a certificate's expiry the
regeneration process should start.
Valid range for number of days: 1 to 120
Note: This value can exceed the certificate's validity in case of short-lived certificates.
Note: User overrides are allowed unless Group Override is active, in which case the group's configuration takes precendence.*CA Account To which account the enrollment request to be submitted. Certificate Type Select the desired certificate type from the dropdown list. *Division Select the division to which the certificate must be enrolled. Note: This field will be shown only for Digicert CA.Certificate Profile Note: This field is applicable only for AppViewX CA and Google CA. For the IDnomic CA, this field is displayed when only-CA setting is selected from the CA Account dropdown list.From the dropdown list, select the profile with which the certificate must enroll.
*RA Workflow Note: This field is displayed when Certificate Authority = IDnomic and a RA setting is selected from the CA Accounts dropdown list.From the dropdown list, select the RA workflow that will be used for certificate enrollment.For the details of a workflow, you can check them on your CA portal on IDnomic.
*Issuer Location Select the location of the issuer CA from the dropdown. Note: This is applicable only for Google CA.*Issuer Name Select the name of the issuer CA from the dropdown. Note: This is applicable only for Google CA.*Issuance Policy Note: This field is applicable only for Futurex.From the dropdown list, select the issuing policy for this certificate.An issuance policy defines the rules Futurex must follow to process the certificate enrollment request. The selected issuance policy will determine the approval requirements for the certificate, the cryptographic settings, notification triggeres and other configuration parameters.
*Root CA Note: This field is applicable only for Futurex.From the dropdown list, select the root CA for the certificate being enrolled.This is the trusted root certificate authority that anchors the certificate chain. All issued certificates will ultimately chain up to this root.
*Signing CA Note: This field is applicable only for Futurex.From the dropdown list, select the Certificate Authority that will sign the requested certificate.*Extension Profiles Note: This field is applicable only for Futurex.Extension profiles enable you to further modify your certificates with additional field, attributes, and requirements.From the dropdown list, select the extension profile that will be used for the certificate being enrolled.
To read more on and for instructions to create extension profiles, refer the Futurex documentation. For links, see the References section.
*Approval Group Name Note: This field is applicable only for Futurex.An approval group is a predefined set of users or roles authorized to approve the certificate enrollment request.From the dropdown list, select the approval group to authorize this enrollment request.
To read more on and for instructions to create and manage approval groups, refer the Futurex documentation. For links, see the References section.
*Connector Name Enter the friendly name for Certificate Authority connector in this field which will be displayed in the holistic view on saving this form. Description Enter the description in this field. Note: Character limit: 2000 characters*CSR Generation Select the CSR generation option as required. Options are:
- Upload CSR: Uploaded CSR will
be used as the source to populate CSR parameters and
submit to CA.To upload a CSR:
- Under CSR Generation, select Upload
CSR.
The Please paste your CSR field is displayed.
- From the Please paste your CSR field, select Browse.
- Navigate to the location of your CSR file, and click Open.
- Click Upload.
On successful upload of this file, the CSR fields are populated with the corresponding details.
- Under CSR Generation, select Upload
CSR.
- HSM: The private key and CSR
will be created in the selected HSM device based on
CSR parameters given.To generate the private key and the CSR, based on the CSR parameters given in an HSM device:
- Under CSR Generation, select HSM.
- To enter/select the configuration details for CSR generation, refer the field descriptions given here.
- End Point: The private key
and CSR will be created in the selected end point
device based on the CSR parameters given.To generate the private and the CSR, based on the CSR parameters given in an endpoint device:
- Under CSR Generation, select End Point.
- To enter/select the configuration details for CSR generation, refer the field descriptions given here.
- AppViewX - Private key and
CSR will be created in AppViewX based on CSR
parameters given.Note: If auto regeneration has been enabled for this cerificate, AppViewX can be enforced as the default CSR generation source (irrespective of any selections made here) every time the certificate is regenerated. To do this, execute the following db script:
db.cert_metadata.insertOne({"_id":"CERT_AUTO_REGENERATE_DEFAULT_APPVIEWX_CSR", "flag":true})
Note: For all CA types except Amazon, you have the option to generate the CSR.*: Mandatory fields Table 47. Field descriptions for using HSM as the CSR generation source Field Description *Device Type From the dropdown list, from the following options, select the type of device on which the private key and the CSR will be generated: - HSM Devices (AppViewX will directly communicate with the HSM device for the CSR generation.)
- ADC Devices (The selected ADC device will interact with the HSM to generate the CSR and subsequently transmit the relevant details to AppViewX.)
*Vendors This field is displayed only when Device Type = ADC Devices. From the dropdown list, select the required ADC device vendor.
Module Number This field is displayed when Device Type = ADC Devices and Vendors = Thales. In the event that multiple HSMs are configured on a system, module number is a unique identifier assigned to each HSM.
In this field, enter the module number assigned to the selected Thales device.*Devices From the dropdown list, select the required HSM/ADC device. This field is populated based on the Device Type and Vendors selected.
- For Device Type = HSM Devices
The dropdown list is populated with HSM devices that were enabled for CSR generation at the time of onboarding and have been successfully onboarded. To read more on onboarding HSM devices in AppViewX, click here.
- For Device Type = ADC Devices
The dropdown list is populated with F5 devices that are in the Managed state.
Currently, AppViewX enables HSM key generation only through F5 devices for the following HSM vendors and their respective supported versions:- Fortanix (v14 and onwards)
- Thales (v12 and onwards)
- Safenet (v12 and onwards)
*Key Handler Name This field is displayed when Device Type = HSM Devices. Key handler name refers to an identifier used to reference a cryptographic key managed by an HSM device.
In this field, enter the reference name assigned to the Master Encryption Key stored in the selected HSM device.*Key Reference Name This field is displayed when Device Type = ADC Devices. Key reference name refers to an identifier used to reference a private key that is stored locally on an ADC device or is securely accessible to the device via an external HSM.
Enter the desired handler name in the field.Table 48. Field descriptions for using an endpoint device as the CSR generation source Field Description Category From the following options, select the ADC device category: - ADC
- Cloud
- Server
- Firewall.
Vendor From the dropdown list, select the vendor for the end point device. Note: The dropdown list for this field is populated based on the Category selected.*Devices This field lists the end point devices present in your environment that belong to the above selected Category and Vendor. From the dropdown list, select the end point device on which you want to generate the private key and the CSR.
Tenant Note: This field is applicable only when Category = ADC.Enter the tenant ID.*Service name From the dropdown list, select the cloud service running on the selected cloud Devices. CSR Location Note: This field is applicable only when Category = Server.*Template Name Note: This field is applicable only when Category = Firewall.Select the required template from the dropdown list.
Note:- This field will be enabled when the Platform = Panorama while onboading PaloAlto device at Menu > CERT+ > Device Management > Inventory> Firewall > Add.
- Templates and partitions are used to enroll certificates at the template level. To enroll a certificate at the Panorama level, set the template to None.
Partition Note: This field is applicable only when Category = Firewall.*CSR File Name Enter the name of the file that contains the CSR parameters. Note: Since the extension is already included in the field, ensure that you enter the file name without the file extension.Note: Starting v2023.1.0 FP2, for enrolling Apache server certificates, this field is labeled as CSR File Location.*Key File Name Enter the name of the file that contains the private key details. Note: Since the extension is already included in the field, ensure that you enter the file name without the file extension.Note: Starting v2023.1.0 FP2, for enrolling Apache server certificates, this field is labeled as Key File Location.*Certificate File Name Note: This field is displayed only when Category = Cloud.Enter the certificate file name.*Key vault Note: This field is displayed only when Category = Cloud, Vendor = Azure, and Service name = Key Vault (Azure).*Service Note: This field is displayed when Category = Server and Vendor = Microsoft Server.This dropdown list is populated based on the Device selected.From the options in the dropdown list, select the service.
*Exchange Server Note: This field is displayed when Category = Server and Vendor = Microsoft Server.From the dropdown list, select the name of the MS Exchange server for which the certificate is being enrolled. -
For the EJBCA certificate authority, enter/select the vendor
details.
Table 49. Field descriptions for the EJBCA Vendor Specific Details section Field Description * End Entity Profile Name From the dropdown list, select the end entity profile name. End entity user name Enter the name of the end user entity. * Issuer Common Name From the dropdown list, select the issuer common name. *Certificate Profile Name From the dropdown list, select the certificate profile name. *: Mandatory fields -
Enter/Select the CSR Parameters.
Table 50. Field descriptions for the CSR Parameters section Field Description *Common Name The common name is one of the key values of Certificate Signing Request (CSR) to be present in the certificate. For example, <appviewx>. No special characters allowed except en dash (_) and hyphen (-).
*Common Name Indicator Important: See note.This field is displayed when the selected CA Account is DigiCert and Certificate Type is one of the following:- Secure Email for Business
- Digital Signature
- Premium
For the common name indicator, from the dropdown list, select one of the following:
- First Name and Last Name
- Pseudonym
- Email (applicable only for the Secure Email for Business certificate type)
*First Name This field is displayed when: - Common Name Indicator = First Name and Last Name
- Common Name Indicator = Email and Indicator Type = First Name and Last Name
Enter the verified first name of the individual subject.
For Common Name Indicator = First Name and Last Name
A combination of the first name and last name will be used to derive the certificate's common name, which will be displayed in the certificate's Common Name field or the Subject DN (in the certificate details that can be accessed from the holistic view).For Common Name Indicator = Email and Indicator Type = First Name and Last Name
The first and last name will be appended as mandatory additional information to the Subject Alternative Name.*Last Name This field is displayed when: - Common Name Indicator = First Name and Last Name
- Common Name Indicator = Email and Indicator Type = First Name and Last Name
Enter the verified last name of the individual subject.
For Common Name Indicator = First Name and Last Name
A combination of the first name and last name will be used to derive the certificate's common name, which will be displayed in the certificate's Common Name field or the Subject DN (in the certificate details that can be accessed from the holistic view).For Common Name Indicator = Email and Indicator Type = First Name and Last Name
The first and last name will be appended as mandatory additional information to the Subject Alternative Name.*Pseudonym This field is displayed when: - Common Name Indicator = Pseudonym
- Common Name Indicator = Email and Indicator Type = Pseudonym
Enter the pseudonym of the individual subject. A pseudonym is a fictitious name assumed for a particular person.
For Common Name Indicator = Pseudonym
The entered pseudonym will be displayed in the certificate's Common Name field or the Subject DN (in the certificate details that can be accessed from trhe holistic view).For Common Name Indicator = Email and Indicator Type = Pseudonym
The pseudonym will be appended as mandatory additional information to the Subject Alternative Name.*Indicator Type This field is displayed when Certificate Type = Secure Email for Business and Common Name Indicator = Email. In this case, the issuer's email address, as specified in the CSR parameters, is used to derive the common name.
For Common Name Indicator = Email, it is mandatory to include additional information in the form of the first name and last name or the pseudonym, which will be appended to the Subject Alternative Name.
From the following options, select the required indicator type to be used as mandatory information along with the email:- First Name and Last
Name
The First Name and Last Name fields are displayed.
- Pseudonym
The Pseudonym field is displayed.
Subject Alternative Name You can see the count of subject alternative names (SAN) available for a certificate in the CSR parameter section, inventory grid, and CA connector page. Select the subject alternative subject name from the dropdown list.
The possible options are,
- Select all
- DNS
- IP Address.
Note:- Multiple values must be separated by a comma.
- The cumulative count SANs appears in the certificate property pop-up window from the holistic view.
*Organization The organization name is one of the CSR parameters to be present in the certificate. This field will be auto-filled and editable based on the configuration in the selected group’s policy. Organization Unit Organization Unit name is one of the CSR parameters to be present in the certificate. This field will be auto-filled and editable based on the configuration in the selected group’s policy. Locality The locality name is one of the CSR parameters to be present in the certificate. This field will be auto-filled and editable based on the configuration in the selected group’s policy. State The state name is one of the CSR parameters to be present in the certificate. This field will be auto-filled and editable based on the configuration in the selected group’s policy. *Country Country name is one of the CSR parameters to be present in the certificate. This field will be auto-filled and editable based on configuration. It must be a 2-letter country code (for example, US, and so on). Email Address The email contact details of the person responsible for maintaining the certificate. Enter the valid e-mail address. Except for SwissSign, this field is mandatory or optional based on the value selected for the Email Address mandatory for Client Certificate field in the corresponding CA policy.
*Order Validity Enter the number in this field and select the entered validity list to be in Days, Months, and Years from the dropdown list. The Order Validity for the following DigiCert S/MIME certificate types cannot exceed 2 years:- Secure Email for Business
- Digital Signature
- Premium
Note: As per revised security regulations for DigiCert S/MIME certificates, the maximum lifespan of the the above listed certificate types is two years.Challenge Password Challenge password is one of the CSR parameters to be present in the certificate. Password must contain at least one alphabet (uppercase and lowercase), one number, and one special character. Confirm Password Reenter the same password to confirm that is entered in the Challenge Password field. *Hash Function The Hash function with which the CSR has to be signed. Any information specific to any CA or vendor has to be covered in the Note section. This field will be auto-filled and editable based on the configuration in the selected group’s policy. Note: For Certificate Authority = HydrantID, irrespective of the hash function selected, by default, the CA returns a certificate with SHA256. Therefore, admins must restrict users from creating a certificate with a hash function other than SHA256. To accomplish this, create policy with a single hash value (SHA256).*Key Type From the dropdown list, select the cryptogrpahic algorithm that will be used for generating the certificate's key pair. The dropdown list is populated based on the CA policy configured for the selected CA.
*Bit Length From the dropdown list, select the required key size (in bits). The dropdown list is populated based on the CA policy configured for the selected CA.
*ECDSA curve For Key Type = EC, from the dropdown list, select the elliptic curve that will be used to create the public and private key pairs. *: Mandatory fields -
In the Attachments section, upload any additional documents that are
relevant to the enrollment of the certificate (for example, approval
emails).
Table 51. Field descriptions for the Attachments section Field Description Name Enter the alternate name for the document to be uploaded. Comments Enter the comments in this field. Note: Character limit: 2000 charactersUpload File Click the Upload button to select the file. - Other than the CSR fields, you can add organization-specific values along with CSR. These values will not be part of the certificate but will be available in the AppViewX inventory. For example, cost center. Inventory can be filtered based on these attributes as well. In the Certificate Attributes can be added under Administration > certificate attributes, it will be reflected on the enrollment page:
-
Enter the relevant details in the Generic Fields. These are default
fields for maintaining the IP address and device information, if required.
Table 52. Field descriptions for the Generic Fields Field Description Device Name Enter the name of the device. Application IP Address Enter the IP address of the application. Tracking ID A free-form business alpha-numerical identifier, included in the audit logs, that may be used to correlate audit logentries (typically enrollment and revocation events) Certificate holder Email Note: For the IDnomic CA, this field is displayed only when the selected CA account has been configured using a Registration Authority (RA).An email address that may be used to send notifications to certificate holder depending on the notification policies configured for the requested workflowFirst name Note: For the IDnomic CA, this field is displayed only when the selected CA account has been configured using a Registration Authority (RA).First name (as a metadata) associated with the certificate to be enrolledLast name Note: For the IDnomic CA, this field is displayed only when the selected CA account has been configured using a Registration Authority (RA).Last name (as a metadata) associated with the certificate to be enrolledOrganization Note: For the IDnomic CA, this field is displayed only when the selected CA account has been configured using a Registration Authority (RA).Organization name (as a metadata) associated with the certificate to be enrolledComment Note: For the IDnomic CA, this field is displayed only when the selected CA account has been configured using a Registration Authority (RA).Additional information (as a metadata) associated with the certificate to be enrolledUUID Note: For the IDnomic CA, this field is displayed only when the selected CA account has been configured using a Registration Authority (RA).Universal Unique Identifier, or UUID, (as a metadata) associated with the certificate to be enrolled -
In the Vendor-Specific Details section, enter the
CA-specific details. Some of the CAs will expect additional details other than
CSR parameters as meta data for their operational purposes. Details common to
all CAs will be taken from the AppViewX user information of the logged in
user.
Table 53. Field descriptions for the common vendor specific details Field Description Certificate ID The Certificate ID is auto-populated based on the value entered in the Common Name field (in the CSR Parameters section). - The Certificate ID can be modified by the user.
- If the user edits the Certificate ID, any change to the Common Name will not reflect in the Certificate ID.
- If the user deletes the Certificate ID, the value of the Certificate ID field is set to the Common Name suffixed with the timestamp.
Table 54. Field descriptions for the DigiCert CA vendor specific details Field Description *Server Type From the dropdown list, select the server on which the application that requires the requested certificate is hosted. *Payment Method From the dropdown list, select one from the following payment methods: - Bill To Account Balance: This
option allows you to pay for the DigiCert
certificate using the available balance in your
DigiCert account.Note: Ensure that the option to bill to account balance is enabled for the account and the account has sufficient balance.
- Bill To Default Credit Card:
This option will charge the cost of the DigiCert
certificate to the credit card set as the default
payment method in your DigiCert account.Note: Ensure that a credit card is configured as the default payment method for your account.
Additional Email Enter email addresses that will receive notifications for renewals, reissues, and duplicates for the specified order. Renewal Message Enter a custom message that will be sent with the renewal notifications. Notes Enter a custom note that will be sent with the order. *: Mandatory fields Table 55. Field descriptions for the Hydrant ID CA vendor specific details Field Description Expiry Emails Enter a comma-separated list of email addresses that will receive the certificate expiry notification from HydrantID. Note: HydrantID CA does not accept updates to these email addresses during the renewal process.Table 56. Field descriptions for the Nexus CA vendor specific details Field Description Procedures The Procedures dropdown list will display only the procedures mapped to the server and the default procedure. From the dropdown list, select the required procedure. -
Click Add.
Once the details are added, you will be redirected to a page where the CSR and CA details are added as a connector. This page is called the holistic view and from here, any action on the certificate can be performed including provisioning the certificate to a server.
-
On the holistic view, click the Submit button to trigger
the request.
The submit action is triggered and the Submit dialog box is displayed.
-
Enter your comments in the text field and click Yes.
If the approval required option is enabled in the CA policy, the request is moved to the Approve and Implementation stages.
-
Click Approve to proceed.
The Approve dialog box is displayed.
-
Enter your comments in the text field.
Note: If the workflow request has to be approved automatically in the future, click the Schedule later button .
-
Click Yes.
Once the approval process is completed, the Implement option is displayed in the holistic view.
-
Click Implement.
The Implement dialog box is displayed.
-
Enter your comments in the text field.
If the workflow request has to be implemented automatically in the future, click Schedule later .
-
Click Yes.
CSR Submission to CA is in progress.Once the CSR submission is successful, the request state will be changed to Submit certificate - retrieval in progress state.
If the enrollment request is compliant with conditions defined and auto-approval enabled in the targeted CA, the certificate will be fetched in a few seconds.
If auto-approval disabled in the targeted CA, you will have to be logged into the CA and approve the request.
Once the certificate is issued successfully, the certificate will be retrieved into AppViewX. You can now push the enrolled certificate(s) to the required endpoint.
Pushing Certificates to AWS Resources with ACM Integration
Adding an Application Connector for AWS Resources with ACM Integration
-
On the certificate holistic view, click Add
Connector.
-
Enter/Select the General Information for the connector.
Table 57. Field descriptions for the connector General Information Field Description *Category From the dropdown list, select Cloud. *Vendor From the dropdown list, select AWS. Service Types From the dropdown list, ACM. *Connector Name Enter a name for this connector, to be able to identify it later.Tip: AppViewX recommends naming connectors according to use cases so they are easily distinguishable.Description Enter any additional details you want to record for this connector. Based on the information entered here, the SSL templates section is populated with the list of available AWS cloud devices already onboarded in AppViewX. -
To select the device(s) to which the certificate will be pushed, under
SSL templates, from the list of Available Devices, for
the required device(s), click
 .
The Selected devices list is updated automatically.
.
The Selected devices list is updated automatically. -
Enter/Select the Certificate Details.
Table 58. Field descriptions for the Certificate Details Field Description *Certificate Type From the dropdown list, select the file type of the certificate to be pushed. Certificate ARN This field is displayed when Certificate Location = ACM. The ARN (Amazon Resource Name) is a unique identifier assigned to each certificate that is managed by ACM. It is used to reference the certificate in API calls, policies, and so on.
In this field, enter the ARN of the certificate to be pushed.
*Certificate File Name In this field, enter the file name of the certificate to be pushed. The file extension is auto-populated based on the Certificate Type selected. Push Root and Intermediate Certificates To push the root and intermediate certificates, along with the end certificate, select this checkbox. For AWS, this field is enabled by default and is non-editable.
-
Enter the Certificate Tags.
A certificate tag is a label that you can assign to a certificate. To capture any details relevant to a certificate, you can associate certificate tags with a certificate. Certificate tags are key-value pair attributes that you can pass when you assume an IAM role or federate a user in AWS STS. These tags will be pushed along with the certificate to the endpoints. On certificate discovery, the tags associated with the certificate will be populated in the certificate inventory.
To enter the certificate tags:
-
Enter/Select the Push Details.
Table 59. Field descriptions for the Push Details Field Description *Script Location Script files are commonly used to perform certain tasks required to be completed before and/or after a certificate is pushed to the target system. The script to be run before the certificate is pushed is called a pre-push script and the script to be run after the push is called a post-push script.
From the following options, select the location of the script file(s):
- In AppViewX
- In Device
Pre - Push Script File Name Enter the file name of the pre-push script. Post - Push Script File Name Enter the file name of the post push script.
Push Automatically To automatically push the certificate after it is renewed/reissued to the target system, enable this checkbox. Note: The auto push feature for a certificate works only if enabled for the certificate application connector as well the associated certificate group. To enable this feature at the certificate group level, refer the instructions here. -
Click Save.
The connector is displayed on the certificate holistic view.
Pushing a Server Certificate
-
Go to (Menu) > CERT+ > CERTIFICATE ACTION >
Push to Device > Server.
The Server Certificate page is displayed.
-
To push a certificate, under Common Name, click the required certificate.
The certificate topology view is displayed.
-
Click Push to Device. The Push to Device option will be shown if
the app connector is already added to the certificate otherwise add the app connector and
then proceed.
Note:
- Only server certificates that include their private keys will be eligible for push
operations to cloud connectors.
After push, during subsequent discovery, when the CC machine is healthy and discovery returns the pushed certificate, the pushed AppConnector should be in Sync status, else the associated AppConnector must be transitioned to an Out of Sync status.
If a new certificate is pushed to the gateway while the old certificate for the AppConnector still exists in the inventory, then after the next discovery, the AppConnector must move to Out of Sync status for the old certificate.
- Endpoint CSR generation is not supported for cloud connectors.
- The Push to Device option is displayed only after an app connector is added to certificate.
The Confirmation dialog box is displayed. - Only server certificates that include their private keys will be eligible for push
operations to cloud connectors.
- Enter your comments, if required, in the text field.
-
Click OK.
- The approval process is triggered. The current flow is based on the default policy of two-level approvals.
- A request ID and work order ID are generated automatically and the work order status is displayed alongside the connector in the certificate topology view.
- To approve the push request, from the certificate topology view, click Approve.
-
In the Confirmation dialog box:
- In the Manual Implementation field, to choose the mode of implementation, use the On/Off toggle.
- If you select Off, set the date and time to schedule the certificate push.
- Enter your comments in the text field and click Yes.
The work order status displayed beside the connector updates to Push-Review In Progress. - To implement the push request, from the certificate topology view, click Implement.
-
In the Confirmation dialog box:
- In the Manual Implementation field, to choose the mode of implementation, use the On/Off toggle.
- If you select Off, set the date and time to schedule the certificate push.
- Enter your comments in the text field and click Yes.
The push action is triggered. After the push action is completed, the status updates to Completed.To refresh the certificate topology view, from the top-right corner of the screen, click Refresh.An automatic HTTPS-based verification job is run at regular intervals to validate that certificates are correctly installed after the push operations triggered between the intervals; the system compares served certificates with the expected ones across all associated IP:ports. The data gathered by this job is used to create the Push Validation Report that highlights the proportion of successful versus failed push operations, providing a quick view of overall push reliability.
Pushing a Client Certificate
-
Go to (Menu) > CERT+ > CERTIFICATE ACTION >
Push to Device > Client.
The Client Certificate page is displayed.
-
To push a certificate, under Common Name, double click the required
certificate.
The certificate topology view is displayed.
-
Click Push to Device. The Push to Device option will be shown if
the app connector is already added to the certificate otherwise add the app connector and
then proceed.
Note: The Push to Device option is displayed only after an app connector is added to certificate.The Confirmation dialog box is displayed.
- Enter your comments, if required, in the text field.
-
Click OK.
- The approval process is triggered. The current flow is based on the default policy of two-level approvals.
- A request ID and work order ID are generated automatically and the work order status is displayed alongside the connector in the certificate topology view.
- To approve the push request, from the certificate topology view, click Approve.
-
In the Confirmation dialog box:
- In the Manual Implementation field, to choose the mode of implementation, use the On/Off toggle.
- If you select Off, set the date and time to schedule the certificate push.
- Enter your comments in the text field and click Yes.
The work order status displayed beside the connector updates to Push-Review In Progress. - To implement the push request, from the certificate topology view, click Implement.
-
In the Confirmation dialog box:
- In the Manual Implementation field, to choose the mode of implementation, use the On/Off toggle.
- If you select Off, set the date and time to schedule the certificate push.
- Enter your comments in the text field and click Yes.
The push action is triggered. After the push action is completed, the status updates to Completed.An automatic HTTPS-based verification job is run at regular intervals to validate that certificates are correctly installed after the push operations triggered between the intervals; the system compares served certificates with the expected ones across all associated IP:ports. The data gathered by this cron job is used to update the Push Validation Report that highlights the proportion of successful versus failed push operations, providing a quick view of overall push reliability.
Enabling Auto Regeneration of Certificates
Enabling Auto Regeneration for a Certificate Group
You can enable and configure the auto regeneration feature at the certificate group level, which will apply to all certificates assigned to that group.
For details and instructions to enable auto regeneration at the certificate group level, click here.
Enabling Auto Regeneration at the Certificate Level
Enabling Auto Regenerate for Certificate Enrollment
For details and instructions to enable auto regeneration at the time of server certificate enrollment, click here.
Enabling Auto Regenerate for Discovered Certificates
-
Go to Menu > CERT+ >
Certificate Inventory >
Server.
The Server Certificate inventory is displayed.
-
From the inventory, for the certificate you want to enable auto push
for, click the common name.
The holistic view of the selected certificate is displayed.
-
For an existing CA connector for the certificate, hover over
 .
.
-
From the menu displayed, click Edit.
The certificate details are displayed.
- Under CA Details, turn on the Regenerate Automatically toggle.
- In the Start Regenerating field, enter the number of days before expiration when the certificate should be regenerated.
-
Click Update.
The holistic view of the selected certificate is displayed.Note: For the auto regenerate process to take effect, set the auto push in the application connector. Refer to the Enabling Auto Push section.
Enabling Auto Push of Certificates to Endpoints
To enable auto push of certificates, you need to enable the corresponding option for the group to which the certificate in question belongs, as well as the connector created for that certificate.
-
To enable auto push for the certificate group:
-
To enable auto push for the certificate connector:
-
From the holistic view, for an existing application connector for the
certificate, hover over
 (More) icon.
To add an application connector, follow the instructions given here.
(More) icon.
To add an application connector, follow the instructions given here.
-
From the holistic view, for an existing application connector for the
certificate, hover over
Troubleshooting for AWS ACM
Overview
Supported Web Browsers
| Browser | Version | Notes |
|---|---|---|
| Firefox | Till latest (Version 84.0.4147.135) | NA |
| Chrome | Till latest (Version 80.0) | NA |
| IE | Limited support in 9, Full support from 10+ | No support for IE9 post-AppViewX Version 11.0 |
| Safari |
Till latest (Windows - Version 5.1.7, macOS - Version 13.1.2) |
From AppViewX Version 11.1 |
| Opera | Till latest (Version 70) | From AppViewX Version 11.1 |
Supported Devices
| Device | OS | Resolution |
|---|---|---|
| Desktop | Windows | 1024 X 768 onwards, 1366x768, 1920x1080, Higher |
| Desktop | Linux | 1024 X 768 onwards, 1366x768, 1920x1080, Higher |
| Desktop | Mac | 1024 X 768 onwards, 1366x768, 1920x1080, Higher |
| iPad | iOS | 1024 X 768 |
Issues in Server Addition using AppViewX GUI
| Error Message | Possible Cause | Possible Solution |
|---|---|---|
| Please provide valid credentials | Provided credential is invalid. |
|
| Provide valid account name | Account name can be duplicate or not as per standard. |
|
| Details Incorrect | Provide mandatory fields. |
Enter mandatory fields like
|
Issues in Fetch Regions
| Error Message | Possible Cause | Possible Solution |
|---|---|---|
| Please provide valid credentials | The provided credential is invalid. |
|
Issues in Discovery in ACM
| Error Message | Possible Cause | Possible Solution |
|---|---|---|
| Please provide information as required |
|
|
| Please select a device | No device is selected in the Discover By section. | Select at least one device from which to discover certificates. |
Issues in Push and Rollback
| Error Message | Possible Cause | Possible Solution |
|---|---|---|
| Unable to initiate request. |
|
|
| Unable to initiate request, template is in disabled state | Given workflow is not in enabled state | Enable the push/rollback workflow from the Workflow section. |
| User is not authorized | Userdoes not have required permissions to push to the device. | Retry after getting the access for required action. |
| Private key content is unavailable. | Private key content is not available for the certificate. | Private key is mandatory for the certificate to be pushed. |
| Application connector(s) not found | Application connector info was not found. | Provide the correct connectorId if not pushing using AppViewX UI. |
| Request associated with the application connector is in progress | Previous work order is in progress and not completed. | Initiate this request after the previous work order is finished. |
| Push not triggered or succeeded or No existing data available for backup process. | Rollback couldn’t proceed because push was not successful. | Only successfully pushed certificates can be rolled back. |
| Certificate not found. | Pushing to device when certificate is unavailable, i.e, in a new state. | Push to device after certificate has been retrieved from CA. |
| Provided certificate is not a valid self signed. Please provide either a valid self-signed certificate or certificate chain | Provided certificate is not a valid certificate. | Push a valid certificate. |
| Push failed as there exists another certificate with commonName | Certificate with same common name is present in certificate manager | Check whether it is a duplicate certificate and remove the invalid one. |