Configuring AppViewX CMP Server
Prerequisites
Onprem
- Make sure that the following pod is running in the cluster by using the
command:
kubectl get pods -A | grep cmp
SaaS
- Navigate to the installation directory of the cloud connector software.
- Run
cd deps/tools - Run
./k3s kubectl get svc -A | grep httpsNote: It should have the avx-mid-server-gateway-https under namespace cc.
Enabling CMP Services
- Log onto the AppViewX installer node.
- Go to
</installation_folder/appviewx_kubernetes/scripts>folder. - Add the
avx-vendor-cert-cmp-agentinENABLED_PLUGINSin theappviewx.conffile. - Specify the datacenter (DC) where the gateway must be deployed:
avx_vendor_cert_cmp_agent=<dc name>
For SaaS
- Navigate to the installation directory of the cloud connector software.
- Run:
cc_installed_path/deps/properties - Open appviewx.properties and set the following
fields as true:
- AUTO_ENROLL_ENABLED=true
- ENABLE_MTLS_PROFILE=true
- ENABLE_HTTP_PROFILE=true
- ENABLE_HTTPS_PROFILE=true
- Scale down the avx-mid-server-platform pod.
- Restart the avx-mid-server-starter pod.Note: Ensure that avx-mid-server-gateway-https is present under namespace cc.

Configuring AppViewX CMP Server
-
Go to
 (Menu) > CERT+ >
Administration > Auto
Enrollment > CMP.
(Menu) > CERT+ >
Administration > Auto
Enrollment > CMP.
- Click the Configure Now button or +Add icon from the middle or top-right of the page respectively.
-
Configure the Agent Details as follows:
Table 1. Agent Details - Field Description Table Field Description *Name Unique name to identify the agent setting. No special characters other than ‘.’, ‘-’,’_’ are allowed. Name should not start with special characters.
*Host For Onprem - Enter the FQDN address of the AppViewX node gateway. It must be the same as the web URL's hostname.
For SaaS
Using On-premises CC:
- Without load balancer: Hostname must be the hostname of the cloud connector where the auto-enrollment gateway is running.
- With load balancer: Hostname must be the hostname of the load balancer.
*CMP URL Select either HTTP or HTTPS. Based on the selection of this field, the CMP endpoints will be configured with HTTP or HTTPS URL. The port information will be dynamically updated based on this selection. *Port For Onprem - Port for HTTP URL - 30022
- Port for HTTPS URL - 31443
For SaaS
Using On-premises CC
- Without load balancer: By default, it is port 30022 (HTTP URL) and 30020 (HTTPS URL). Leave it as is.
- With load balancer: Port must be the listening port of the load balancer.
Note:- It is recommended to set the listening port as 30020, which is the same as AppViewX.
- If the load balancer's listening port is different from 30020, then update the respective port.
Note: Fields with the red asterisk (*) symbol indicate mandatory fields. -
Configure the Client Authentication details as
follows:
Table 2. Client Authentication - Field Description Table Field Description *Authentication Mode This field has two values - MAC
- Certificate Based Authentication
*Challenge Password This field is enabled when Authentication Mode = MAC. Enter the password which is used to authenticate the CMP packet. *Issuer Certificate This field appears when Authentication Mode = Certificate Based Authentication. Enter the issuer certificate used to authenticate the client certificate, *RA Certificate This field appears when Authentication Mode = Certificate Based Authentication. Enter the common name/ serial number of the RA certificate, Note: Fields with the red asterisk (*) symbol indicate mandatory fields.Load balancer configuration
It is recommended to set the listening port as 30020, which is the same as AppViewX.
Health check URL for load balancer:- HTTP method: GET
- Healthcheck API: https://<FQDN>:30020/
- Hostname: Hostname of cloud connector enabled with the HTTPS gateway.
- Expected response code: 404. As the load balancer is accessing the URL without any parameters, it will receive a 404 response.
-
Configure the CA Accounts details as follows:
The fields for CA Accounts section are as follows:
Table 3. CA Accounts - Field Description Table Field Description *Certificate Group Select a specific group under which certificate needs to be enrolled. *Certificate Category Select a specific certificate type (Server / Client) to be enrolled. *Select CA Select the required CA from the available options: - AppViewX
- AppViewX PKIaaS
- AppViewX PKIaaS Native
- Amazon Private CA
- DigiCert
- DigiCert One
- EJBCA
- Entrust
- Entrust MPKI
- Globalsign
- Globalsign Atlas
- Globalsign MSSL
- HydrantID
- IDnomic
- Microsoft Enterprise
- Microsoft Standalone
- Nexus
- OpenTrust
- Sectigo (Comodo Certificate Manager)
- SwissSign
Note: The Vendor Specific Details and Custom Attributes section are displayed for some of the CAs as follows:- Digicert
- EJBCA
- Entrust
- Entrust MPKI
- GlobalSign MSSL
- MS Enterprise
- Nexus
The certificate will be enrolled under the selected CA.
Note: Fields with the red asterisk (*) symbol indicate mandatory fields.When AppViewX is selected as CA, the fields for AppViewX CA are as follows:Table 4. Details for AppViewX CA - Field Description Table Field Description *CA Account Select the specific CA Account associated with the selected CA to be used for certificate creation operations. *Certificate Profile Type 3 or more letters of the certificate keywords after which a list of server certificates issued from the above selected CA account will be displayed, one certificate can be selected for further communications with CMP client machine. *CA Connector Name Name of the CA connector after the certificate is enrolled. *Certificate Validity Validity of the certificate to be enrolled. Note: Fields with the red asterisk (*) symbol indicate mandatory fields.When AppViewX PKIaaS Native is selected as CA. The fields for AppViewX PKIaaS Native are as follows:
Table 5. Details for AppViewX PKIaaS Native - Field Description Table Fields Description *CA Account Select a specific CA Account from the selected CA which is to be used for certificate creation operations. Template Name Select a template name from the dropdown list. *Issuer Name Select an issuer name to issue the certificate. *CA Connector Name Name of the CA connector after the certificate is being enrolled. *Certificate Validity Validity of the certificate to be enrolled. Note: For some CAs, the validity available in their respective CA portal is considered despite the specified certificate validity.Note: Fields with the red asterisk (*) symbol indicate mandatory fields.When Amazon Private CA is selected as CA, the fields for Amazon Private CA are as follows:Table 6. Details for Amazon Private CA - Field Description Table Field Description *CA Account Select the specific CA Account associated with the selected CA to be used for certificate creation operations. *Region Select a valid region associated with the CA account. The dropdown is populated with the first available value. Select an appropriate value as required. *Issuer Select a valid issuer associated with the CA account. The dropdown is populated with the first available value. Select an appropriate value as required. *Signature Algorithm Select a valid issuer associated with the CA account. The dropdown is populated with the first available value from the group's associated policy. Select an appropriate value as required. *CA Connector Name Name of the CA connector after the certificate is enrolled. *Certificate Validity Validity of the certificate to be enrolled. Note: Fields with the red asterisk (*) symbol indicate mandatory fields.When DigiCert is selected as CA, the fields for DigiCert CA are as follows:Table 7. Details for DigiCert CA - Field Description Table Field Description *CA Account Select the specific CA Account associated with the selected CA to be used for certificate creation operations. *Division Select the division associated with the CA account. *Certificate Type Select certificate type to issue the certificate. *CA Connector Name Name of the CA connector after the certificate is enrolled. *Order Validity Validity of the certificate to be enrolled. Note: Fields with the red asterisk (*) symbol indicate mandatory fields.If the selected CA is DigiCert, a separate section Vendor Specific Details is displayed after the CA Accounts section.The fields for Vendor specific details are as follows:Table 8. Vendor Specific Details for DigiCert CA - Field Description Table Field Description *Server Type Select a server type. *Payment Method Select a payment method. The possible options are: - Bill To Account Balance - Pay with account balance. Returns an error if this option is disabled for the account or if the account has insufficient fund.
- Bill To Default Credit Card - Pay with account's default credit card. Returns an error if no default credit card is configured for the account.
Note: Fields with the red asterisk (*) symbol indicate mandatory fields.When DigiCert One is selected as CA. The fields for DigiCert One CA are as follows:
Table 9. Details for DigiCert One CA - Field Description Table Fields Description *CA Account A unique name to identify the CA setting. Note: No special characters other than ‘.’, ‘-’,’_’ are allowed. Names should not start with special characters.*Purpose/Usage Certificate Type for which CLM actions will be enabled. For example, Server or Client. Proxy Required Enable this field if the CA communication needs to happen via proxy. The proxy details configured in general settings will be used for communication. Data Center (AppViewX's CA agent) Select the data center for CA communication, with the CC node being the recommended option. The selected node will handle the communication through the chosen CC node. CA Configuration *Base URL This URL will contain the hostname of the DigiCert CA instance and used for constructing the API requests. *Authentication method By default, API Token is selected. *API Token Enter the API token to authorize the communication between AppViewX and DigiCert One. Allow Seat ID during enrollment Enabling this field displays a Seat ID field in the Auto enrollment settings that you can use instead of the CA settings. *Seat ID Unique value assigned to identify an entity in the DigiCert One account.You can provide multiple ID separated by a comma. They can be used for enrollment, renewal, and regeneration. Use DigiCert One to switch certificates from DigiCert MPKI Enable this field to automatically switch your DigiCert MPKI certificates to DigiCert One with auto-enrollment/auto-regenerate. Note: Fields with the red asterisk (*) symbol indicate mandatory fields.When EJBCA is selected as CA, the fields for EJBCA CA are as follows:Table 10. Details for EJBCA CA - Field Description Table Field Description *CA Account Select the specific CA Account associated with the selected CA to be used for certificate creation operations. *CA Connector Name Name of the CA connector after the certificate is enrolled. Note: Fields with the red asterisk (*) symbol indicate mandatory fields.If the selected CA is EJBCA, a separate section Vendor specific details is displayed after the CA Accounts section.The fields for Vendor specific details are as follows:Table 11. Vendor Specific Details for EJBCA CA - Field Description Table Field Description *End Entity Profile Name Select a profile of an end entity. End entity user name Enter the user name for the end entity. *Issuer Common Name Select a common name of an issuer. *Certificate Profile Name Select a profile name of certificate. Note: Fields with the red asterisk (*) symbol indicate mandatory fields.When Entrust is selected as CA, The fields for Entrust CA are as follows:Table 12. Details for Entrust CA - Field Description Table Field Description *CA Account Select a specific CA Account from the selected CA which is to be used for certificate creation operations. *Certificate Type Select a valid cert type associated with the CA account. If the Certificate Category radio button is selected to Server, the dropdown list is populated with the first available value. Select an appropriate value as required.
If the Certificate Category radio button is selected to Client, the dropdown list is populated with ‘None’ as the default value.
*CA Connector Name Name of the CA connector after the certificate is enrolled. *Certificate Validity Validity of the certificate to be enrolled (in days/months/years). Note: Fields with the red asterisk (*) symbol indicate mandatory fields.If the selected CA is Entrust, a separate section displaying Vendor specific details is displayed after the CA Accounts section.Note: Based on the Entrust ECS account configuration Custom Attributes section may also be displayed.Table 13. Vendor Specific Details for Entrust CA - Field Description Table Field Description Additional Emails Enter the valid email address in the field. Requester Name Enter the demo details Requester Email Enter a valid eamil id Requester Phone Enter the 10-digit phone number. Note: Fields with the red asterisk (*) symbol indicate mandatory fields.When Entrust MPKI is selected as CA, the fields for Entrust MPKI CA are as follows:Table 14. Details for Entrust MPKI CA - Field Description Table Field Description *CA Account Select a specific CA Account from the selected CA which is to be used for certificate creation operations. *CA Connector Name Name of the CA connector after the certificate is enrolled. Note: Fields with the red asterisk (*) symbol indicate mandatory fields.If the selected CA is Entrust MPKI, a separate section Vendor Specific Details is displayed after the CA Accounts section. The following table provides the field description for Vendor specific details:Table 15. Vendor Specific Details for Entrust MPKI CA - Field Description Table Field Description *CA Name Select a CA name from the dropdown list. *Cert Profiles Select a cert profile from the dropdown list. Note: Fields with the red asterisk (*) symbol indicate mandatory fields.When GlobalSign is selected as CA.
The fields for GlobalSign CA are as follows:Table 16. Details for GlobalSign CA - Field Description Table Field Description *CA Account Select a specific CA Account from the selected CA which is to be used for certificate creation operations. *Certificate Type Select the specific Certificate Type. The values are fetched from the CA Settings configuration. *CA Connector Name Name of the CA connector after the certificate is enrolled. *Certificate Validity Validity of the certificate to be enrolled. (in days/months/years) Note: Fields with the red asterisk (*) symbol indicate mandatory fields.The following field is displayed in the Vendor Specific Details section as per the selected CA, if the Select CA =GlobalSign, and the Certificate type = Alpha SSL or Domain SSLTable 17. Vendor Specific Details for GlobalSign CA - Field Description Table Field Description *Domain Admin Email Select the email id to receive the approval requests from GlobalSign CA. Note: Fields with the red asterisk (*) symbol indicate mandatory fields.The following fields are displayed in the Vendor Specific Details section as per the selected CA, if the Select CA =GlobalSign, and the Certificate type = Extended SSLTable 18. Vendor Specific Details for GlobalSign CA - Field Description Table Field Description *Incorporating Agency Reg. No Enter the Registration number of the incorporating agency. *Designation Enter the designation of the requester. *Business Category Select the type of business (private org., government entity, or business entity Note: Fields with the red asterisk (*) symbol indicate mandatory fields.The following field is displayed in the Point of Contact section as per the selected CA if the Select CA =GlobalSign, and the Certificate type = Organization SSL . The CA mandates the point of contact information (First Name) for traceability. All auto-enrollment requests via this endpoint are registered with the point of contact information entered here.
When GlobalSign Atlas is selected as CA
The fields for GlobalSign Atlas CA are as follows:Table 19. Details for GlobalSign Atlas CA - Field Description Table Field Description *Select CA Select a specific CA Account from the selected CA which is to be used for certificate creation operations. *API Credential Friendly name Select a CA Account to communicate with during the certificate enrollment actions. *Certificate Profile Select the certificate Profile from the dropdown list. *CA Certificate Select the specific issuer certificate, that will be used for signing CSR by the certificate authority. Certs available in the root or intermediate cert inventory are displayed. *CA Connector Name Name of the CA connector after the certificate is enrolled. *Certificate Validity Validity of the certificate to be enrolled. (in days/months/years) Note: Fields with the red asterisk (*) symbol indicate mandatory fields.A Generic Fields section is also displayed below the CA Accounts section. It contains the fields related to the CSR parameters based on the profile (API Credential Friendly name) selected. Only the Organization field is mandatory and is fetched from the selected profile. Rest of the fields are optional.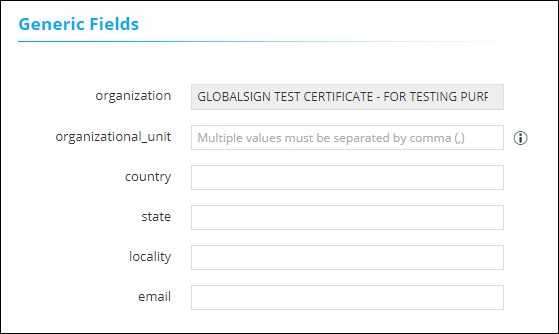
When GlobalSign MSSL is selected as CA.
The fields for GlobalSign MSSL CA are as follows:
Table 20. Details for GlobalSign MSSL CA - Field Description Table Field Description CA Account Select a specific CA Account from the selected CA which is to be used for certificate creation operations. Product Type Select the specific Certificate Type. The values are fetched from the CA Settings configuration.
CA Connector Name Name of the CA connector after the certificate is enrolled. Certificate Validity Validity of the certificate to be enrolled. (in days/months/years) Note: Fields with the red asterisk (*) symbol indicate mandatory fields.The following field is displayed in the Vendor Specific Details and Point of Contact section as per the selected CA: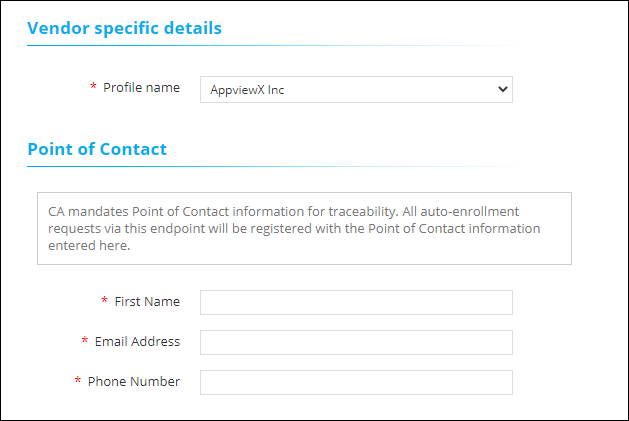
Table 21. Vendor Specific Details for GlobalSign MSSL CA - Field Description Table Field Description *Profile Select the Profile based on the configurations made in the Certificate Authority setting. Note: Fields with the red asterisk (*) symbol indicate mandatory fields.The following field is displayed in the Point of Contact section as per the selected CA. The CA mandates the point of contact information for traceability. All auto-enrollment requests via this endpoint are registered with the point of contact information entered here.Table 22. Point of Contact Details for GlobalSign MSSL CA - Field Description Table Field Description *First Name Enter the first name. *Email Address Enter the valid email address. *Phone Number Enter the valid phone number. Note: Fields with the red asterisk (*) symbol indicate mandatory fields.When Google is selected as CA, the fields for Google CA are as follows:Table 23. Details for Google CA - Field Description Table Field Description *CA Account Select a specific CA Account from the selected CA which is to be used for certificate creation operations. *Certificate Profile Type 3 or more letters of the certificate keywords after which a list of server certificates issued from the above selected CA account will be displayed, one certificate can be selected for further communications with CMP client machine. *Issuer Location Select the issuer location associated with the CA account. *Issuer Name Select a issuer name to issue the certificate. Template Name Select a template name from the dropdown list. *CA Connector Name Name of the CA connector after the certificate is enrolled. *Certificate Validity Validity of the certificate to be enrolled (in days/months/years). Note: Fields with the red asterisk (*) symbol indicate mandatory fields.The fields for Vendor Specific details are as follows:
Field Description Certificate ID Enter the valid certificate id. When HydrantID is selected as CA, the fields for HydrantID CA are as follows:Table 24. Details for Lets HydrantID CA - Field Description Table Field Description *CA Account Select a specific CA Account from the selected CA which is to be used for certificate creation operations. *HydrantID Policy Select the policy associated with the CA Account to be used for certificate operations. *CA Connector Name Name of the CA connector after the certificate is enrolled. *Certificate Validity Validity of the certificate to be enrolled (in days/months/years). Note: Fields with the red asterisk (*) symbol indicate mandatory fields.When IDnomic is selected as CA, the fields for IDnomic CA are as follows:Table 25. Details for IDnomic CA - Field Description Table Field Description *CA Account Select a specific CA Account from the selected CA which is to be used for certificate creation operations. *Certificate Profile Select the certificate Profile from the dropdown list. *CA Connector Name Name of the CA connector after the certificate is enrolled. *Certificate Validity Validity of the certificate to be enrolled (in days/months/years). Note: Fields with the red asterisk (*) symbol indicate mandatory fields.When Microsoft Enterprise is selected as CA, the fields for Microsoft Enterprise CA are as follows:Table 26. Details for Microsoft Enterprise CA - Field Description Table Field Description *CA Account Select a specific CA Account from the selected CA which is to be used for certificate creation operations. *CA Connector Name Name of the CA connector after the certificate is enrolled. Note: Fields with the red asterisk (*) symbol indicate mandatory fields.If the selected CA is Microsoft Enterprise, a separate section displaying Vendor specific details is displayed after the CA Accounts section.Table 27. Vendor Specific Details - Field Description Table Field Description *Template Name Select the desired template name. This value is based on the policy setting and its group association. Note: Fields with the red asterisk (*) symbol indicate mandatory fields.When Microsoft Standalone is selected as CA, the fields for Microsoft Standalone CA are as follows:Table 28. Details for Microsoft Standalone CA - Field Description Table Field Description *CA Account Select the specific CA Account associated with the selected CA to be used for certificate creation operations. *CA Connector Name Name of the CA connector after the certificate is enrolled. Note: Fields with the red asterisk (*) symbol indicate mandatory fields.When Nexus is selected as CA.
The fields for Nexus CA are as follows:Table 29. Details for Nexus CA - Field Description Table Field Description *CA Account Select a specific CA Account from the selected CA which is to be used for certificate creation operations. *CA Connector Name Name of the CA connector after the certificate is enrolled. *Certificate Validity Validity of the certificate to be enrolled (in days/months/years). Note: Fields with the red asterisk (*) symbol indicate mandatory fields.The following field is displayed in the Vendor Specific Details section as per the selected CA:Table 30. Vendor Specific Details - Field Description Table Field Description *Procedure Select the Procedure based on the configurations made in the Certificate Authority Setting. Note: Fields with the red asterisk (*) symbol indicate mandatory fields.When OpenTrust is selected as CA.
The fields for OpenTrust CA are as follows:Table 31. Details for OpenTrust CA - Field Description Table Field Description *CA Account Select a specific CA Account from the selected CA which is to be used for certificate creation operations. *Certificate Management Profile Select one issuer certificate from the dropdown list. This issuer certificate will be used for signing the CSR by the certificate authority. Note: Only the issuer certificates available in the root or intermediate certificates inventory will be shown for selection.Zone Select the zone pertaining to the Certificate Management Profile *CA Connector Name Name of the CA connector after the certificate is enrolled. Note: Fields with the red asterisk (*) symbol indicate mandatory fields.When Sectigo (Comodo Certificate Manager) is selected as CA. The fields for Sectigo (Comodo Certificate Manager) CA are as follows:
Table 32. Details for Sectigo (Comodo Certificate Manager) CA - Field Description Table Fields Description *CA Account A unique name to identify the CA setting. Note: No special characters other than ‘.’, ‘-’,’_’ are allowed. Names should not start with special characters.
*Purpose/Usage Certificate Type for which CLM actions will be enabled. Example: Server and Client.
Proxy Required Enable this field if the CA communication needs to happen via Proxy. The proxy details configured in general settings will be used for communication. Data Center (AppViewX's CA agent) Select the data center through which the CA communication needs to happen. (CC node is recommended) i.e., whichever node is selected the communication will happen via that CC node. CA Configuration *Base URL This URL will contain the hostname of the Sectigo CA instance and used for constructing the API requests. *Login URI Provide the customer login URI for API authentication. *User Name Enter the Username of the Sectigo portal to communicate with the CA. *Password Enter the Password of the Sectigo portal to communicate with the CA. *Organization Id Enter the organization id used for the certificate lifecycle action. (You will find it in the Organization tab of the Sectigo portal) Note: Fields with the red asterisk (*) symbol indicate mandatory fields.When SwissSign is selected as CA, the fields for SwissSign CA are as follows:
Table 33. Details for SwissSign CA - Field Description Table Field Description *CA Account Select a specific CA Account from the selected CA to be used for certificate creation operations. *Client Name Select the specific client. *Product Select the specific product. *Server Certificate Select the certificate issued by the selected CA using which the trusted inventory is validated. You can search for it by typing the exact common name or the serial number. *CA Connector Name Name of the CA connector after the certificate is being enrolled. *Certificate Validity Validity of the certificate to be enrolled. Note: Fields with the red asterisk (*) symbol indicate mandatory fields. -
Configure the Advanced Settings section as follows:
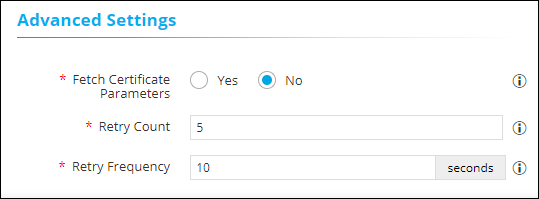 The following table provides the field description for the Advanced Settings section:
Table 34. Advanced Settings - Field Description Table Field Description *Fetch Certificate Parameters Setting the radio button to Yes, will enable the system to automatically fetch certificate parameters from a Suggestive Policy, and append them to the client CSRs. *Retry Count Specify a retry count up to which the agent will retry for the certificate to be fetched. *Retry Frequency Specify a retry frequency up to which the agent will wait for each retry count. Note: Fields with the red asterisk (*) symbol indicate mandatory fields.
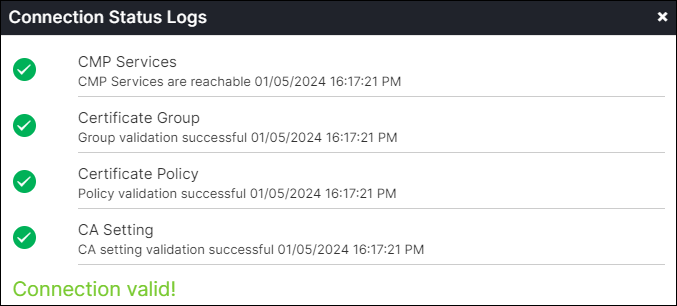
Validating CMP
Once the CMP settings are added validation needs to be done to check whether the CA and Agent related details are properly configured.
-
Go to
(Menu) > CERT+ >
Administration > Auto
Enrollment > SCEP.
-
On the CMP page, click Check from the Status column to
validate the CMP setting that has been created.
The CMP settings will be validated and the Status will be shown as either Success or Failure.
Success Scenario
OpenSSL Commands for Certificate Enrollment
- AppViewX supports both P10CR and CCR (Revoke) modes of operation.
- A separate CMP client is not required, as AppViewX utilizes OpenSSL CMP commands to perform validation tasks.
HTTP mode
-
Generate the key and CSR using the command below:
openssl genrsa -out testcmp.key 4096openssl req -new -key testcmp.key -out testcmp.csr -subj "/CN=AutoEnrollCMP.domain.info" -
Configure the AppViewX Server and other details using the configuration
file below:
openssl_conf = openssl_init
[openssl_init]
cmp = cmp_client
ssl_conf = ssl_sect

[cmp_client]
server = <HTTP AppViewX CMP URL>
path = /avxapi/cmp/cmp
msg_timeout = 30
ref = cmp
secret = pass:<password>
digest = sha256
subject = /CN=test.cmp.appviewx
issuer = /CN=Issuername
recipient = /CN=Issuername
cmd = p10cr
certout = cmp.crt
csr = testcmp.csr

[ssl_sect]
system_default = system_default_sect

[system_default_sect]
tls_cipher = DEFAULT:@SECLEVEL=1
-
Enroll the certificate from AppViewX server using of the above created
configuration file.
openssl cmp -config <Above Created Config>.cnf -section cmp_client -verbosity 8 -reqout request.der -
If the above configuration file is not used, then execute the command
below to directly trigger the enroll certificate action from the
AppViewX server.
openssl cmp -cmd p10cr -server <HTTP AppViewX CMP URL> -ref cmptestp10cr
-secret pass:<password> -certout cmptestp10cr.pem -csr testcmp.csr -verbosity 8 -reqout request.der
HTTPS mode
- When the curl command is used over HTTPS, the certificate request is successfully enrolled in AppViewX, and a response is returned to the client machine. However, the client cannot directly extract the enrolled certificate.
- When the OpenSSL command is used with an HTTPS URL in CMP P10CR mode, a 426 Upgrade Required error occurs.
- This issue arises because OpenSSL CMP does not support HTTP/2 and sends a request using HTTP/1.x POST. The AppViewX server, which expects HTTP/2 communication on the HTTPS endpoint, responds with a 426 error to clients that do not upgrade to the required protocol.
- In contrast, this error does not occur when using curl, as curl supports ALPN (h2 and http/1/1). The AppViewX server then selects h2 (HTTP/2) and successfully processes the CMP request, returning a 200 OK response.
-
Generate the key and CSR using the command below:
openssl genrsa -out testcmp.key 4096openssl req -new -key testcmp.key -out testcmp.csr -subj "/CN=AutoEnrollCMP.domain.info" -
Configure the AppViewX Server and other details using the configuration
file below:
openssl_conf = openssl_init
[openssl_init]
cmp = cmp_client
ssl_conf = ssl_sect

[cmp_client]
server = <HTTPS AppViewX CMP URL>
path = /avxapi/cmp/cmp
msg_timeout = 30
trusted = root.crt
tls_trusted = root.crt
tls_cert = auth.crt
tls_key = auth.key
ref = cmp
secret = pass:<password>
digest = sha256
subject = /CN=test.cmp.appviewx
issuer = /CN=Issuername
recipient = /CN=Issuername
cmd = p10cr
certout = cmp.crt
csr = testcmp.csr

[ssl_sect]
system_default = system_default_sect

[system_default_sect]
tls_cipher = DEFAULT:@SECLEVEL=1
-
Enroll the certificate from AppViewX server using of the above created
configuration file.
openssl cmp -config <Above Created Config>.cnf -section cmp_client -verbosity 8 -reqout request.der -
If the above configuration file is not used, then execute the command
below to directly trigger the enroll certificate action from the
AppViewX server.
openssl cmp -cmd p10cr -server <HTTPS AppViewX CMP URL> -ref cmptestp10cr -secret pass:<password> -certout cmptestp10cr.pem -csr testcmp.csr -tls_used -verbosity 8 -reqout request.der -
In the above OpenSSL CMP command, AppViewX server returns the following
error:
setup_client_ctx:apps/cmp.c:2218:CMP info: will contact <HTTPS AppViewX CMP URL>
CMP DEBUG: Starting new transaction with ID=EB:A5:89:31:AB:68:28:78:C2:CE:2B:BF:88:E1:49:C4
CMP info: sending P10CR
CMP DEBUG: connecting to CMP server 192.168.73.193:31443 using TLS
CMP DEBUG: disconnected from CMP server
CMP error: unexpected eof while reading
CMP error: error sending:server=<HTTPS AppViewX CMP URL>
CMP error: transfer error:request sent: P10CR, expected response: CP
Even though errors are returned while executing the command, request.der will be created successfully. -
Execute the following curl command:
curl -H "Content-Type: application/pkixcmp" -kv <HTTPS AppViewX CMP URL> -X POST --data-binary @request.der --output output.txtUsing this command, the certificate is successfully enrolled in the AppViewX inventory; however, the response received cannot be directly extracted as a certificate. This confirms that the enrollment process functions correctly through the HTTPS CMP URL.