
Platform Administration and Operations
Kubernetes Commands for Maintenance
The following kubectl commands are used for day-to-day platform management. A backup copy of the privileged kubeconfig is available at <home directory>/.kube/backup/config. Note: Ensure the privileged kubeconfig file is available at <home directory>/.kube/config. This kubeconfig is used for privileged command execution. AppViewX recommends securely storing the <home directory>/.kube/backup/config file in a protected location, as it provides privileged access to the Kubernetes cluster.
| Purpose | Command |
|---|---|
| View all cluster nodes | kubectl get nodes |
| View all AppViewX pods | kubectl get pods -n <NAMESPACE> -o wide |
| View all services | kubectl get services -n <NAMESPACE> |
| List all namespaces | kubectl get namespaces |
| List all ConfigMaps | kubectl get configmaps -n <NAMESPACE> |
| List all deployments | kubectl get deployments -n <NAMESPACE> |
| Describe a pod | kubectl describe pods -n <NAMESPACE> <pod name> |
| View pod logs | kubectl logs <pod name> -n <NAMESPACE> |
| Execute a shell inside a pod | kubectl exec -it <pod name> -n <NAMESPACE> /bin/sh |
| Log in to the MongoDB pod | kubectl exec -it mongo-routerdb-0 -n <NAMESPACE> -- /bin/sh |
| Stop a specific deployment | kubectl scale --replicas=0 deployment/<DEPLOYMENT NAME> -n <NAMESPACE> |
| Start a specific deployment | kubectl scale --replicas=1 deployment/<DEPLOYMENT NAME> -n <NAMESPACE> |
| Edit a ConfigMap | kubectl edit configmaps -n <NAMESPACE> avx-common-config |
| Rolling restart all pods in namespace | kubectl rollout restart deployment -n <NAMESPACE> |
| Force-delete a stuck pod | kubectl delete pod <pod name> -n <NAMESPACE> --force |
| Get all pods with distribution info | kubectl get pods -o wide -n <NAMESPACE> |
Plugin Management
- Navigate to: <INSTALL_PATH>/appviewx_kubernetes/scripts/
- Open appviewx.conf and add the plugin name to ENABLED_PLUGINS.
- Add the DC assignment: <plugin_name>=<DC_NAME>
- Save the file.
- From the scripts directory, run: ./plugins_install.shWarning: Never remove appviewx dependencies,avx platform gateway from ENABLED PLUGINS.
Restarting a Plugin
Delete the pod, Kubernetes recreates it automatically:
kubectl delete pod <pod name> -n <NAMESPACE>
# To restart all pods for a deployment:
kubectl rollout restart deployment/<deployment name> -n <NAMESPACE># Scale down (stop all pods)
kubectl scale --replicas=0 deployment/<deployment name> -n <NAMESPACE>
# Scale up
kubectl scale --replicas=<COUNT> deployment/<deployment name> -n <NAMESPACE># Edit the deployment's JVM arguments (xmx / xms)
kubectl edit deployment/<deployment name> -n <NAMESPACE>For persistent changes across upgrades: update custom_changes.yaml → memoryAllocations section → ./appviewx.sh --apply-allocate-memory
Custom Pod Configurations
- Navigate to: <INSTALL_PATH>/appviewx_kubernetes/scripts/
- Copy: cp custom_changes.yaml.template custom_changes.yaml
- The file must begin with three dashes (---) on the first line.
- Edit the appropriate section and run the corresponding apply command.
| Configuration | YAML Section | Apply Command |
|---|---|---|
| Node affinity | affinities:<Plugin>: nodeAffinity/podAffinity/podAntiAffinity | ./appviewx.sh --apply-affinities |
| Node labels | node labels:<node name>: ingress: 'true' | ./appviewx.sh --apply-labels |
| Memory allocation | memoryAllocations:<plugin>: xms/xmx/memoryRequest/cpuRequest | ./appviewx.sh --apply-allocate- memory |
| Logstash pipeline | logstash customs: pipelineWorkerCount: '5' | ./appviewx.sh --apply- logstashCustoms |
| Replica count | replication:<pod name>: count: '2' | ./appviewx.sh --apply-replicas |
| HPA values | horizontalPodAutoScalling:<pod>:maxReplicas/minReplicas/cpu | ./appviewx.sh --apply-hpa |
| Host Aliases | HostAliases. <plugin>: <ip>:hostnames | ./appviewx.sh --apply-host-aliases |
Trusted Certificate for GUI/API Access
To replace the default self-signed certificate with an externally signed certificate for the AppViewX Web UI:
Method 1
Create a Kubernetes TLS secret:
kubectl --kubeconfig=~/.kube/config create -n istio-system secret tls \
external-tls-credential \
--key=<path to key file> \
_ _ _ --cert=<path to cert bundle>
Replace the secret name in values.yaml:
sed -i 's/tls-credential/external-tls-credential/g' \
<INSTALLER PATH>/yaml/appviewx plugins/avx platform web/chart/values.yaml
Apply the change:
cd <INSTALLER PATH>/yaml/appviewx plugins/avx platform web helm upgrade avx-platform-web ./chart
Verify the certificate by accessing https://<SERVICE_URL>:<PORT>/appviewx in a browser.
Method 2- via appviewx.sh (recommended)
./appviewx.sh --update-web-cert
Add the Ingress Loadbalancer for the visual workflow emailer functionality
-
Login to installer node
- Navigate to the <appviewx_installer_path>/scripts.
- open appviewx.conf.
- Add ingress LB's hostname and port in INGRESS_LB_URL and INGRESS_LB_PORT.

- Execute the following script.
./add_ingress_var.sh - Restart subystems and subsystems-sync for all the
DC's.
kubectl delete po -l app=avx-subsystems-sync -A --force
kubectl delete po -l app=avx-subsystems -A --force
Enabling Strict Data Center Routing
Strict DC routing ensures that calls from AppViewX to a plugin or device through one datacenter are not rerouted to another DC when no plugins are available there.
# Set STRICT_ROUTING_DC in appviewx.conf, then:
./appviewx.sh --enable_strict_routing
Enabling Load Balancer for Kubernetes API Server
A TCP load balancer for the Kubernetes master/API server layer is required in environments where multiple control-plane (master) nodes are deployed across different data centers or availability zones. It provides a single, stable endpoint for Kubernetes API communication and distributes incoming TCP traffic across the available master nodes to ensure high availability and fault tolerance.
By default, Kubernetes supports only Layer 4 (TCP) load balancing for the Kubernetes API server. In highly available or multi-data-center Kubernetes deployments, the load balancer helps maintain uninterrupted cluster operations by automatically redirecting traffic to healthy master nodes during node or site failures. The load balancer must be configured to forward TCP traffic on the Kubernetes API server port (default: 6443) with appropriate health checks enabled to ensure traffic is routed only to healthy control-plane nodes. This configuration is required only when distributing traffic between multiple Kubernetes master nodes and the load balancer was not configured during the initial cluster installation.
Prerequisite
Create a TCP load balancer for the Kubernetes API Server (Kube Master API Server).
Note: This configuration is applicable only if a load balancer for the Kubernetes API Server was not configured during the initial AppViewX installation.
Sample F5 Configuration
Load Balancer Configuration for Kubernetes API Server
ltm virtual vs-appviewxmasterapi {
destination <Load Balancer IP Address>:sun-sr-https
ip-protocol tcp
mask 255.255.255.255
pool pool-avxmasterapi
profiles
{ fastL4 { }
}
serverssl-use-sni disabled
source 0.0.0.0/0
source-address-translation {
type automap
}
translate-address enabled
translate-port enabled }ltm pool pool-avxmasterapi {
members {
<Master Node IP Address>:sun-sr-https {
address 192.168.94.199
session monitor-enabled
state up
}
<Master Node IP Address>:sun-sr-https {
address 192.168.94.200
session monitor-enabled
state up
}
<Master Node IP Address>:sun-sr-https {
address 192.168.94.206
session monitor-enabled
state up
}
}
monitor gateway_icmp }Steps to Enable the Load Balancer for the Kubernetes API Server
- Validate the Load Balancer Connectivity.
Execute the following command to verify that the load balancer is reachable and properly forwarding traffic to the Kubernetes API Server:
curl -k https://<loadbalancer-ip>:6443/healthzEnsure the command returns the “ok” details successfully before proceeding. If the command fails, resolve the load balancer connectivity issue before continuing.
- Apply the Latest Scripts Patch. Download and apply the latest scripts patch available from the AppViewX Release Portal.
- Update the API Address Configuration:
- Navigate to the following
directory:
<installerLocation>/appviewx_kubernetes/scripts/ Open the appviewx.conf file
 and update the API_ADDRESS parameter with the load balancer IP address or FQDN.
Example:
API_ADDRESS=<Load Balancer IP or FQDN>
- Navigate to the following
directory:
- Execute the Load Balancer Configuration Script. Navigate to the following
directory:
<installerLocation>/appviewx_kubernetes/scripts/loadbalancer/ Execute the script:
./loadbalancer.sh - Enter the node password when prompted.
Validation
Execute the following command:
kubectl cluster-info - Verify that the Kubernetes API Server endpoint in the output reflects the updated load balancer IP address or FQDN.
Database Backup and Restore
Taking a Backup
# Navigate to scripts
cd <INSTALL PATH>/appviewx kubernetes/scripts/
# MongoDB backup
./appviewx.sh --db-backup
# Vault backup
./appviewx.sh --vault-backup
Backup files are stored at the BACKUP_HOSTPATH location defined in appviewx.conf.
Restoring a Backup
# MongoDB restore
./appviewx.sh --db-restore <BACKUP LOCATION>
# Vault restore
./appviewx.sh --vault-restore <BACKUP LOCATION>Decrypting Encrypted Backup Files
If SFTP backup with encryption is enabled, decrypt before restoring:
# Extract archive
tar -xzf <backup>.tar.gz
# Decrypt AES key using the backup private key
openssl pkeyutl -decrypt -inkey backup key.pem \
-in <aes encrypted key>.bin -out decrypted aes key.bin
# Decrypt MongoDB backup
openssl enc -d -aes-256-cbc -pbkdf2 \
-in <mongo backup>.bin -out <mongo backup>.tar.gz \
-pass file:decrypted aes key.bin
# Decrypt Vault backup
openssl enc -d -aes-256-cbc -pbkdf2 \
-in <vault backup>.bin -out vault backup.txt \
-pass file:decrypted aes key.binRemote SFTP Backup Configuration
- Set SFTP_TRANSFER=TRUE in appviewx.conf.
- Set REMOTE_BACKUP_SERVER, REMOTE_BACKUP_SERVER_SSH_PORT, and REMOTE_BACKUP_ABSOLUTE_PATH.
- Set REMOTE_BACKUP_SERVER_AUTHENTICATION_METHOD to: rsa, password, or
passwordless.
Auth Method Required Configuration RSA Set REMOTE BACKUP SERVER AUTHENTICATION to the private key file path. Password Username and password will be prompted during installation. Passwordless Private key must be stored as id rsa under ~/.ssh/ on each MongoDB host node. Run: chmod 400 id_rsa - Apply the configuration: ./appviewx.sh --setup_sftp To modify SFTP settings post-installation: update appviewx.conf and re-run --setup_sftp.
Certificates in Kubernetes (kubeadm and Istio)
This describes the use of self-signed certificates in a Kubernetes cluster deployed using kubeadm and clearly distinguishes how Istio independently manages its internal certificates to enable mutual TLS (mTLS) for secure service-to-service communication.
Scope
- Kubernetes clusters deployed using kubeadm
- Clusters using the Istio service mesh for internal service communication
- Internal cluster communication secured using self-signed certificates
- This document explicitly separates Kubernetes platform certificates from Istio
- Service mesh certificates.
- Kubernetes Certificate Architecture (kubeadm).
Overview
When a Kubernetes cluster is initialized using kubeadm, it automatically generates and manages a set of self-signed certificates that secure communication between control plane and node components.
Control Plane And Node Certificates
The following certificates are generated during cluster initialization:
- Kubernetes Root Certificate Authority (CA)
- API Server certificate
- etcd CA and etcd server/peer certificates
- kubelet client certificates
- Front-proxy CA and client certificates
- /etc/kubernetes/pki/
- /var/lib/kubelet/
Trust Model
- The Kubernetes Root CA is self-signed and acts as the trust anchor for the cluster
- All Kubernetes component certificates are signed by this CA
- Certificate-based authentication is enforced for all control plane and node communication.
Certificate Lifecycle Details – Kubernetes
- Kubernetes control plane certificates are typically valid for one year by default
- The Kubernetes Root CA certificate is generally valid for ten years
- Certificate renewal is supported prior to expiration using: ./appviewx.sh --renew-kube-certificate
Kubelet Certificates
- Each kubelet uses a client certificate to authenticate with the Kubernetes API server
- Kubelet client certificates are typically valid for one year by default
- These certificates ensure secure and authenticated communication between worker nodes and the control plane
Istio Certificate Management And mTLS
Istio PKI Architecture
Istio operates an independent internal PKI that is separate from Kubernetes control plane certificates and is used exclusively for service-to-service communication within the cluster.
- Istio certificates are issued strictly for internal cluster communication purposes
- These certificates are not intended for external or public-facing use
- Istiod functions as the Certificate Authority for the service mesh
- Each workload receives a unique X.509 certificate representing its service identity
- Certificates are issued automatically using a self-signed root certificate by default.
- Istio workload certificates and private keys are not stored on the Kubernetes node filesystem.
- Certificates are delivered dynamically to the Envoy sidecar proxy via Istio Secure Secret Discovery Service (SDS).
- Certificates reside in memory only within the proxy process and are not written to disk.
- This design significantly reduces the risk of certificate leakage or unauthorized access.
Mutual TLS (mTLS) Enforcement
With mTLS enabled in Istio:
- Client and server workloads authenticate each other using certificates
- All pod-to-pod traffic is encrypted in transit
- Identity-based security replaces implicit network trust
Certificate Lifecycle Details – Istio
Certificate Issuance
- Certificates are automatically issued to workloads via Istio sidecar proxies
- No manual certificate provisioning is required
Certificate Rotation
- Certificates are automatically issued and rotated by Istio
- Workload certificates are short-lived (six days) to support high availability during disaster recovery scenarios
- Certificate lifetime is configurable through the appviewx.conf file.
- Rotation occurs transparently without application downtime.
Compliance And Security Alignment
The implementation aligns with common security and compliance requirements by:
- Enforcing encryption in transit using Istio mTLS
- Providing certificate-based authentication for Kubernetes components and workloads
- Maintaining strict trust boundaries between platform and service mesh components
- Supporting audit and compliance reviews
External Certificate Support
AppViewX supports the use of customer-provided signed certificates for Kubernetes
components such as the API server, etcd, and kubelet. Customers can bring their own server and client certificates and apply them using the procedures outlined. In a Kubernetes cluster deployed using kubeadm, self-signed certificates establish a secure trust foundation for control plane and node communication. Separately, Istio manages its own internal certificates to enforce mutual TLS for service-to-service communication. Together, these mechanisms provide strong isolation, automated certificate management, and a secure, compliant internal communication model.
External CA for Kubernetes
The section describes the steps to update the external certificate authority for the Kubernetes kubeadm. It contains the certificate specifications for the different certificates to be generated since .p12 is the only file format that is supported. For more details, refer here.
Dynamic API Management
Dynamic APIs allow you to create and expose new API endpoints through configuration - without code changes or plugin redeployment. They invoke existing APIs or trigger workflows with optional request transformations. For more details, refer here.
Log Collection (Interactive UI)
Log collection is supported exclusively through the Interactive UI. This provides date-range filtering, log-type selection, and visual progress tracking.
- Run: ./install.sh > Select Continue > option 4 (Collect Logs).
- Provide admin kubeconfig path if prompted: <Home
Directory>/.kube/backup/config
Option Values Description Date Range No (default) / Yes No: collect 1 year of logs. Yes: specify start/end date (YYYY-MM-DD). Log Type all-logs · application-logs · system-logs · performance-logs Select the category. Tab for suggestions. all-logs includes all categories plus DB logs. - Logs are archived as a tarball. The output location is displayed on screen.
Compare Configuration
- Compares the current appviewx.conf against previously saved snapshots to detect configuration drift. Snapshots are captured automatically after each lifecycle event (installation, upgrade, patch, data restore).
- Run: ./install.sh > Select Continue > option 7 (Compare Configuration).
- Provide admin kubeconfig path if prompted.
- The utility captures a current snapshot and compares it against the previous one. Changed areas are highlighted.
- Press Ctrl+N to compare with the next snapshot.Note: Admin conf is required for this utility. All configuration snapshots are stored automatically; no manual action is needed.
Graceful Reboot Procedure
A graceful reboot ensures AppViewX services and Kubernetes workloads remain stable after system restarts. OS updates (e.g. apt update) can be done without stopping services. Reboot requires the sequence below.
- Stop services: ./appviewx.sh --stop <nodename>
- Reboot: reboot
- Start services: ./appviewx.sh --start <nodename>
Multi-Node Reboot - Full Cluster (Minimal Downtime)
- Stop all services: ./appviewx.sh --stop -all
- Reboot all servers.
- Start all services: ./appviewx.sh --start -all
Multi-Node Reboot - Rolling (No Downtime for HA Clusters)
- For multi-master HA clusters, reboot one node at a time (workers first, then masters). Requires master load balancer to be configured.
- From the installer node scripts directory, for each node starting with worker
nodes:
./appviewx.sh --stop <nodename> reboot ./appviewx.sh --start <nodename> # Wait for node to be Ready before proceeding: kubectl get nodes - After all nodes are rebooted, realign pod
distribution:
kubectl rollout restart deployment -n <NAMESPACE> kubectl get pods -o wide -n <NAMESPACE> - If any pods are stuck in Terminating
state:
kubectl delete pod <pod name> -n <NAMESPACE> --force
Adding Nodes to the Cluster
Adding a Master Node
- Log in to the installer node.
- Navigate to the scripts
directory:
cd <INSTALLER PATH>/appviewx kubernetes/scripts/ - Ensure the current kube context is set to the admin user.
- Run the node addition
script:
sudo ./appviewx add node.sh - When prompted, enter: current installer directory · IP addresses of new master nodes (comma- separated for multiple) · datacenter:hostname pairs.
- Total master node count must remain odd (3, 5, 7...).
- Verify the new node joined and pods are
deployed:
kubectl get pods -n <DATACENTER NAME> -o wide
Adding a Worker Node
- Follow the same procedure as Adding a Master Node.
- When prompted, provide: worker node IPs · datacenter:hostname pairs ·
- (optional) DC names for strict host routing.Note: The appviewx add node.sh script adds both master and worker nodes together. The script validates that new nodes have the same OS version as existing nodes and that worker IPs do not conflict with master IPs.
OS Security Patching - Rolling Update
- Apply OS security patches across a multi-node cluster with minimal downtime using a rolling update.
- Patch one node at a time, starting with secondary DC nodes.
-
Prerequisites:
- Ubuntu nodes: APT proxy access or connectivity to repos.appviewx.com (AppViewX- managed Ubuntu repository).
- RHEL / Rocky / Oracle nodes: access to your organisation's approved package repositories — AppViewX does not manage RHEL OS repositories.
- TCP load balancer configured for multi-master environments.
- Sudo privileges on all nodes.
- VM snapshots taken before patching.
-
Step Command / Action 1 - Stop application on node ./appviewx.sh --stop <node name> 2 - Apply OS patches sudo apt update -y && sudo apt upgrade -y 3 - Reboot node sudo reboot 4 - Start application on node ./appviewx.sh --start <node name> 5 - Verify pods on node kubectl get pods -A -o wide | grep <node name> 6 - Repeat for all nodes Patch one node at a time. Proceed to the next only after the current node is Ready. 7 - Move to next DC After all nodes in the current DC are patched and running, proceed to the next DC. Note: For multi-master clusters, ensure the master load balancer is properly configured to handle failover during this process. Brief downtime (~5 minutes) is expected when secondary DC nodes are stopped.
Enabling HSM
Prerequisites
- To configure Fortanix and Utimaco, the .so file and config file must be present in the current AppViewX version.
- The .so file is essential for communicating with the HSM using the PKCS11 interface.
- The config file facilitates communication between the HSM and AppViewX.
- After the successful upgrade, proceed with the steps below to enable HSM.
- Ensure the HSM pod is operational and running in the required datacenters and
that the HSM node is specified in the appviewx.conf file, execute the following
command:
kubectl get pods -A -o wide |grep hsm - From the command line interface, navigate to the properties folder path {APPVIEWX_INSTALLATION_PATH}/appviewx_dependencies/properties.
- For Fortanix
- Open the HSM file using the following command:
vi hsm - Check and confirm if the HSM file has the following lines.
- If not, uncomment the following
lines:
export FORTANIX_PKCS11_CONFIG_PATH= /appviewx/dependencies/hsm/fortanix/pkcs11.conf echo "FORTANIX Config Path : $FORTANIX_PKCS11_CONFIG_PATH" - If the file is edited, restart the avx-platform-hsm pod, using the
following commands:
kubectl get pods -n <namespace>
kubectl delete pods -n <namespace> <PodName> --force
- Open the HSM file using the following command:
- For Utimaco
- Open the HSM file using the following command:
vi hsm - Check and confirm if the HSM file has the following lines. If not,
uncomment the following
lines:
export CS_PKCS11_R2_CFG=/appviewx/dependencies/hsm/utimaco/cs_pkcs11_R2.cfg echo "UTIMACO Config Path : $CS_PKCS11_R2_CFG" - If the file is edited, restart the avx-platform-hsm pod, using the
following commands:
kubectl get pods -n <namespace>
kubectl delete pods -n <namespace> <PodName> --force
- Open the HSM file using the following command:
- Once the HSM pod is back to running state, login to AppViewX and navigate to Platform > Vault & Security > HSM.
- Access the required HSM.
- Configuring Fortanix
- If the added HSM is Fortanix, upload the .so file and config file as
follows:
- To upload the .so file,
- Click Browse.
- Navigate to the location of the .so file.
- Select the .so file and click Open.
- To upload the .cfg (config) file,
- Click Browse.
- Navigate to the location of the .cfg file.
- Select the .cfg file and click Open.
- To upload the .so file,
- Choose the respective datacenter.
- Update each HSM available in the inventory one by one, ensuring that the HSM is moved to the Available status.
- If the added HSM is Fortanix, upload the .so file and config file as
follows:
- Configuring Utimaco
- If the added HSM is Utimaco, upload the .so file and config file as follows:
- To upload the .so file,
- Click Browse.
- Navigate to the location of the .so file.
- Select the .so file and click Open.
- To upload the .cfg (config) file,
- Click Browse.
- Navigate to the location of the .cfg file.
- Select the .cfg file and click Open.
- Choose the respective datacenter.
- Update each HSM available in the inventory one by one, ensuring that the HSM is moved to the Available status.
Note: If you have previously configured Thales GPN, Thales DPoD, and Thales TCT in AppViewX v2020.3.0 and have performed the Application Upgrade, then freshly configure the same in the upgraded version.
Verifying/Modifying HSM Configuration for Private Key Encryption
- On the top-right corner of the HSM inventory page, click the master encryption
settings icon.
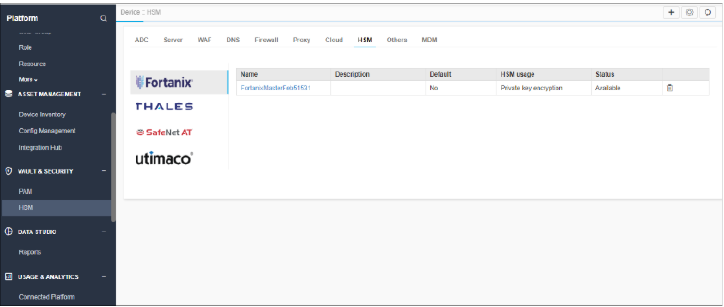
- If the already added HSM has implementation type private key generation or Both
and Set as "default" in 2020.3.0 AppViewX version then that HSM will be
available in the Master encryption settings page as default HSM.
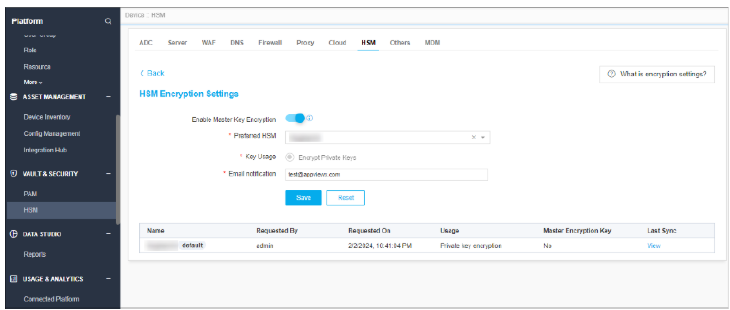
- To receive emails for default HSM health status, configure the email address in
the settings page.Note:
- For email use case, SMTP settings should be available in Platform > System Administration > SMTP.
- To change the new default HSM, add the new HSM with HSM usage as Master key encryption or both.
- Once the HSM is moved to Available status it will be present in the Preferred HSM dropdown field of the master key encryption settings page.
- Choose the new HSM and click Save.
Health Check Procedures
-
Component Check Command Expected Result All pods kubectl get pods -n <NAMESPACE> All Running, 0 CrashLoopBackOff/Pending. Version ./appviewx.sh --version Matches expected release string. MongoDB ./appviewx.sh --db-shell → rs.status() 1 primary, ≥1 secondary, no STARTUP/RECOVERING. Vault ./appviewx.sh --vault-sync-status All nodes synced and unsealed. Nodes kubectl get nodes All Ready. Vault key versions ./appviewx.sh --vault-key-version-validate Consistent key version across all nodes. Web UI curl -k https://<HOSTNAME>:31443/appviewx/login HTTP 200 or login page redirect. LB health curl -k https://<LB IP>:6443/healthz OK
Enable etcd Secrets Encryption with AES-GCM
Run the etcd_secrets_encryption.sh script with
key-rotation to rotate the encryption key used by the
Kubernetes etcd AES-GCM provider.
Important Notes
- Ensure etcd secrets encryption is already enabled on all master/control-plane nodes.
- If encryption is not enabled, first complete the enablement procedure in Section 10.22.
- The script supports single-node, multi-node, and multi-DC setups.
- Use this only after Kubernetes installation is complete.
- For multi-node or multi-DC environments,
other_user_internal.pemis mandatory. - Provider requires periodic key rotation after approximately 200,000 writes.
- Enabling encryption restarts the kube-apiserver, resulting in a brief API downtime of approximately 20 – 30 seconds.
Enable etcd Secrets Encryption
- Switch the kubeconfig Context to the Current User. Switch kubeconfig context to
current user context.
cp /home/appviewx/.kube/config /home/appviewx/.kube/backup/read-only-config cp /home/appviewx/.kube/backup/config /home/appviewx/.kube/config - Verify PEM File for Multi-Node or Multi-DC Setups. For multi-node or multi-DC
deployments, verify
other_user_internal.pemis available.This file is required for securely copying the encryption configuration across all master/control-plane nodes.
- Execute the Encryption Script. Navigate to the scripts directory and execute the
etcd_secrets_encryption.sh
script.
cd <appviewx_installer_path>/scripts ./etcd_secrets_encryption.sh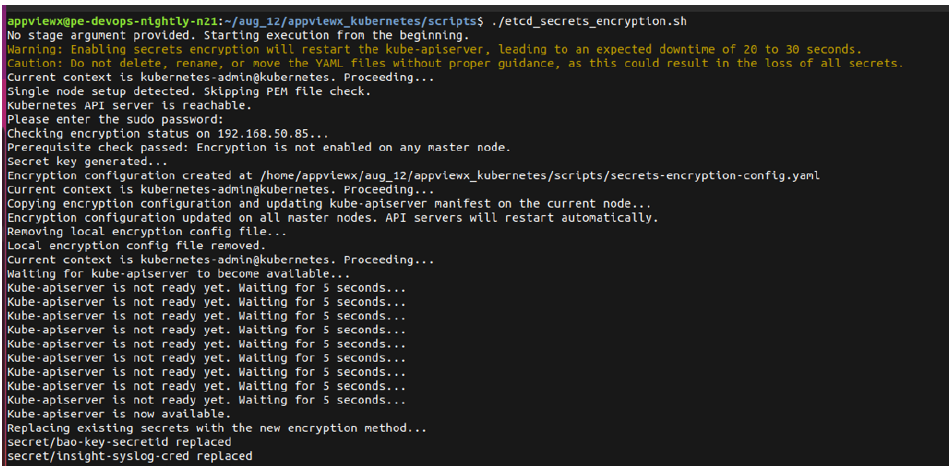 The script performs the following operations automatically:
- Generates the AES-GCM encryption key
- Creates the Kubernetes encryption configuration
- Updates the kube-apiserver manifest
- Restarts the Kubernetes API server
- Re-encrypts all existing Kubernetes secrets in etcd
- Synchronizes the configuration across all master nodes in multi-node setups.
- Verify Encryption Configuration File. After successful execution, verify that
the encryption configuration file
exists.
cd /etc/kubernetes/pki
ls -lrt secrets-encryption-config.yaml
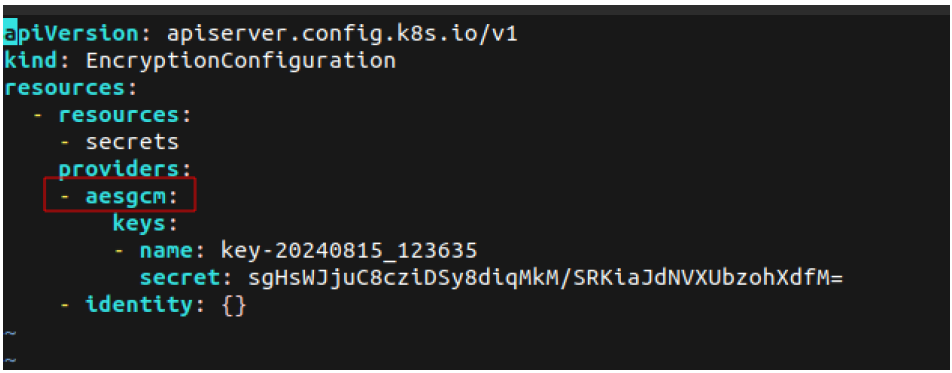 Note: Do not rename, modify, or delete the
secrets-encryption-config.yamlfile. Removing or modifying this file improperly may result in loss of access to all encrypted Kubernetes secrets. - Verify kube-apiserver Configuration. Verify that the kube-apiserver manifest
includes the encryption provider
configuration.
cd /etc/kubernetes/manifests
sudo vi kube-apiserver.yaml
Ensure the following argument is present under the kube-apiserver command arguments:--encryption-provider-config=/etc/kubernetes/pki/secrets-encryption-config.yaml
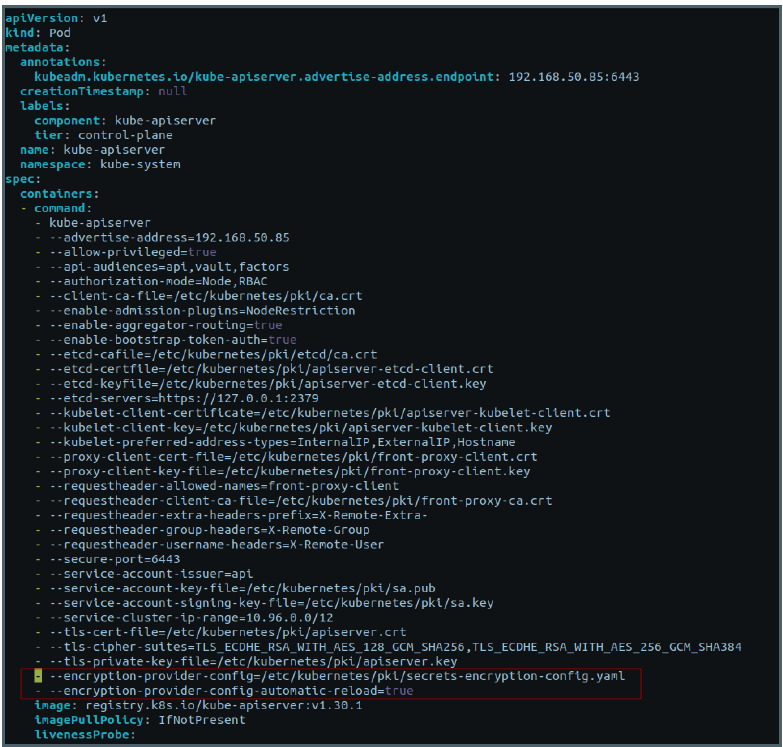 Note: Do not remove or modify this configuration entry.
 - Create a test secret. Create a Kubernetes secret to validate that encryption is
functioning
properly.
kubectl create secret generic secret1 \ -n default \ --from-literal=mykey=mydata - Verify the Secret is Encrypted in etcd. The etcdctl utility may not be available
by default on all Kubernetes nodes. You can verify the encryption using either
of the following methods.
Option 1
Verify Using kubectl exec into the etcd Pod
Identify the etcd pod:
kubectl get pods -n kube-system | grep etcdConnect to the etcd pod:
kubectl exec -it -n kube-system <etcd_pod_name> -- shInside the pod, execute:
TCDCTL_API=3 etcdctl \
--cacert=/etc/kubernetes/pki/etcd/ca.crt \
--cert=/etc/kubernetes/pki/etcd/server.crt \
--key=/etc/kubernetes/pki/etcd/server.key \
get /registry/secrets/default/secret1 | hexdump -C
Option 2: Download and use etcdctl-
Download the appropriate etcd release package from the official etcd releases page:
tar -xvf etcd-<version>-linux-amd64.tar.gz cd etcd-<version>-linux-amd64 - Run the verification
command:
sudo ETCDCTL_API=3 ./etcdctl \ --cacert=/etc/kubernetes/pki/etcd/ca.crt \ --cert=/etc/kubernetes/pki/etcd/server.crt \ --key=/etc/kubernetes/pki/etcd/server.key \ get /registry/secrets/default/secret1 | hexdump -C - If encryption is enabled correctly, the output will appear encrypted
and unreadable instead of displaying the secret value in plain
text.
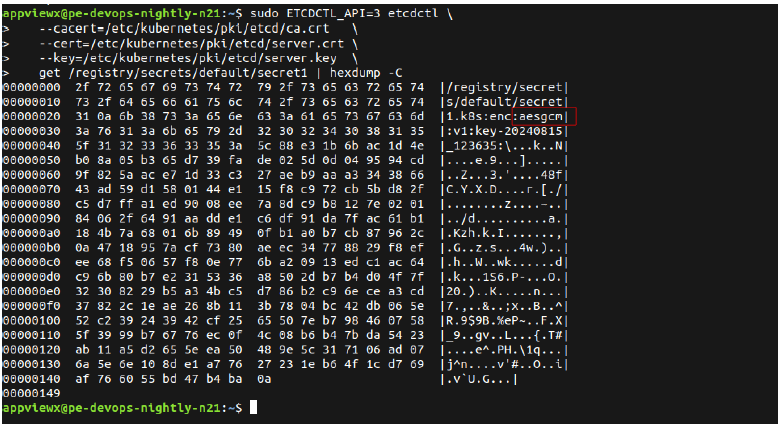
-
- Delete the test secret. After verification, remove the test
secret.
kubectl delete secret secret1 - Restore admin kubeconfig context. Switch the kubeconfig back to the admin configuration.
cp /home/appviewx/.kube/backup/read-only-config /home/appviewx/.kube/config Note: After completing these steps:
- All existing Kubernetes secrets are re-encrypted using AES-GCM.
- All newly created secrets will be stored encrypted in etcd.
- Encryption is consistently applied across single-node, multi-node, and multi-DC environments.
AES-GCM Encryption Key Rotation for etcd Secrets
Run the etcd_secrets_encryption.sh script with
key-rotation to rotate the encryption key used by the
Kubernetes etcd AES-GCM provider.
- Ensure etcd secrets encryption is already enabled on all master/control-plane nodes.
- If encryption is not enabled, first complete the enablement procedure in Section 10.22.
- The script supports single-node, multi-node, and multi-DC setups.
- Execute this only after Kubernetes installation is complete.
- For multi-node or multi-DC environments,
other_user_internal.pemis mandatory. - The AES-GCM provider requires periodic key rotation after approximately 200,000 writes.
- During key rotation,
kube-apiservermay restart briefly, causing temporary API unavailability.
-
Switch the kubeconfig context to the current user. Switch the kubeconfig from the admin context to the current user context before executing the script.
cp /home/appviewx/.kube/config /home/appviewx/.kube/backup/read-only-config cp /home/appviewx/.kube/backup/config /home/appviewx/.kube/config -
Verify PEM file for multi-node or multi-DC setups. For multi-node or multi-DC deployments, ensure the following PEM file is available:
Ensure
other_user_internal.pemis available. This file is required to synchronize updated encryption configuration across all master/control-plane nodes. -
Execute the key rotation script. Navigate to the scripts directory and execute the script with the key-rotation argument.
cd <appviewx_installer_path>/scripts
./etcd_secrets_encryption.sh key-rotation
The script performs these operations automatically:
- Generates a new AES-GCM encryption key.
- Updates the Kubernetes encryption configuration.
- Updates kube-apiserver configuration.
- Restarts Kubernetes API server if required.
- Re-encrypts all existing Kubernetes secrets in etcd.
- Synchronizes updated configuration across all master nodes in multi-node environments.
Note: After execution, all existing secrets stored in etcd will be re-encrypted with the newly generated encryption key. -
Verify the updated encryption configuration file. Ensure the encryption configuration YAML file has been updated with the new encryption key.
cd /etc/kubernetes/pki
vi secrets-encryption-config.yaml
Note: Do not rename, modify, or deletesecrets-encryption-config.yaml. Improper changes may cause loss of access to encrypted Kubernetes secrets. Verify the backup configuration file.
A backup of the previous encryption configuration file is automatically created before rotation. Backup location:
/home/appviewx/<appviewx_installer_path>/scripts/secrets-encryption-config.yaml.bakIf rotation fails, restore backup to:
/etc/kubernetes/pki/secrets-encryption-config.yaml-
Create a test secret. Create a Kubernetes secret to validate that the new encryption key is functioning properly.
kubectl create secret generic secret1 \
-n default \
--from-literal=mykey=mydata
Verify the secret is encrypted with the new key.
The etcdctl utility may not be available by default on all Kubernetes nodes.
You can verify the encryption using either of the following methods.
Option 1: Verify using kubectl exec into etcd pod
kubectl get pods -n kube-system | grep etcd
kubectl exec -it -n kube-system <etcd_pod_name> -- sh
ETCDCTL_API=3 etcdctl

--cacert=/etc/kubernetes/pki/etcd/ca.crt

--cert=/etc/kubernetes/pki/etcd/server.crt

--key=/etc/kubernetes/pki/etcd/server.key
get /registry/secrets/default/secret1 | hexdump -C
Option 2: Download and use etcdctl
Download the appropriate etcd release package from the official etcd releases page:tar -xvf etcd-<version>-linux-amd64.tar.gz cd etcd-<version>-linux-amd64 sudo ETCDCTL_API=3 ./etcdctl \ --cacert=/etc/kubernetes/pki/etcd/ca.crt \ --cert=/etc/kubernetes/pki/etcd/server.crt \ --key=/etc/kubernetes/pki/etcd/server.key \ get /registry/secrets/default/secret1 | hexdump -CNote: If encryption is functioning correctly, the output will appear encrypted and unreadable instead of displaying the secret value in plain text.Delete the test secret. After verification, delete the test secret.
kubectl delete secret secret1Restore admin kubeconfig context. Switch the kubeconfig back to the admin configuration.
cp /home/appviewx/.kube/backup/read-only-config
                        /home/appviewx/.kube/config
- All existing Kubernetes secrets are re-encrypted using the newly rotated AES-GCM key.
- All newly created Kubernetes secrets use the updated encryption key.
- Encryption remains consistent across single-node, multi-node, and multi-DC environments.
Disable etcd Secrets Encryption
This procedure disables Kubernetes etcd secrets encryption and reverts secret storage to plain text in etcd.
Important Notes
- In multi-node or multi-DC setups, apply these steps on all master/control-plane nodes.
- Disabling encryption restarts kube-apiserver and may cause temporary API unavailability.
- Back up the encryption configuration file before modifications.
- After completion, existing and newly created secrets are unencrypted in etcd.
Steps to Disable etcd Secrets Encryption
- Switch kubeconfig context to current user context. Switch the kubeconfig from
the admin context to the current user context before performing the
changes.
cp /home/appviewx/.kube/config /home/appviewx/.kube/backup/read-only-config cp /home/appviewx/.kube/backup/config /home/appviewx/.kube/config - Navigate to encryption config location. Go to the location where the encryption
configuration file is stored.
cd /etc/kubernetes/pki
- Create backup of encryption config. Before making any modifications, create a
backup of the existing configuration
file.
sudo cp secrets-encryption-config.yaml secrets-encryption-config.yaml.backup - Edit encryption config and place
identity: {}as first provider.sudo vi secrets-encryption-config.yaml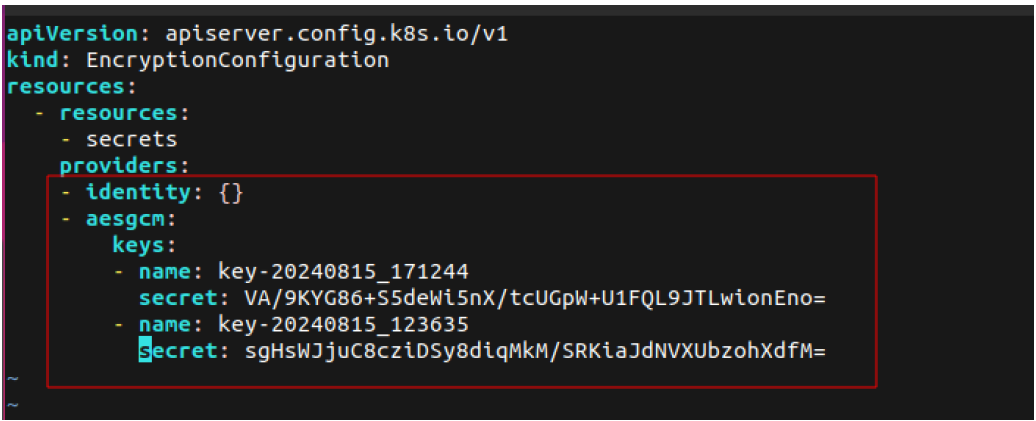 Under the providers section, move the following provider to the first position:
identity: {}Example:providers: - identity: {} - aescbc: keys: - name: key1 secret: <existing_key>This change instructs Kubernetes to use the non-encrypted identity provider for all future secret operations.
- Restart kube-apiserver. Restart the Kubernetes API server to apply the updated
encryption
configuration.
kubectl delete pod -n kube-system -l component=kube-apiserver - Verify kube-apiserver status and wait until pods are running. Ensure the
kube-apiserver is running and operational after the
restart.
kubectl get pod -n kube-system -l component=kube-apiserverNote: Wait until all kube-apiserver pods return to the Running state. - Rewrite all existing secrets with identity provider.
Once the API server is available, update all Kubernetes secrets so they are re-written using the non-encrypted provider.
kubectl get secrets --all-namespaces -o json | kubectl replace -f -Note: This operation converts all existing encrypted secrets into plain-text entries in etcd. - Create test secret.
Create a new Kubernetes secret to verify that encryption has been disabled.
kubectl create secret generic secret1 \ -n default \ --from-literal=mykey=mydata - Verify secret is stored unencrypted in etcd.
The etcdctl utility may not be available by default on all Kubernetes nodes.
You can verify the secret using either of the following methods.
Option 1: Verify Using kubectl exec into the etcd Pod
kubectl get pods -n kube-system | grep etcd kubectl exec -it -n kube-system <etcd_pod_name> -- sh ETCDCTL_API=3 etcdctl \ --cacert=/etc/kubernetes/pki/etcd/ca.crt \ --cert=/etc/kubernetes/pki/etcd/server.crt \ --key=/etc/kubernetes/pki/etcd/server.key \ get /registry/secrets/default/secret1 | hexdump -C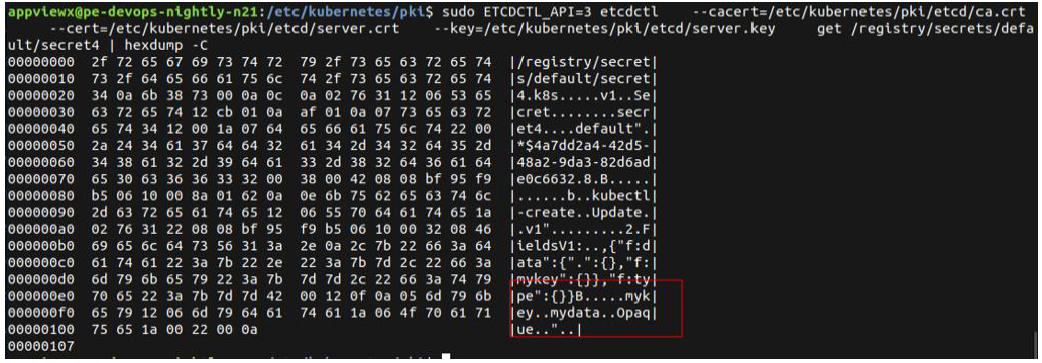 Option 2: Download and Use etcdctl
- Download the appropriate etcd release package from the official etcd
releases
page:
tar -xvf etcd-<version>-linux-amd64.tar.gz cd etcd-<version>-linux-amd64 - Run the verification
command:
sudo ETCDCTL_API=3 ./etcdctl \
--cacert=/etc/kubernetes/pki/etcd/ca.crt \
--cert=/etc/kubernetes/pki/etcd/server.crt \
--key=/etc/kubernetes/pki/etcd/server.key \
get /registry/secrets/default/secret1 | hexdump -C
Note: If encryption has been disabled successfully, the output will display the secret contents in readable plain text instead of encrypted data.
- Download the appropriate etcd release package from the official etcd
releases
page:
- Remove encryption provider arguments from kube-apiserver manifest. After
verification, safely remove the following arguments from the kube-apiserver.yaml
manifest:
--encryption-provider-config=/etc/kubernetes/pki/secrets-encryption-config.yaml
--encryption-provider-config-automatic-reload=true
Edit the kube-apiserver manifest:
cd /etc/kubernetes/manifests
sudo vi kube-apiserver.yaml
Note: Once saved, Kubernetes automatically restarts the kube-apiserver. - Delete test secret. After verification, delete the test
secret.
kubectl delete secret secret1 - Restore admin kubeconfig context. Switch the kubeconfig back to the read-only
user configuration.
cp /home/appviewx/.kube/backup/read-only-config /home/appviewx/.kube/configAfter completing these steps:- All existing Kubernetes secrets are stored in plain text in etcd.
- All newly created secrets will no longer use AES-GCM encryption.
- The Kubernetes cluster will no longer use the etcd encryption provider configuration.
Syncing Host Entries and DNS Configuration to avx-vendors Pods
- /etc/hosts entries: Static hostname-to-IP mappings on the host node
- /etc/resolv.conf nameservers: DNS servers configured for hostname resolution
This section describes how these configurations are automatically propagated to avx-vendors pods during installation, upgrades, and patches, as well as how to manually synchronize them when changes are made post-deployment.
DNS Resolution via /etc/resolv.conf
Standard Behavior: No action is required for most deployments.
CoreDNS is pre-configured to automatically inherit nameserver entries from the host
node's /etc/resolv.conf. These nameservers are used for DNS
resolution within avx-vendors pods and this behavior is consistent across
installation, upgrade, and patch operations.
Updating DNS Configuration Post-Deployment
If nameservers are added or modified in /etc/resolv.conf after the
initial installation, CoreDNS pods must be restarted for the new configuration to
take effect.
kubectl rollout restart deployment coredns -n kube-systemHost Entry Synchronization via /etc/hosts
AppViewX provides --apply-host-aliases to read host entries from
node and inject them into avx-vendors and
avx-vendors-cert-sync using Kubernetes
hostAliases.
How Synchronization Works
- Read
/etc/hosts, skipping loopback and invalid IP entries. - Read existing
hostAliases.avx_vendorsentries fromcustom_changes.yaml. - Merge both sources, with
/etc/hoststaking precedence. - Validate hostnames against RFC 1123; skip invalid entries only.
- Write merged results back to
custom_changes.yaml. - Patch
avx-vendorsandavx-vendors-cert-syncdeployments in active namespaces.
Host Entry Sources and Priority
| Source | Priority | Description |
|---|---|---|
| /etc/hosts on installer node | Higher | Primary source. All non-loopback entries are read from the node |
| hostAliases in custom_changes.yaml | Lower | Supplementary entries. Useful when host entries need injection without modifying node's /etc/hosts |
If the same IP exists in both sources, /etc/hosts hostnames take precedence. Entries from custom_changes.yaml are included only if they do not conflict with /etc/hosts.
Enable Host Entry Synchronization
The host entry synchronization feature is disabled by default. Set the following in
appviewx.conf:
ENABLE_SYNC_VENDOR_HOST_ALIASES=TRUEEnable During Installation
When performing a fresh installation, the feature can be enabled via the interactive installer:
- Run installer and navigate to Advanced Configurations.
- At prompt for syncing
/etc/hostsentries intoavx-vendorshostAliases, select Yes. - Proceed with installation. The host entries will be synchronized during the process.
Automatic Execution During Deployments
- Fresh installation workflows
- Upgrade procedures
- Patch operation.
Manual or On-Demand Execution
The utility can be run independently at any time to synchronize host entries. For example, after /etc/hosts is updated on the host node post-deployment.
./appviewx.sh --apply-host-aliasesAdding Custom Host Entries via custom_changes.yaml
Host entries can be added directly to custom_changes.yaml under the hostAliases.avx_vendors section. This is useful when entries need injection into the pod without modifying the node's /etc/hosts.
Apply Custom Entries from custom_changes.yaml
Example format:
hostAliases:
  avx_vendors:
    - ip: 10.0.0.10
      hostnames:
        - internal-api.example.com
        - api-shortname
    - ip: 10.0.0.20
      hostnames:
        - db.example.com
Applying Custom Host Entries
After saving entries to custom_changes.yaml, apply changes by running:
./appviewx.sh --apply-host-aliasesValidation and Skip Rules
The following entries are skipped individually with a warning. All other valid entries are still applied:
| Condition | Reason |
|---|---|
| Loopback IPs (127.x.x.x, ::1) | Not relevant to pod networking |
| Invalid IP address | Kubernetes rejects non-IP values in hostAliases |
| Hostnames with _ (underscore) | Violates RFC 1123 |
| Hostnames with uppercase characters | Violates RFC 1123 |
| Hostnames starting or ending with - | Violates RFC 1123 |
Hostname Format Requirements (RFC 1123)
| Example | Valid? |
|---|---|
| host.example.com | Yes |
| my-internal-host | Yes |
| my_internal_host | No - underscore not allowed |
| MyHost | No - underscore not allowed |
|
-myhost |
No - cannot start with hyphen |
