
AppViewX Installation
All AppViewX installation is performed through the Interactive UI a full-screen terminal wizard launched by running ./install.sh. There is no separate manual CLI installation path. The wizard collects all configuration, validates prerequisites on all target nodes, and deploys the platform automatically.
Pre-Installation Checklist
Ensure all items below are confirmed before starting:
- All hardware and OS requirements.
- Required packages downloaded from the Release Portal and md5sum validated.
- firewalld is disabled on all nodes (or required ports are open).
- Sudo access configured for the installation user.
- tmux is installed - strongly recommended to protect the session from SSH disconnections.
- NTP (chrony) is active and synchronised across all nodes.
- Password for the installation user does not contain: ' " \ & , ; or
combinations %{ and ${
- If using key-based (PEM) authentication: passwordless sudo is configured. Refer 2.7.3
- If enabling SFTP backup: remote SFTP server is accessible and credentials are ready.
- If using HSM: HSM client is configured on the designated node(optional).
- Load balancer(Master(L4 - TCP) and Web access(L7)) is provisioned (optional but recommended for HighAvailability).
- External .p12 certificate for the web UI is available (optional but recommended).
Adding Third-Party Libraries
Some vendor integrations require proprietary .jar files that must be added after installation. Obtain these from the respective vendor.
| Integration | Source | Target (pre-install) |
|---|---|---|
| F5 iControl | DevCentral F5 download: iControl, axis, javax.xml.soap-api Library jars for Java | <INSTALLER PATH>/external libs/ |
| Thales Luna HSM | /opt/nfast/java/classes/ on the HSM node (appviewx worker node) | <INSTALLER PATH>/external libs/ |
| Safenet/Gemalto | /usr/safenet/lunaclient/jcprov/lib/ on the HSM node (appviewx worker node) | <INSTALLER PATH>/external libs/ |
Fresh Installation
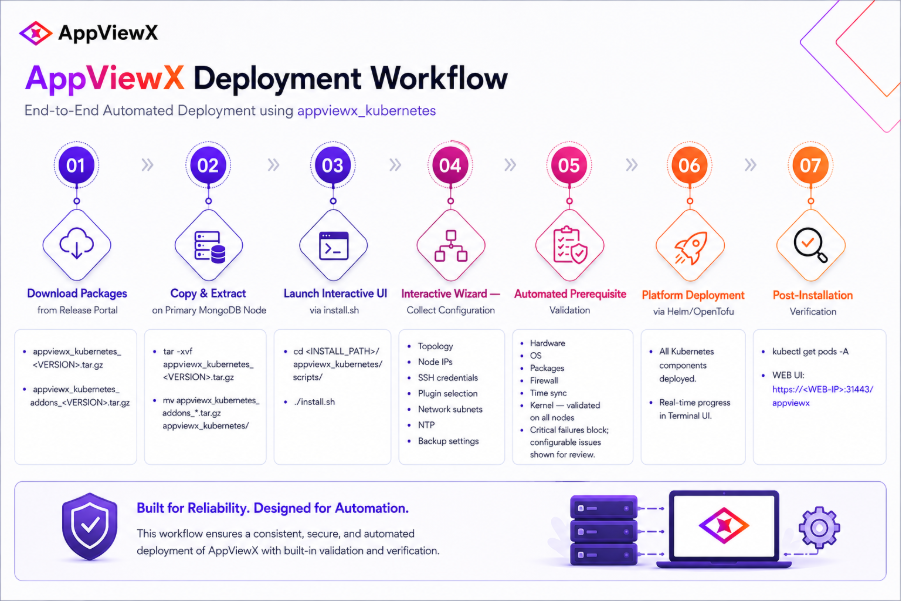
Step-by-Step Commands
| Step | Action | Command / Detail |
|---|---|---|
| 1 | Extract the core installer | tar -xvf appviewx kubernetes <VERSION>.tar.gz |
| 2 | Move addons tarball into the installer directory |
mv appviewx_kubernetes_addons_.tar.gz appviewx_kubernetes/ |
| 3 | (Optional) Place patch file | mv <patch file> appviewx kubernetes/patch/ |
| 4 | Navigate to scripts directory | cd appviewx kubernetes/scripts/ |
| 5 | Launch the installer | ./install.sh |
| 6 | tmux session opens | 'appviewx' tmux session is created. preinstall.sh extracts the Python runtime and launches the Interactive UI. |
| 7 | Welcome screen | Read the overview, select Continue. |
| 8 | Select Fresh Installation | Enter 1 from the main menu. |
| 9 | Answer configuration questions | Topology · Node IPs · SSH credentials · DC names · Plugin selection · Subnets · NTP · Backup. |
| 10 | Review summary table | All collected values displayed - type 'y' to proceed. |
| 11 | Prerequisite validation | Installer validates all prerequisites on all target nodes. Press 'y' to auto-configure missing items (requires internet or proxy). |
| 12 | Deployment | Helm charts deployed in real time. Press 'v' for verbose logs. |
| 13 | Post-install validation | See Post-install validation Section. |
Key Configuration Questions
During the wizard, you will be prompted for the following key decisions:
| Question | Options | Notes |
|---|---|---|
| Multi-node installation? | Yes / No | Yes: distributed cluster. No: single-node. |
| Authentication method | Password / Private key | Private key recommended for production. |
| Number of data centers | Integer | Determines DC namespace count. |
| Total VMs | Integer | Minimum 3 for multi-master HA. |
| Master VM count | Integer | Must be odd (1, 3, 5...). |
| External signed certificate? | Yes / No | Provide <.p12> path if Yes. |
| Enable HSM plugin? | Yes / No | HSM client must be pre-installed. |
| SFTP backup? | Yes / No | SFTP server details required if Yes. |
Updating the Kernel version
kubeadm init
setup is no longer compatible with older Linux kernel versions. This is
primarily due to enhanced reliance on cgroups (control groups), a Linux
kernel feature that manages resource isolation and allocation. This incompatibility
typically affects nodes running older operating system versions, particularly those
in the RHEL 8 series (e.g., 8.5, 8.6, or even 8.10), depending on the
specific kernel version present on the node. 
Cgroups Overview:
Control Groups (cgroups) are a kernel-level feature that enables the limitation, prioritization, and isolation of resource usage (CPU, memory, I/O, and so on.) among process groups. Kubernetes leverages cgroups extensively for container orchestration.
Determining the Cgroups Version in Use:
stat -fc %T /sys/fs/cgroup- If the output is
tmpfs, the system is using cgroups v1.
- If the output is
cgroup2fs, the system is using cgroups v2.
| Cgroups Version | Minimum Kernel Version | Recommended Kernel Version |
|---|---|---|
| v1 | 4.19+ | 5.x or 6.x series |
| v2 | 4.15+ | 5.8 or later |
To ensure compatibility with Kubernetes 1.36.3, it is recommended to validate and, if necessary, upgrade the Linux kernel version in accordance with the cgroups configuration of the host system.
uname -r
Solution provided:
- If the system does not meet the minimum required kernel version, the installation will be blocked from proceeding.
- Additionally, if the system is using cgroups v1, a warning message will be displayed recommending an upgrade to cgroups v2 for improved compatibility and performance.
Interactive UI Keyboard Shortcuts
| Shortcut | Action |
|---|---|
| Ctrl + Z | Go back to the previous question. |
| Ctrl + L | Collect logs during the current session. |
| Ctrl + C | Cancel the current operation. |
| Ctrl + P | Rollback during Apply Patch failures. |
| Ctrl + R | Resume an interrupted session. |
| Ctrl + E | Display the current error message. |
| Ctrl + T | Show or hide a password field. |
| Ctrl + W / Ctrl + S | Scroll up / scroll down. |
| Ctrl + A / Ctrl + D | Scroll left / scroll right. |
| Ctrl + N | Next snapshot (Compare Configuration). |
| Tab | Show auto-complete suggestions. |
| V | Toggle verbose log output. |
Points to Remember
- Do not reuse an appviewx_kubernetes installer that was previously used for an upgrade. The installer's seed data is replaced during upgrade and may cause issues in a subsequent fresh installation. Always use a new installer for fresh installations.
Post-Installation Validation
| Check | Command / Action | Expected Result |
|---|---|---|
| All pods running | kubectl get pods -n <NAMESPACE> | All Running, 0 CrashLoopBackOff or Pending. |
| Platform version | ./appviewx.sh --version | Matches installed release version. |
| Web UI | https://<HOSTNAME>:31443/appviewx/ | Login page loads successfully. |
| MongoDB health | ./appviewx.sh --db-shell → rs.status() | 1 primary, ≥1 secondary, no STARTUP/RECOVERING. |
| Vault status | ./appviewx.sh --vault-sync-status | All nodes synced and unsealed. |
| Node status | kubectl get nodes | All nodes in Ready state. |
| Whitelist ingress LB | Whitelist ingress LB | ./appviewx.sh --whitelist-ingress-hosts |
OVA-Based Installation
| OVA File | Purpose |
|---|---|
| appviewx production ubuntuV24.04.4_Master_<Version>.ova | Master node VM. |
| appviewx production ubuntuV24.04.4_Worker1TB_<Version>.ova | 1 TB worker node VM. |
| appviewx production ubuntuV24.04.4_Worker500GB_<Version>.ova | 500 GB worker node VM. |
- Download the OVA from the Release Portal.Note: Validate the md5sum.
- Log in to ESXi > Virtual Machines > Create/Register VM.
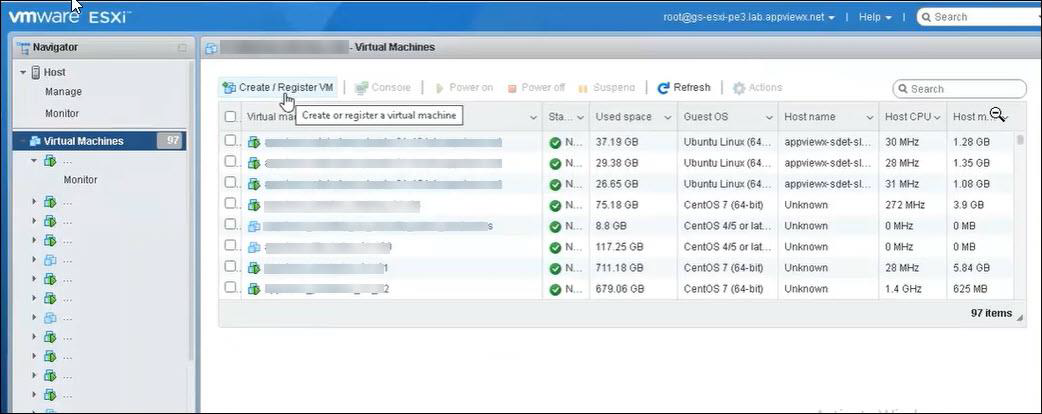
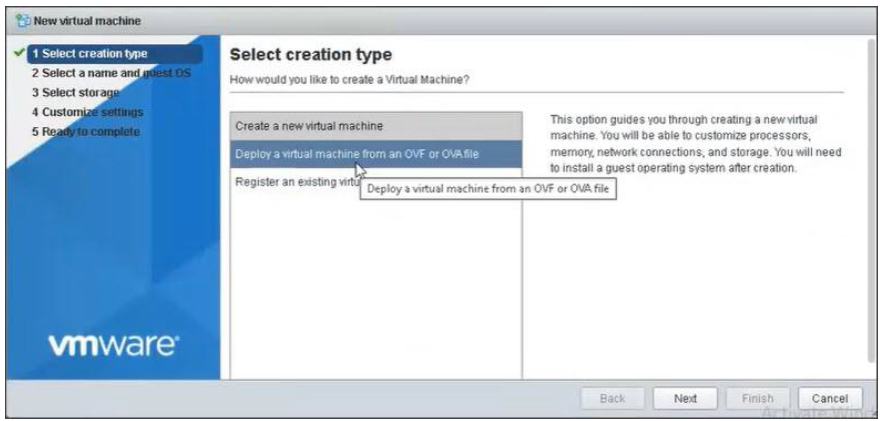
- Select Deploy a virtual machine from an OVF or OVA
file.
- Enter name, select OVA, choose storage, set Disk Provisioning to Thin.
- Click Finish
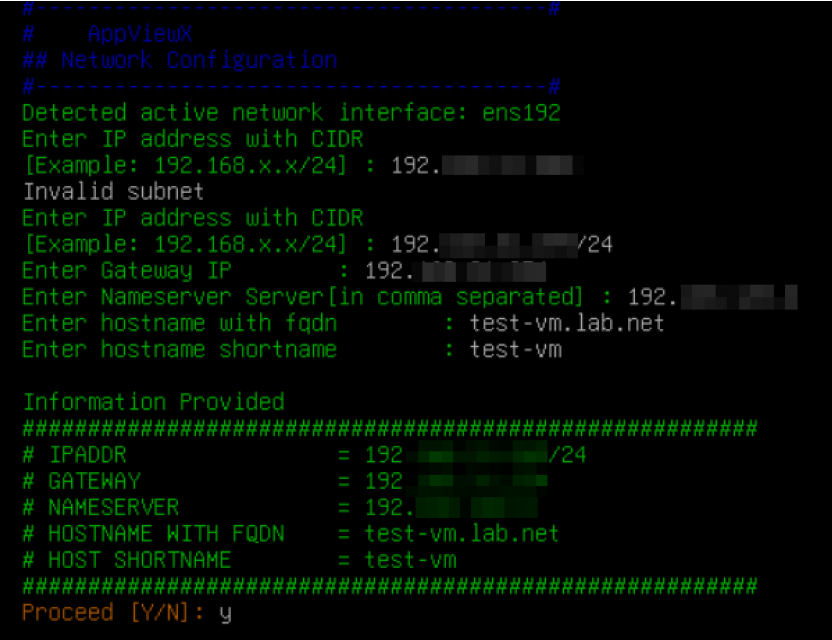 .Note: The AppViewX provisioning console opens automatically.
- Detected active network interface - The automation automatically detects the active network interface (for example, ens192) that will be used for network configuration.
- Enter IP address with CIDR - Provide the server IP address along
with the subnet in CIDR format.
- Valid format: 192.168.1.xx/24
- Invalid format examples:
- 192.168.1.xx (missing CIDR)
- 192.168.1.xx/ (incomplete subnet)
- 192.168.1.xx/33 (invalid subnet range)
- 192.168.x/24 (invalid IP format).
- Enter Gateway IP - Provide the default gateway IP address used
for external network communication.
- Valid format: 192.168.1.x
- Invalid format examples:
- 192.168.x
- 192.168.1.xxx
- gateway.local
- Enter Nameserver Server [in comma separated] - Provide one or
more DNS server IP addresses separated by commas.
- Valid format: 8.8.8.8,1.1.1.x
- Invalid format examples:
- 8.8.x
- 8.8.8.8;1.1.1.x (semicolon not supported)
- dns.google
- Enter hostname with FQDN - Provide the Fully Qualified Domain
Name (FQDN) of the server.
- Valid format: test-vm.lab.net
- Invalid format examples:
- test-vm (missing domain)
- .lab.net
- test vm.lab.net (spaces not allowed)
- Enter hostname shortname - Provide the short hostname without the
domain name.
- Valid format: test-vm
- Invalid format examples:
- test-vm.lab.net (FQDN not allowed)
- test vm (spaces not allowed)
- test_vm! (special characters not supported).
- Information Provided - The automation displays a summary of the entered network configuration details for verification before applying the changes.
- Proceed [Y/N] - Enter Y to confirm and apply the configuration,
or N to cancel and modify the entered details.
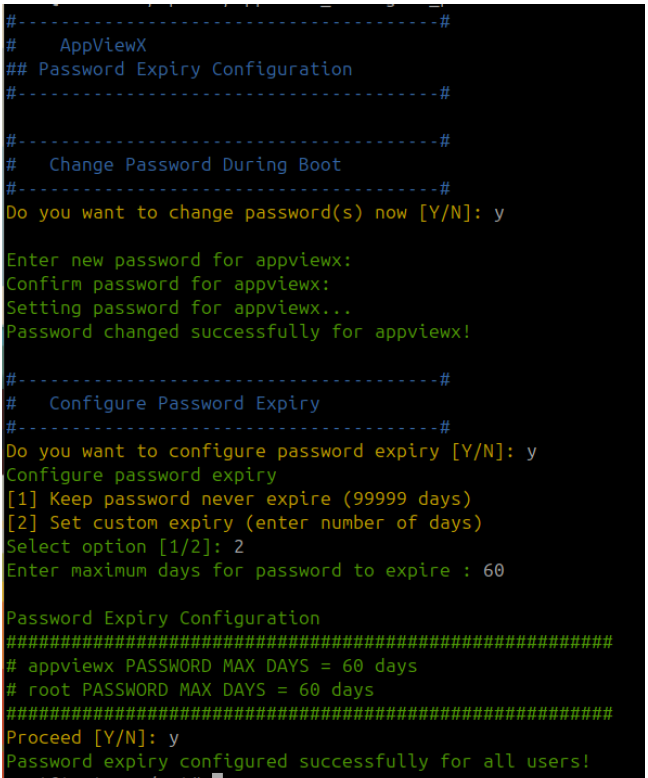
- Change Password During Boot – The automation prompts
whether the user wants to change the default passwords during
the boot process.
- Prompt: Do you want to change password(s) now [Y/N]:
- Valid input: Y or N.
- Invalid input examples: Yes, No, and 1.
- Enter new password for appviewx – Provide the new
password for the appviewx user. The password supports a minimum
of 14 characters.
- Valid format: Strong password with atleast 2 uppercase,
2 lowercase, 2 number, and 2Note: Special character with minimum 14 characters.
- Valid example: Ovaa@Summer@7835672
- Invalid format examples:
- Empty password
- password (weak password)
- 12345678 (numeric only, monotonic sequence)
- Appviewx@72635425(contains username)
- Valid format: Strong password with atleast 2 uppercase,
2 lowercase, 2 number, and 2
- Confirm password for appviewx – Re-enter the same
password entered in the previous step for confirmation.
- Valid input: Same password as previously entered.
- Invalid input examples:
- Password mismatch
- Empty confirmation password
- Password changed successfully – The automation updates the password for the specified user account successfully.
- Configure Password Expiry – The automation prompts
whether password expiry needs to be configured.
- Prompt: Do you want to configure password expiry [Y/N]:
- Valid input: Y or N
- Invalid input examples: Yes, 0, and Blank input.
- Password Expiry Options – Select the password expiry
policy option.
- [1] Keep password never expire (99999 days)
- [2] Set custom expiry (enter number of days)
- Valid input: 1 or 2
- Invalid input examples: 3, abc, and Empty input.
- Enter maximum days for password to expire – Provide the
maximum number of days after which the password should
expire.
- Valid format: Positive numeric value (example: 60)
- Invalid format examples: 0, -1, sixty, Special characters.
- Password Expiry Configuration Summary – The automation
displays the configured password
expiry values for verification before applying the changes.
- Change Password During Boot – The automation prompts
whether the user wants to change the default passwords during
the boot process.
- Proceed [Y/N] – Enter Y to confirm and apply the password expiry configuration, or N to cancel and modify the entered details.
