Self-Service SIGN+: Download Package & Manage Credentials
Objectives
Key Requirements- Enable user autonomy: Allow users to access and install the SIGN+ package on their own systems.
- Credential ownership: Provide users the ability to generate, view, and manage their own credentials securely.
- Ensure isolation and security: Enforce strict separation so that each user can access and manage only their own service accounts and credentials, with no visibility into other users' data.
- Reduce admin dependency: Eliminate the need for administrator involvement in distributing the SIGN+ package and credential management operations.
- Secure, authenticated access to download the SIGN+ package.
- Role-based access control (RBAC) ensures users can only manage their own accounts and credentials.
- A user-friendly interface to view, create service accounts.
- Enforcement of isolation rules to prevent access to service accounts created by other users.
Self-Service Package Download using SSO with Service Account
Overview
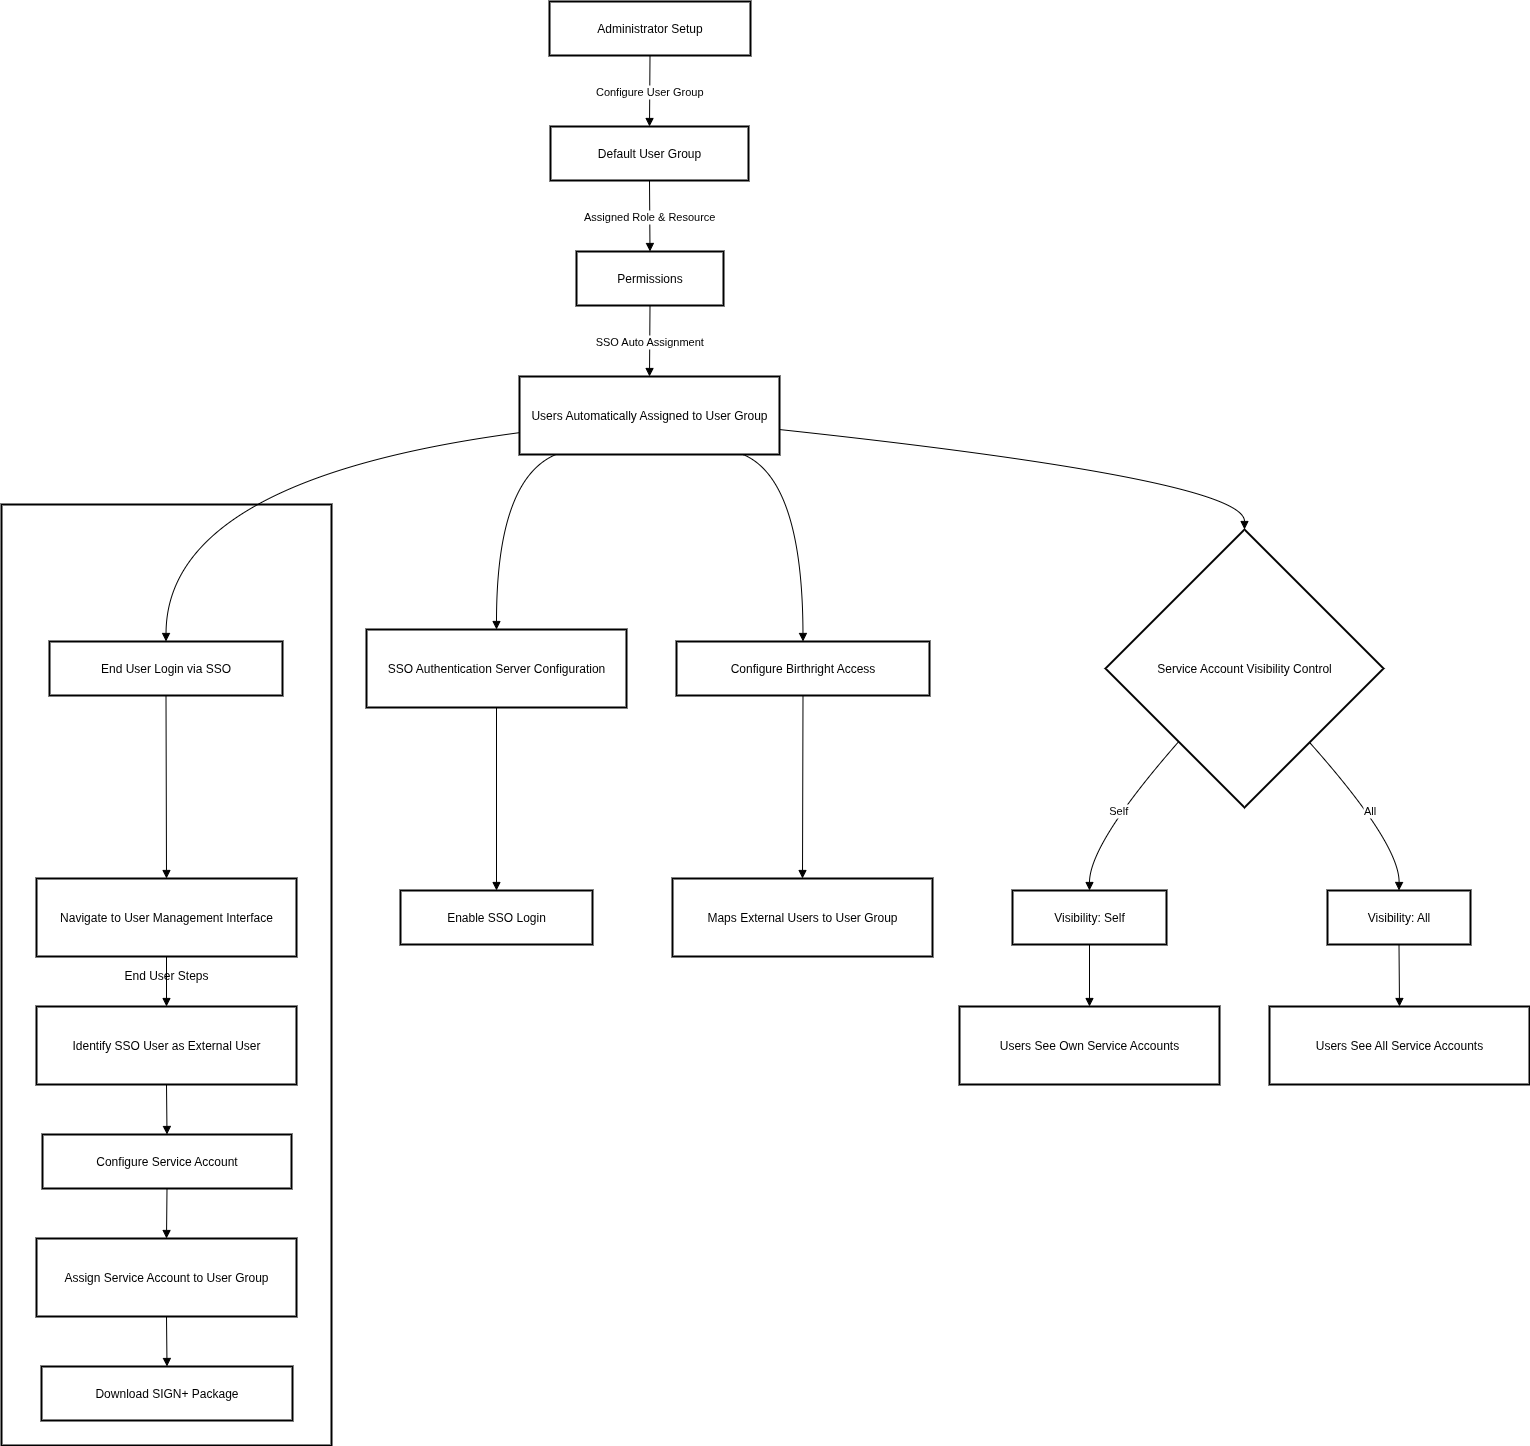
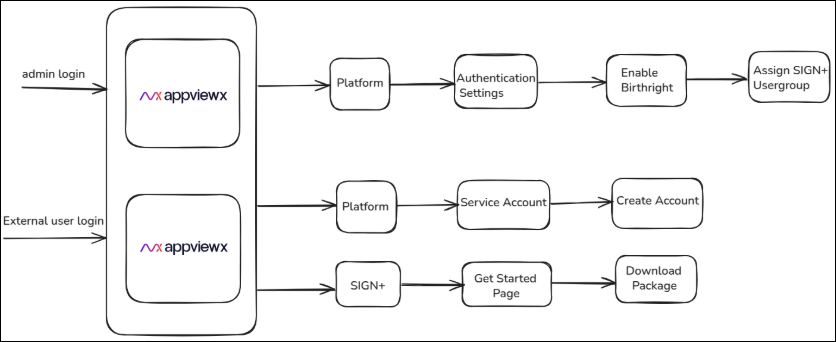
Steps for the Administrator
-
The administrator must configure a default user group, which will be
associated with a specific Role and Resource containing only the
necessary permissions.
Note: Any user logging in via SSO will automatically be assigned to this user group and will be able to perform only the actions permitted by the assigned role.
-
Service Account Visibility Control : The role assigned to a user
group will include a crucial setting for managing the visibility of
service account details. This setting offers three distinct options,
allowing for granular control over who can view information about the
service accounts, particularly those created by users within that
group.
- Self: When "Self" is selected, users within the assigned group will only be able to view the service account details for accounts they themselves have created. This option ensures a high level of privacy and control, limiting access strictly to the creator of the service account. It's ideal for scenarios where individual accountability and data isolation are paramount.
- All: Choosing "All" will grant users within the assigned group the ability to view the details of all service accounts, regardless of who created them. This option provides complete transparency within the designated user group and is suitable for collaborative environments where multiple team members may need access to various service accounts for operational or troubleshooting purposes.
The system will dynamically adjust the displayed service accounts based on the permission selected. For example, if "Self" is chosen, the user's interface will only present the service accounts they have personally generated. If "All" is active, a comprehensive list of all service accounts will be visible. This ensures that users consistently have access only to the relevant accounts, maintaining security and preventing unauthorized viewing of sensitive service account information. -
The administrator needs to configure the SSO authentication server
within the platform to enable users to log in via SSO.
Reference Link: For SSO Integration.
-
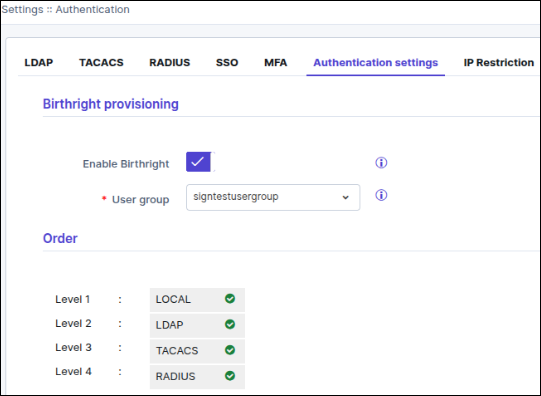
The administrator will configure birthright access to
automatically assign external users (who log in via SSO) to the
appropriate user group which was configured in the previous step upon
their first login. This setup is managed through the Platform →
Access Management → Authentication Settings section of the
application. By enabling birthright access, the platform ensures that
external users are seamlessly mapped to predefined user groups without
requiring manual intervention. These user groups are configured with
specific roles and permissions relevant to their access needs so that
users are granted the correct level of access immediately upon logging
into AppViewX via SSO. This approach streamlines user onboarding while
maintaining consistent security and role-based access control.
Steps for the End User
- To access the application, utilize Single Sign-On (SSO) for login. User access within the application's interface is restricted based on the permissions associated with their designated user group.
-
Navigate to Platform → Identity → User. The SSO User will be
identified as an external user which would have been assigned to the
respective user group which was configured in the Authentication
Settings.
Reference Link: Default Roles Creation.
-
Since SSO user credentials do not allow access to SIGN+ services
through REST APIs, the user should configure a service account
and assign it to the appropriate user group. Navigate to Platform →
Identity → Service Account to perform this configuration.
- Reference Link: Service Account Creation.
- Reference Link: Service Account Management.
-
The user is now ready to download the SIGN+ package using the
created service account and associated policies to perform signing
operations. Navigate to Get started page to download and the SIGN+
Package for the required credential.
Reference Link: SIGN+ Package Download.
Flowchart on How RBAC Works