Migrating the CA for Code Signing Certificates
-
Go to
 (Menu) > CERT+ > CERTIFICATE
ACTION > CA Switch > Code
Signing.
The Code Signing Certificate page is displayed.
(Menu) > CERT+ > CERTIFICATE
ACTION > CA Switch > Code
Signing.
The Code Signing Certificate page is displayed. -
To run the revocation check for a certificate,under Common Name, select
the checkbox corresponding to the required certificate.
Tip: You can run the revocation check for more than one certificate at the same time. To do this, select the checkboxes corresponding to all the required certificates.
-
From the Actions menu, select CA Switch.
The CA Switch dialog box is displayed.
-
Enter/Select the switch-related details.
Table 1. Field descriptions for the CA Switch details Options Description *Target CA From the dropdown list, select the target CA for the CA switch operation. *Settings From the dropdown list, select the CA setting that will be applied to the CA switch operation. *Name Enter a unique name for the CA switch operation. This will help to identify the CA switch process within the system.
Constraints:- Valid special characters for CA switch name: space, ., -, _
- CA switch name cannot start with a special character.
-
Click Save.
The CA Switch Summary page is displayed.
Table 2. Understanding the CA Switch Summary Options Description 
Allows you to delete the certificates from the list if decided not to migrate. 
Refreshes the CA Switch summary page. 
Displays the number of certificates displayed on the current page. 
Allows you to move to the next and previous page if more pages exist. Search Searches for the given keyword in the field and results in the feature that matches the search keyword. Color Coding Status The color code on the top-right indicates the status of the certificate on the CA Switch summary page. - For the certificate you want to migrate, select the corresponding checkbox.
- In the Common Name column, click the eye icon to view certificate details.
- In the CSR details column, click Update CSR to review the details.
- In the Validation log column, click View to display the events recorded during the CA switch.
- Click Submit.
-
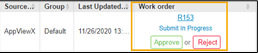
Perform the required actions in the Work order column.
-
In the Work order column, click Approve.
The Approve dialog box is displayed.
- If the workflow request has to be approved automatically in the future, click Schedule later.
- Select the Implementation Time from the calendar field.
- Enter the Comments.
- Click Yes.
-
In the Work order column, click the status if you want
to see the Summary and Details of the progress.
The View Work order Status page is displayed.
-
In the Work order column, click Implement.
The Implement dialog box appears.
- If the workflow request has to be approved automatically in the future, click Schedule later.
- Select the Implementation Time from the calendar field.
- Enter the Comments in the field.
- Click Yes.
-
In the Work order column, click the status if you want
to see the Summary and Details of the progress.
The View Work order Status page is displayed.
-
Click the refresh icon on the top-right of the page to update the Work Order
status.
After the CA Switch is completed, the Work order status changes to Completed.
Bulk Migrating the CA for Code Signing Certificates
Important: Currently, the bulk CA switch feature
has been enabled only for switching from:
- All CAs to Microsoft CA (Enterprise and Standalone)
- Microsoft CA (Enterprise and Standalone) to Microsoft CA (Enterprise and Standalone)
-
Go to (Menu) > CERT+ > CERTIFICATE
ACTION > CA Switch > Code
Signing.
The Code Signing Certificate page is displayed.
- Select the checkboxes corresponding to the certificates for which the CA has to be migrated.
-
From the Actions menu, select CA
Switch.
The CA Switch dialog box is displayed.
-
Enter/Select the switch-related details.
Table 3. Field descriptions for the CA Switch details Options Description *Target CA From the dropdown list, select Microsoft Enterprise CA/Microsoft Standalone CA. *Settings From the dropdown list, select the CA setting that will be applied to the CA switch operation. *Name Enter a unique name for the CA switch operation. This will help to identify the CA switch process within the system.
Constraints:- Valid special characters for CA switch name: space, ., -, _
- CA switch name cannot start with a special character.
-
Click Save.
The CA Switch Summary page is displayed.
This page lists all the CA switch requests pending approval.
-
To bulk approve CA switch requests, select the checkboxes corresponding to
the required requests.
The Bulk Update CSR and Actions buttons are enabled.
-
Click Bulk Update CSR.
The Update Connector Details dialog box is displayed.
- Update the connector details, as required.
-
Click Update.
You will be redirected to the CA switch summary page. The Certificate Status is updated to Ready to migrate.
- Select the required CA switch requests.
-
Click Submit.
The message Selected certificates have been submitted. is displayed.
Work order details of the selected requests are updated to display the work order number, and the Approve and Reject buttons.
- Select the required CA switch requests.
- To approve the CA switch request, from the Actions menu, select Proceed Further.
- In the Confirmation dialog box displayed, click Yes.
- To implement the CA switch requests, from the Actions menu, again, select Proceed Further.
- In the Confirmation dialog box displayed, click Yes.
- Once the CA switch requests are processed, the Work Order status is updated to Completed.