Linux-based Installation of the Config Scan Agent
Prerequisites
- Ubuntu: 20.04 and above (GLIBC >= 2.28)
- RHEL: 8 and above (GLIBC >= 2.28)
- sudo access (not needed if the user is a root user)
- Read access, for input files
- Execute access, for extracting service metadata
- Write access, for the output folder in which the scan reports must be saved
Installation Instructions
-
Login and download the latest Linux variant of the AppViewX Config Scan
Agent from the release portal (link given below), in your Ubuntu or RHEL
machine, as required.
https://release.appviewx.com/downLoadArtifact?id=1820Note: This agent can be used to perform configuration scan, certificate scan, and network scan.
-
To verify that the tar file has not been tampered with and is secure for
use.
-
From the downloaded folder, execute the following command to untar the
downloaded file:
tar -xvf config-scan-agent-linux-v2.0.0-2026.1.tar.gzThe AppViewX Config Scan Agent, config-scan-agent, is extracted from the zipped file. - Save the AppViewX Config Scan Agent in all the endpoint machines where the configuration scan needs to be performed.
-
Verify if the execute permission has been assigned to the executable. If
not, execute the following command:
chmod +x config-scan-agent -
Create the configuration file required to run the AppViewX Config Scan
Agent.
./config-scan-agent --create-configFor additional options that you can use with the
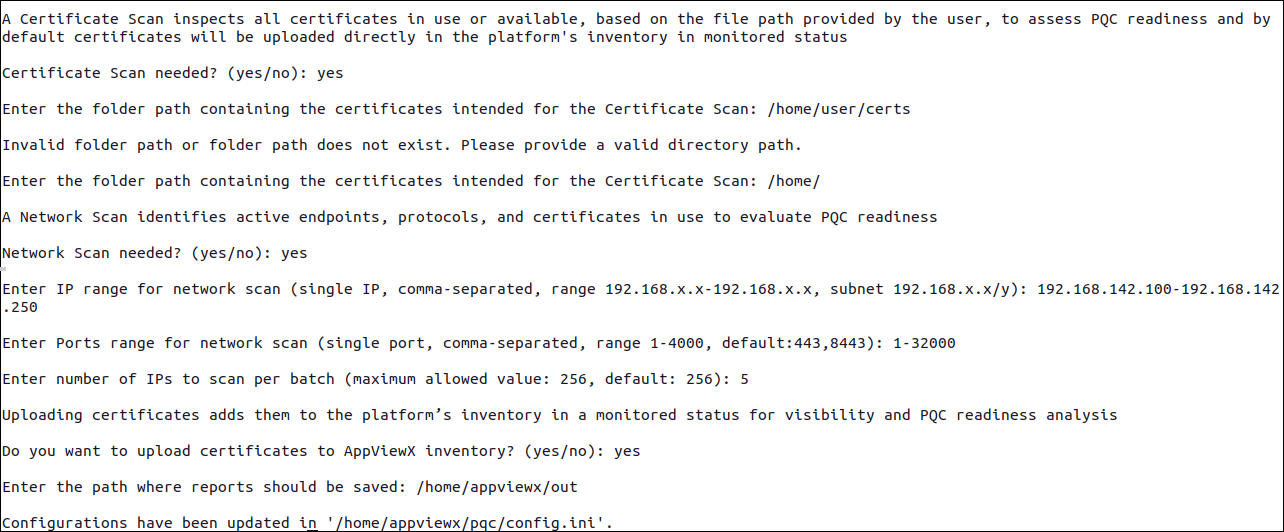
./config-scan-agentcommand, click here.Executing this command will display a series of prompts to set up the configuration scan (as shown in the image below); your responses to these prompts will be entered in the configuration file.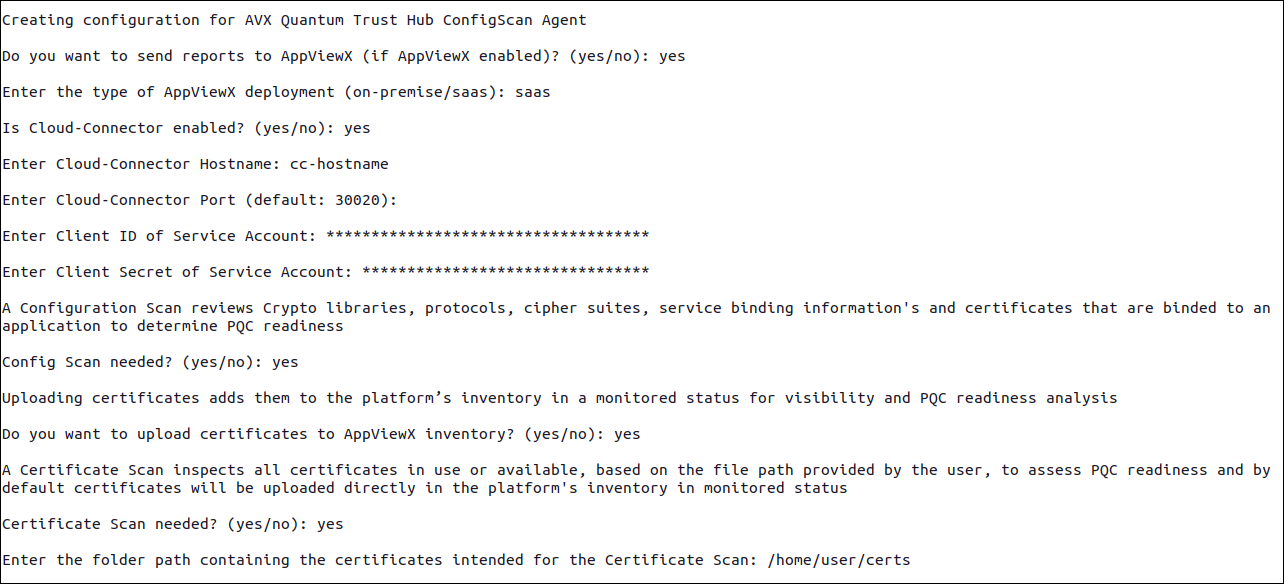
 Note: For a full list of the options available for configuring the AppViewX Config Scan Agent, execute the following command:
./config-scan-agent --help -
Reply to the configuration prompts displayed.
The prompts and their recommended responses are explained in detail here.Important: You will also be required to enter your service account details as part of the configuration file set up. Ensure that the service account is created and you have the required details. For instructions, see Configuring a Service Account to Send Reports to AppViewX.The prompt responses will be used the following two files in the working directory of the host machine: config.ini (configuration file) and secret.key (file containing the secret key for the encryption and decryption)
-
To view the existing configuration, execute the following command:
Here:./config-scan-agent --view-config <config_file_path> --secret-key <secret_key_path>- <config_file_path>: Location of the configuration file
- <secret_key_path>: Location of the secret key file
-
To perform the config scan, execute the following command:
Here:./config-scan-agent --config <config_file_path> --secret-key <secret_key_path> --log-dir <log_directory>- <config_file_path>: Location of the configuration file
- <secret_key_path>: Location of the secret key file
- <log_directory>: Location of the file where the logs must be saved
After the scan is completed:- Output reports (JSON/CSV/CycloneDX CBOM) will be saved in the output path provided in the configuration file.
- If enabled, the output reports will be sent to AppViewX and the corresponding data will be displayed in the List of Scans inventory in the Quantum Trust Hub.
- The configuration scan results will be displayed on the Configuration Scan Dashboard in the Quantum Trust Hub.
- Depending on the response to the corresponding prompt, certificates discovered as part of the scan will be uploaded to the AppViewX certificate inventory, in the Monitored state.
- Logs will be generated and saved in the working directory, by
default.
To save the logs in a custom log directory use the
<log_directory>argument to specify the required location.
Additional Instructions
- To update the contents of the configuration file:
- Execute the following
command:
./config-scan-agent --update-config <config_file_path> --secret-key <secret_key_path>The configuration prompts are displayed.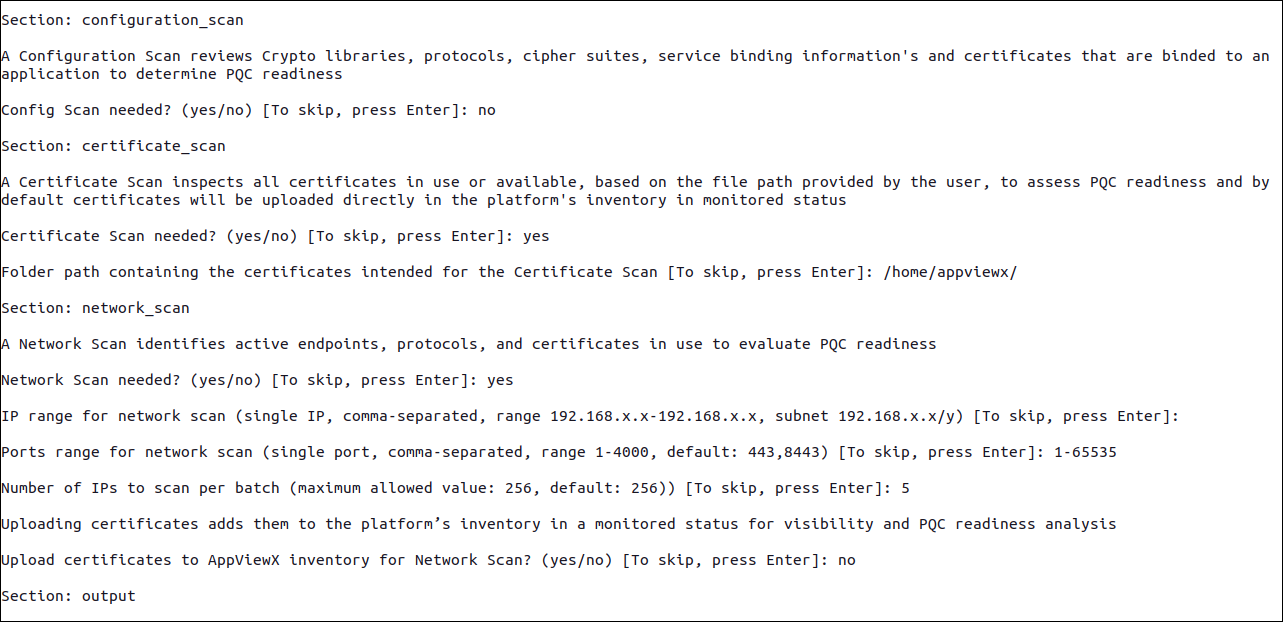
- Update the prompt responses as required.
All updated values will overwrite the existing values
- Execute the following
command:
- To update only the service account details, execute the following command
and update the prompt
responses:
./config-scan-agent --update-service-acc <config_file_path> --secret-key <secret_key_path> - To set log levels, log directory, output directory use the options provided
in the - -help option.For example:
-
--log-level INFO ['DEBUG', 'INFO', 'WARNING', 'ERROR', 'CRITICAL'] -
--log-dir /path/to/log/dir -
--output /path/to/output/dir
-
- To rotate the secret key (by default generated every time a new
configuration file is generated) used for encryption and decryption of the
service account credentials and the configuration file, execute the
following
command:
Pass the./config-scan-agent --rotate-key <secret_key_path> --config <config_file_path>--configargument to continue using the existing configuration file with the newly rotated secret key.