Upgrading the Config Scan Agent
Important: Currently, agent version upgrade is supported
only for the Linux v2.0.0 (2026.1) and Windows v1.0.0 (2026.1) base versions. If
your current agent version is Linux v1.0.0 (2025.11), please ensure that you replace
the older version with the Linux v2.0.0 (2026.1) version.
Upgrading a Linux-based Installation of the Config Scan Agent
- Manually use the upgrade script to download the latest binary and replace the existing one
- Schedule the upgrade process to run automatically at regular intervals
Manually Initiating Upgrades
Ensure that you have the following:
- Configuration file (config.ini)
- Secret key file (secret.key)
- jq, tar, and realpath utilities installed in the Linux machine
- Sudo privileges
-
Assign executable permission to the upgrade script.
chmod +x ./config_scan_upgrade.sh -
Execute the following command:
Here:./config_scan_upgrade.sh \ --config /path/to/config.ini \ --key /path/to/secret.key \ --agent /path/to/config-scan-agent \ –-no-delay- /path/to/config.ini is the absolute path of the config.ini configuration file
- /path/to/secret.key is the absolute path of secret.key secret key file
- /path/to/config-scan-agent is the absolute path of config-scan-agent binary
The command checks the version of the currently installed agent. If the agent is not up to date and an upgrade is required, the upgrade script is triggered, which identifies the latest available version of the agent and initiates the upgrade. The following log messages are displayed on the terminal:If the agent version is up to date and an upgrade is not required, the following log messages are displayed: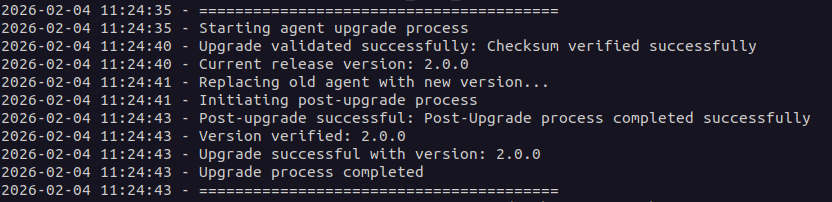
 Note: To view how to use the upgrade script, run this command with the
--helpflag. For the complete list of additional commands that can be used for the config scan agent configuration, click here.
Scheduling the Upgrade Process
Ensure that you have the following:
- Configuration file (config.ini)
- Secret key file (secret.key)
- Upgrade script (config_scan_upgrade.sh) and scheduler script (config_scan_upgrade_scheduler.sh) placed in the same folder as the agent
- jq, tar, and realpath utilities installed in the Linux machine
- Sudo privileges
-
Assign the executable permission to the scheduler and upgrade
scripts.
chmod +x config_scan_upgrade_scheduler.sh chmod +x config_scan_upgrade.sh -
Schedule the upgrade process.
Here:sudo ./config-scan-agent --config /path/to/config.ini --secret-key /path/to/secret.key --schedule-upgrade- /path/to/config.ini is the absolute path of the config.ini configuration file
- /path/to/secret.key is the absolute path of secret.key secret key file
Executing this command creates a systemd service that checks for available upgrades every 6 hours and initiates an upgrade if one is available.Note: To set a custom upgrade check interval, use the above command with the --interval flag. However, remember that the minimum required interval duration is 90 minutes.For example, to set the interval to 90 minutes, execute the following command:sudo ./config-scan-agent --config /path/to/config.ini --secret-key /path/to/secret.key --schedule-upgrade --interval 1h30minNote: To view how to use the upgrade script, run this command with the--helpflag. For the complete list of additional commands that can be used for the config scan agent configuration, click here. -
To check logs for the running systemd service, execute the following
command:
journalctl -u config_scan_upgrade.service
Upgrading a Docker-based Installation of the Config Scan Agent
Ensure that you have access to images.appviewx.com.
-
Pull the latest Docker image of the AppViewX Config Scan Agent from the
AppViewX Docker Registry.
docker pull images.appviewx.com/appviewx/pqc_config_scan:latest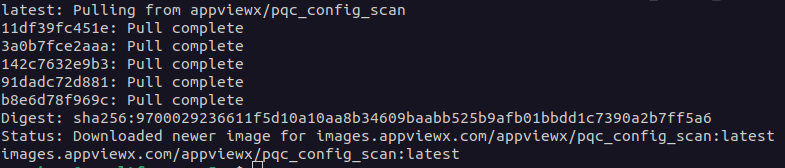
- Execute the agent using the installation instructions given here.
Upgrading a Windows-based Installation of the Config Scan Agent
- Manually use the upgrade script to download the latest binary and replace the existing one
- Schedule the upgrade process to run automatically at regular intervals
Note: The agent binary and upgrade scripts will be
digitally signed using the AppViewX Intermediate Certificate. This certificate
will be added to the Windows Trusted Publishers store to ensure seamless
execution of the binary and upgrade scripts without any security
restrictions.
Manually Initiating Upgrades
Ensure that you have the following:
- Configuration file (config.ini)
- Secret key file (secret.key)
- Administrator user/SYSTEM account privileges
Execute the following command in PowerShell:
./config_scan_upgrade.ps1 \
-config /path/to/config.ini \
-key /path/to/secret.key \
-agent /path/to/config-scan-agent.exe \
-no_delay
- /path/to/config.ini is the absolute path of the config.ini configuration file
- /path/to/secret.key is the absolute path of secret.key secret key file
- /path/to/config-scan-agent is the absolute path of config-scan-agent binary
The command checks the version of the currently installed agent.
If the agent is not up to date and an upgrade is required, the
upgrade script is triggered, which identifies the latest available
version of the agent and initiates the upgrade. The following log
messages are displayed on the terminal:If the agent version is up
to date and an upgrade is not required, the following log messages
are displayed:
Note: To view how to use the upgrade script, run
this command with the
--help flag. For the complete
list of additional commands that can be used for the config scan
agent configuration, click here.Scheduling the Upgrade Process
Ensure that you have the following:
- Configuration file (config.ini)
- Secret key file (secret.key)
- Upgrade script (config_scan_upgrade.ps1), scheduler script (config_scan_upgrade_scheduler.ps1), and batch script (config_scan_upgrade_scheduler.bat) placed in the same folder as the agent
- Administrator user/SYSTEM account privileges
- Create the configuration file and the secret key file.
-
To schedule the upgrade process, run the following command in
PowerShell:
Here:./config-scan-agent.exe --config /path/to/config.ini --secret-key /path/to/secret.key --schedule-upgrade- /path/to/config.ini is the absolute path of the config.ini configuration file
- /path/to/secret.key is the absolute path of secret.key secret key file
Executing this command creates a scheduled task that checks for available upgrades every 6 hours and initiates an upgrade if one is available.Note: To set a custom upgrade check interval, use the above command with the --interval flag. However, remember that the minimum required interval duration is 90 minutes.Logs for the scheduled task can be viewed at the following location: c:\agent\logs.For example, to set the interval to 90 minutes, execute the following command in PowerShell:./config-scan-agent.exe --config /path/to/config.ini --secret-key /path/to/secret.key --schedule-upgrade --interval 1h30minNote: To view how to use the upgrade script, run this command with the--helpflag. For the complete list of additional commands that can be used for the config scan agent configuration, click here.