Configuring PQC Readiness/Post-Quantum Policies
- Continuously evaluates your organization’s algorithms and protocols against the PQC-readiness standards
- Automatically transforms non-compliant cryptographic elements into compliant ones based on organization-specific policy decisions
- Detecting all cryptographic algorithms/protocols in use across applications, infrastructure, and source code
- Classifying each algorithm as quantum Vulnerable or Quantum Resistant per custom PQC policy
- Maintaining the auditability of decisions and changes for security and compliance reporting
- Supporting crypto-agility so policies can evolve with new PQC standards or threat intelligence
Viewing the PQC Policy Inventory
Prerequisite: Verify that your user role has the required ACF permission to view policy inventory. To enable ACF permission, click here.
To view the PQC Policy inventory, go to Menu > Quantum Trust Hub > Policy.
The PQC Policy page is displayed.
This page documents all key details related to each governance policy created for your organization’s quantum-readiness framework. It also lets you create, modify, and delete policies, and control policy enforcement.
Understanding the PQC Policy Inventory
| Fields | Description |
|---|---|
| Toolbar | The PQC policy inventory toolbar has the
following options:
|
| Policy Name | User-assigned policy name |
| Description | Additional details related to the policy, if and as specified by the user |
| Policy Scope | Cryptographic asset that the policy was created for (code, configuration, certificate) |
| Policy Enforcement | This field controls enabling/disabling a policy.
For instructions and ACF rules, see Enforcing a Policy. Important: There can be only
one active policy at a time. |
Creating a Policy
Prerequisite: Verify that your user role has the required ACF permission to create policies. To enable ACF permission, click here.
Creating a Custom Policy
-
Go to
 (Menu) > Qauntum Trust Hub
> Policy.
The Post-Quantum Policy page is displayed, which is your complete policy inventory.
(Menu) > Qauntum Trust Hub
> Policy.
The Post-Quantum Policy page is displayed, which is your complete policy inventory. -
From the toolbar, click Create.
The Post-Quantum Policy > Create page is displayed.
-
Under Crypto Policy Management:
-
Click Save.
The policy is created and listed in the PQC policy inventory.
Adding a Code Rule to Your Custom Policy
-
From the scope toolbar, click Code and then
click Add Policy.
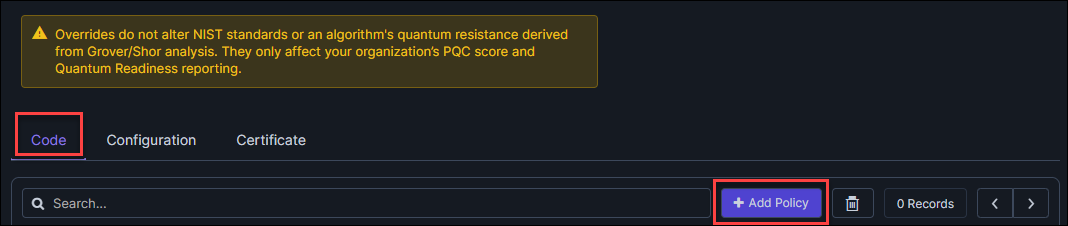 The Add Policy pop-up dialog box is displayed.
 -
Enter/Select the following details for the code rule in your custom
policy:
Important: Overrides do not alter NIST standards or an algorithm's quantum resistance derived from Grover/Shor analysis. They only affect your organization’s PQC score and Quantum Readiness reporting.
Fields Description *Type To override the default quantum-safety status for an encryption algorithm, from the dropdown list, select the required algorithm type. *Override Classification From the dropdown list, select the new quantum-safety status value for the selected algorithm, which will override its default value. *Key type & strength From the dropdown list, select the new key type and strength that will override the algorithm’s default values. Notes Enter your justification for the override configured using the above fields. While this is an optional field, entering the description is a recommended practice to ensure a knowledge base to guide decisions for future configurations to a policy.
*: Mandatory fields -
Click Add Policy Rule.
The code rule is added to the rule inventory.
To read on the details in the rule inventory, click here.
Adding a Configuration Rule to Your Custom Policy
-
From the scope toolbar, click Configuration and
then click Add Policy.
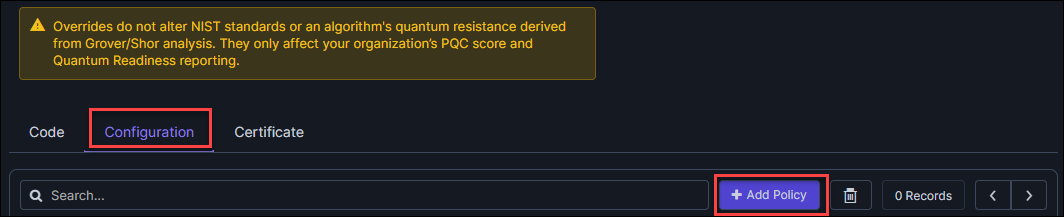 The Add Policy pop-up dialog box is displayed.
 -
Enter/Select the following details for the configuration rule in your
custom policy:
Important: Overrides do not alter NIST standards or an algorithm's quantum resistance derived from Grover/Shor analysis. They only affect your organization’s PQC score and Quantum Readiness reporting.
Fields Description *Type To override its default NIST classification, from the dropdown list, select the required protocol or cipher suite component. *Override Classification From the dropdown list, select the new quantum-safety status value for the selected protocol/cipher suite component, which will override its default value. *Key type & strength From the dropdown list, select the key type and strength that will override the selected protocol/cipher suite component’s default values. Notes Enter your justification for the override configured using the above fields. While this is an optional field, entering the description is a recommended practice to ensure a knowledge base to guide decisions for future configurations to a policy.
*: Mandatory fields -
Click Add Policy Rule.
The configuration rule is added to the rule inventory.
To read on the details in the rule inventory, click here.
Adding a Certificate Rule to Your Custom Policy
-
From the scope toolbar, click Certificate and
then click Add Policy.
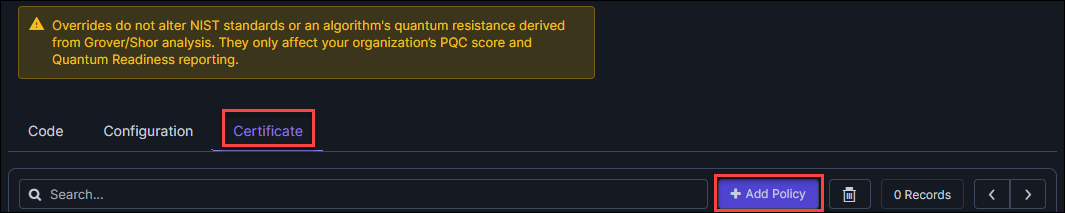 The Add Policy pop-up dialog box is displayed.
 -
Enter/Select the following details for the certificate rule in your
custom policy:
Important: Overrides do not alter NIST standards or an algorithm's quantum resistance derived from Grover/Shor analysis. They only affect your organization’s PQC score and Quantum Readiness reporting.
Fields Description *Type To override the default quantum-safety status for an encryption algorithm, from the dropdown list, select the required algorithm type. *Override Classification From the dropdown list, select the new quantum-safety status value for the selected algorithm, which will override its default value. *Key type & strength From the dropdown list, select the key type and strength that will override the selected algorithm’s default values. Notes Enter your justification for the override configured using the above fields. While this is an optional field, entering the description is a recommended practice to ensure a knowledge base to guide decisions for future configurations to a policy.
*: Mandatory fields -
Click Add Policy Rule.
The certificate rule is added to the rule inventory.
To read on the details in the rule inventory, click here.
Understanding the Rule Inventory
Common Inventory Functions
| Fields | Description |
|---|---|
| Search | Enter free text or keywords to search for specific policies in the inventory. |
|
|
To delete a rule from the
inventory, select the corresponding checkbox and click
|
| Pagination | Use the pagination control
dropdown to select the number of records that will be
displayed per page of the inventory. You can select to display 25, 50, 75, or 100 records per page of the inventory. |
| Pagination navigation | Use the pagination navigation buttons to move between the pages in the inventory. |
Rule Details
| Fields | Description |
|---|---|
| Type | Algorithm/protocol/cipher suite component for which the quantum-status classification has been modified |
| Key Type & Strength | Default key type and strength of the selected algorithm/protocol/cipher suite component |
| Default Quantum Status | Default quantum-status of the selected algorithm/protocol/cipher suite component |
| Organization override | New quantum-status classification assigned to the selected algorithm/protocol/cipher suite component, which will override the default value |
| Added By | Name of the user who created the policy rule |
| Date | Date on which the policy rule was created |
Enforcing a Policy
Enabling ACF for Policy Enforcement
Enabling/Disabling a Policy
Modifying a Policy
Prerequisite: Verify that your user role has the required ACF permission to modify policies. To enable ACF permission, click here.
-
From the PQC Policy inventory,
click the Policy Name of the policy that has to be modified.
Policy details entered at the time of policy creation are displayed.
-
Update the policy details as required.
For field descriptions, see the corresponding instruction in Creating a Policy.
- Click Save.
-
Click Update.
A confirmation message is displayed to indicate if the policy update was a success or a failure.
If the policy update is a success, all reports are updated immediately according to the modifications made.
Deleting a Policy
Prerequisite: Verify that your user role has the required ACF permission to delete policies. To enable ACF permission, click here.
-
From the PQC Policy inventory,
select the checkbox corresponding to the policy you want to delete.
You can select more than one policy.
-
From the toolbar,
click Delete.
The selected policy is/policies are deleted.