Upgrade AppViewX in Managed Kubernetes
- If you are using the self managed private docker registry instead of AppViewX's docker registry, then before proceeding with the upgrade, ensure you have copied the latest images to your registry. The list of images can be found in the Prerequisite section - AppViewX Docker Images.
To upgrade AppViewX with a new image version, follow the steps below:
-
To take the backups, execute the commands below.
For self-managed mongodb:
kubectl create job --from=cronjob/mongo-backup -n avx mongo-backup-<unique-identifier>
Replace <unique-identifier> in above commands with some random string and run. Monitor the pods until completion and verify the backups are placed in the storage bucket.kubectl create job --from=cronjob/vault-backup -n avx vault-backup-<unique-identifier>Note: Atlas backup must be taken in the atlas dashboard. Refer to the atlas snapshots section in the page Backup and Restore. - Before performing the Infra Upgrade, update the following parameters.
- Download the upgrade tar file (upgrade.tar.gz) from the release portal and extract it to a suitable location. (The extracted files contain the binary and helm charts tar.)
- Navigate to the folder where the upgrade tar is extracted.
-
Copy the appviewxctl binary from the current folder (extracted folder
location) to the installer location.
cp appviewxctl <absolute path of the installer directory> - Navigate to the installer directory.
-
To merge the old data of .appviewxctl.yaml to the new file, execute the command
below.
./appviewxctl mergeConfForUpgrade --config .appviewxctl.yaml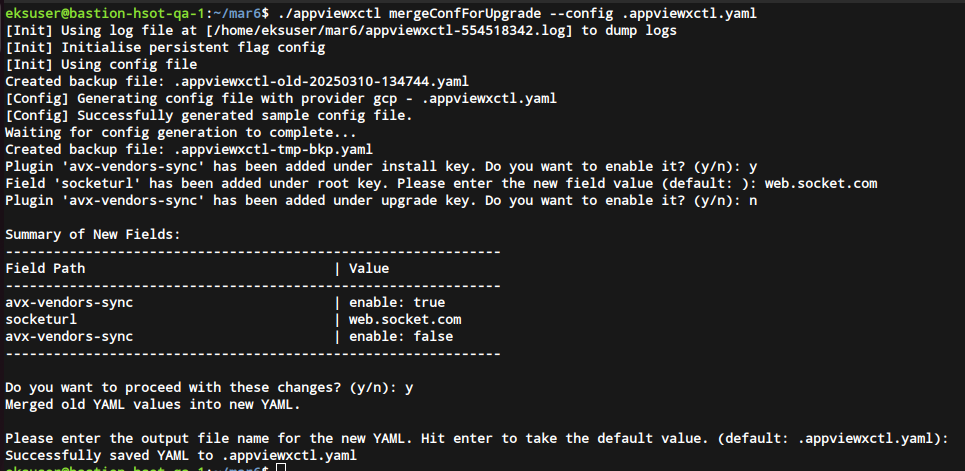 During the execution of the above
command, the fields of the old conf file are compared with that of the newly
generated conf file and you will be prompted to enter values.
During the execution of the above
command, the fields of the old conf file are compared with that of the newly
generated conf file and you will be prompted to enter values.- If it's a plugin, you'll be prompted to enable or disable it during both installation and upgrade.
- If a new field has been added to the
.appviewxctl.yamlfile, you'll be prompted to provide a value for it. Pressing Enter without input will apply the default value.
Once all the values are entered, the process continues as follows:
- A summary table is displayed to confirm the provided inputs.
- If the user declines, the prompts will repeat.
- If the user confirms, the system proceeds to merge the old YAML with the new one.
- The values provided by the user for the newly added fields will be retained, while existing fields will retain values from the old configuration file.
- Users can specify a custom output filename for the merged YAML; if not
specified, the default will be
.appviewxctl.yaml. - The merged YAML is successfully saved to the output file.
-
Refer to the tables below for the essential upgrade parameters and their
description.
Table 1. Upgrade Parameters in the appviewxctl.yaml file Parameters Description of Values upgrade.imageRegistry The URL of the container registry where the images are to be pulled from by the pods. Example: gcr.io/pe-qa-358108
upgrade.imageTag The tag of the image that will be used for upgrade. Example: 2023.1.0_FP_750-alpine
install.imageTag The tag of the image that will be used for installation. Example: 2022.1.0_FP_750-alpine
upgrade.isSaasEnabled Boolean value for SaaS enablement. This value should be set to true for Managed K8s. upgrade.plugins The list of plugins that will be installed. Each plugin will have three fields - enable
- imageTag
- name
Set enable to true if the plugin is to be upgraded. If the same image tag is to be used as defined in the global ImageTag keep it latest otherwise override with some other tag of your choice.Note: The list of plugins to be enabled should match the ones in the install section.Example:
- enable: true
  imageTag: latest
  name: avx-config-server
upgrade.upgradeInfra Boolean value to upgrade infra component. Set to True for upgrade. upgrade.upgradeThirdParty Boolean value to upgrade the monitoring (ELK, insight, and monitoring) components. Set to True for upgrade. socketurl Customers can now configure their own web-socket URL in the MongoDB by updating the socketurlparameter in the .appviewxctl.yaml file. After installation or upgrade, the specified socket URL will be recorded in the saas_agent_meta collection.Table 2. Component Parameters in the appviewxctl.yaml file Parameters Description of Values install.thirdPartyApp.elk Boolean value to add Elk component. Set to True for upgrade. install.thirdPartyApp.monitoring Boolean value to add Monitoring component. Set to True for upgrade. install.thirdPartyApp.insight Boolean value to add Insight component. Set to True for upgrade. Table 3. Install parameters in the appviewxctl.yaml file required to integrate the kubernetes cluster to the external vault. Parameters Description of Values cloudConnectorEnabled A boolean value (true/false) to denote the cloud connector usage for southbound communications. If a cloud connector is used set the value to true. install.externalVault.enable A boolean value (true/false) to denote if the external vault is to be used in the setup. True is to enable the external vault. install.externalVault.externalVaultAddr Contains the vault URL and listening port Example: https://pm-lxs-node01.lab.appviewx.net:8200
install.externalVault.externalVaultAuthRole Name of the role created against the access kubernetes auth path install.externalVault.externalVaultCACertSecret Name of the secret where vault-ca.crt file is mounted. install.externalVault.externalVaultDBRole Static role created to access the database cred. install.externalVault.externalVaultEnginePath Enter the value “/database” install.externalVault.externalVaultKubeAuthPath The Kuberenetes access path created with cluster information for service account authentication. install.externalVault.externalVaultSAName The Service account used to create externalVaultAuthRole. install.externalVault.mongoPasswordVaultEngine Enter the value DATABASE Note: Path parameters should have a leading forward slash '/'. -
Copy the vault_restore_openbao_migration.sh file from the current folder
(extracted folder location) to installer location
Note: If this step was completed during the previous upgrade (2025.0.0.0), you can skip it. However, if you are upgrading from an older version (2023.1.3 or earlier), this step is required.
cp vault_restore_openbao_migration.sh <absolute path of the installer directory> -
Copy the mongo_restore.sh file from the current folder (extracted folder
location) to installer location
cp mongo_restore.sh <absolute path of the installer directory> -
To upgrade AppViewX infra, execute the command
Note: If you plan on enabling additional 3pt monitoring components as part of the infra upgrade do the following:
- Navigate to <installer>/helm_charts/avx_thrid_party/.
- Edit the values.yaml file.
- Set "enable" to true for the components you wish to enable as part of the upgrade.
./appviewxctl infraUpgrade --config .appviewxctl.yaml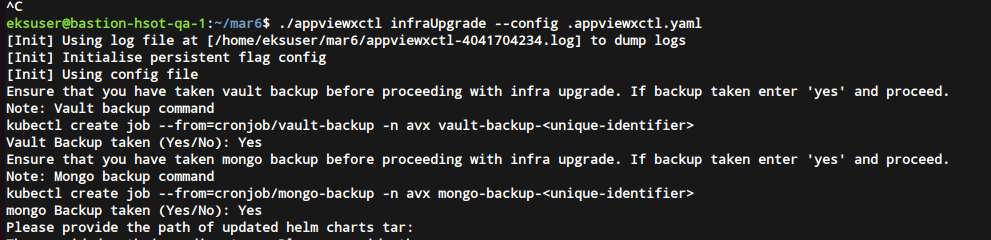 This will prompt the following message
Vault Backup taken (Yes/No):
If you haven't taken the backup, enter No, and execute the vault backup command in step 2. If you have already taken the backup, enter Yes. You will be prompted with the message below.This will prompt the following messageMongo Backup taken (Yes/No):
If you haven't taken the backup, enter No, and execute the vault backup command in step 2. If you have already taken the backup, enter Yes. You will be prompted with the message below.Please provide the path of updated helm charts tar. :
Enter the absolute path of the extracted Helm charts tar artifact to proceed with the infrastructure upgrade. Ensure you provide the full file path, not just the directory location, for example: /home/aksuser/mar06/upgrade_avx/helm_charts.tar.gz. Appropriate error messages will be displayed if: only the directory (without file name), wrong file type, or incorrect tar.gz values are entered.
Note: After completing the infrastructure upgrade and before triggering the installMongoRS, ensure theinstall.imageTagin the.appviewxctl.ymlfile is updated with the latest imageTag. -
Install Mongo Replicaset using the command below
Note: If this step was completed during the previous upgrade (2025.0.0.0), you can skip it. However, if you are upgrading from an older version (2023.1.3 or earlier), this step is required.
./appviewxctl --config .appviewxctl.yaml installMongoRS -
Install OpenBao using the command below.
Note: If this step was completed during the previous upgrade (2025.0.0.0), you can skip it. However, if you are upgrading from an older version (2023.1.3 or earlier), this step is required.
./appviewxctl --config .appviewxctl.yaml installOpenbao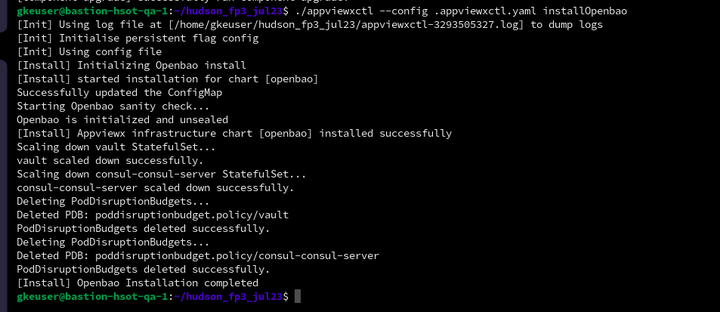 Note: The plugin pods must not be restarted after installing OpenBao until the plugin upgrade is complete. Restarting the pods prematurely may disrupt functionality, as Vault could lock the user if it detects multiple login attempts.
 -
To restore the vault, fetch the backup files and place them in the bastion in a
directory such as /home/user/backup execute the restore
scripts below.
Note: If this step was completed during the previous upgrade (2025.0.0.0), you can skip it. However, if you are upgrading from an older version (2023.1.3 or earlier), this step is required.
./vault_restore_openbao_migration.sh -p <absolute path of the vault_bkp_file_location> -
To restore the mongo, fetch the backup files and place them in the bastion in a
directory such as /home/user/backup and execute the restore
scripts below.
Note:
- If this step was completed during the previous upgrade (2025.0.0.0), you can skip it. However, if you are upgrading from an older version (2023.1.3 or earlier), this step is required.
- Before you trigger the
mongo_restore.shcommand, ensure that the mongo restore file has the file extension as .tar.gz.
./mongo_restore.sh <absolute path of the mongo_bkp_file_location> -
Run the plugin upgrade command below.
./appviewxctl upgrade --config .appviewxctl.yamlRollback Steps
-
Restore the DB using the restore scripts (step 11 in the Installation Steps section) for self-managed DB or in atlas using snapshot restore in the dashboard.
-
Update the appviewxctl.yaml upgrade section’s values to the previous image tag and re-run the upgrade command.
-
-
To install CC-related components, run the following command:
./appviewxctl ccDBDump --config .appviewxctl.yaml
Post-Upgrade Actions
-
Retrieve the updated web login IP by executing:
kubectl get svc -n istio-systemFrom the output, locate the
ExternalIPassociated with theistio-ingressgatewayand use that IP to access the web login page. -
Update the RSocket URL in the properties file and restart the
avx-mid-server-starterandavx-mid-server-platformpods. -
If GUI login fails:
Complete the following steps after the pluging upgrade ONLY if they have not been performed previously.
- Remove/delete all traces MongoShardDB setup, refer to the section MongoShardDB Cleanup.
- Remove/delete all traces of vault setup, refer to the section Vault/Consul Cleanup.