Install AppViewX in Managed Kubernetes
Migration Strategy
db.profile.update({'_id' : 'installationType'}, {$set : {"value" : "Managed_K8s"}})Installation Steps
- Download the installer from the release portal.
- Create a directory Managedk8s-installer in the bastion host and extract the installer file tar -xf installer.tar.gz in the same directory.
-
Verify that the extracted installer must have the following files
- appviewxctl (binary)
- helm_charts (directory of helm charts)
-
Generate the configuration files based on the cloud provider. If the cloud
provider is Google, execute the command below.
./appviewxctl config generate --provider gcp - Verify that the execution of the above command creates the configuration files named .appviewxctl.yaml in the same location.
- The file .appviewxctl will be populated with the fields necessary for installation, in particular cloud provider that was provided in the previous command (-- provider).
-
Edit the .appviewxctl.yaml file and populate the values as described below:
Table 1. appviewxctl.yaml file - Parameters and Description Parameters Description of Values chartPath The path to the helm_charts which is to be installed. It points to the helm_charts directory extracted in step 3. configFile The path to the kube config file to be used by helm and kubectl. If the bastion host is already configured and kube config is under $HOME/.kube directory, then keep this field empty.
install.enableAppBackupCron Boolean value to enable/disable the backup cronjobs. (True/False). This value is needed for self-managed mongo only. For atlas backup this has to be scheduled in the atlas dashboard.
install.enablePrivateImagePullSecret Boolean value to enable image pull secret. Set values as false if the cluster already has access to the container registry.
Otherwise set it to true and fill all the details of the access keys described in below sections.
install.enableThirdPartyInstall Boolean value (True/False) to determine whether third party monitoring components such as ELK, Monitoring, and Insight needs to be installed. install.thirdPartyApp.elk Boolean value to add Elk component. Set to True if it needs to be installed. install.thirdPartyApp.monitoring Boolean value to add Monitoring component. Set to True if it needs to be installed. install.thirdPartyApp.insight Boolean value to add Insight component. Set to True if it needs to be installed. install.imageRegistry The URL of the container registry where the images are to be pulled from by the pods. Example: gcr.io/pe-qa-358108
install.imageTag The tag of the image that will be used for installation. Example: 2023.1.0_FP_750-alpine
install.isSaasEnabled Boolean value for SaaS enablement. This value should be set to true for Managed K8s. install.kafkaCloudConnector It is a combination of three values. - enable
- password
- user
Example
kafkaCloudConnector:
    enable: true
    password: ""
    user: ""
install.mongo It is a combination of fields specific to the type of mongodb used. dbIsolation Boolean value to indicate whether the database isolation is to be enabled. In order for database isolation to work, the following prerequisite must be taken care of while creating the cluster node group.-
Add label mongo=true and taint designatedMongo=true:NoSchedule to the nodepool to be used for mongodb.
mongoAtlas The fields specific to mongodb atlas are as folows: - enable: Boolean value to decide if mongodb atlas to be used. If set to false, a self managed mongodb cluster will be created. If set to true mongodb atlas will be used and details of which are to be provided in below mentioned fields.
- host: URL of the mongodb atlas cluster.
- password: password of the mongodb atlas cluster.
- user: username in the mongodb atlas cluster.
Example:
mongo:
    dbIsolation: false
    mongoAtlas:
      enable: true
      host: "managed-k8s.test.mongodb.net"
      password: "samplepassword"
      user: "user1"
install.useDockerPrivateRegistry Set this to true if the dockerhub private repository is to be used for pulling the necessary images needed. Otherwise set the value false and the container registry ACR, ECR, and GCR will be used based on the cloud provider. If this value is set to true, populate the below values, otherwise keep it empty.- dockerhub.pass: password to be used for authenticating in the dockerhub private repository.
- dockerhub.username: username configured in the dockerhub private repository.
Example:
useDockerPrivateRegistry: true
dockerhub:
    pass: "testpassword"
    username: "appviewx"
install.size The size of the installation. Based on the use cases and number of certs to be managed there different sizes (contact AppViewX for sizing recommendations). The sizes supported are (case sensitive values) - xsmall
- small
- medium
- large
- xlarge
- custom
Example:
size: smallNote: The size provided must be taken into cluster creation and nodegroup sizes must be defined accordingly.install.plugins The list of plugins that will be installed. Each plugin will have three fields - enable
- imageTag
- name
Set enable to true if the plugin is to be installed. If the same image tag is to be used as defined in the global ImageTag keep it latest otherwise override with some other tag of your choice.
Example:
- enable: true
  imageTag: latest
  name: avx-config-server
To enable Cloud DC support in Managed Kubernetes, set plugins as follows:- enable: true imageTag: latest name: avx-mid-server-platformNote: Ensure that install.isSaasEnabled and install.kafkaCloudConnector are set to true.internalLoadBalancer If set to true, all the Loadbalancers will be private and can only be accessed within the VPC else it will be public. install.enableSftpStorage Change to true to use SFTP server for mongodb, vault, and icontrol.jar storage. Boolean (Default: false) install.sftpServerDetails. dbBackupPath Provide the location of mongodb backup storage directory. String (Default: “”) install.sftpServerDetails. vaultBackupPath Provide the location of vault backup storage directory. String (Default: “”) install.sftpServerDetails. sftpServerUserName Provide the username of SFTP server. String (Default: “”) install.sftpServerDetails. sftpServerIp Provide the sftp server IP. String (Default: “”) cloudConnectorEnabled A boolean value (true/false) to denote the cloud connector usage for southbound communications. If a cloud connector is used set the value to true. socketurl Customers can now configure their own web-socket URL in the MongoDB by updating the socketurlparameter in the .appviewxctl.yaml file. After installation or upgrade, the specified socket URL will be recorded in the saas_agent_meta collection.The next fields are to be filled with values that must be collected during the cluster creation and setup process and filled as mentioned below.Parameters Description of Values install.privateImagePullSecret In this section populate the details of the access keys needed to authenticate and pull the image from the registry. They are not needed if the Dockerhub is used as described above. - registry: The registry whose token must be provided below and used to pull images.
- token: The login token for the registry
used. Token can be generated from CLI if
authenticated in the CLI from the respective
google cloud account. A sample command to generate
token of gcr.io
registry
gcloud auth print-access-token |docker login -u oauth2accesstoken --password-stdin https://gcr.io
Example:
registry: "gcr.io/pe-qa-358108"
token: "sample token"
install.storageAccess The storage bucket details to be used for setting up backup capability. - bucketObject: The name of the bucket object.
- serviceAccountAnnotation: Annotation of service account that provides access to the storage bucket
Example:
bucketObject: "appviewx-samplebucket"
serviceAccountAnnotation: "avx-storage-bucket-access-gsa@sampleproject.iam.gserviceaccount.com"
The following fields must be added to integrate the kubernetes cluster to the external vault.Table 2. appviewxctl.yaml file - Parameters and Description (for external vault) Parameters Description install.externalVault.enable A boolean value (true/false) to denote if the external vault is to be used in the setup. True is to enable the external vault. install.externalVault.externalVaultAddr Contains the vault URL and listening port Example: https://pm-lxs-node01.lab.appviewx.net:8200
install.externalVault.externalVaultAuthRole Name of the role created against the access kubernetes auth path install.externalVault.externalVaultCACertSecret Name of the secret where vault-ca.crt file is mounted. install.externalVault.externalVaultDBRole Static role created to access the database cred. install.externalVault.externalVaultEnginePath Enter the value “/database” install.externalVault.externalVaultKubeAuthPath The Kuberenetes access path created with cluster information for service account authentication. install.externalVault.externalVaultSAName The Service account used to create externalVaultAuthRole. install.externalVault.mongoPasswordVaultEngine Enter the value DATABASE -
Once the values are filled in .appviewxctl as described in the step
above, proceed with the installation. Before doing so, check if the the
preconditions are met by executing the command
./appviewxctl preflight --config .appviewxctl.yamlThis will prompt if the necessary prerequisites are met.
-
The metrics server in the GCP clusters comes pre-installed with the
cluster, hence they must be disabled from the avx_pre_req chart.
- Navigate to helm_charts/avx_pre_req.
- Edit the values.yaml file by setting the following
parameters.
avx-metrics-server:
enable: false
The metrics server installation is disabled.
-
To proceed with installation, execute the command
./appviewxctl install --config .appviewxctl.yamlNote: The installation will take several minutes to complete. Upon completion you see the following message:[Install] Successfully installed Appviewx infra stackThis would imply the completion of infra component setup.
-
This step involves restoring the existing data from the previous AppViewX
version’s cluster in case there is a need to migrate from the older versions
to the Managed K8s version. Ignore this step if it's a fresh setup with
no migration necessary.
To restore mongodb and vault fetch the backup files and place them in the bastion in a directory such as /home/user/backup execute the mongo_restore and vault_restore scripts as follows:
Note: Before you trigger themongo_restore.shcommand, ensure that the mongo restore file has the file extension as .tar.gz../mongo_restore.sh <mongo backup tar filepath>./vault_restore.sh -p <vault backup filepath> --removedekAttention: If the data is being restored from an older version (2020.3.0 - 2022.1) then use the command./vault_restore.sh -p <vault backup filepath> --removedekNote:- The backup files must have extension as .tar.gz
- The above commands work for a self-managed mongodb setup. Setting up the mongodb atlas requires the installation of mongodb tools in the bastion host as described below.
For an rpm based OS:echo -e "[mongodb-org-4.2] \nname=MongoDB Repository\nbaseurl=https://repo.mongodb.org/yum/redhat/\$releasever/mongodb-org/4.2/x86_64/\ngpgcheck=1\nenabled=1\ngpgkey=https://www.mongodb.org/static/pgp/server-4.2.asc" > /etc/yum.repos.d/mongodb-org-4.2.repo yum install mongodb-org-shell-4.2.0 yum install mongodb-org-tools-4.2.0For a debian based OS:wget -qO - https://www.mongodb.org/static/pgp/server-6.0.asc | sudo apt-key add - sudo apt-get install gnupg wget -qO - https://www.mongodb.org/static/pgp/server-6.0.asc | sudo apt-key add - echo "deb [ arch=amd64,arm64 ] https://repo.mongodb.org/apt/ubuntu focal/mongodb-org/6.0 multiverse" | sudo tee /etc/apt/sources.list.d/mongodb-org-6.0.list sudo apt-get update sudo apt-get install -y mongodb-mongosh sudo apt-get install -y mongodb-org-toolsVerify if the mongodb restore commands have executed successfully using the commandmongorestore -- version -
To proceed with the AppViewX application installation, execute the
command:
./appviewxctl installapp --config .appviewxctl.yamlOnce installation is complete the following messages are displayed:
[Install] Appviewx infrastructure chart [avx-app] installed successfully
[Install] Successfully installed Appviewx application stack
[Install] Fetching login URL for app
[Install] Waiting for Public IP allotment for istio service
[Install] AppViewX Web URL: https://34.100.197.159/appviewx/
[Install] AppViewX Gateway URL: https://34.100.197.159/avxmgr/
[Install] Grafana URL: https://34.100.197.159/grafana/
[Install] Kibana URL: https://34.100.197.159/kibana/login
[Install] Run below commands to get mongo user credentials
	export MONGO_USER=$(kubectl get secret -n avx mongo-key -o=jsonpath='{.data.mongo-init-user}' | base64 -d)
	export MONGO_PASS=$(kubectl get secret -n avx mongo-key -o=jsonpath='{.data.mongo-init-pass}' | base64 -d)
[Install] Run below commands to get Elasticsearch and Kibana credentials
	export ES_PASS=$(kubectl get secret -n avx elasticsearch-pw-elasticsearch -o=jsonpath='{.data.password}' | base64 -d)
	export KIBANA_PASS=$(kubectl get secret -n avx elasticsearch-pw-kibana -o=jsonpath='{.data.password}' | base64 -d
[Install] Application Installation completed successfully
Note: Follow the URLs and commands given in the output message to get the credentials and access the application. -
To proceed with the CC installation, ensure that the CC binaries are
uploaded first by running the following command:
./appviewxctl ccDBDump --config .appviewxctl.yaml -
If installation of the third party monitoring components was not enabled
during the entire process, they can be installed later by the following
steps:
- If you have to install the Helm based CC, then parch the internal tenant
secret, using the command below:
Once the command is executed, restart the saas-proxy.kubectl patch secret internal-tenant -n avx --type='json' -p='[{"op": "add", "path": "/data/REPO_AUTH_TOKEN", "value": "<repoauthtokenvalue>"}]' - Customers migrating from AppViewX version 2020.3.0 to Managed Kubernetes, it
is mandatory to upgrade the license.
- Login to the AppViewX with valid credentials.
- Navigate to Platform >> System Administration >> License page.
- Click Upgrade License.
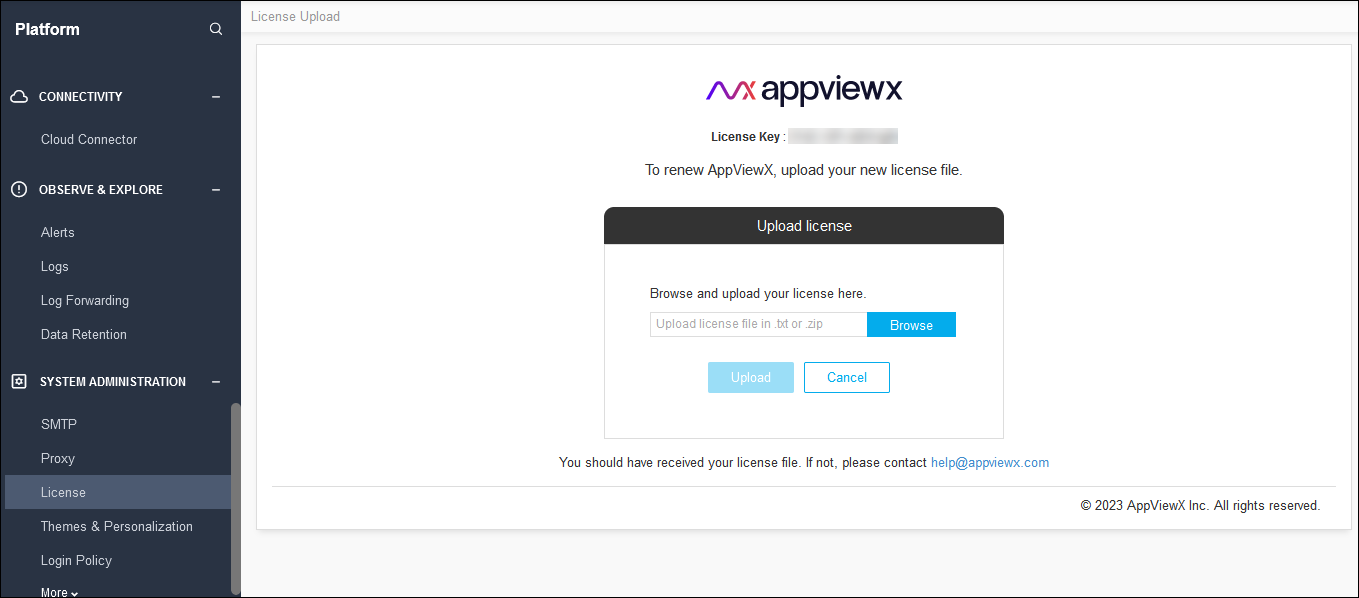
- Click Browse to find the latest license key file.
- Click Upload.