Azure
For Azure Services except Virtual Machines
-
On the certificate holistic view, click Add
Connector.

-
Enter the General Information for the connector.
Table 1. Field descriptions for the connector General Information Field Description *Category From the dropdown list, select Cloud. If the certificate being pushed was enrolled with CSR generation at endpoint, this field is auto populated with the category selected at the time of certificate enrollment.
*Vendor From the dropdown list, select Azure. If the certificate being pushed was enrolled with CSR generation at endpoint, this field is auto populated with the vendor selected at the time of certificate enrollment.
Service Types From the dropdown list select, one of the following: - Key vault
- Application gateway
- App service
- Enterprise Application
- Api Management
- App Registration
- Front Door
Target Profile A target profile is a configuration that defines the details for integrating and pushing certificates to the target system. For application gateway From the dropdown list, from the following options, select a target profile for pushing a certificate to the application gateway:- Gateway SSL Profile (Configure TLS/SSL encryption for secure communication between gateway and clients.)
- Gateway Listener Profile (Accept incoming HTTP/HTTPS requests on specific ports and paths.)
- Gateway Backend Settings Profile (Route requests to specific application servers based on routing rules.)
For app service From the dropdown list, from the following options, select a target profile for pushing a certificate to the app service:- Bring Your Own Certificate (.pfx) (Upload your own .pfx certificate, along with its private key.)
- Public Key Certificates (Upload only the public certificate without the private key, for scenarios where the certificate will be used only for verification purposes.)
*Connector Name Enter a name for this connector, to be able to identify it later. Tip: AppViewX recommends naming connectors according to use cases so they are easily distinguishable.Description Enter any additional details you want to record for this connector. *: Mandatory fields Based on the information entered here, the SSL templates section is populated with the list of available Microsoft Azure devices already onboarded in AppViewX. -
To select the device(s)/profile(s) and domain(s), for Azure Front Door, to
which the certificate will be pushed, under SSL templates, from the
list of Available Devices, for the required device(s), click
 .
The Selected devices list is updated automatically.
.
The Selected devices list is updated automatically. -
Enter the Certificate Details.
Table 2. Field descriptions for the Certificate Details Field Description *Certificate Type From the dropdown list, select the file type of the certificate to be pushed. For Service Types = Enterprise Application, by default, the PKCS#12 (*.pfx) certificate type is selected and the field is disabled for editing.
*Certificate File Name Enter the file name of the certificate to be pushed. The file extension is auto-populated based on the Certificate Type selected. Keyvault Object Type This field is displayed when Service Types = Key vault. From the following options, select the key vault object to which the certificate will be pushed:- Certificates (The Azure key vault can store x509 certificates for securing communications and establishing the identity of services.)
- Secrets (The Azure key vault secret is a secure object used for storing sensitive information, such as passwords and cryptographic keys.)
Certificate Status Enabled This field is displayed only when Keyvault Object Type = Secrets. To enable the certificate after it is pushed to the target system, select Yes.
Set activation date This field is displayed only when Keyvault Object Type = Secrets. To set an activation date for the certificate being pushed:
- Select the Set activation date checkbox.
- Use the calendar widget and time zone dropdown list to set the date and time for the certificate activation.
Set expiration date This field is displayed only when Keyvault Object Type = Secrets. To set an expiration date for the certificate being pushed:
- Select the Set expiration date checkbox.
- Use the calendar widget and time zone dropdown list to set the date and time for the certificate expiry.
Make Certificate Active This field is displayed when Service Types = Enterprise Application. To make the certificate being pushed the active certificate for the Enterprise Application service, select this checkbox.
An active certificate is the default certificate used for securing communication, authentication, and encryption. The rest of the certificates associated with this service are categorized as inactive certificates.
Notification Email Addresses This field is displayed when Service Types = Enterprise Application. To enter email addresses that will be notified when this certificate is pushed and/or made active:Alternatively, you can use the search field to add an already entered email address.- Click
 .
. - Enter the required email address and press Enter.
- To add multiple email addresses, repeat steps a and b.
Certificate Push Type Certificate push type specifies the mechanism that will be used for pushing certificates to the targeted service. For application gateway Select one from the following options:
- Upload a Certificate to Gateway (for uploading a new certificate)
- Replace/Update existing Certificate in Gateway (for renewing/replacing an existing certificate)
For app service For Azure app service, certificate push type has the following values:
- Upload a Certificate to App Service (for uploading a new certificate)
- Replace/Update existing Certificate in App Service (for renewing/replacing an existing certificate)
Important: However, for Azure app service, this field is disabled for editing and the Upload a Certificate to App Service is selected by default.For Api Management For the Azure Api management service, certificate push type has the following values:
- Upload a Certificate to Api Management (for uploading a new certificate)
- Replace/Update existing Certificate in Api Management (for renewing/replacing an existing certificate)
Important: However, for the Azure Api management service, this field is disabled for editing and the Upload a Certificate to App Service is selected by default.Certificate Location For the Azure Application Gateway From the following options, select where the certificate will be stored after it is pushed:- Upload directly to Application Gateway: Upload certificates directly to the Application Gateway
- Choose from Azure Key Vault: Store certificates in Azure Key Vault and then reference them in the Application Gateway configuration.
For Azure App Service From the following options, select where the certificate will be stored after it is pushed:- Upload directly to App Service
- Choose from Azure Key Vault: Store certificates in Azure Key Vault and then reference them in the App Service configuration.
For Azure Api Management From the following options, select where the certificate will be stored after it is pushed:- Upload directly to Api Management: Upload certificates directly to the Application Gateway
- Choose from Azure Key Vault: Store certificates in Azure Key Vault and then reference them in the Api Management configuration.
*Secret Name This field is displayed when Service Type = Front Door. Enter the name of the secret in Azure Key Vault that stores the certificate to be pushed to Azure Front Door.
*Key Vault Subscription ID This field is displayed when Service Type = Front Door. Enter (a new)/Select (from an existing list) the Azure subscription ID for the Key Vault from which the certificate is to be retrieved.
*Key Vault Name This field is displayed when Service Type = Front Door. From the dropdown list, select the name of the Key Vault in which the certificate is stored.
Replace Certificate in Key Vault This field is displayed when Service Type = Front Door. Use the toggle key to specify whether an existing certificate in the specified Key Vault should be overwritten with the new one during the push operation.
*Key Vault Certificate Name This field is displayed when Service Type = Front Door. Enter the logical name under which the certificate is stored in the Key Vault.
Push Root and Intermediate Certificates To push the root and intermediate certificates, along with the end certificate, select this checkbox. -
Enter the Push Details.
Table 3. Field descriptions for the Push Details Field Description Pre - Push Script File Name Enter the file name of the pre-push script. Important: Read the pre and push script usage instructions here.Post - Push Script File Name Enter the file name of the post push script. Important: Read the pre and push script usage instructions here.Push Automatically To automatically push the certificate after it is renewed/reissued to the target system, enable this checkbox. Note: The auto push feature for a certificate works only if enabled for the certificate application connector as well the associated certificate group. To enable this feature at the certificate group level, refer the instructions here. -
Click Save.
The connector is displayed on the certificate holistic view.
For Azure Virtual Machines
For Linux-based Virtual Machines
- Category
- Vendor
- Key Location
- Private key in Device
-
On the client (or) server certificate holistic view, click Add
Connector.
-
Enter the General Information for the connector.
Table 4. Field descriptions for the connector General Information Field Description *Category From the dropdown list, select Server. If the certificate being pushed was enrolled with CSR generation at endpoint, this field is auto populated with the category selected at the time of certificate enrollment.
*Vendor From the dropdown list, select LinuxServer. If the certificate being pushed was enrolled with CSR generation at endpoint, this field is auto populated with the vendor selected at the time of certificate enrollment.
*Connector Name Enter a name for this connector, to be able to identify it later. Tip: AppViewX recommends naming connectors according to use cases so they are easily distinguishable.Description Enter any additional details you want to record for this connector. Based on the information entered here, the SSL templates section is populated with the list of available Linux Server devices already onboarded in AppViewX. -
To select the device(s) to which the certificate will be pushed, under SSL
templates, from the list of Available Devices, click .
You can use the Available Devices dropdown list to filter devices based on functionality.The Selected devices list is updated automatically.
-
Enter the Certificate Details.
Table 5. Field descriptions for the Certificate Details Field Description *Certificate Type From the dropdown list, select the file type of the certificate to be pushed. Enable Truststore Update This field is displayed for all PEM certificate types. Click the radio button to enable the Update System TrustStore option for root and intermediate certificates.
Note: By default, this option is disabled.Note: The toggle button will be enabled by default for Linux devices if it is activated in the Device Settings under the CERT+ > ADMINISTRATION > Device Management > Server > Device Settings < > Vendor
Specific Details section >
Update System
TrustStore.
> Vendor
Specific Details section >
Update System
TrustStore.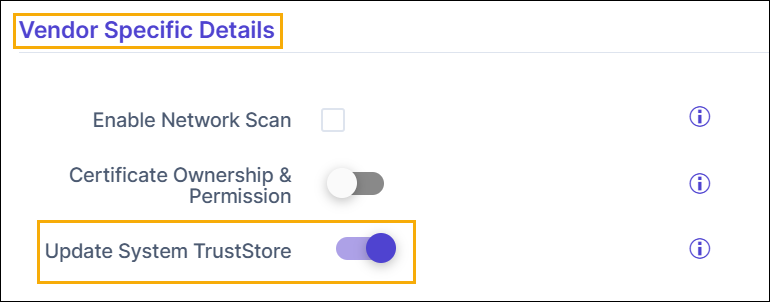
Certificate Ownership & Permission Enable the toggle button to customize the certificate ownership and define the file permissions for the certificates. Note: The toggle button will be enabled by default for Linux devices if it is activated in the Device Settings under the CERT+ > ADMINISTRATION > Device Management > Server > Device Settings <> Vendor Specific
Details section > Certificate
Ownership & Permission.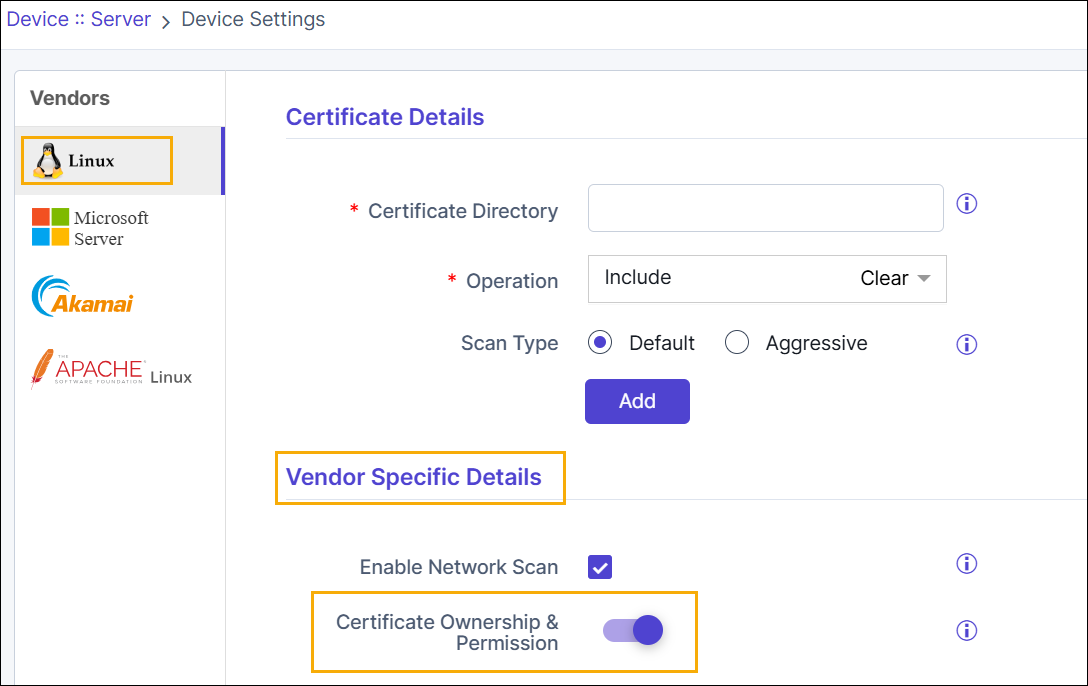 Field descriptions
for the Certificate Ownership & Permission
Details
Field descriptions
for the Certificate Ownership & Permission
DetailsCustom Push This field is displayed for all PEM and DER certificate types. From the following options, select the method of pushing certificates:
- Chain: The full certificate chain, which includes the end, intermediate, and root certificates, will be pushed to the server.
- Issuer & Server: The server’s certificate and its issuer’s certificates will be pushed to the server.
- Server Only: Only the server’s certificate will be pushed to the server.
*KDB File Name Enter the name of the KDB certificate file that will be pushed to the IBMClient server. *KDB password Enter the password required to access the KDB certificate file. Server Certificate Label This field is disabled when the Private key in device checkbox is selected. Enter the label for the server certificate.
Push Root and Intermediate Certificates To push the root and intermediate certificates, along with the end certificates, select this checkbox. For the Linux Server, this feature is enabled by default and the field is non-editable.
Intermediate Certificate Label If an intermediate certificate is available in the KDB file, the system will retain the existing label. The given label name will not be used. Root Certificate Label If a root certificate is available in the KDB file, the system will retain the existing label. The given label name will not be used. Certificate Location This field is displayed for all PEM, DER and PKCS#7 certificates. Enter the path to the location on your local system where the certificate file to be pushed is stored.
Key Location This field is displayed for all PEM, DER and PKCS#7 certificates. The private key associated with a certificate is stored in a key file.
In the Key Location field, enter the path to the location on your local system where the private key file for the certificate to be pushed is stored.
*KeyStore Location This field is displayed for the PKCS#12 and JKS certificates. A keystore is a repository used for storing private keys and certificates.
In the KeyStore Location field, enter the path to the location on your local system where the keystore file, for the certificate to be pushed, is stored.
*KeyStore Password This field is displayed for the PKCS#12 and JKS certificates. Enter the password required to access the keystore file for the certificate to be pushed.
*Alias Name This field is displayed for the PKCS#12 and JKS certificates. Enter the certificate alias assigned in the CSR generated for requesting/enrolling the certificate.
Truststore Location In the Truststore Location field, enter the path to the location on your local system where the truststore file, for the certificates to be pushed, is stored.
Note: Truststore Location can be specified without the file extension as well.Truststore password This field is displayed for the JKS certificates. Enter the password required to access the truststore file for the JKS certificate to be pushed.
Private key in device If the private key associated with the certificate being pushed has been stored on a hardware device, select this checkbox. Table 6. Field descriptions for the Certificate Ownership & Permission Details Field Description Owner Enter the username for certificate ownership on the target device. Owner Permission Select the owner permission level from the dropdown list. - Read (r)
- Read-Write (rw)
- Read-Write-Execute (rwx).
User Group Enter name of the user group that requires access to the certificate. User Group Permission Select the group permission level from the dropdown list. - Read (r)
- Read-Write (rw)
- Read-Write-Execute (rwx).
Other User Permission Select the other user permission level from the dropdown list. - Read (r)
- Read-Write (rw)
- Read-Write-Execute (rwx).
-
Enter the Push Details.
Table 7. Field descriptions for the Push Details Field Description *Script Location Script files are commonly used to perform certain tasks required to be completed before and/or after a certificate is pushed to the target system. The script to be run before the certificate is pushed is called a pre-push script and the script to be run after the push is called a post-push script.
From the following options, select the location of the script file(s):
- In AppViewX
- In Device
Pre - Push Script File Name Enter the file name of the pre-push script. Important: Read the pre and push script usage instructions here.Pre - Push Script File Path This field is displayed when Script Location = In Device. Enter the location on your local system where the pre-push script file is stored.Important: Read the pre and push script usage instructions here.Post - Push Script File Name Enter the file name of the post push script.Important: Read the pre and push script usage instructions here.Post - Push Script File Path This field is displayed when Script Location = In Device. Enter the location on your local system where the post-push script file is stored.Important: Read the pre and push script usage instructions here.Push Automatically To automatically push the certificate after it is renewed/reissued to the target system, enable this checkbox. Note: The auto push feature for a certificate works only if enabled for the certificate application connector as well the associated certificate group. To enable this feature at the certificate group level, refer the instructions here. -
Click Save.
The connector is displayed on the certificate holistic view.
For Windows-based Virtual Machines
-
On the certificate holistic view, click Add
Connector.
-
Enter the General Information for the connector.
Table 8. Field descriptions for the connector General Information Field Description *Category From the dropdown list, select Server. If the certificate being pushed was enrolled with CSR generation at endpoint, this field is auto populated with the category selected at the time of certificate enrollment.
*Vendor From the dropdown list, select Microsoft Server. If the certificate being pushed was enrolled with CSR generation at endpoint, this field is auto populated with the vendor selected at the time of certificate enrollment.
*Connector Name Enter a name for this connector, to be able to identify it later. Tip: AppViewX recommends naming connectors according to use cases so they are easily distinguishable.Description Enter any additional details you want to record for this connector. Based on the information entered here, the Server selection section is populated with the list of available Windows Apache devices already onboarded in AppViewX. -
To select the device(s) to which the certificate will be pushed, from the
dropdown list, select one of the following options:
- MS Server
- Exchange Server
Note: If you have selected Exchange Server, profiles will be displayed in the format, Server type : Service name : Node details. -
Under Server selection, from the list of Available Devices, click
.
The Selected devices list is updated automatically.
-
Enter the Certificate Details.
Table 9. For MS Server: Field descriptions for the Certificate Details Field Description Location Type From the following options, select the location to which the certificate will be pushed: - File System (a storage location on your computer)
- Certificate Store (a specialized location within the operating system for managing digital certificates)
*Certificate Type From the dropdown list, select the file type of the certificate to be pushed. *Credential Type This field is displayed for the JKS certificates. From the dropdown list, select the source of the access credentials.
*Push Location Enter the endpoint where the certificate will be pushed. This can be a network location or directory on the server, or a URL from where the server can retrieve the certificate. *Key File Name This field is displayed for the PEM, DER, and PKCS#7 certificates. The private key associated with a certificate is stored in a key file.
Enter the name of the file that contains the private key associated with the certificate to be pushed.
The file extension .key is automatically populated.
*Certificate File Name Enter the file name of the certificate to be pushed. The file extension is auto-populated based on the Certificate Type selected. *PFX Password This field is displayed for the PKCS#12 certificate types. Enter the password that will be required to access the .pfx and the .p12 certificate files.
*KeyStore Password This field is displayed for JKS certificate types. Enter the password required to access the keystore that contains the JKS certificate to be pushed.
Alias Name This field is displayed for the PKCS#12 and CERTDB certificate types. Enter the certificate alias assigned in the CSR generated for requesting/enrolling the certificate.
Private key entry password This field is displayed for the JKS certificates. Enter the password required to decrypt the private key associated with the certificate.
Push Root and Intermediate Certificates To push the root and intermediate certificates, along with the end certificates, select this checkbox. *Intermediate Certificate Alias Name 1 This field is displayed only when Push Root and Intermediate Certificates is enabled.
This field is not displayed for the JKS certificate types.
Enter the alias name of the intermediate certificate file.
*Root Certificate Alias Name This field is displayed only when Push Root and Intermediate Certificates is enabled.
Enter the alias name of the root certificate file.
Table 10. For Exchange Server: Field descriptions for the Certificate Details Field Description *Certificate Type The certificate type is defaulted to the following values - For AppViewX CSR generation - certificates which have private key, PKCS#12(*.p12) is the supported certificate format.
- For Endpoint CSR generation PKCS#7(*.p7b) is the supported certificate format.
*Friendly Name - For PKCS#7(*.p7b) certificate type, the friendly name is the common name of the certificate specified at the time of Endpoint CSR generation. During the push operation the common name is populated in the friendly name field (it is not editable).
- For PKCS#12(*.p12) it is the user specified input.
Services From the dropdown list, select one from the following services: - POP
- IIS
- SMTP
- IMAP
Restart Service This field is displayed only when Services = IIS. To restart the IIS service after the certificate is pushed, to ensure all changes have taken effect as required, select this checkbox.
Note:When pushing certificates , the system now automatically selects the appropriate PKCS12 encryption algorithm based on the target Windows Server version:
- Windows Server 2016 and earlier: Uses TripleDES encryption for compatibility
- Windows Server 2019 and later: Uses the encryption algorithm from General Settings
This is applicable for all service/devices such as Microsoft Server, Microsoft Exchange Server, Windows Gateway.
-
Enter the Push Details.
Table 11. Field descriptions for the Push Details Field Description *Script Location Script files are commonly used to perform certain tasks required to be completed before and/or after a certificate is pushed to the target system. The script to be run before the certificate is pushed is called a pre-push script and the script to be run after the push is called a post-push script.
From the following options, select the location of the script file(s):
- In AppViewX
- In Device
Pre - Push Script File Name Enter the file name of the pre-push script. Important: Read the pre and push script usage instructions here.Pre - Push Script File Path This field is displayed when Script Location = In Device. Enter the location on your local system where the pre-push script file is stored.Important: Read the pre and push script usage instructions here.Post - Push Script File Name Enter the file name of the post push script. Important: Read the pre and push script usage instructions here.Post - Push Script File Path This field is displayed when Script Location = In Device. Enter the location on your local system where the post-push script file is stored.Important: Read the pre and push script usage instructions here.Overwrite The Overwrite option is used to specify if existing certificates on the target system will be overwritten with the certificate being pushed. If this option is enabled, the certificate being pushed will overwrite any existing certificates with the same identifier on the target system. This will also ensure that only the latest version of the certificate is available on the target system.
If it is disabled, the push operation will fail in the event of conflicts with the certificates on the target system.
Push Automatically To automatically push the certificate after it is renewed/reissued to the target system, enable this checkbox. Note: The auto push feature for a certificate works only if enabled for the certificate application connector as well the associated certificate group. To enable this feature at the certificate group level, refer the instructions here.Secure Push The Secure Push option ensures that the certificate is pushed to the target system securely, protected from any unauthorized access. -
Click Save.
The connector is displayed on the certificate holistic view.