Onboarding Journey
These scans allow for the identification of high-risk, critical-risk, and non-standard certificates, providing the necessary insights to remediate these issues, thereby improving the overall crypto score and strengthening the organization's security posture. By leveraging these discovery scans, organizations can maintain robust certificate management practices, enhance their security measures, and ensure compliance with relevant regulations, ultimately safeguarding their digital infrastructure and data.
Freemium or New Customers to Initiate the Onboarding Process
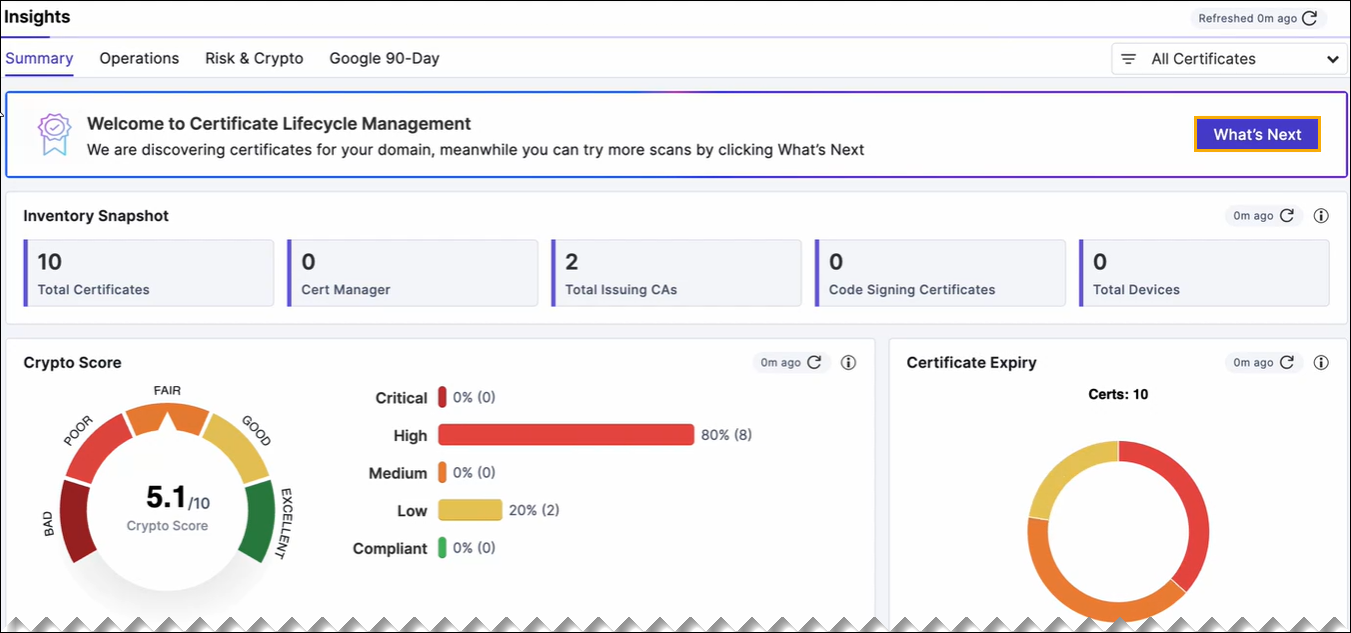
- Click the What's Next button in the welcome
banner that appears on the Insights >
Summary section. For more details about
Insights Summary, refer to Insights Summary
section.
 Note:
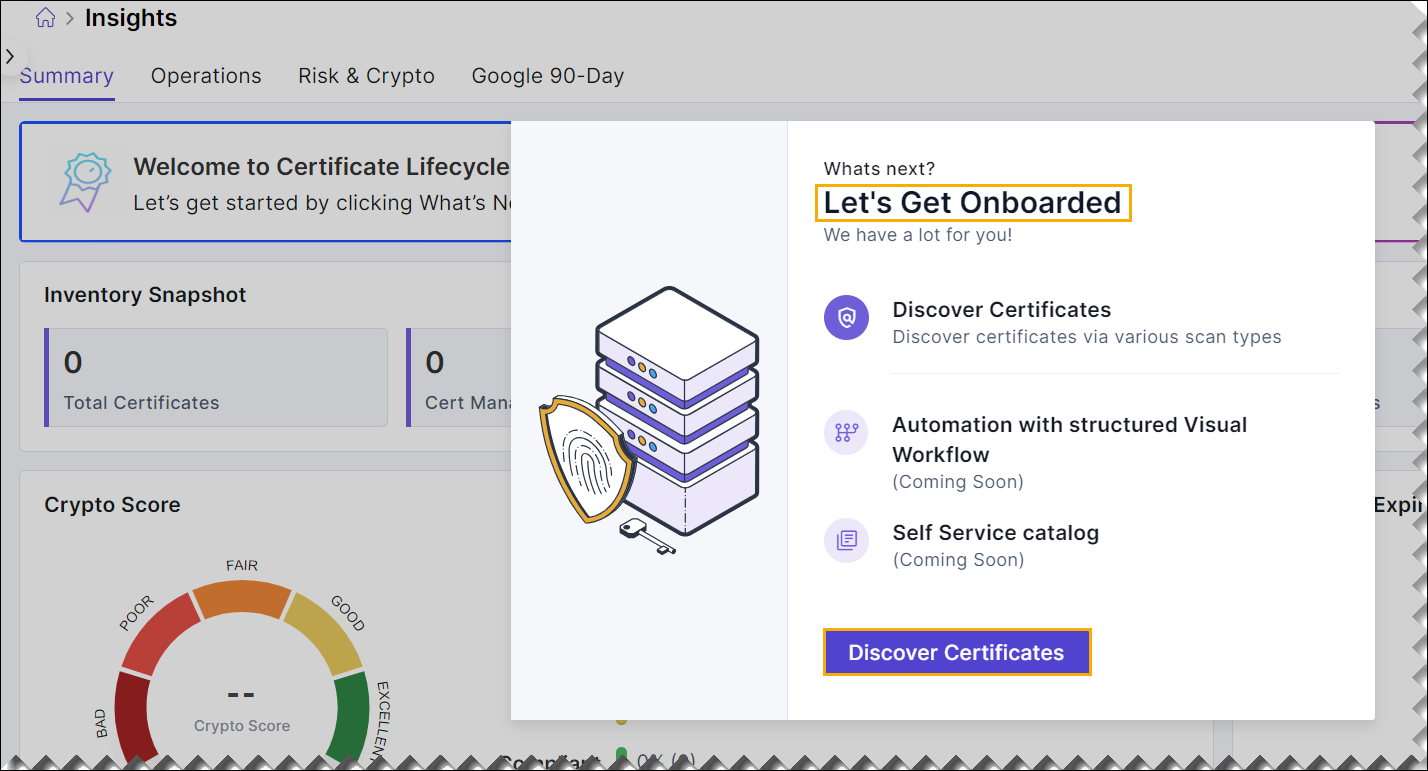
Note:- The Certificate Transparency (CT) Log Scan is a background process in the CERT+ application that continuously monitors and fetches certificate data from Certificate Transparency logs. This scan helps in identifying and managing certificates by bringing the results directly to the Insights Summary page, providing users with real-time visibility into their certificate landscape.
- If the CT Log Scan encounters issues such as a network outage or other disruptions that prevent it from completing its task, the application detects the failure. To ensure users are aware of the issue and to guide them through alternative steps, the application triggers a Let's Get Onboarded pop-up window.
- (or) The Let's Get Onboarded pop-up window
appears in the Insights >
Summary tab.
 Note: Once the certificate discovery process is complete, the welcome banner will disappear.
 - Click the Discover Certificates button from the
pop-up window.The Cert+ onboarding > Certificate Discovery Scans page is displayed.
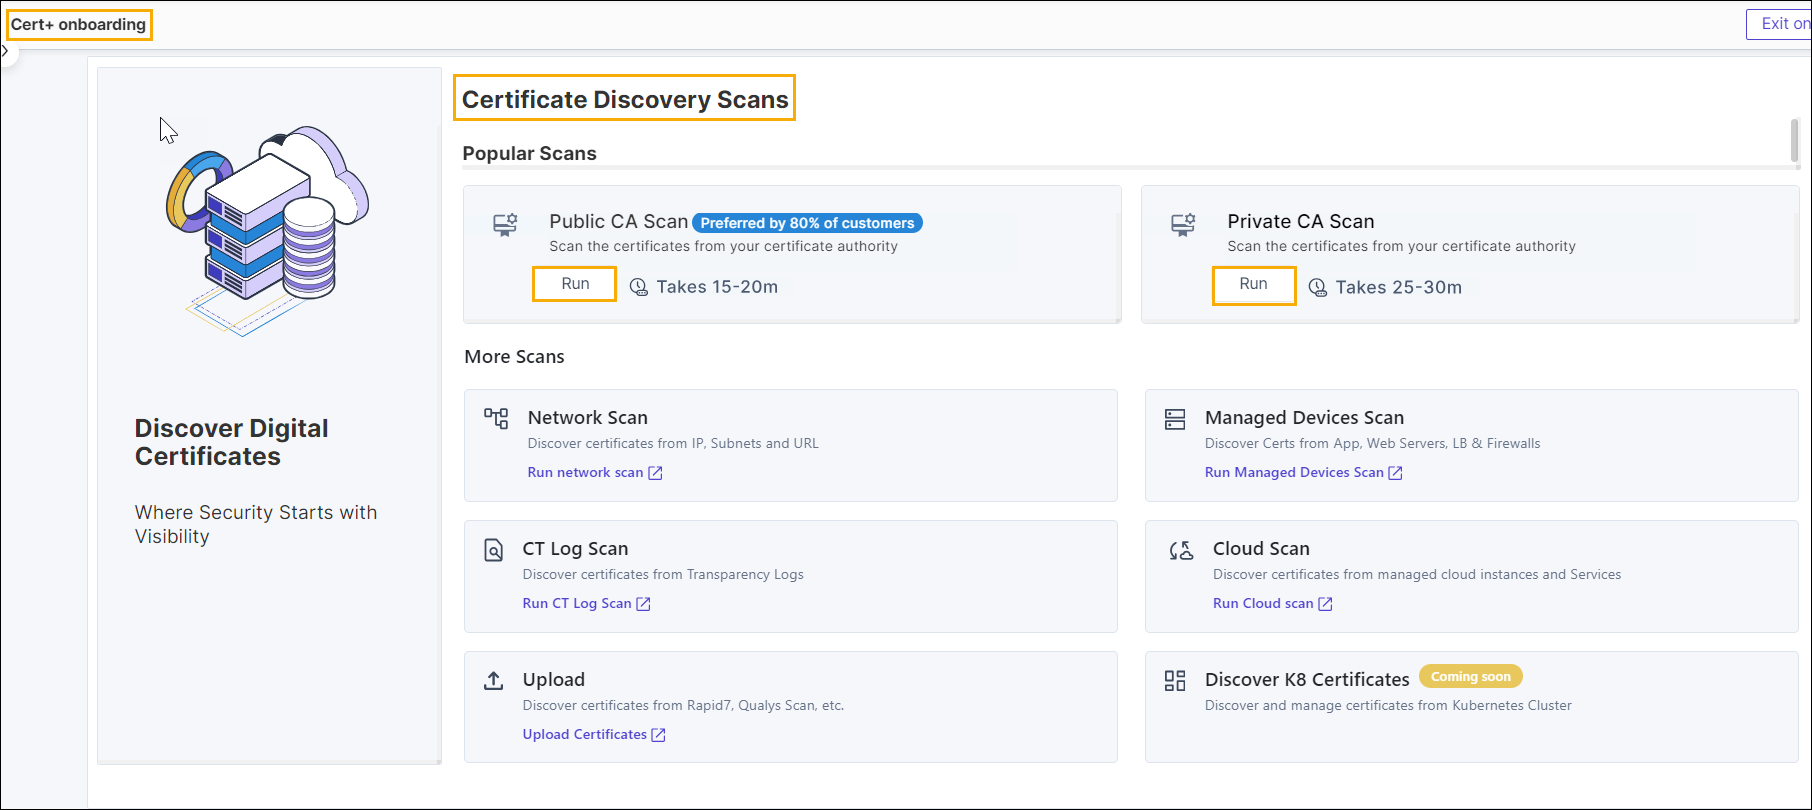 Note: Initially, only popular scans Public CA Scan or Private CA Scan will be enabled. More scans will become available once you try one of the popular scans.
Existing Customers to Initiate the Onboarding Process
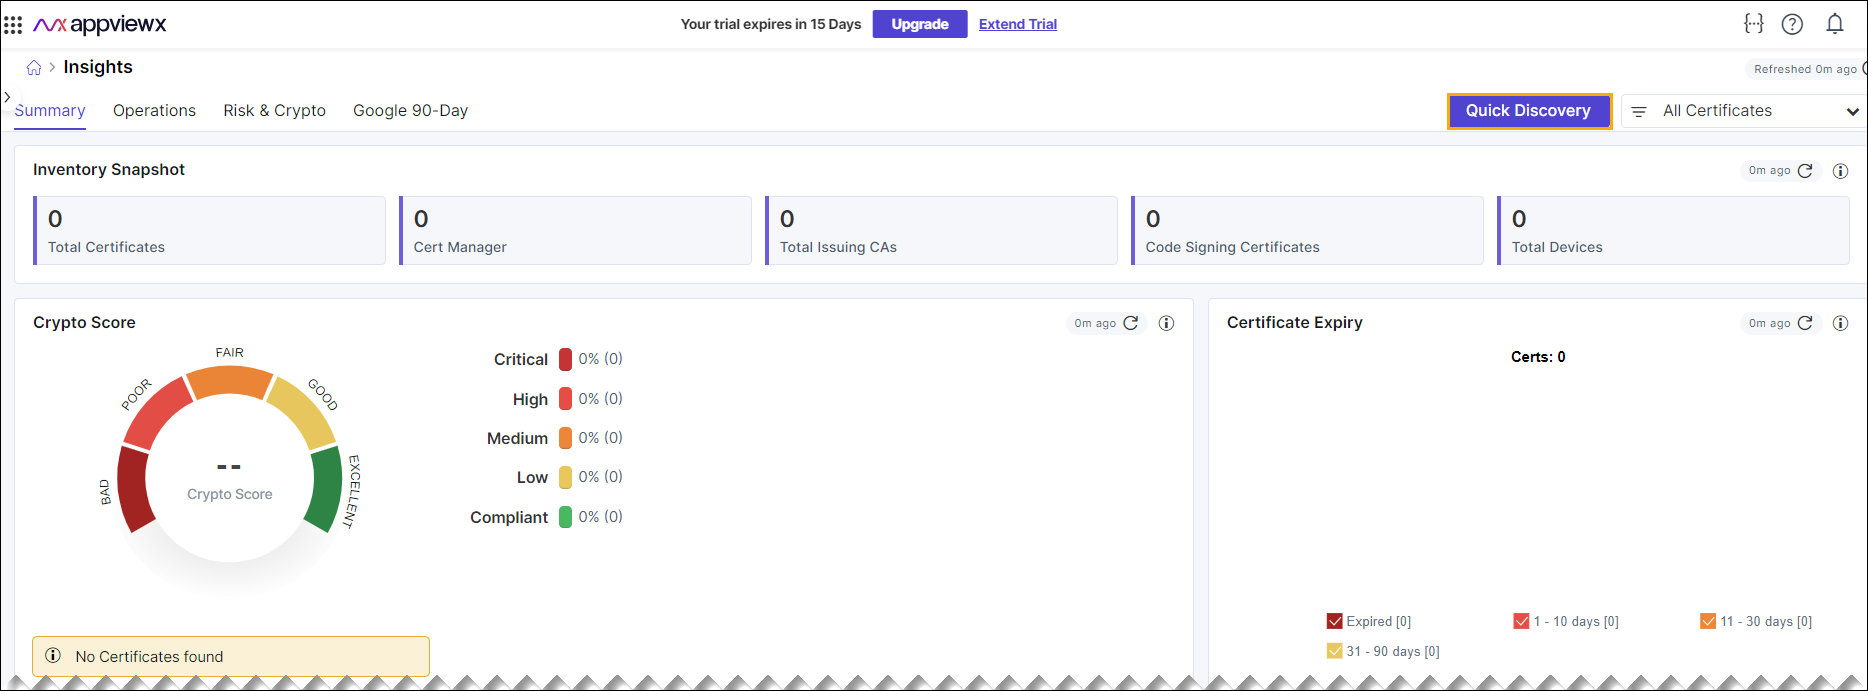
- Click the Quick Discovery button that appears on
the Insights > Summary
section. For more details about Insights Summary, refer to Insights
Summary section.
 Note: The Certificate Transparency (CT) Log Scan is a background process in the CERT+ application that continuously monitors and fetches certificate data from CT logs. This scan helps in identifying and managing certificates by bringing the results directly to the Insights Summary page, providing users with real-time visibility into their certificate landscape.
The Cert+ onboarding > Certificate Discovery Scans page is displayed.
Note: Initially, only popular scans Public CA Scan or Private CA Scan will be enabled. More scans will become available once you try one of the popular scans.
Public CA Scan
A public CA is a third-party organization that issues certificates for a fee after performing required checks on the requesting organization. These checks typically include domain validation. Public CAs use their own public-private key pairs to sign the certificates.
As part of the onboarding process, you can perform Public CA Scans targeting certificates issued by public Certificate Authorities (CAs) such as DigiCert and Entrust. These scans identify and analyze digital certificates within your organization's infrastructure, ensuring a complete inventory, timely renewal, security compliance, and proactive vulnerability remediation. They analyze certificate configurations, highlight high-risk, critical-risk, and non-standard certificates, and maintain detailed records. By leveraging these scans, organizations can effectively manage their certificates, ensure security and compliance, and safeguard their digital infrastructure while maintaining stakeholder trust.
DigiCert CA Scan
- Make sure that you have DigiCert API key.
- To obtain the DigiCert API key, follow the instructions provided on
the Prerequisites Public Scan page.
- In the Public Scan section, click
Run.
The Prerequisites Public Scan page is displayed.
- Click DigiCert from the
Vendors left menu.Note: Complete the instructions provided on the Prerequisites Public Scan page.
- Click Close to return to the Cert+ onboarding page.
- In the Public Scan section, click
Run.
For the DigiCert CA discovery scan, follow these steps.
- In the Discovery Details section,
- Enter the Discovery Instance Name in the
field.Note: The instance name can be any friendly name to the scan configuration.
- Click the required radio button for the discovery
configuration.The available Discovery configuration options are,
- Certificate expiring within 90 days: By configuring the certificate expiring within 90 days feature, the discovery scan and monitoring will happen faster, allowing organizations to efficiently manage their digital certificates and ensure strong security and smooth operations.
- Discover all certificates: By
configuring the Discover all certificates feature,
the discovery scan might take longer depending on
the certificate volume, with the time varying based
on the number of certificates.
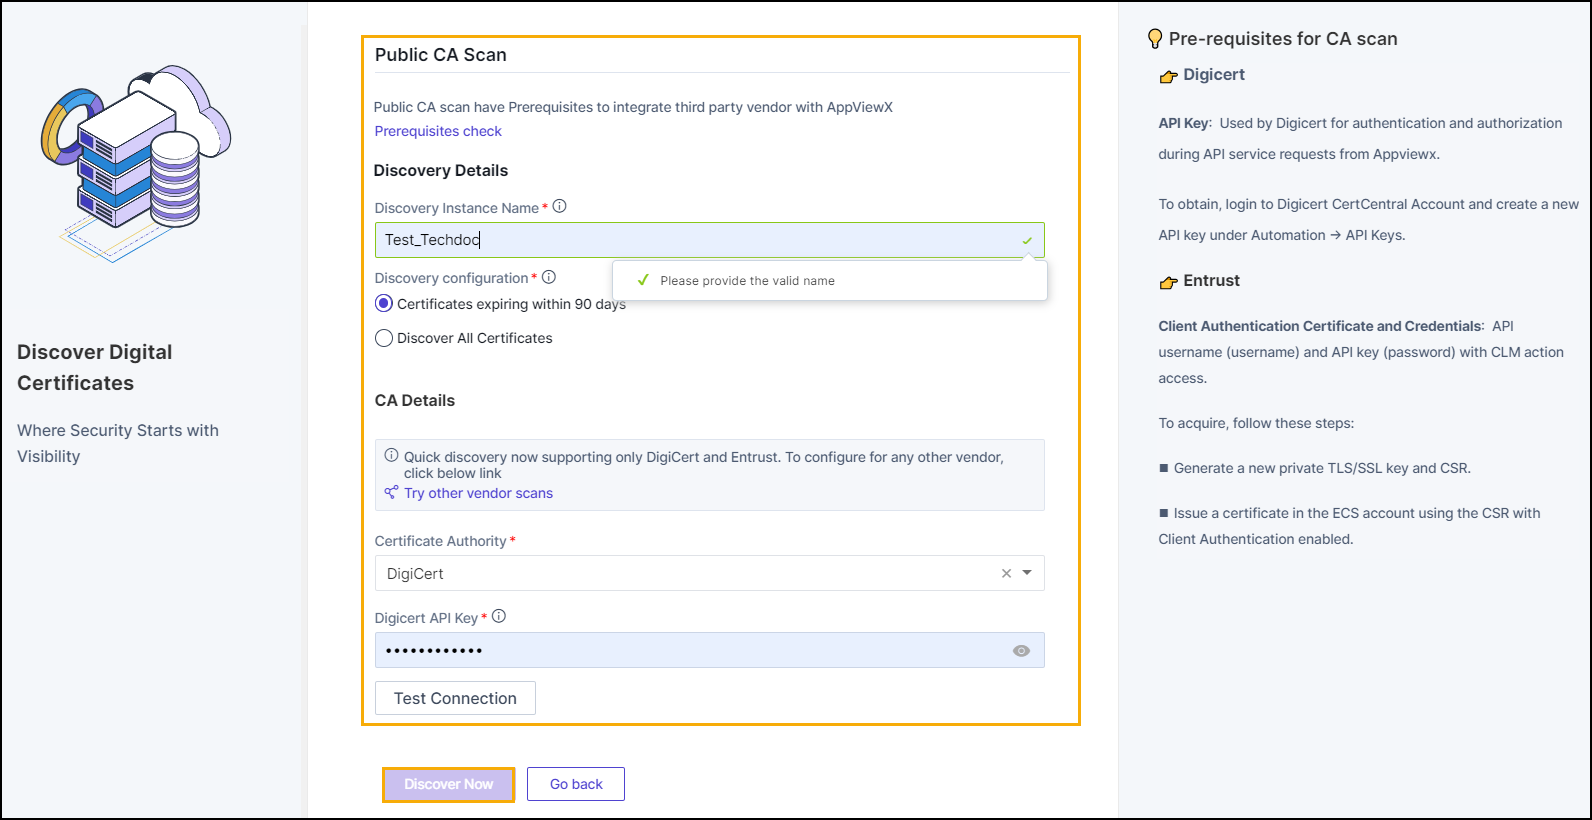
Note: By default, the Certificates expiring within 90 days radio button is enabled.
- Enter the Discovery Instance Name in the
field.
- In the CA Details section,
- Select the Certificate Authority as DigiCert from the dropdown list.
- In the Digicert API Key field, enter the API key.
- Click the Test Connection button.
- Click the Discover Now button.
Entrust CA Scan
- Client Authentication Certificate
- API username (username)
- API key (password) with CLM action access
- To obtain the Entrust prerequisites, follow the instructions
provided on the Prerequisites Public Scan
page.
- In the Public Scan section, click
Run.
The Prerequisites Public Scan page is displayed.
- Click Entrust from the
Vendors left menu.Note: Complete the instructions provided on the Prerequisites Public Scan page.
- Click Close to return to the Cert+ onboarding page.
- In the Public Scan section, click
Run.
For the Entrust CA discovery scan, follow these steps.
- In the Discovery Details section,
- Enter the Discovery Instance Name in the
field.Note: The instance name can be any friendly name to the scan configuration.
- Click the required radio button for the discovery
configuration.The available Discovery configuration options are,
- Certificate expiring within 90 days: By configuring the certificate expiring within 90 days feature, the discovery scan and monitoring will happen faster, allowing organizations to efficiently manage their digital certificates and ensure strong security and smooth operations.
- Discover all certificates: By
configuring the Discover all certificates feature,
the discovery scan might take longer depending on
the certificate volume, with the time varying based
on the number of certificates.
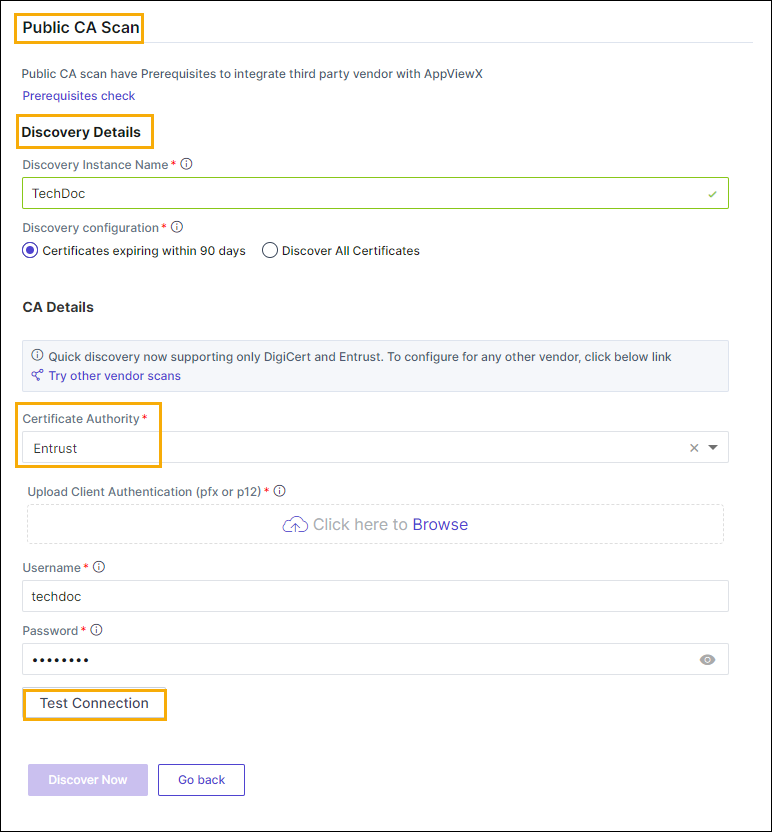 Note: By default, the Certificates expiring within 90 days radio button is enabled.
- Enter the Discovery Instance Name in the
field.
- In the CA Details section,
- Select the Certificate Authority as Entrust from the dropdown list.
- Click the Browser button to upload the client authentication. Allowed formats are <.pfx> or <.p12>.
- Enter the API username to communicate with CA in its field.
- Enter the API password to communicate with CA in its field.
- Click the Discover Now button.
- Click the Test Connection button.
Private CA Scan
When an organization creates its own local CA instead of using an external one, it is referred to as a private CA. In this case, the certificates are signed with the private key of the organization’s root certificate, which is the primary certificate used to sign other certificates. Private CAs can be established to issue certificates for an organization’s internal network, where discretion is required and only a select group of users are involved.
As part of the onboarding process, you can perform Private CA Scans targeting certificates issued by private Certificate Authorities (CAs) such as Microsoft. These scans analyze and identify digital certificates across your organization, ensuring a thorough inventory, timely renewal, security compliance, and proactive vulnerability management. They assess certificate configurations, flag high-risk, critical-risk, and non-standard certificates, and maintain comprehensive records. By utilizing these scans, organizations can efficiently manage certificates, uphold security standards, protect digital infrastructure, and maintain stakeholder trust.
Microsoft CA Scan
- Cloud Connector: Install on a Linux system with minimum requirements: 4CPU, 8GB.
- Command Execution Host: A Windows system attached to the Microsoft CA for cloud connector connection and scan execution.
- Username/Password: Credentials for accessing the command execution host.
- CA Machine Host Name: Automatically populated based on the selected CA.
For the Microsoft CA discovery scan, follow these steps.
- In the Discovery Details section,
- Enter the Discovery Instance Name in the
field.Note: The instance name can be any friendly name to the scan configuration.
- Enter the Discovery Instance Name in the
field.
- In the Connectivity section, click the Cloud Connector dropdown menu.
- Click the +Add New button.
The Cloud Connector Setup page is displayed. For more details, refer Cloud Connector User Guide.
The cloud connector (CC) can be connected with private CA in two ways.
- Automated
- Manual.
Note: By default, the Automated tab is selected.For the automated CC connection with private CA, follow these steps.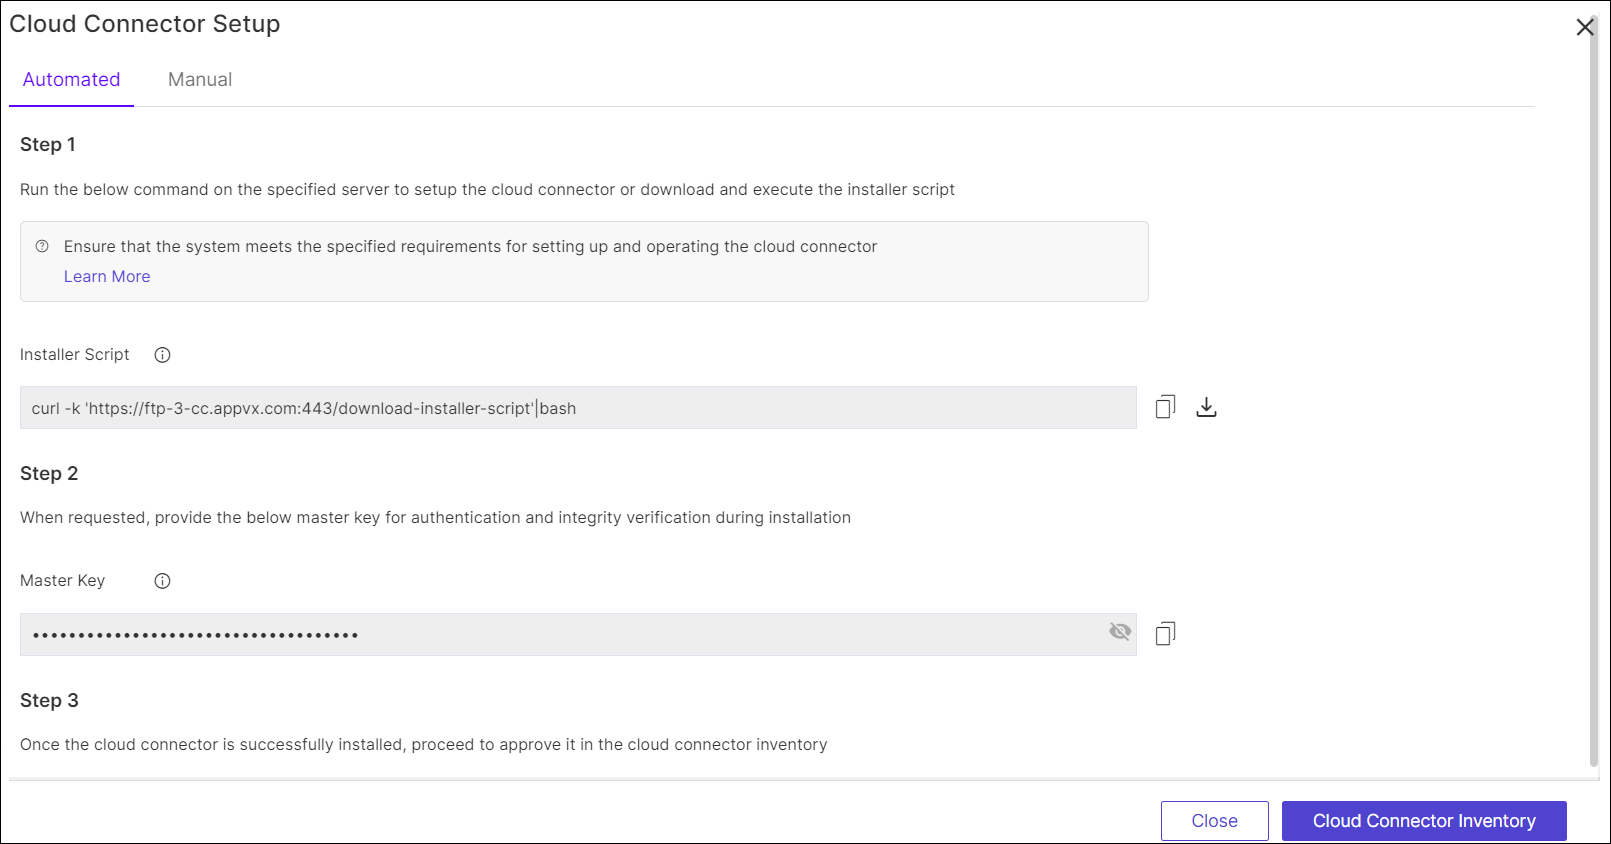
- Run the below command on the specified server to setup the cloud
connector or download and execute the installer script.
curl -k 'https://ftp-3-cc.appvx.com:443/download-installer-script'|bash - When requested, provide the below master key for authentication
and integrity verification during
installation.
22f77628-51c6-4209-b59f-3c91f859ea63 - Once the cloud connector is successfully installed, proceed to approve it in the cloud connector inventor.
- Click Cloud Connector Inventory.
The Setting Cloud Connector page is displayed.
- Click Close.
(or) For the Manual CC connection with private CA, follow these steps.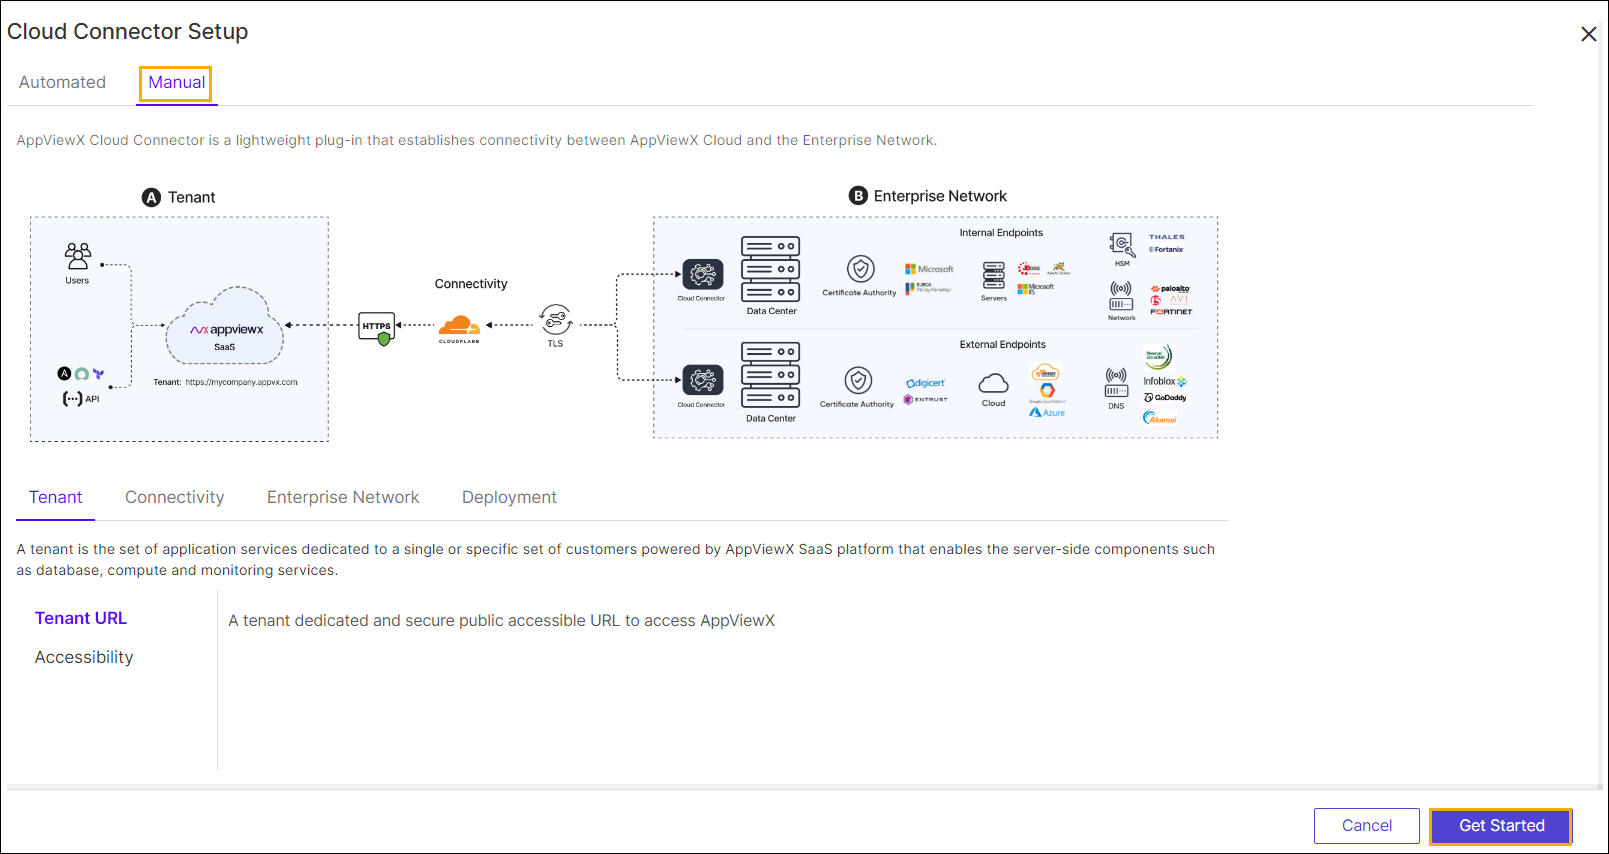
- Click Get Started.
The Basic Information page is displayed. For more details, refer Cloud Connector User Guide.
- Select the desired Installation
Type radio button.
- Native OS
- Virtual Image.
- Enter the Cloud Connector Name (FQDN) in the field.
- Select the desired Installation
Type radio button.
- Click Next.
The Assign Data Center page is displayed.
- Click Add Data Center.
The Add Data Center page is displayed.
- Enter the name of the data center in the field.
- Click Add Data Center.
- Click Next.
The Advanced Configuration page is displayed.
- Select the TLS Authentication radio as required.
Table 1. Field Description *TLS Authentication The available TLS Authentications are: - Auto Generate
- Custom Certificate
*TLS Certificate Password Enter the TLS certificate's password. *TLS Certificate Upload TLS certificate in the <.p12> format. *: Mandatory fields - Select the Use Proxy check box if required.
- Select the proxy from the dropdown list.
- If not listed in the dropdown menu, click
Click here link.
The Add Proxy page is displayed.
- Enter/select the following details Proxy Name, Server IP, Port, URL, Authentication, Username, and Password in the Add Proxy page
- Click Save.
- If not listed in the dropdown menu, click
Click here link.
- Click Finish.
- Click the Test Connection button, to validate the connection.
- Click the Discover Now button.