Setting up the AppViewX Cloud Connector using a Virtual Image on Azure
To deploy the AppViewX virtual machine for Azure:
- Go to https://release.appviewx.com/Login and, from Overview, navigate to release Example: 20XX.0.0.
- Scroll down to Production Images and download the latest artifact of Azure CC VHD, AppViewX-20XX.X.X.10-CC-Ubuntu-Azure-ddmmmyyy-vhd.tar.gz.
-
Untar the downloaded artifact.
tar -xvf AppViewX-20XX.X.X.10-CC-Ubuntu-Azure-ddmmmyyy-vhd.tar.gz -
Download the Azure Storage Explorer from here.
The Azure Storage Explorer is a desktop application that provides you with a GUI for easily managing your Azure resources.Important: Install the Azure Storage Explorer at the same location as the downloaded Azure CC VHD artifact.
- Using the Azure Storage Explorer, login to the Azure account for which the VM has to be created.
-
On successful login, go to the disks section and select the resource
group.
The resource group page is displayed.
- Click Upload.
-
In the pop-up window displayed, enter/select the resource details.
Table 1. Descriptions for the resources and their corresponding values Resource Value Source VHD <Disk file location> Disk name <Name of the disk> OS type Linux Location <region in which the VM is to be created> Availability Zone <zone name> Account type Premium SSD Hyper-V Generation V1 Architecture x64 Note: All the values in bold, in the above table, are actual values and have to be assigned as is; values enclosed in angle brackets (<>) have to be assigned as per your specific configuration. - Click Create.
- Once the disk is successfully uploaded to the Azure cloud, from the Azure portal, select the disk and click +Create VM.
- On the Create a virtual machine page, configure the VM configurations based on your organization’s standards and requirements.
-
Once the VM is successfully created, use the password provided by SRE/TS team
to login to the node (on which the cloud connector is to be installed). To do
this, on the Command Line Terminal or Powershell, execute the following command:
ssh appviewx@<ip/hostname> -
To add an entry for the nameserver in the resolv.conf file, execute the
following command:
echo "nameserver <IP of nameserver>" > /etc/resolv.conf -
Update the /etc/hosts file for the IP and the hostname of the VM created, using
the following commands:
vi /etc/hosts hostnamectl set-hostname “hostname-of-the-vm” -
To validate the update to the /etc/hosts file, execute the following
commands:
hostname -i hostname -f hostname -
To switch to the appviewx user, execute the following command:
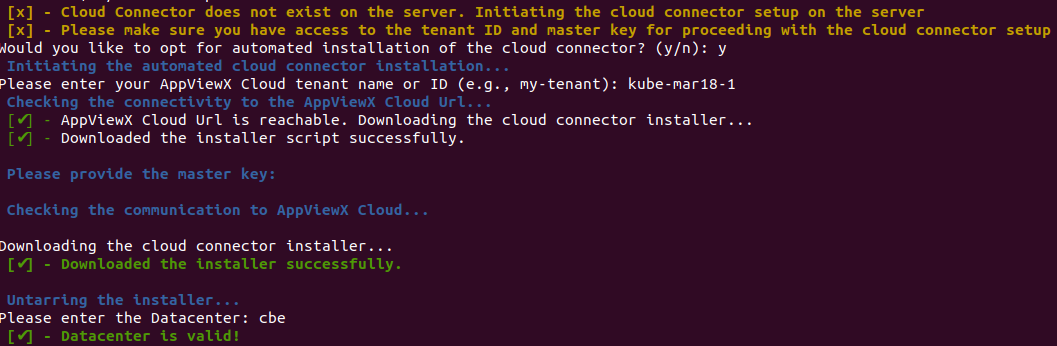
sudo su – appviewxAfter the execution of this step, if the cloud connector does not exist on this host machine, the following prompt is displayed: Would you like to opt for automated installation of the cloud connector? (y/n):. -
To install the AppViewX cloud connector at this point, enter y.
-
When prompted Please enter your AppViewX Cloud tenant name or ID, enter
the required details.
Internet connectivity on the host machine is validated. The installation proceeds only if the host machine has internet access.Note: If internet access is unavailable, you will be prompted to proceed with installation using a proxy. Enter y and for instructions on proceeding with the installation with a proxy, click here.
-
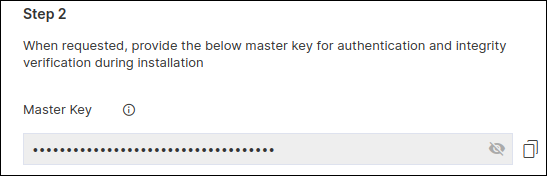
When prompted to Please provide the master key, enter the required
details.
To retrieve the master key:
-
Go to
 (Menu) > Platform >
Connectivity > Cloud Connector.
The Settings :: Cloud Connector inventory page is displayed.
(Menu) > Platform >
Connectivity > Cloud Connector.
The Settings :: Cloud Connector inventory page is displayed. -
From the Automated Cloud Connector Setup window, under Step
2, copy the Master Key.
The cloud connector installation script will check for the prerequisites and trigger the cloud connector installation.When the cloud connector instance is successfully installed, a corresponding entry will be listed in the cloud connector inventory.
-
Go to
- When prompted, Please enter Datacenter, enter the name of the data center on which this cloud connector will be deployed.
-
Note: Enabling auto-enrollment protocols is recommended only if the cloud connector is being installed in a demilitarized zone (DMZ) or devices in a restricted environment (that disables them from connecting to the <tenant>-aep directly.When prompted to enable auto-enrollment protocols, enter y and enter the protocol name(s) you want to enable. For instructions on enabling auto-enrollment protocols, click here.Note: By default, only the AppViewX certificate is enabled for auto-enrollment. To enable custom certificate for auto-enrollment:
- Execute the command
 ./avxctl upgrade
                                gateway-cert
. - When prompted, enter the location of the custom certificate.
On successful completion of the setup, a corresponding instance of this cloud connector is displayed in the inventory.Note: The cloud connector installation on a OVA-based host machine will not prompt you to select if you want to manage F5 Big-IP devices. However, after the cloud connector has been installed you can copy the iControl jar in the deps/external_libs folder (click here for instructions) and restart the starter and platform pods (click here for instructions), to enable this feature.Note: Optional, required only for password authentication) In order to successfully execute the installation, AppViewX needs to run a script for which authentication via the .pem file needs to be bypassed. To do this, execute the following commands:sudo sed -i 's/.*PasswordAuthentication.*/PasswordAuthentication yes/g' /etc/ssh/sshd_config sudo systemctl restart sshd - Execute the command
-
To approve the cloud connector installation:
-
Go to (Menu) > Platform >
Connectivity > Cloud Connector.
The Settings :: Cloud Connector inventory page is displayed.
Troubleshooting: If the AppViewX Cloud Connector instance has been approved but is not moved to the Running state, you can check the pod status and/or restart the pod(s), as required. -
Go to