Creating the Configuration File for Agent Set Up

Creating a Linux-based Configuration File

  1. Login to the release portal https://release.appviewx.com/downLoadArtifact?id=1729 and download the latest Linux variant of the code scan agent, code-scan-agent-linux-v1.0.0-2025.09.tar.gz, in your Ubuntu or RHEL machines, as required.
  2. To verify that the tar file has not been tampered with and is secure for use.
    1. Download the signature file from the release portal https://release.appviewx.com/downLoadArtifact?id=1730.
    2. Execute the following command:
      openssl cms -verify -in /path/to/SIG-file -inform DER -binary -noverify -content /path/to/tar-file
      Here:
      • /path/to/SIG-file: Signature file downloaded from release portal
      • /path/to/tar-file: Location of the tar file downloaded from the release portal
  3. Untar the Code Scan Agent.
    tar -xvf code-scan-agent-linux-v1.0.0-2025.09.tar.gz
  4. Assign execution permissions for the Code Scan Agent.
    chmod +x code-scan-agent
  5. Create the configuration file and secret key needed for executing the code scan agent.
    1. Execute the following command to initiate the file creation process:
      ./code-scan-agent --create-config
      During config file creation, you can provide --config and --key arguments to specify your configuration file and secret key location, else by default these will be created in relative path.

      For additional options that you can use with the ./code-scan-agent command, click here.

    2. Reply to the configuration prompts displayed.
      The prompts and their recommended responses are explained in detail here.
      Important: You will also be required to enter your service account details as part of the configuration file set up. Ensure that the service account is created and you have the required details. For instructions, see Configuring a Service Account to Send Reports to AppViewX.
      Important:
      • To run the code scan agent in the local file system, for the configuration prompt, Is this config file creation intended for CICD?, your response must be No.
      • To view reports only locally and not visualize them on the Quantum Trust Hub dashboards, for the configuration prompt, Do you want to send reports to AppViewX, your response must be No.
    The config.ini file and the secret.key file will be created in the relative path. The secret key will be used to decrypt the configuration file while the scans are being executed.

Creating a Docker-based Configuration File

Prerequisites

  • Set the required permissions for the configuration file creation.
    For Docker, execute the following commands:
    sudo mkdir /path/to/config-directory
    sudo chmod 666 /path/to/config-directory
    
    For podman, execute the following commands:
    mkdir -p /path/to/config-directory
    chown <username>:<group> /path/to/config-directory
    

Configuration File Creation Instructions

  1. Login to the release portal https://release.appviewx.com/downLoadArtifact?id=1727 and download the latest Docker variant of the code scan agent, code-scan-agent-docker-v1.0.0-2025.09.tar.gz, in your Ubuntu or RHEL machines, as required.
  2. Verify that the tar file has not been tampered with and is secure for use.
    openssl cms -verify -in /path/to/SIG-file -inform DER -binary -noverify -content /path/to/tar-file
    Here:
    • /path/to/SIG-file: Signature file downloaded from release portal
    • /path/to/tar-file: Location of the tar file downloaded from the release portal
  3. Untar the Code Scan Agent.
    tar -xf code-scan-agent-docker-v1.0.0-2025.09.tar.xz
  4. Load the docker agent.
    docker load -i code-scan-agent-image-v1.0.0.tar.gz
  5. Create the configuration file and secret key needed for executing the code scan agent.
    1. Execute the following command to initiate the file creation process:
      [Adjust paths and usernames as needed for your environment.]
      For Docker [Use sudo if required by your system.]
      sudo docker run --rm -it \
          -v "/path/to/config-directory:/config" \
          code-scan-agent:v1.0.0 \
          --config /config/config.ini \
          --key /config/secret.key \
          --create-config
      Here, /path/to/config-directory is the absolute path of the existing directory where the configuration file must be created.
      For podman
      podman run --rm -it \
        -v "/path/to/config-directory:/config:Z" \
        code-scan-agent:v1.0.0 \
        --config /config/config.ini \
        --key /config/secret.key \
        --create-config
      
      Here, /path/to/config-directory is the absolute path of the existing directory where the configuration file must be created.

      The :Z option ensures proper SELinux labeling.

      For additional options that you can use with the ./code-scan-agent command, click here.

    2. Reply to the configuration prompts displayed.
      The prompts and their recommended responses are explained in detail here.
      Important: You will also be required to enter your service account details as part of the configuration file set up. Ensure that the service account is created and you have the required details. For instructions, see Configuring a Service Account to Send Reports to AppViewX.
      Important:
      • To run the code scan agent in the local file system, for the configuration prompt, Is this config file creation intended for CICD?, your response must be No.
      • To view reports only locally and not visualize them on the Quantum Trust Hub dashboards, for the configuration prompt, Do you want to send reports to AppViewX, your response must be No.
    The config.ini file and the secret.key file will be created in the relative path. The secret key will be used to decrypt the configuration file while the scans are being executed.

Creating a Windows-based Configuration File

Prerequisites

Supported OS-Runner machine:
  • Windows 10 and above with 64-bit architecture
  • Windows server 2019 and above with 64-bit architecture

Configuration File Creation Instructions

  1. Login into the release portal and download the latest Windows variant of the AppViewX Code Scan Agent tar available (for example, code-scan-agent-windows-v1.0.0-2026.1.tar.gz) in one or more supported Windows machines.
  2. To verify that the tar file has not been tampered with and is secure for use:
    1. Download the signature file from the release portal https://release.appviewx.com/downLoadArtifact?id=1730.
    2. Execute the following command:
      openssl cms -verify -in /path/to/SIG-file -inform DER -binary -noverify -content /path/to/tar-file
      Here:
      • /path/to/SIG-file: Signature file downloaded from release portal
      • /path/to/tar-file: Location of the tar file downloaded from the release portal
  3. Untar the downloaded AppViewX Code Scan Agent.
    tar -xvf code-scan-agent-windows-v1.0.0-2026.1.tar.gz
  4. Create the configuration file needed to execute the agent.
    .\code-scan-agent.exe --create-config
    A series of questions regarding the AppViewX deployment details, port details and service account details will be prompted.
  5. Reply to the configuration prompts displayed.
    The prompts and their recommended responses are explained in detail here.
    Important:
    • To run the code scan agent in the local file system, for the configuration prompt, Is this config file creation intended for CICD?, your response must be No.
    • To view reports only locally and not visualize them on the Quantum Trust Hub dashboards, for the configuration prompt, Do you want to send reports to AppViewX, your response must be No.
    The config.ini and secret.key files will be created in the relative path, using the prompt responses entered. The secret.key file will be used to decrypt the config.ini file while performing the scan.

Sample Configuration Files

For agent running in CICD using Cloud Connector for communication
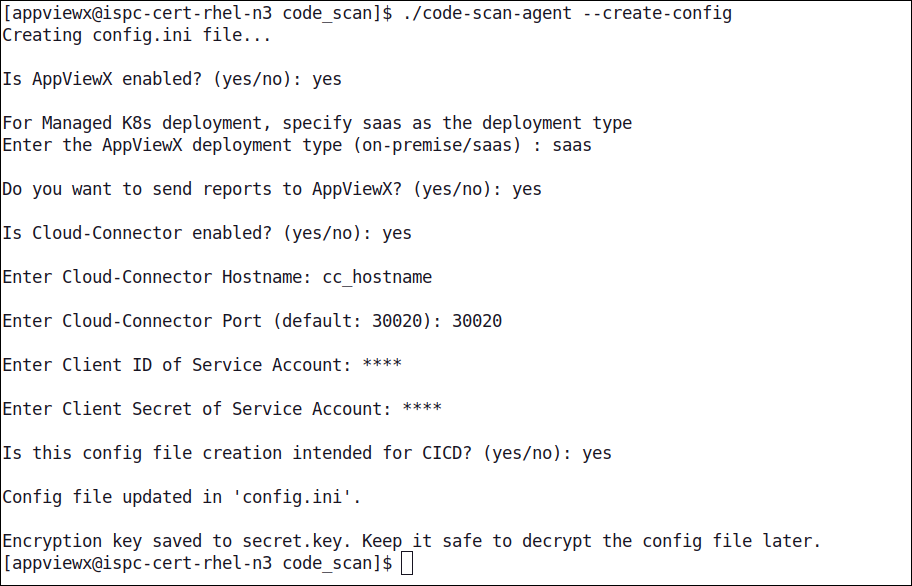
For agent running in CICD using Tenant Hostname for communication
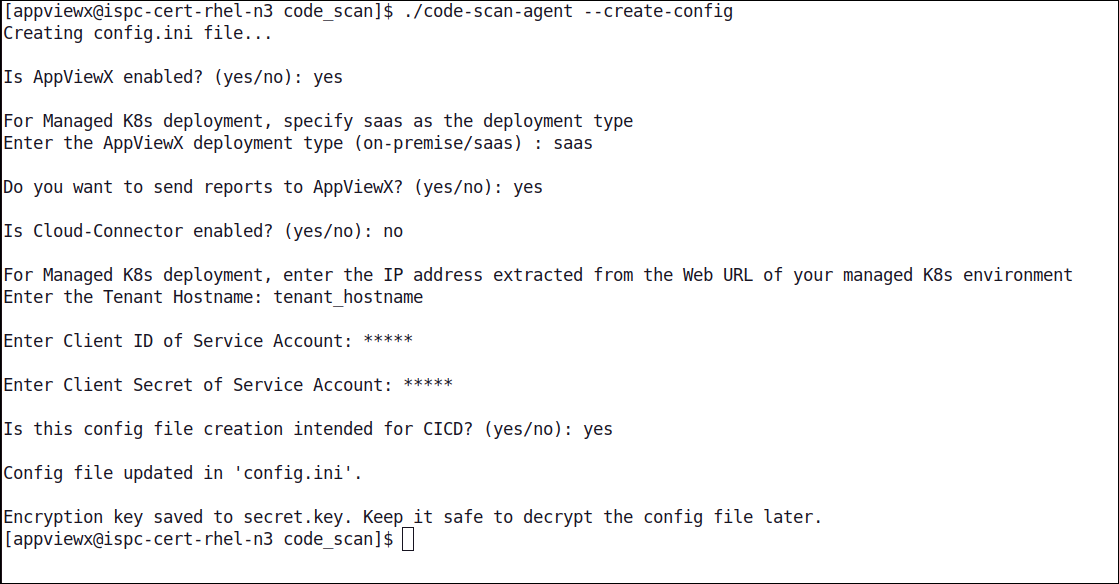
For agent running in local file system in On-Premise environment