Adding Imperva SecureSphere
Prerequisites
- AWS
- User permissions and navigation settings can be configured either individually or by assigning a predefined role that includes the necessary settings. When a role is assigned, the user automatically inherits all privileges associated with that role. While additional permissions or navigation options can be added, privileges inherited from the role cannot be revoked individually.
- Minimum required permissions
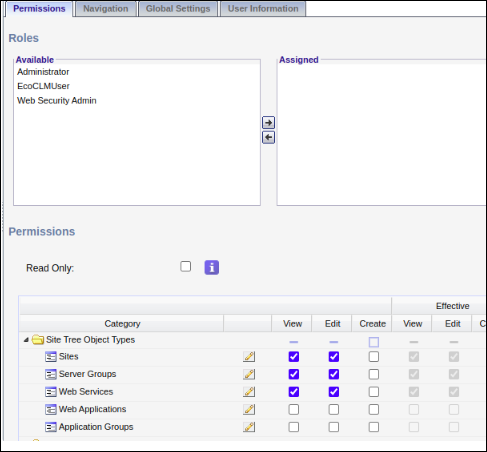
In the Site Tree Object Types category, enable:- Sites > Edit
- Server Groups > Edit
- Web Services > Edit
Note: Edit access provides View/Read access implicitly; no need to provide View access separately.
- SaaS
- Configure user account roles and permissions within Imperva SaaS to efficiently perform Certificate Lifecycle Management (CLM) operations. Enable administrator or service account access to the Imperva SaaS portal to create a new User and role.
- Define and manage roles to assign the appropriate permissions for Imperva SaaS configuration sync, endpoint enrollment, push, and binding from AppViewX to Imperva SaaS.
- Access the Roles page to create and manage roles. This page is available
to the account administrator or users with the Manage user roles
permission.
- On the sidebar, click User Management > Roles > New Role.
- Create a new role with the following permissions:
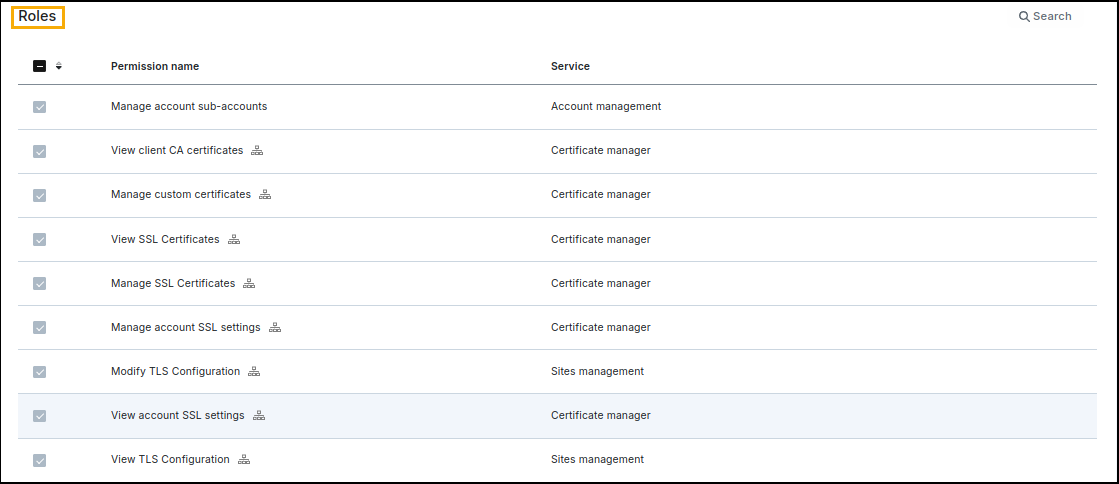
Permissions:
- View client CA certificates
- Manage custom certificates
- Manage account SSL settings
- View account SSL settings
- View TLS Configuration
- View SSL Certificates
- Manage SSL Certificates
- Modify TLS Configuration
- Manage account sub-accounts
- AWS
- Due to API limitations, existing certificates from Imperva AWS/On-Prem cannot be discovered. Furthermore, the discovery API metadata does not include the certificate's serial number, which prevents the creation of an AppConnector for the discovered certificate.
- CSR generation is not supported at the endpoint.
- SaaS
Imperva SaaS does not offer an API for exporting certificate content and only provides certificate metadata. Consequently, certificates from Imperva SaaS cannot be directly discovered. However, if a certificate is already present in the AppViewX inventory, a connector will be created using the serial number from the metadata.
API Key Management
- On the sidebar, click User Management > Users.
- Click Add New user to create a new user, and then enter the details as required.
- Click the Add User button.Note: When a new user is added to an account, a verification email is sent to their registered address. The user must click the link in the email to verify their address and set a login password.
- Once the User account is created, select Edit, navigate to the API Keys category, and generate an API ID and API Key.
- Click Create. It creates an API ID and API Key.
To add the WAF device:
-
Go to
 (Menu) >
CERT+ > ADMINISTRATION >
Device Management.
By default, the ADC tab opens.
(Menu) >
CERT+ > ADMINISTRATION >
Device Management.
By default, the ADC tab opens. - Click the WAF tab.
-
Click the
 (Add) icon.
The Device details page is displayed.
(Add) icon.
The Device details page is displayed. - Select Imperva Securesphere from the Vendors list.
-
In the General Information section, enter the details as
follows:
Fields Description Platform Select either: - AWS: Select AWS for Imperva on-prem or AWS Marketplace deployment.
- SaaS: Select SaaS for Imperva SaaS deployment.
Note: By default, AWS platform is selected.*Device name Enter a unique name for the device to be onboarded. Onboarding Group Select the onboarding group to assign the device. Note: Devices without an assigned group are automatically mapped to the Default group during migration, onboarding, and when edited without existing group mappings.Communication This field is displayed if Platform = AWS. Select IP address or FQDN. *IP Address This field is displayed if Platform = AWS and Communication = IP Address. Enter the IP address of the device to be onboarded.
*FQDN This field is displayed if Platform = AWS and Communication = FQDN, or if Platform = SaaS. Enter the fully qualified domain name of the device to be onboarded. *Rest port This field is displayed if Platform = AWS. Enter the rest port number. Data center Enter the data center name. It holds all the SSL related information that is to be retrieved from the server. Proxy Required Enable this field if the device communication needs to happen via a proxy. The proxy details configured in general settings will be used for communication.
Cert Sync Choose from any of the following: - Managed - AppViewX performs the config fetch operations and the certificates are discovered and managed in the inventory. CLM actions (push & bind, rollback etc.) can be performed on them.
- Monitored - AppViewX performs the config fetch operations and the certificates are downloaded in the inventory in the read-only state. CLM actions cannot be performed on them.
- Ignored - AppViewX only performs the config fetch operations for the devices. There is no certificate discovery performed.
*: Mandatory fields Note: AppViewX supports certificate enrollment and deployment to the primary Imperva SaaS account and its associated sub-accounts. -
In the Credentials section, enter the details as
indicated below. The credentials entered in this section are used to
authenticate the session between the AppViewX node and the WAF device.
Note: This field is displayed if General Information = AWS.
Fields Description *Credential Type Select the credential type from the dropdown: - Manual entry (default) - to directly add the credentials in the username and password text box.
- Credential List - AppVewX - to use any credentials from the saved AppViewX Credential List.
- Credential List - CyberArk - to use any credentials from the saved AppViewX CyberArk List.
*Access type Select the method to access the Imperva SecureSphere. API is the default value. *Username This field will be visible if the Credential Type is selected as Manual entry. If the Credential Type is selected as Credential List - Appviewx, the username is entered by default and field is read only.
If the Credential Type is selected as Credential List - Cyerark, this field is not displayed.
Enter the designated username for Imperva Sourcesphere.
*Password This field will be visible if the Credential Type is selected as Manual entry. If the Credential Type is selected as Credential List - Appviewx, the password is entered by default and field is read only.
If the Credential Type is selected as Credential List - Cyerark, this field is not displayed.
Enter the designated password to access Barracuda.
*Credential list This field will be visible only if the Credential type is selected as Credential List - AppViewX or Credential List - CyberArk The dropdown contains a list of credentials stored in AppViewX.
*: Mandatory fields Note: This field is displayed if General Information = SaaSFields Description *Credential Type Select the credential type from the dropdown. - Manual entry (default) - to directly add the credentials in the username and password text box.
*Access type Select the method to access the Imperva SecureSphere. API is the default value. *API ID Enter the valid API ID. *API Key Enter the valid API ID. *: Mandatory fields -
In the Secondary device information section, enter the
details as follows.
Note: This field is displayed if General Information = AWS.
Fields Description Secondary / Failover / Sync group Select either Ignore or Manual entry. *Device name Enter a unique name for the secondary device to be onboarded. Communication Select from IP address and FQDN. *IP Address This field is displayed if Communication = IP Address Enter the IP address of the secondary device to be onboarded.
*FQDN This field is displayed if Communication = FQDN Enter the fully qualified domain name of the secondary device to be onboarded.
*Rest port Enter the rest port number of the secondary device. Data center Enter the data center name. It holds all the SSL related information that is to be retrieved from the server. *: Mandatory fields In the Secondary device credentials section (displayed only if Secondary / Alternate device = Manual entry, enter the details as follows:Fields Description *Use same credentials The Enable checkbox is used to fix the credentials type to either Credential List - Appviewx or Credential List - CyberArk based on its selection. *Credential type Select the credential type from the dropdown. - Manual entry (default) - to directly add the credentials in the username and password text box.
- Credential List - Appviewx - to use any credentials from the saved AppViewX Credential List.
- Credential List - CyberArk - to use any credentials from the saved AppViewX CyberArk List.
*Access type Select the method to access the secondary device. API is the default value. *Username This field will be visible if the Credential Type is selected as Manual entry. If the Credential Type is selected as Credential List - Appviewx, the username is entered by default and field is read only.
If the Credential Type is selected as Credential List - Cyerark, this field is not displayed.
Enter the designated username for the secondary device.
*Password This field will be visible if the Credential Type is selected as Manual entry. If the Credential Type is selected as Credential List - Appviewx, the password is entered by default and field is read only.
If the Credential Type is selected as Credential List - Cyerark, this field is not displayed.
Enter the designated password to access the secondary device.
*Credential list This field will be visible only if the Credential type is selected as Credential List - AppViewX or Credential List - CyberArk The dropdown contains a list of credentials stored in AppViewX.
*: Mandatory fields - [Optional step] Click Add. This button is displayed only if Secondary device information is Manual entry. More than one devices can be configured. (Use the Update and Delete buttons to make changes or remove the devices added.)
-
Click Save.
The device is onboarded successfully.