Create F5 GTM WideIP with Topology and Patition
This workflow creates a WideIP with multiple Pools and chooses a topology record for the pools that are created.
To run this workflow:- Go to Menu > ADC+ > AUTOMATION > Workflow Catalog > View/Run
- Click the F5 BIG-IP GTM category on the View/Run Workflows page.
-
On the popup window, hover the mouse over the Create F5 GTM WideIP
with Topology and Partition workflow.
The Run and Schedule buttons are displayed.
-
Click
 .
The Request > Create F5 GTM WideIP with Topology and Partition :: FormBuilder page is displayed.
.
The Request > Create F5 GTM WideIP with Topology and Partition :: FormBuilder page is displayed. -
Enter/select the Device Details.
Table 1. Device Details Section - Field and Description Table Field Description Datacenter Displays the list of datacenters of the devices, which are created in the Device Inventory. Select the datacenter of a device from the drop-down option for which this request is to be created. For the devices which are created without a datacenter in the Device Inventory, select the datacenter as None. *Device Name Displays the list of devices associated with the selected datacenter. If the datacenter is selected as None, the devices that are created without datacenter details are listed. Select the desired device from the drop-down option. *Partition Select Partition from the dropdown list on which WideIP has to be created. -
Enter/select the DNS Details.
Table 2. DNS Details Section - Field and Description Table Field Description *Do you want to integrate with DNS By default, the No option is selected. If you want to integrate with DNS for CNAME record creation, select Yes. When you select Yes, the following fields are displayed: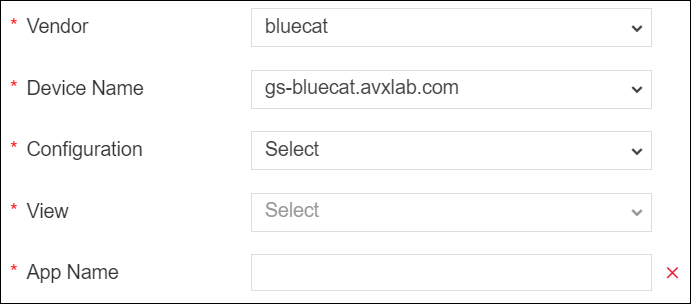
Select the Vendor from the drop-down list. The default vendors are Infoblox and bluecat.
When you select DNS vendor as Infoblox, you need to provide the following details:
- Select the Device Name from the drop-down list.
- Enter the App Name for the WideIP name in the format www.<name>.com.
When you select DNS vendor as bluecat, you need to provide the following details: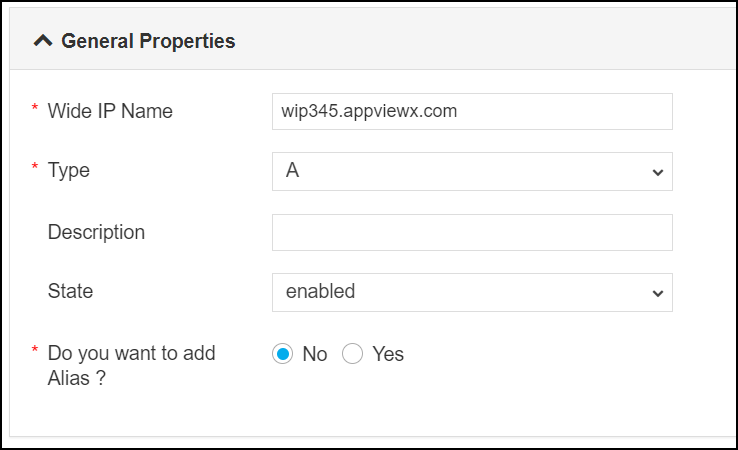
- Select the Device Name from the drop-down list.
- Select the Configuration from the drop-down list.
- Select the View for the selected configuration. The options are displayed based on the selected configuration.
- Enter the App Name for the WideIP name in the format of www.<name>.com.
-
Enter/select the General Properties.
Table 3. General Properties Section - Field and Description Table Field Description *Wide IP Name Enter the WideIP Name in the FQDN format. *Type Select the pool/WideIP type. The types are:
- A - the pool/Wide IP responds to A queries. The A pool/Wide IP is a mapping of an FQDN to a set of IPv4 virtual servers that host the domain's content, such as a Web site or an e-commerce site. You can also specify pool members' virtual server and ratio settings.
- CNAME - the pool/Wide IP responds to CNAME queries. A CNAME pool/Wide IP is a mapping of an FQDN to its canonical name. This is the configuration of a static name or a Wide IP name. Static names support older configurations. Wide IP names allow service checking, enhanced load balancing, and CNAME chasing in the reply. You can also specify pool members' ratio.
Description Enter the descriptive text to identify the WideIP. State It allows the system to use this wide IP and its resources for load balancing. The options are:
- enabled (default)
- disabled
*Do you want to add Alias ? Add Alias for the WideIP name. The options are:
- No (default)
-
Yes – When you select Yes the following fields are displayed to add
alias details:
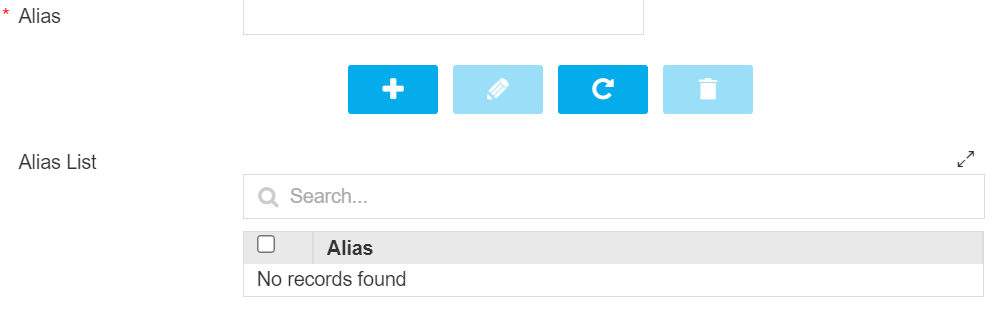
Enter the alias name for WideIP in the Alias field. You can add any number of aliases for WideIP. After entering the alias in the Alias field, click
 to add an
alias. The added aliases are displayed under the Alias List. You can
manage the added alias(es) to the list.
to add an
alias. The added aliases are displayed under the Alias List. You can
manage the added alias(es) to the list.
-
Enter/select the Pool details.
Table 4. Pool Section - Field and Description Table Field Description Info Information that is to be noted while entering the details in this section. *Load Balancing Method The load balancing method is used to select a pool in this WideIP. The methods are:
- round-robin - the system selects the pools sequentially.
- global-availability -. the system selects a pool by following the order of the Pool List. The system repeatedly selects the first pool in the list for as long as its status is available. If the pool becomes unavailable for any reason, the system then repeatedly selects the next pool in the list, and so on.
- ratio - the system selects a pool based on the ratio that you assign to the pool.
*Persistence By default, this option is disabled. When a local DNS makes repetitive requests on behalf of a client, the system reconnects the client to the same resource as previous requests. *Pool Name Enter the pool name. Preferred Select the preferred load balancing method. The system tries this method first.
Note: When you choose the fallback-ip option, the Fallback IP field will be displayed and you need to input the Fallback IP.Alternate Select the alternate load balancing method. The system tries this method if the Preferred method is unsuccessful in picking the WideIP.
Note: When you choose the fallback-ip option, the Fallback IP field will be displayed and you need to input the Fallback IP.Fallback Select the alternate load balancing method. The system tries this method if the Preferred and Alternate methods are unsuccessful in picking the WideIP. Pools Click to add the pool details to the list. You
can add multiple to the pool to the list. After adding pool(s) to the list, you
can manage them. -
Enter/select the Pool Member Details.
Table 5. Pool Member Details Section - Field and Description Table Field Description Info Information that is to be noted while entering the details in this section. *Pool Click the Retrieve (  )
button to get the pool name.
)
button to get the pool name.*Pool Member Type Select the pool member types. The pool member types are:
-
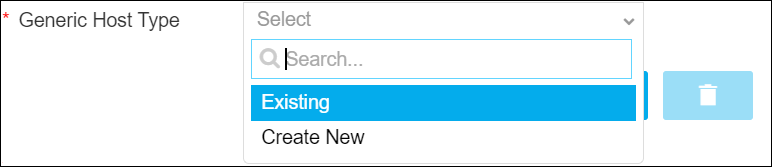
Generic Host – When you select this pool member type, you get the option to select the Generic Host Type.
-
Big IP System – When you select this pool member type, you get the option to select the configured virtual servers under Big IP System.

Note: It takes a while to load the servers.*Virtual Server When the pool member type is selected as Big IP System. Select a virtual server from the dropdown list. *Pool Member List Enter the IP address of the pool member. And then click . Any number of pool numbers can be added
to the pool. After adding the pool, you can manage them. -
-
Enter/select the Topology details.
Table 6. Topology Section - Field and Description Table Field Description *Request Source (Region) The origination section of the topology record for the pool. Click
to retrieve the list of associated regions.*Destination (Pool) The target section of the topology record for the pool. *Weight The weight of the topology record. The system finds the weight of the first topology record that matches the server object (pool or pool member) and the local DNS. The system then assigns that weight as the topology score for that server object. The system load balances to the server object with the highest topology score. If the system finds no topology record that matches both the server object and the local DNS, then the system assigns that server object a zero score. *Topology Record Detail … After providing the topology details for the pool, click . The
List of topologies is added for the pool. You can manage topology records after
adding them. -
Click Submit.
The Confirmation dialog box is displayed.
-
To save this form so you can edit it later, click Save Draft and then click
OK.
The form will be saved as Open request under Request > My Request.
OR
To submit the form, click OK.
The validation starts automatically and reaches the Review stage.Note:- If there is any failure at this stage, start a new request by providing the correct data.
- Alternatively, select the failed request and clone it. Update the correct input data in the form input, and submit the workflow again.
-
Review the input data under the implementation, rollback, and
postvalidation tabs.
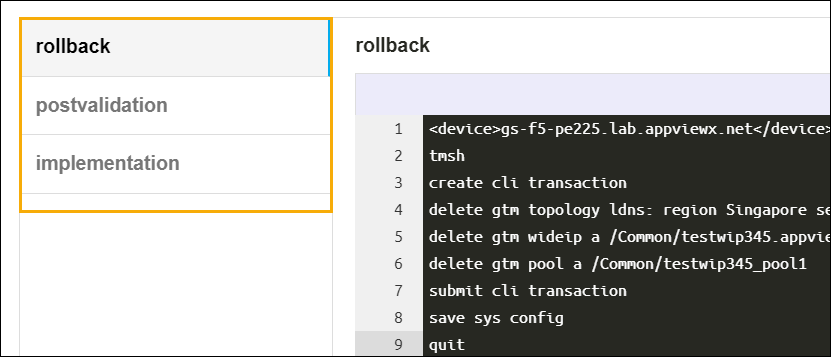
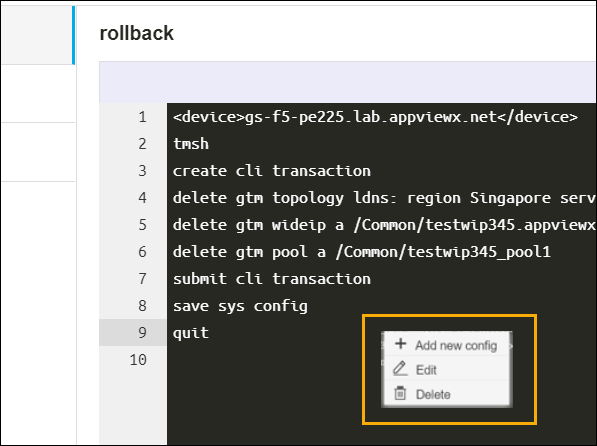
-
(Optional) If you need to change any data at this stage, right click and select the
required option.
-
After the review, click Submit.
The Confirmation dialog box is displayed.Note: To stop running the workflow creation, click Cancel.
-
Click Ok to continue the workflow creation.
It takes a while to complete the request.
After a successful post-validation, the workflow is created and the email triggered to the configured email IDs.
Note: The stages of the request are shown in the left side of the screen. To view a particular stage of the request, click the respective stage.