Adding a Juniper Firewall Device
Prerequisites
- General prerequisites:
- Ensure communication between AppViewX and the firewall is enabled.
- AppViewX needs an internet or proxy connection to communicate with the firewall via the REST API.
- Valid firewall account details, including API tokens/keys and user credentials, are necessary.
- The API must have elevated (admin) permissions to read and modify SSL certificates.
- IP Address/FQDN: IP address or FQDN
- User Privilege:
- Username/Password
- Credential List AppViewX/CyberArk
- Enable Password: Required
- License Check: Not required
- Services and Port for AppViewX Communication: Port number 22 (SSH)
- Internet Access/Proxy: Not required
- Location from which the certificates are discovered if Certificate Managed: Not
supportedNote: For Visual Workflow action items, you will require credentials with write privilege.
Configuring a Juniper Firewall Device
To add a Juniper device,
-
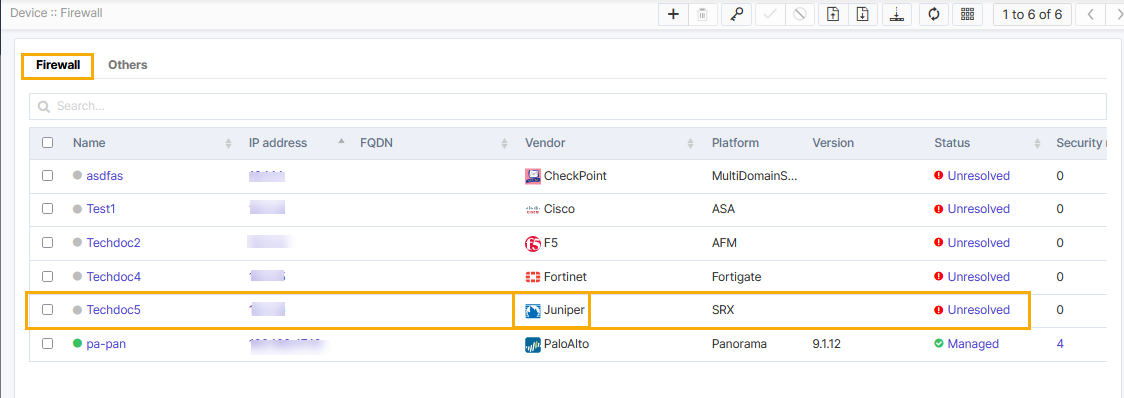
Go to Menu > FIREWALL+ > DEVICE MANAGEMENT >
Inventory> Firewall.
By default, the Firewall tab opens.
-
In the Firewall tab, click
 (Add) icon located upper right corner.
The Add page appears.
(Add) icon located upper right corner.
The Add page appears. -
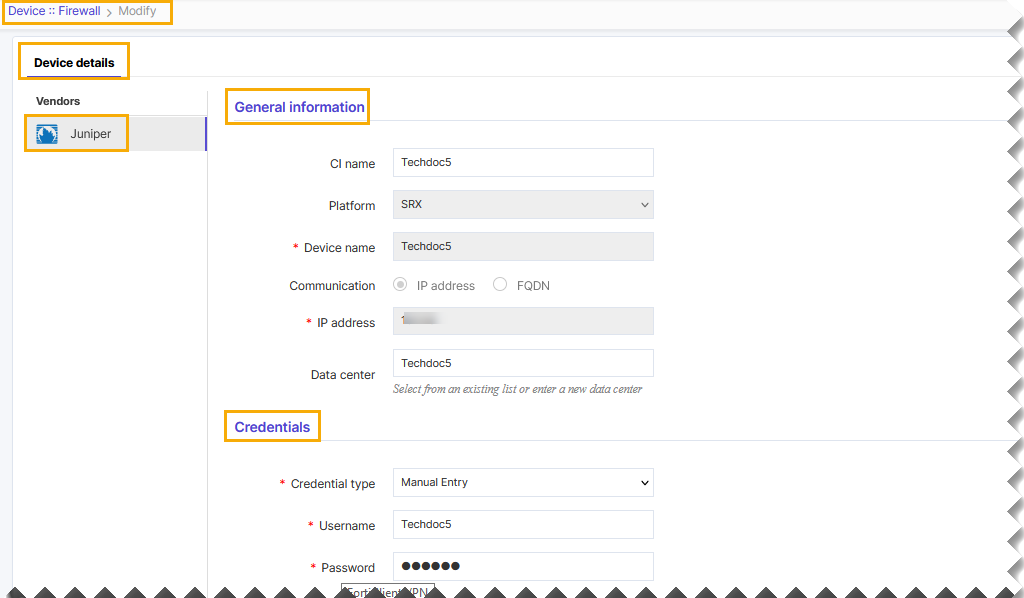
Select the Juniper vendor from the left side bar. bar.
-
Enter or select the field information in the General Information section.
Table 1. Field and Description Table Field Description CI name Name of the CI. Platform Select the platform from the drop-down list. The available option is, - SRX.
*Device name Unique custom identifier of your device. Data center The data center on which the device has been hosted. Select a Datacenter from the drop-down list or enter a data center name. Communication The communication mode that firewall devices can be added to AppViewX. The possible communication modes are:
- IP Address - The IP Address can be IPV4 and it can be either management IP or Self IP of the Firewall device. By default, the IP address has been selected.
- FQDN - On adding the device with FQDN, it will be resolved to an IP address and communication to the device will be made through it. If the FQDN is resolved to more than one device IP, AppViewX will choose a random IP for communication.
*IP address/FQDN Enter the IP address or FQDN based on the selected communication mode. Data center Select from an existing list or enter a new data center. Cert sync Provision to discover and manage the SSL certificates from the firewall devices. The possible Cert syncs are: - Managed - All SSL certificates will be discovered and added to AppViewX certificate inventory and used for certificate lifecycle management like renew, revoke, etc.
- Monitored - All SSL certificates will be discovered and will not have any CA-related communication.
- Ignored - No SSL certificates will be discovered from the firewall device.
Note: The certification sync is based on the license applied.*: Mandatory fields -
Enter or select the field information in the Credentials section:
Table 2. Field and Description Table Field Description *Credential type Credentials can be manually provided or stored as a one-time entry onto the credential library and referred at the time of device addition. Select one of the following credential types from the drop-down list: - Manual Entry - The user name and password of the device need to be entered with device details. By default, the Manual Entry option is selected.
-
AppViewX Credential List - The user name and password can be added to the List and that entry can be referred to during device addition. The credential lists are integrated within AppViewX application for the secured authentication.
To create a credential list, see Creating Credential List in the Platform User Guide.
*Username Username for the firewall device when you select the Manual Entry credential type. *Password Valid password for the firewall device when you select the Manual Entry credential type. Note: Use strong passwords for secure device communication. Your Passwords can be of any length with a combination of alpha-numerical, symbols, and special characters.Expert password Enter the password. *: Mandatory fields -
Enter or select the field information in the Secondary device information
section as follows:
-
Auto-Detect - This option will automatically detect the corresponding secondary devices and add it as a new entry into AppViewX inventory using the Primary device’s credential.
-
Manual Entry - This selection will enable you to manually add Secondary devices with a Sync-group name entered for reference. This name will be used to identify the pairs in the inventory. Follow similar steps.
-
Ignore - This option can be enabled if you need to ignore the detection of the secondary device associated with the current device.
Note:- By clicking the Add button, multiple devices can be added as secondary devices and all the devices will be available in the grid.
- By managing the Primary and Secondary devices in AppViewX during the device flips, traffic routing and management can be seamlessly handled in AppViewX.
-
-
Click the Save button to add an Firewall device.
Note:
- To discard the changes, click the Cancel button.
A pop-up message is displayed as Device added successfully.
Validating the Juniper Device Addition
After adding the device, you can validate the device by searching device in the device inventory.
-
Go to Menu > FIREWALL+ > DEVICE MANAGEMENT >
Inventory> Firewall.
By default, the Firewall tab opens.
-
Search the device name and validate whether the device is added
successfully.