KUBE+ Deployment Architecture
AppViewX KUBE+ consists of a control plane and a set of in-cluster components, designed on a microservice architecture and deployed as a container workload. The control plane is equipped with the ability to gain valuable insights into SSL/TLS certificates throughout K8s clusters and enforce PKI policies for these clusters. Meanwhile, the in-cluster components handle the automated lifecycle management of x.509 digital certificates for K8s clusters and container workloads.
-
KUBE+: As a control plane feature, KUBE+ serves as a centralized hub, empowering users to effortlessly discover, manage, and automate certificate issuance via a robust policy-driven approach.
- Cert-Orchestrator: The primary component of KUBE+ which is deployed within a Kubernetes cluster and is responsible for managing the lifecycle of certificates.
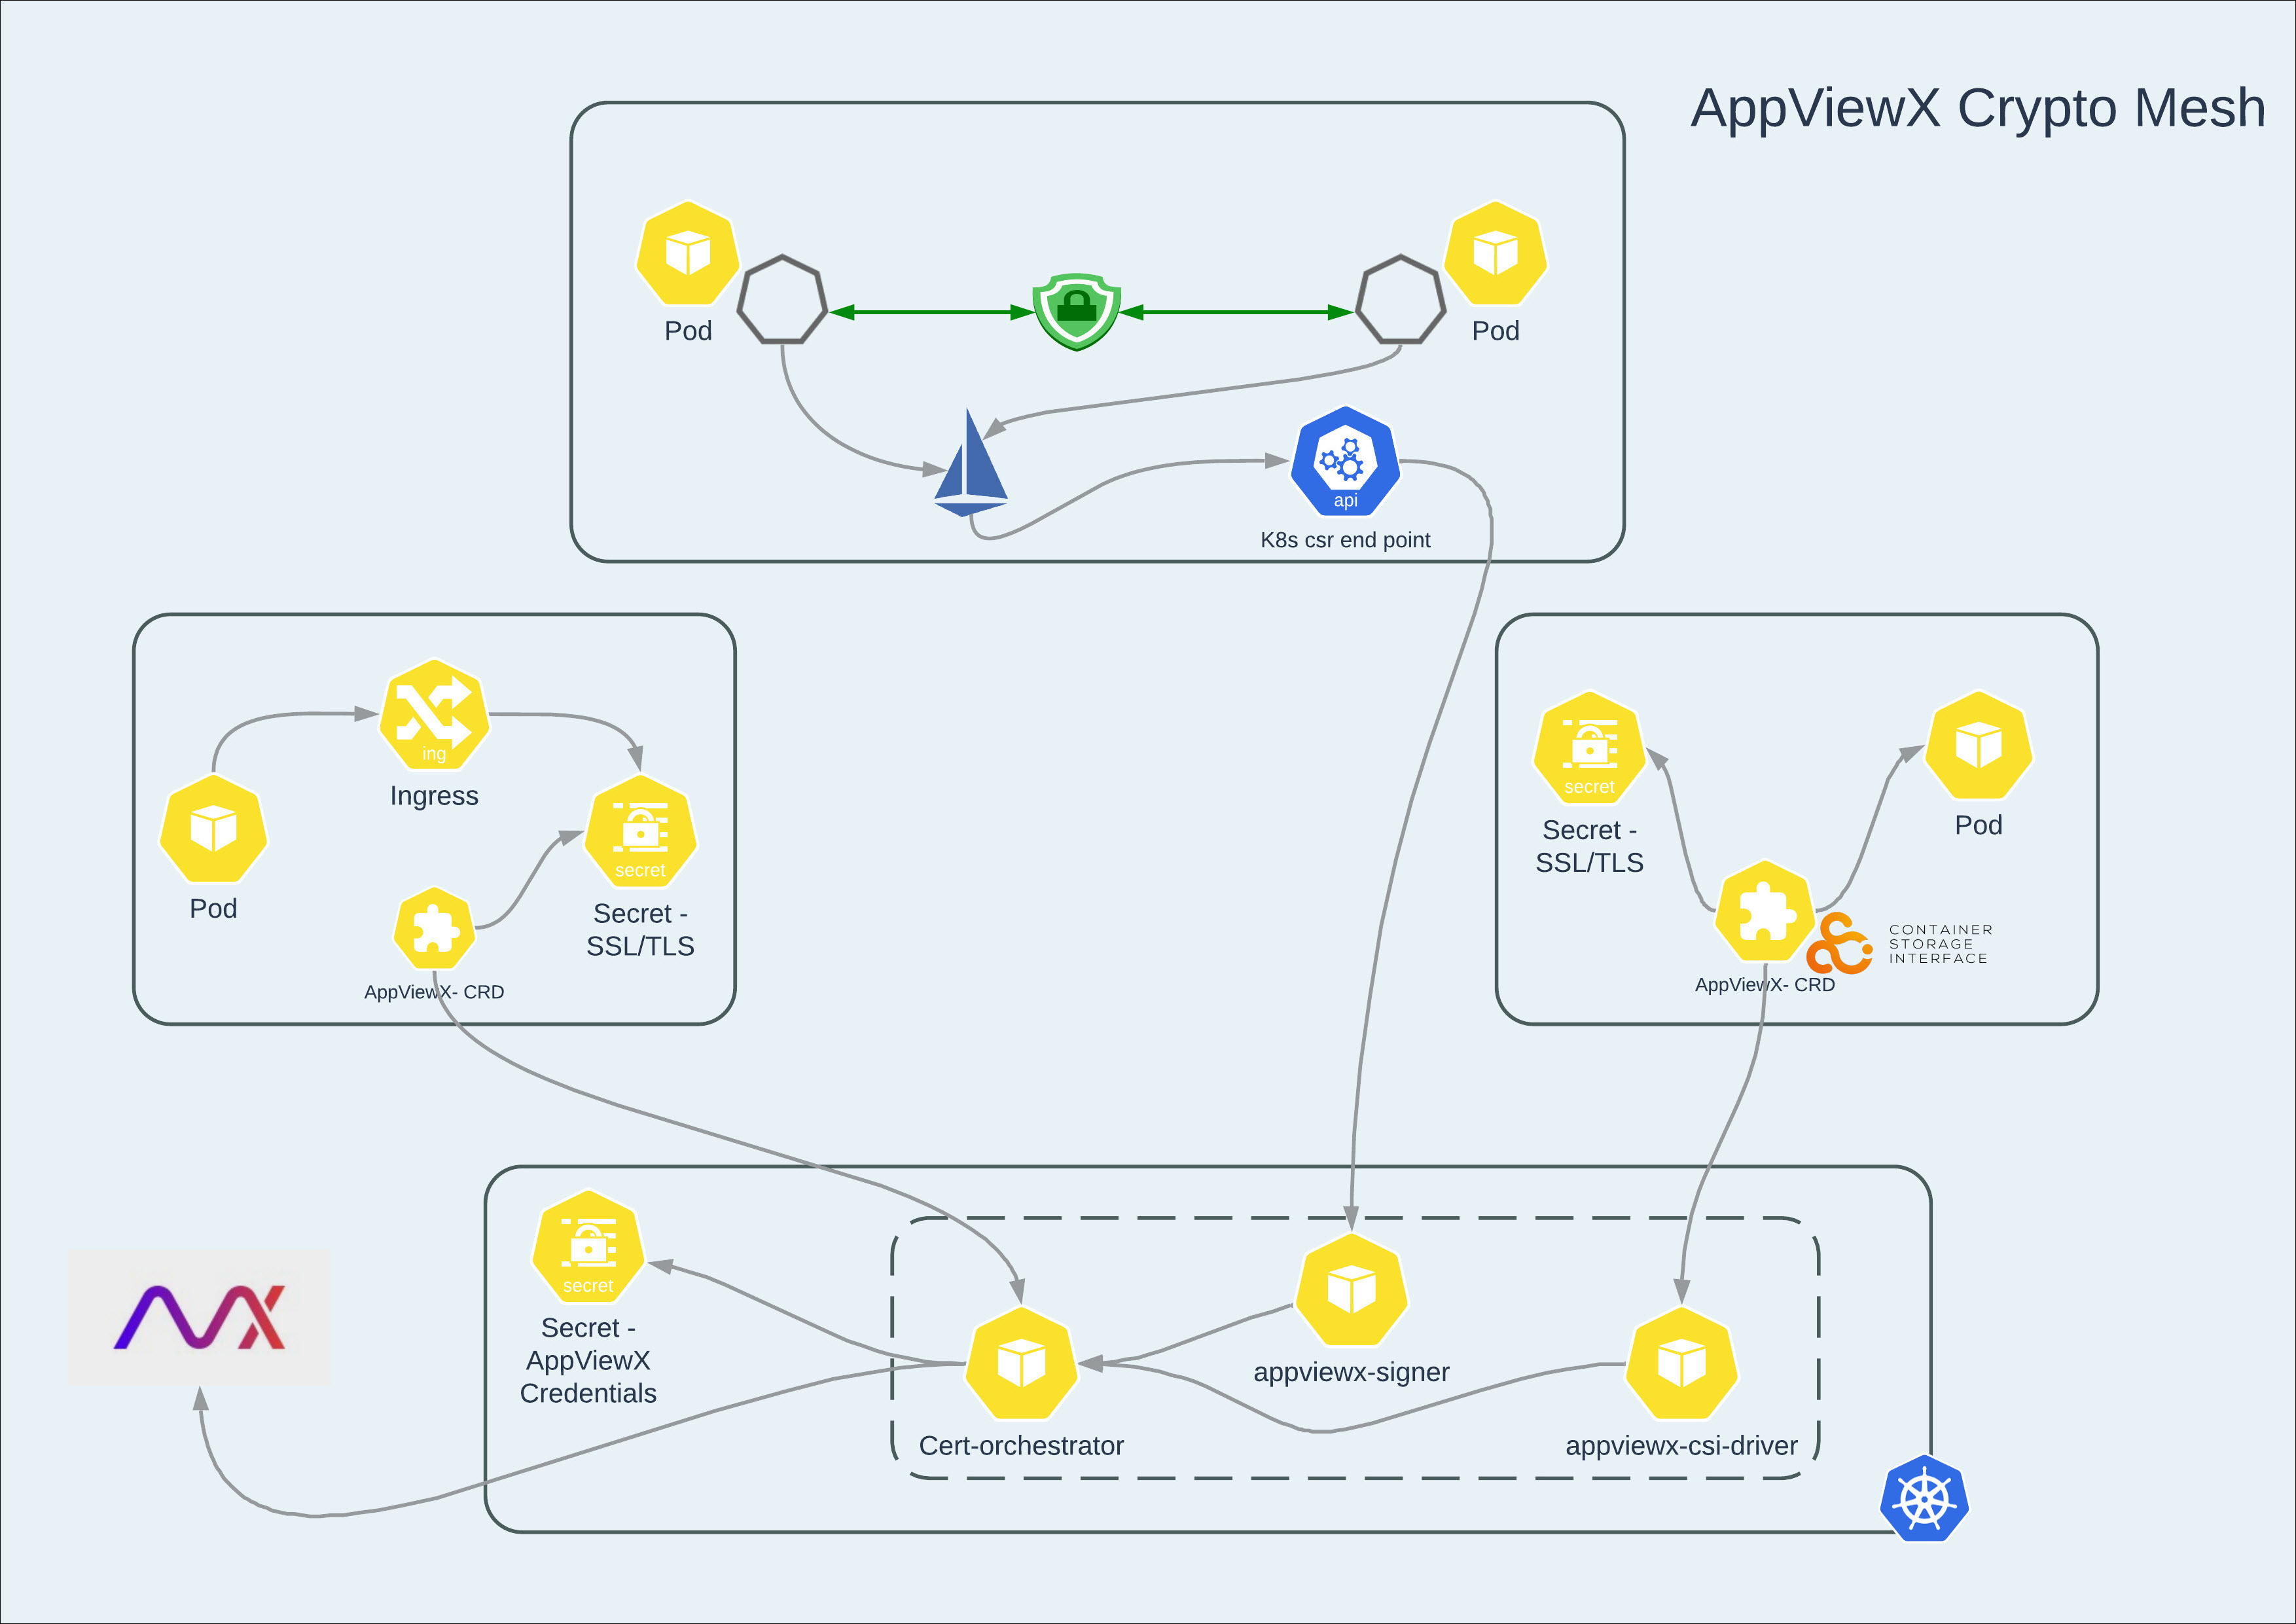
Cert-Orchestrator
Cert-Orchestrator is a Kubernetes cryptomesh that utilizes a microservice architecture and is deployed as a container workload. Its purpose is to facilitate the implementation of KUBE+ across workloads and hosted clusters.
Users have the option to deploy and integrate the cert orchestrator with AppViewX KUBE+. This enables the full range of Crypto Mesh features, or specific features can be selectively implemented depending on the use case. The cert-orchestrator comprises several sub-components that enable the KUBE+ solution:
-
Cert-orchestrator controller: The primary component of KUBE+ is deployed to enable end-to-end certificate lifecycle management, including discovery, enrollment, and renewal.
-
AppViewX-Signer: The KUBE+ component is deployed together with Cert-orchestrator to manage certificates within Istio Service Mesh.
-
AppViewX-CSI: The KUBE+ component is deployed along with Cert-orchestrator to manage certificates within ephemeral volumes of pods.
- AppViewX-Infra-orchestrator: The KUBE+ component, deployed as a daemon set along with Cert-orchestrator, enables certificate lifecycle management for the Kubernetes infrastructure or control plane, including certificate discovery and enrollment from external public or private CAs.
To install cert-orchestrator, see Onboarding a Cluster - Advanced.
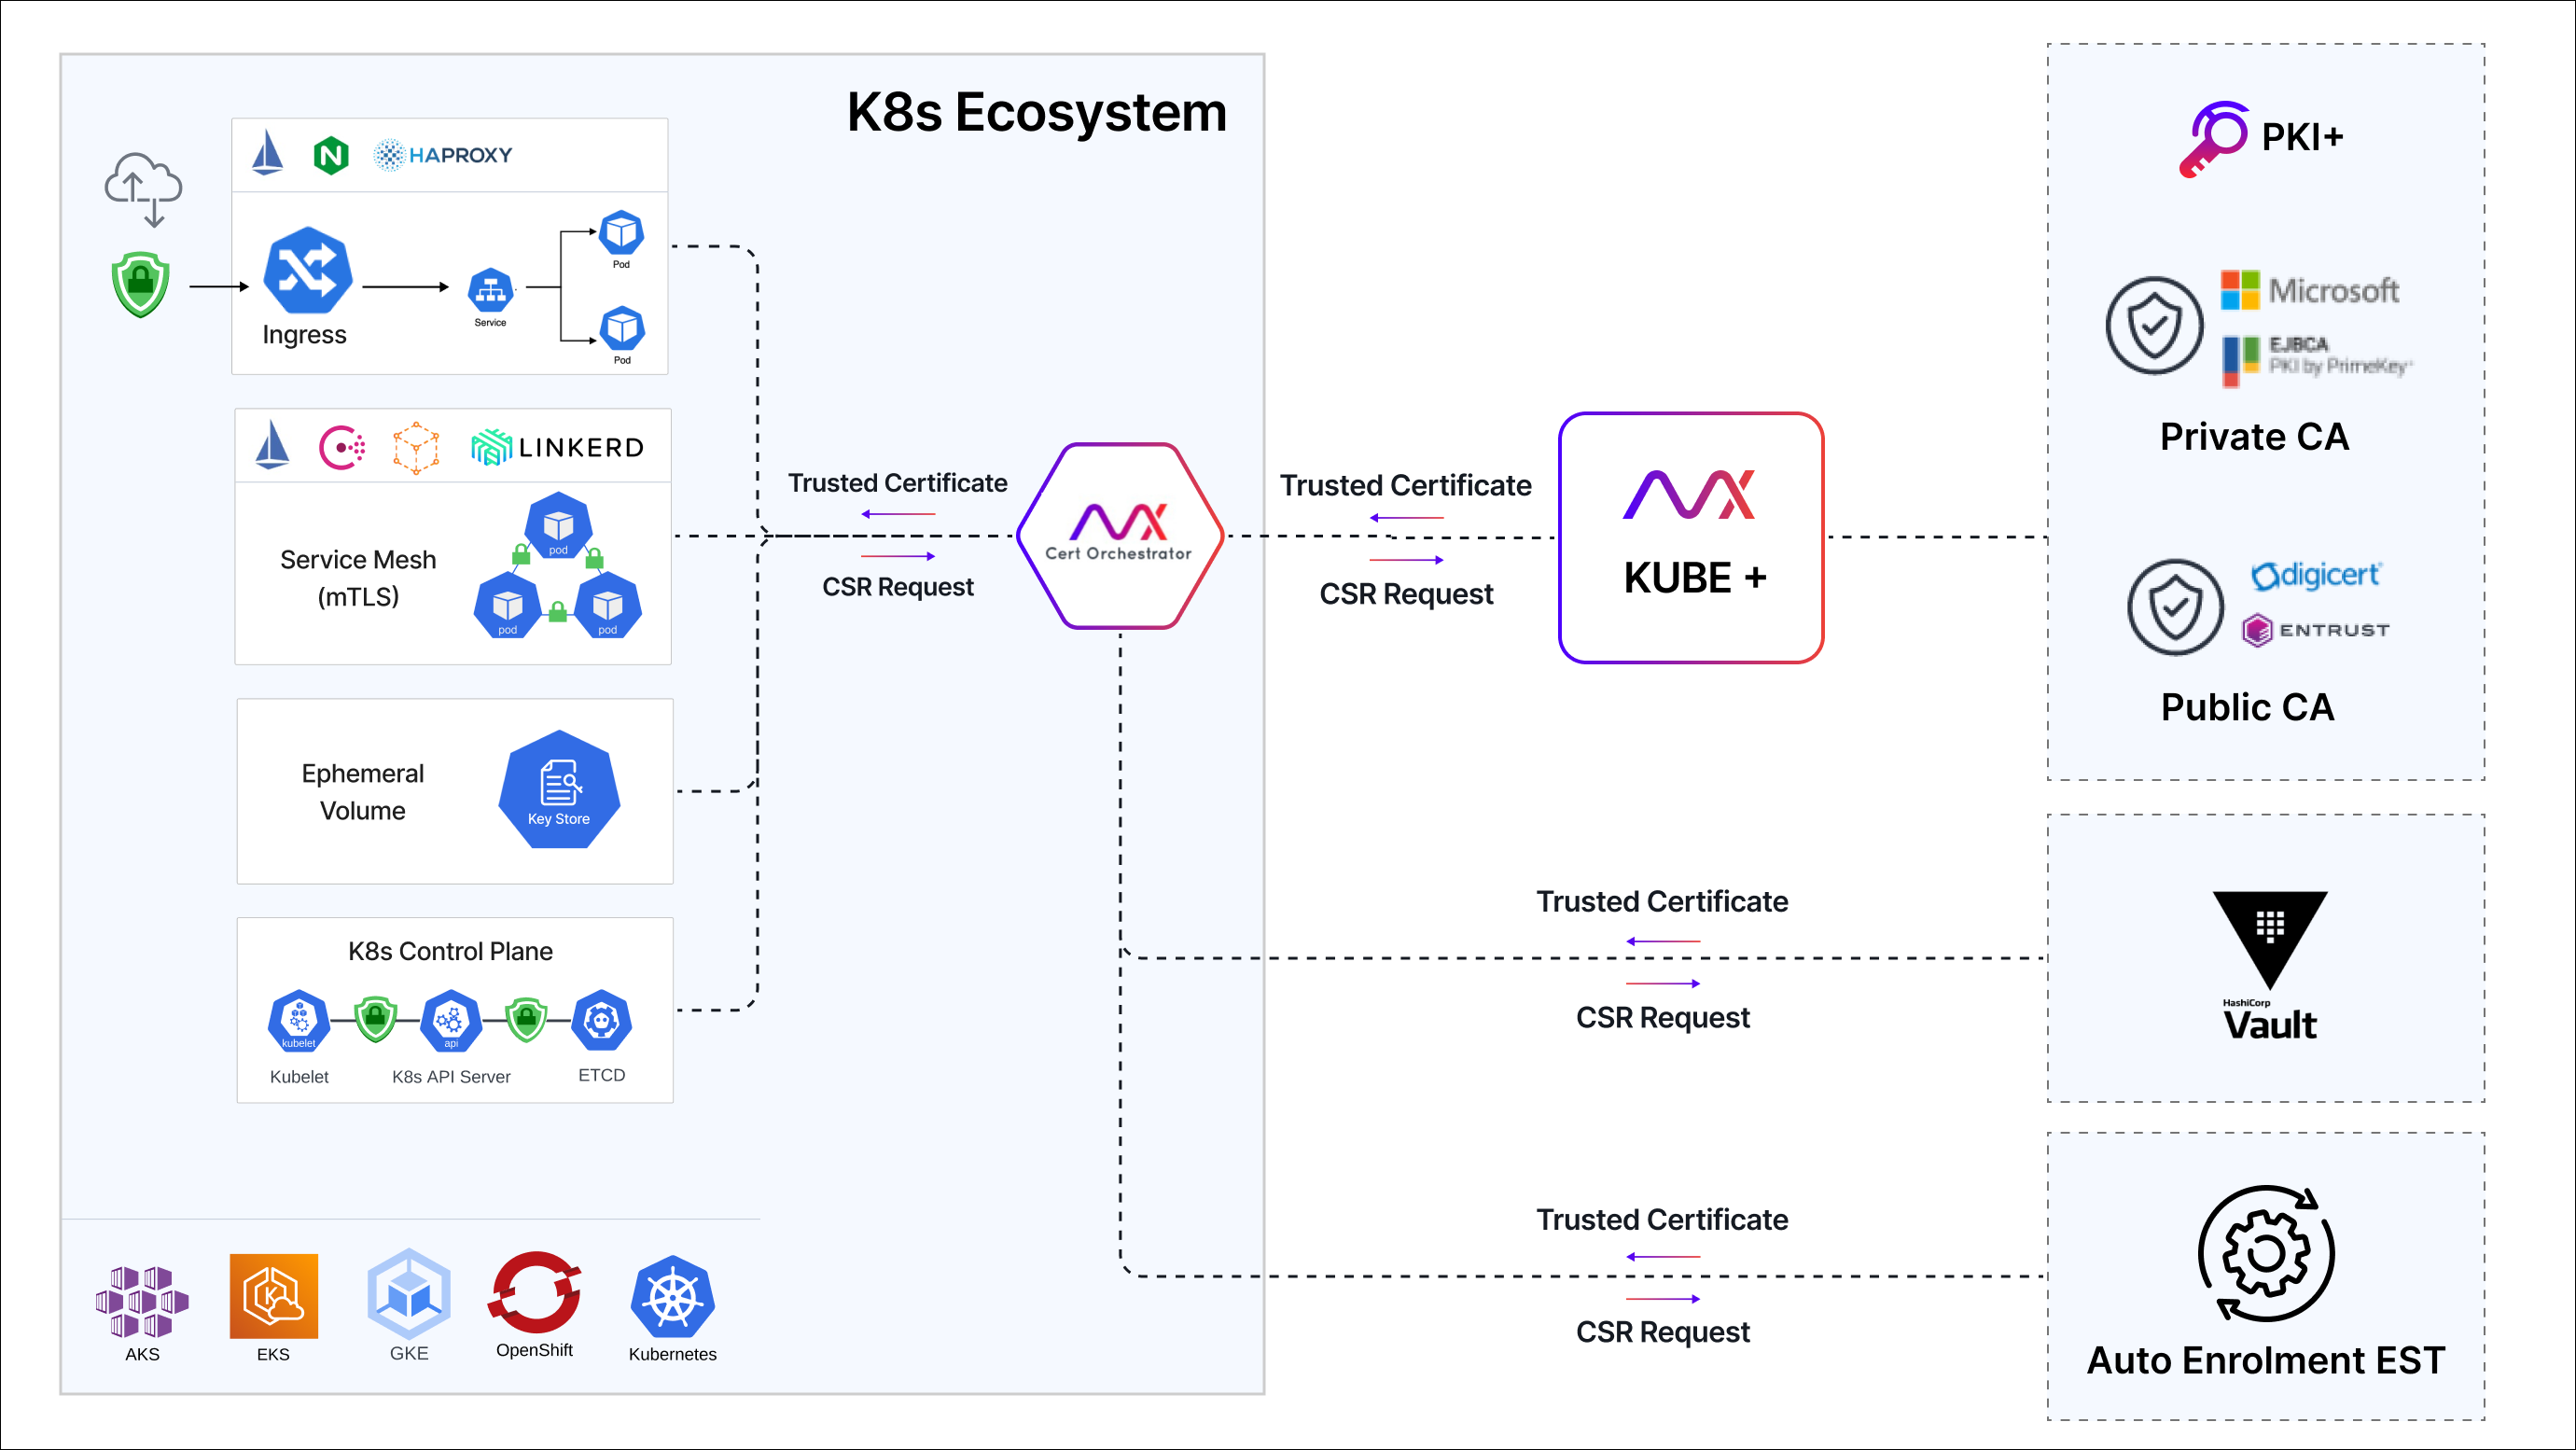
Communication Flow
Cert-orchestrator and AppViewX KUBE+ primarily communicate through REST API-based communication to facilitate end-to-end certificate lifecycle management operations.
The communication between the subcomponents of the cert-orchestrator and AppViewX KUBE+ for their respective business logic is enabled and routed through the cert-orchestrator controller. The cert-orchestrator serves as the control plane for the end-to-end certificate lifecycle management operations, which means that any outgoing communication from the Kubernetes cluster to AppViewX KUBE+ is only routed through the primary controller.
Authentication and Access Control
The communication between the K8s cluster and AppViewX KUBE+ takes place through a REST API, and it is authenticated. AppViewX provides several authentication modes to access its API.
-
Basic Authentication: AppViewX offers multiple modes of authentication for accessing its API. Users can create a dedicated user for authentication, either an external user (LDAP, RADIUS and TACACS) or an internal user created in AppViewX. For more information on Basic Authentication, refer to Platform User guide.
-
OAuth 2.0 (Service Account): Users have the option to create a service account that is enabled through AppViewX OAuth 2.0. They can then obtain the client ID and client secret from the service account, which can be used for authentication purposes. Once the ClientID and ClientSecret are configured in cert-orchestrator, they will be used for authentication. If the existing ClientSecret expires, cert-orchestrator will renew it by using the current ClientID and ClientSecret. The new ClientSecret will then be stored and used for subsequent authentication with AppViewX. For more information on OAuth 2.0, refer to Platform User guide.
Specific permissions to access modules and carry out tasks within each AppViewX module are assigned by each role. Roles are exclusively assigned to user groups. Any user groups assigned to a role will automatically inherit all the associated permissions. User groups can also be assigned more than one role.
KUBE+ simplifies role-based access control by providing Out Of the Box (OOB) roles for KUBE+ features. These predefined roles can be cloned, enabled, or disabled, but not updated or deleted. For more granular control, administrators can create custom roles, which can be fully managed (updated, deleted, enabled, and disabled). Users can then be assigned either OOB roles or custom roles to align with their specific permissions, streamlining the management of user access and permissions for various personas within KUBE+.
KUBE-Application-User: For DevOps/Application users/CloudOps teams to perform Certificate Lifecycle Management for their applications (or) business units.
KUBE-PKI-Administrator: For Infosec and PKI teams to define and enforce PKI policies for their Kubernetes environments.
KUBE-cert-orchestrator: Role to be mapped to the service account or user used for deployment of Cert-Orchestrator for performing CLM operations on individual Kubernetes clusters.
As previously explained, when deploying Cert-Orchestrator within the Kubernetes cluster for access control, it's necessary to follow these steps:
- Create a user or service account and associate it with the User Group.
- Assign the KUBE-cert-orchestrator role to the User Group.
- Additionally, ensure that the super access resource is linked to the User Group.
- Ensure MFA (Multi Factor Authentication) is disabled for this user since it is used for API access.
For detailed instructions to perform any actions on role, see Platform User Guide.