Setting up the AppViewX Cloud Connector using a Virtual Image on Azure
To deploy the AppViewX virtual machine for Azure:
- Go to https://release.appviewx.com/Login and, from Overview, navigate to release Example: 20XX.0.0.
- Scroll down to Production Images and download the latest artifact of Azure CC VHD, AppViewX-20XX.X.X-FPX-CC-Ubuntu-Azure-ddmmmyyy-vhd.tar.gz.
- Scroll down to Production Images and download the latest artifact of Azure CC VHD, AppViewX-20XX.X.X.10-CC-Ubuntu-Azure-ddmmmyyy-vhd.tar.gz.
-
Untar the downloaded artifact.
tar -xvf AppViewX-20XX.X.X.10-CC-Ubuntu-Azure-ddmmmyyy-vhd.tar.gz -
Download the Azure Storage Explorer from here.
The Azure Storage Explorer is a desktop application that provides you with a GUI for easily managing your Azure resources.Important: Install the Azure Storage Explorer at the same location as the downloaded Azure CC VHD artifact.
- Using the Azure Storage Explorer, login to the Azure account for which the VM has to be created.
-
On successful login, go to the disks section and select the resource
group.
The resource group page is displayed.
- Click Upload.
-
In the pop-up window displayed, enter/select the resource details.
Table 1. Descriptions for the resources and their corresponding values Resource Value Source VHD <Disk file location> Disk name <Name of the disk> OS type Linux Location <region in which the VM is to be created> Availability Zone <zone name> Account type Premium SSD Hyper-V Generation V1 Architecture x64 Note: All the values in bold, in the above table, are actual values and have to be assigned as is; values enclosed in angle brackets (<>) have to be assigned as per your specific configuration. - Click Create.
- Once the disk is successfully uploaded to the Azure cloud, from the Azure portal, select the disk and click +Create VM.
- On the Create a virtual machine page, configure the VM configurations based on your organization’s standards and requirements.
-
Once the VM is successfully created, use the password provided by SRE/TS team
to login to the node (on which the cloud connector is to be installed). To do
this, on the Command Line Terminal or Powershell, execute the following command:
ssh appviewx@<ip/hostname> -
Update the /etc/hosts file for the IP and the hostname of the VM
created, using the following commands:
vi /etc/hosts hostnamectl set-hostname “hostname-of-the-vm” -
To validate the update to the /etc/hosts file, execute the following
commands:
hostname -i
hostname -f
hostname
After the execution of this step, if the cloud connector does not exist on this host machine, the following prompt is displayed: Would you like to opt for automated installation of the cloud connector? (y/n):. -
Since these instructions are for setting up the cloud connector via the user
interface, enter n.

-
Enter your account URL (for example,
https://tenant-name.appvx.com/appviewx/login) in the address bar of your
browser.
The AppViewX login page is displayed.
- Login to AppViewX.
-
Navigate to the cloud connector's setup interface.
There are three ways you can access the interface for setting up the AppViewX Cloud Connector:
- From the product landing page (that you will see as soon as you have
logged in)
- Expand the Connectivity section and click
 .
.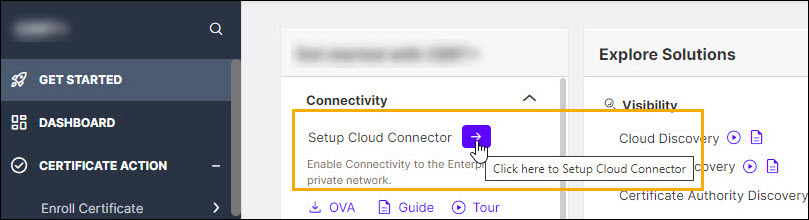 You will be redirected to
the Settings :: Cloud Connector page.
You will be redirected to
the Settings :: Cloud Connector page.
- Expand the Connectivity section and click
- From the new navigation menu (displayed by default starting product
version 2022.1.0 FP3 onwards):
- From the menu in the top-right corner of the page, select
Platform.
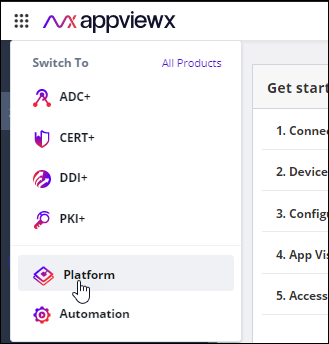
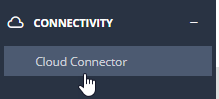
- From the Platform menu, under Connectivity, click
Cloud Connector.The Settings :: Cloud Connector page is displayed.
- From the menu in the top-right corner of the page, select
Platform.
- From the old navigation menu: Note: For instructions on switching between the new and the old navigation menus, click here.
- From the top right corner of the landing page, click the menu icon.
- From the menu displayed, navigate to Settings > Cloud
Connector.
The Settings :: Cloud Connector page is displayed.
- From the product landing page (that you will see as soon as you have
logged in)
-
On the Setting :: Cloud Connector page, click Add Cloud
Connector.
The Cloud Connector Setup screen is displayed.
The landing page gives you a quick introduction to the AppViewX Cloud Connector, with a graphical representation of how the infrastructure is deployed and works.
-
To start with the process of adding the cloud connector, from the bottom-right
corner of the screen, click Get Started.
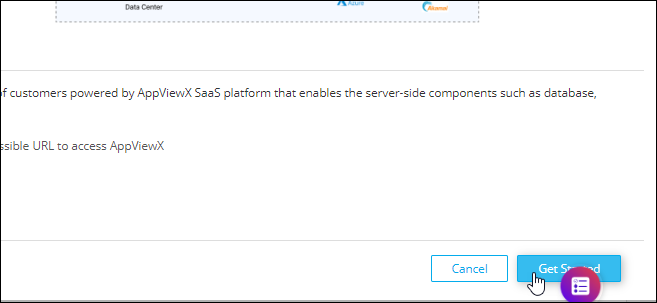 You will be redirected to the Basic Information page.
 -
On the Basic Information page, configure the basic cloud connector
settings.
-
[Optional] Execute a prerequisite check script.
Note: This is an optional step. The prerequisite check script is executed automatically at the time of installing the AppViewX Cloud Connector and the results are shown as a part of the installation logs.
To simplify compliance to the AppViewX Cloud Connector installation prerequisites, you can execute a script to identify and rule out any deviations from the prerequisites.
-
On the Basic Information screen, under Setup Cloud
Connector, you will see a list of the installation
prerequisites.
From this list, for Executing the Prerequisites Check Script, to download the script, click
 . The pre-requisite-check.sh script file is downloaded.
 -
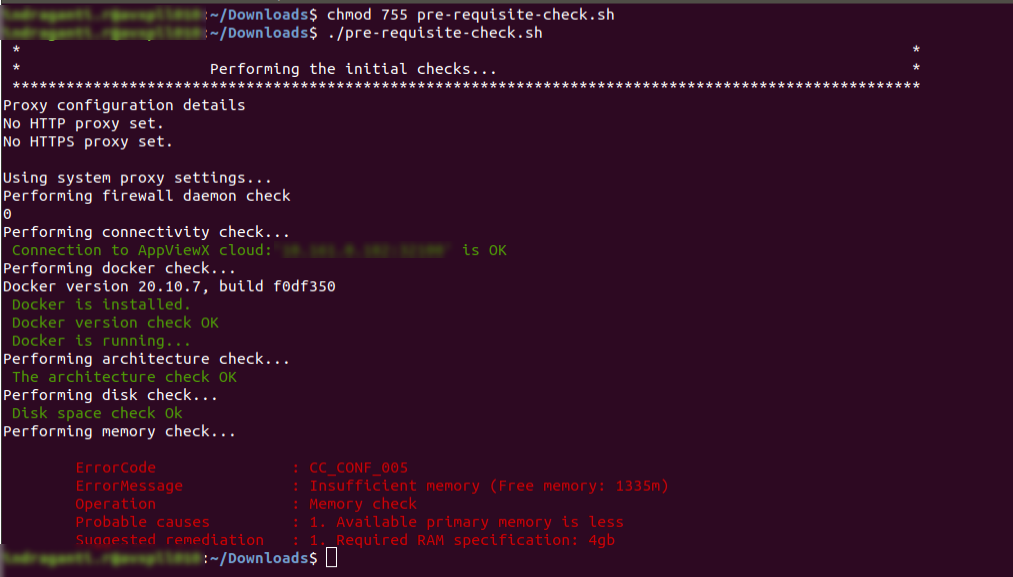
Execute the .sh prerequisite check script file:
./pre-requisite-check.shIf the node does not meet the prerequisites for the AppViewX Cloud Connector installation, the output of the command returns an error code and the corresponding error message, causes, and fixes, if any.For example, as seen in the sample output in the image below, the prerequisite check for the memory requirement has failed.
 Note: For resolutions to the prerequisite check failure scenarios, click here.
-
On the Basic Information screen, under Setup Cloud
Connector, you will see a list of the installation
prerequisites.
-
Click Next.
You will be navigated to the AssignData Center screen, where, for deploying the AppViewX Cloud Connector, you can either select an existing data center or add a new one.
-
To use an existing data center, select one from the options displayed on the
Assign Data Center screen.
Tip: Alternatively, you can use the Search… field on this screen to search for an existing data center.To add a new data center:Tip: The Data Center based routing section to the right of the Assign Data Center screen explains the concept of data center-based routing and how you can achieve high availability. To read more on this, click Learn More from the top-right corner of this screen.
-
Click Next.
The Advanced Configuration screen is displayed.
-
On the Advanced Configuration page, to configure the TLS authentication
and proxy server settings for your cloud connector:
-
Enter/Select the advanced configuration settings for the AppViewX Cloud
Connector.
Note: The Data center field is auto-populated based on your selection on the Assigning a Data Center screen.
Field Description TLS Authentication Tip: The section on the right of the screen gives you a brief context of what is TLS Authentication. To read more, click Learn More (next to the TLS Authentication heading).- To auto-generate a TLS certificate,
select Auto-generate
(default selection).
By default, the certificate is generated using the AppViewX CA.
Note: The created certificate is available in the certificate inventory. You can:- Assign this certificate to a certificate group
- Configure a certificate expiry alert for this certificate group from the Server Certificate dashboard, using the Certificate Summary Report widget settings
- To enter details of a custom TLS
certificate, select
Custom.
The TLS Certificate Password and Custom TLS Certificate fields are displayed. The instructions for filling these fields are given below.
TLS Certificate Password* Note: This field is displayed only if you have selected to enter details of a Custom TLS certificate in the TLS Authentication field.Password of the TLS certificate (that will be uploaded in the next step)Note: This is a mandatory field if a Custom TLS certificate is uploaded. AppViewX supports only password-protected Custom TLS certificates.TLS Certificate Note: This field is displayed only if you have selected to enter details of a Custom TLS certificate in the TLS Authentication field.To upload a custom TLS certificate:-
To navigate to the location of the custom TLS certificate, click within the field.
-
Select the certificate file.
-
Click Open.
-
To upload the custom TLS certificate selected, click Upload.
Note: AppViewX supports only password-protected Custom TLS Certificates.Use proxy Tip: The section on the right of the screen gives you a brief context of what is Proxy based routing. To read more, click Learn More (next to the Proxy based routing heading).A proxy server is required if the AppViewX Cloud Connector is unable to connect to your endpoints available in the internet.To use a proxy server for the deployment:
- Select the Use proxy checkbox.
- To select a preconfigured proxy (for the selected data center), from the Select Proxy dropdown list, select a proxy server.
OR
To create a new proxy server setting:
- Use the
 option shown below the
Select Proxy dropdown list.
option shown below the
Select Proxy dropdown list.
The Add Proxy pop-up screen is displayed.
- Enter/Select the details required to
add a proxy.
Table 2. Field descriptions for the Add Proxy details Field Description *Proxy Name Name of the proxy server *Server IP IP address/FQDN of the proxy server *Port Port number of the proxy server URL From the dropdown menu, select the URL. Authentication To enable authentication for accessing the proxy server, select this checkbox. *Username Note: This field is enabled only when Authentication is selected.Enter the username required for accessing the proxy server.*Password Note: This field is enabled only when Authentication is selected.Enter the password required for accessing the proxy server.
- To auto-generate a TLS certificate,
select Auto-generate
(default selection).
-
Click Finish.
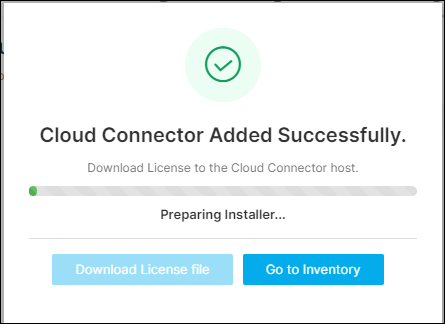
A confirmation message is displayed. AppViewX begins preparing the installer and the license file. Once the license file is ready, you can download it and proceed with the installation of the AppViewX Cloud Connector.
-
Enter/Select the advanced configuration settings for the AppViewX Cloud
Connector.
-
Download the license file.
Note: The installer is prepackaged with the OVA, so, for a virtual image-based installation, you only need to download the license file.
-
On the Cloud Connector Added Successfully dialog box, when the
License is Ready for Download, click Download License
file.
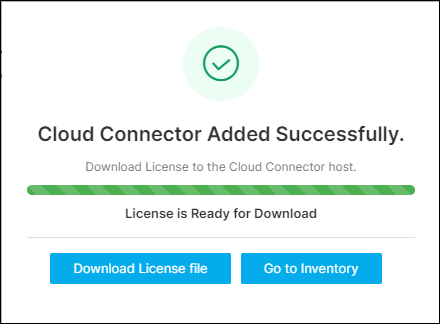 Tip: At this point, if the installer has been deleted or is not usable, and you wish to revert to a native installation, click Go to Inventory. It will take you back to the cloud connector inventory, from where you can download the license file and installer for the native OS download.Tip: You can also choose to download the license file and the installer package individually. To do this:
-
Click the Cloud Connector Name.
The selected Cloud Connector’s details are shown in a pane to your right.
-
To download the AppViewX Cloud Connector installer package, click Download Cloud Connector. This is useful in the event that the installer has been deleted or is no longer usable.
To download the license file, click Download License.
Note: A installer download is made available even for a virtual-image based deployment, to help you with reconfiguration in case the existing OVA configuration is deleted. -
-
On the Cloud Connector Added Successfully dialog box, when the
License is Ready for Download, click Download License
file.
-
Install the AppViewX Cloud Connector Agent.
Note: The following steps assume that:
- All system prerequisites are fulfilled by the host machine.
- The AppViewX Cloud Connector installer (downloaded in the above step) is securely copied via SCP/SFTP to the host machine where the AppViewX Cloud Connector is to be installed.
-
On the node where the AppViewX Cloud Connector agent will be installed,
from the extracted installation package, run the ./install.sh
script.
The script will check if the installation prerequisites for the AppViewX Cloud Connector have been fulfilled.Note: Ensure that the license file is placed in the same location as the install.sh script. If the license file is placed in another location, run the install.sh script using the following command:On successful verification of the prerequisites, you will be prompted to specify if you want to manage f5 BIG-IP devices and if you need auto-enrollment of the certificates.
./install.sh <complete path of the license file with the filename>
-
Enter the sudo password.
After the relevant details have been entered, the installation proceeds. Installation logs, according to the outcome of the installation, are displayed.
Given below are sample installation logs:
Loaded image: rancher/k3s:v1.23.3-k3s1 Loaded image: rancher/k3d-tools:5.2.2 Loaded image: rancher/mirrored-pause:3.6 [36mINFO[0m[0000] [SimpleConfig] Hostnetwork selected - disabling injection of docker host into the cluster, server load balancer and setting the api port to the k3s default [33mWARN[0m[0000] No node filter specified [33mWARN[0m[0000] No node filter specified [33mWARN[0m[0000] No node filter specified [36mINFO[0m[0000] Prep: Network [36mINFO[0m[0000] Re-using existing network 'host' (8bebb4ae61001f74487d0aa6b315396405d0127c938da1206614d113295ae139) [36mINFO[0m[0000] Created volume 'k3d-cc-images' [36mINFO[0m[0000] Starting new tools node... [36mINFO[0m[0000] Starting Node 'k3d-cc-tools' [36mINFO[0m[0001] Creating node 'k3d-cc-server-0' [36mINFO[0m[0001] Using the k3d-tools node to gather environment information [36mINFO[0m[0001] Starting cluster 'cc' [36mINFO[0m[0001] Starting servers... [36mINFO[0m[0001] Starting Node 'k3d-cc-server-0' [36mINFO[0m[0033] All agents already running. [36mINFO[0m[0033] All helpers already running. [36mINFO[0m[0033] Cluster 'cc' created successfully! [36mINFO[0m[0034] You can now use it like this: kubectl cluster-info Cluster setup is completed. Will start the deployment shortly... Importing the required images... [36mINFO[0m[0000] Importing image(s) into cluster 'cc' [36mINFO[0m[0000] Importing images from 1 tarball(s)... [36mINFO[0m[0000] Importing images '[/home/appviewx/CCTEST/deps/tools/mid-server-docker-image/avx-mid-server-base-22.1.0.0.tar]' into node 'k3d-cc-server-0'... [36mINFO[0m[0024] Successfully imported image(s) [36mINFO[0m[0024] Successfully imported 1 image(s) into 1 cluster(s) Import in progress... [36mINFO[0m[0000] Importing image(s) into cluster 'cc' [36mINFO[0m[0000] Importing images from 1 tarball(s)... [36mINFO[0m[0000] Importing images '[/home/appviewx/CCTEST/deps/tools/mid-server-docker-image/k3d-tools-5.2.2.tar]' into node 'k3d-cc-server-0'... [36mINFO[0m[0005] Successfully imported image(s) [36mINFO[0m[0005] Successfully imported 1 image(s) into 1 cluster(s) Import in progress... [36mINFO[0m[0000] Importing image(s) into cluster 'cc' [36mINFO[0m[0000] Importing images from 1 tarball(s)... [36mINFO[0m[0000] Importing images '[/home/appviewx/CCTEST/deps/tools/mid-server-docker-image/rancher-mirrored-coredns-coredns-1.8.6.tar]' into node 'k3d-cc-server-0'... [36mINFO[0m[0007] Successfully imported image(s) [36mINFO[0m[0007] Successfully imported 1 image(s) into 1 cluster(s) [36mINFO[0m[0000] Importing image(s) into cluster 'cc' [36mINFO[0m[0000] Importing images from 1 tarball(s)... [36mINFO[0m[0000] Importing images '[/home/appviewx/CCTEST/deps/tools/mid-server-docker-image/rancher-local-path-provisioner-v0.0.21.tar]' into node 'k3d-cc-server-0'... [36mINFO[0m[0004] Successfully imported image(s) [36mINFO[0m[0004] Successfully imported 1 image(s) into 1 cluster(s) [36mINFO[0m[0000] Importing image(s) into cluster 'cc' [36mINFO[0m[0000] Importing images from 1 tarball(s)... [36mINFO[0m[0000] Importing images '[/home/appviewx/CCTEST/deps/tools/mid-server-docker-image/rancher-mirrored-pause-3.6.tar]' into node 'k3d-cc-server-0'... [36mINFO[0m[0003] Successfully imported image(s) [36mINFO[0m[0003] Successfully imported 1 image(s) into 1 cluster(s) Deploying the Cloud Connector... NAME: avx-mid-server-starter LAST DEPLOYED: Mon May 30 15:51:13 2022 NAMESPACE: cc STATUS: deployed REVISION: 1 NOTES: 1. It may take a couple of minutes for the Cloud Connector to be up. kubectl get pod --namespace cc ******************************************************************** * Congratulations!!! The installation completed successfully. * * Please wait till the Cloud Connector is up and running. * ******************************************************************** (1%) Cloud Connector status: Running [32m Cloud Connector is up and running. (B[mThe AppViewX Cloud Connector consists of two important components—the starter plugin and the platform. The starter plugin component is installed along with the AppViewX Cloud Connector, in the same installation process.Troubleshooting: For installation errors, refer to the Troubleshooting section.When installed, the starter plugin is used to initiate the download of the platform component. The platform component is used to host business use cases related to the AppViewX Cloud Connector. When the platform component download is in progress, it is indicated by the
 symbol prefixed to the platform
component version number in the AppViewX Cloud Connector inventory
details
symbol prefixed to the platform
component version number in the AppViewX Cloud Connector inventory
details  . A completed download/upgrade is
indicated by the
. A completed download/upgrade is
indicated by the  symbol in the same location
  . Note: Based on the internet bandwidth and the number of cloud connectors being installed, the downloading of the cloud connector may vary between 5 to 15 minutes.
-
To approve the cloud connector installation:
-
Go to
 (Menu) > Platform >
Connectivity > Cloud Connector.
The Settings :: Cloud Connector inventory page is displayed.
(Menu) > Platform >
Connectivity > Cloud Connector.
The Settings :: Cloud Connector inventory page is displayed.
Troubleshooting: If the AppViewX Cloud Connector instance has been approved but is not moved to the Running state, you can check the pod status and/or restart the pod(s), as required. -
Go to