Entering All Certificates in the appviewx.conf File
- Navigate to the <appviewx_installed_location>/appviewx_kubernetes/scripts and open appviewx.conf file.
-
To enable the external CA for kubeadm, set the value
KUBE_EXTERNAL_CERT=TRUE

-
Enter the encrypted certificate password in the
CERT_PASSWORDkey. To encrypt the password,
-
Enter the absolute path of the certificate which is generated for the common
name kube-etcd in
KUBE_ETCD_PATH -
Enter the absolute path of the certificate which is generated for the common
name kube-etcd-peer in
KUBE_ETCD_PEER_PATH -
Enter the absolute path of the certificate which is generated for the common
name kube-etcd-healthcheck-client in
KUBE_ETCD_HEALTHCHECK_CLIENT_PATH -
Enter the absolute path of the certificate which is generated for the common
name kube-apiserver-etcd-client in
KUBE_APISERVER_ETCD_CLIENT_PATH -
Enter the absolute path of the certificate which is generated for the common
name kube-apiserver in
KUBE_APISERVER_PATH -
Enter the absolute path of the certificate which is generated for the common
name kube-apiserver-kubelet-client in
KUBE_APISERVER_KUBELET_CLIENT_PATH -
Enter the absolute path of the certificate which is generated for the common
name front-proxy-client in
FRONT_PROXY_CLIENT_PATH -
Enter the absolute path of the certificate which is generated for the common
name kubernetes-admin in
KUBERNETES_ADMIN_PATH -
Enter the absolute path of the certificate which is generated for the common
name system:kube-controller-manager in
KUBE_CONTROLLER_MANAGER_PATH -
Enter the absolute path of the certificate which is generated for the common
name system:kube-scheduler in
KUBE_SCHEDULER_PATHKUBE_ETCD_PATH=/home/appviewx/external_p12_multinode/kube-etcd_17_BA_FA_51_75_3A_CE_0D_E5_86_9B_20_A5_5A_4D_14_00_35_89_DD.p12 KUBE_ETCD_PEER_PATH=/home/appviewx/external_p12_multinode/kube-etcd-peer_51_A3_CE_5F_51_35_9A_72_3C_15_1B_54_BE_83_5C_25_ED_94_CB_C4.p12 KUBE_ETCD_HEALTHCHECK_CLIENT_PATH=/home/appviewx/external_p12_multinode/kube-etcd-healthcheck-client_31_54_F6_E1_3E_68_AB_B1_65_EC_02_99_E2_FB_A9_A7_5D_0C_D5_D3.p12 KUBE_APISERVER_ETCD_CLIENT_PATH=/home/appviewx/external_p12_multinode/kube-apiserver-etcd-client_27_FC_1E_94_84_0A_A8_90_D8_5D_99_5F_98_BB_B9_10_BF_E8_B5_4A.p12 KUBE_APISERVER_PATH=/home/appviewx/external_p12_multinode/kube-apiserver_19_33_6A_BE_B7_5E_F0_90_E6_2A_A8_F8_5D_C3_A0_2C_2A_78_BD_D1.p12 KUBE_APISERVER_KUBELET_CLIENT_PATH=/home/appviewx/external_p12_multinode/kube-apiserver-kubelet-client_7D_5F_B2_78_2C_51_03_D1_39_17_BF_FD_26_6E_A2_1A_60_93_1C_BF.p12 FRONT_PROXY_CLIENT_PATH=/home/appviewx/external_p12_multinode/front-proxy-client_61_97_2B_D9_E8_13_2B_24_3F_7E_85_B3_1A_F9_3A_AF_10_4C_5F_45.p12 KUBERNETES_ADMIN_PATH=/home/appviewx/external_p12_multinode/kubernetes-admin_2D_A0_1B_5E_A0_CF_27_2E_6B_9C_34_02_D9_E0_CA_60_95_BD_92_E0.p12 KUBE_CONTROLLER_MANAGER_PATH=/home/appviewx/external_p12_multinode/system_kube-controller-manager_31_32_15_2E_5F_4A_9C_B9_0E_2A_11_9B_CE_15_AA_59_5D_B7_FC_D1.p12 KUBE_SCHEDULER_PATH=/home/appviewx/external_p12_multinode/system_kube-scheduler_6A_FF_10_E1_F1_C9_9F_3C_0F_9D_82_88_18_38_EB_01_FB_3D_02_70.p12 -
Enter the Kubelet certificates in a colon ‘:’ separated format, such as
<hostname>:<kubelet_certificate.p12>. There should not be any
spaces and also no colon (:) in the certificate file name.
Note:
- If the kubelet certificate is generated for the host
pe-iu-node20.lab.appviewx.net, the entry should be in
the format KUBELET_CERT_PATH=<hostname>:<absolute
certificate file path>. The entry for the host would be
KUBELET_CERT_PATH=pe-iu-node20.lab.appviewx.net:/home/appviewx/external_p12_multinode/system_node_pe-iu-node20.lab.appviewx.net.p12 - Enter all certificates that match the hosts in a comma-separated
format, as given in the example below:
KUBELET_CERT_PATH=pe-iu-node20.lab.appviewx.net:/home/appviewx/external_p12_multinode/system_node_pe-iu-node20.lab.appviewx.net.p12,pe-iu-node16.lab.appviewx.net:/home/appviewx/external_p12_multinode/system_node_pe-iu-node16.lab.appviewx.net.p12,pe-iu-node17.lab.appviewx.net:/home/appviewx/external_p12_multinode/system_node_pe-iu-node17.lab.appviewx.net.p12,pe-iu-node18.lab.appviewx.net:/home/appviewx/external_p12_multinode/system_node_pe-iu-node18.lab.appviewx.net.p12,pe-iu-node19.lab.appviewx.net:/home/appviewx/external_p12_multinode/system_node_pe-iu-node19.lab.appviewx.net.p12,pe-iu-node20.lab.appviewx.net:/home/appviewx/external_p12_multinode/system_node_pe-iu-node20.lab.appviewx.net.p12,pe-iu-node21.lab.appviewx.net:/home/appviewx/external_p12_multinode/system_node_pe-iu-node21.lab.appviewx.net.p12
Warning: Entering wrong certificates in the paths mentioned above will compromise the functioning of the application. - If the kubelet certificate is generated for the host
pe-iu-node20.lab.appviewx.net, the entry should be in
the format KUBELET_CERT_PATH=<hostname>:<absolute
certificate file path>. The entry for the host would be
-
After adding all the certificate entries in the appviewx.conf
- Navigate to the <appviewx_installer_location>/appviewx_kubernetes/scripts
-
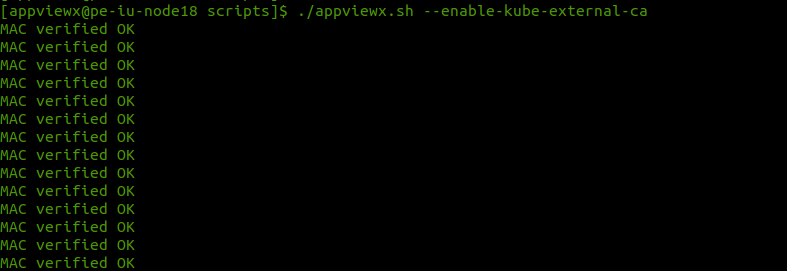
Execute the command
./appviewx.sh
                                --enable-kube-external-ca
-
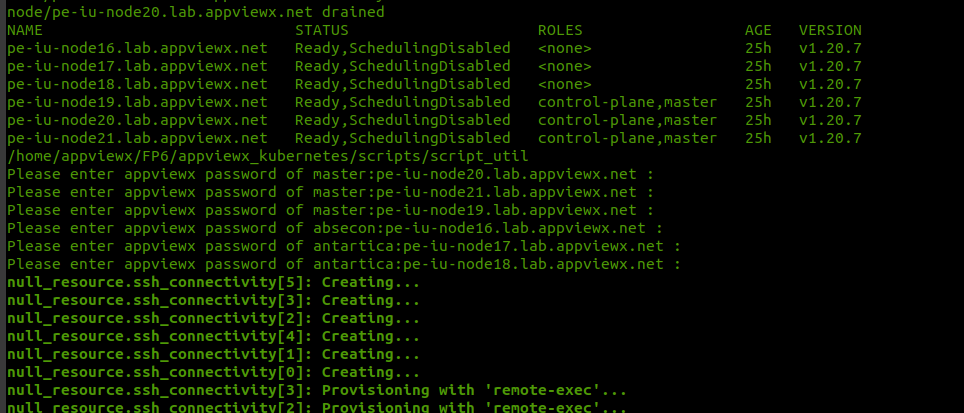
The command prompt for the passwords of all the nodes once the validations are
completed. Enter the passwords, and hit the keyboard Enter key to proceed
further.
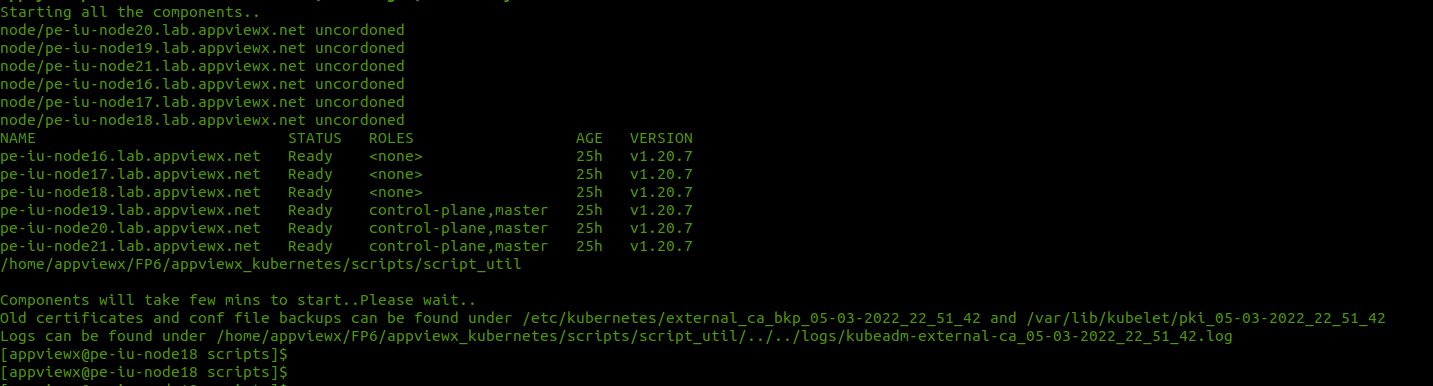
 The following message is displayed on the successful completion of the execution: